Kitchen of the Week: A Budget Remodel That Looks High-End, Thanks to DIY and Clever Design

A high-end kitchen does not require custom everything, a celebrity-sized budget, or a refrigerator that sends emotional-support notifications. The most convincing luxury often comes from smart planning: improve the layout, simplify the color palette, disguise affordable building blocks, and spend selectively on details that people actually notice.
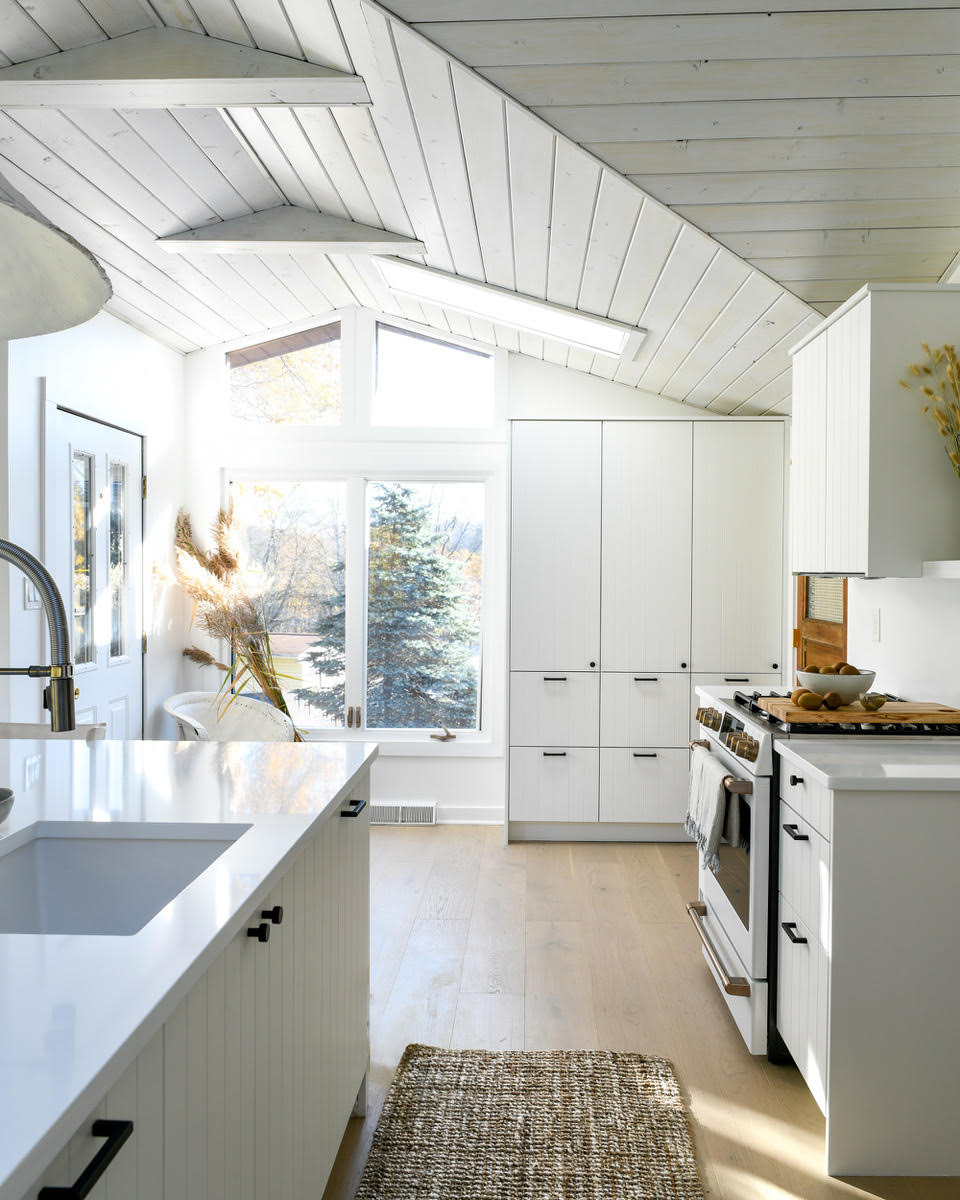
This Pittsburgh kitchen demonstrates the formula beautifully. A dated ranch house gained a bright, warm cooking space by relocating the kitchen into an existing sunroom, using mass-produced cabinet boxes with upgraded fronts, painting away unwanted orange wood tones, and turning a relatively inexpensive handmade light fixture into the room’s star. The result feels collected and architectural rather than budget-driven.
A Family Home With Good Bones and a Gloomy Kitchen
The remodel began with a house that had far more sentimental value than visual appeal. Homeowner Kelly Jo moved back to Pittsburgh and purchased the ranch-style home that had belonged to her grandparents. It was full of family history, but its dark interiors and undersized kitchen were ready for a less nostalgic chapter.
Instead of forcing a larger kitchen into the original room, the project team recognized the potential of a light-filled sunroom added years after the house was built. Moving the kitchen into that existing space provided more room, better daylight, and a stronger connection to the surrounding living areas without constructing an entirely new addition.
The overall remodeling budget was reportedly $80,000, but that amount had to cover much more than one kitchen. The project also included converting the former kitchen into an office, opening the entryway, improving adjoining rooms, and furnishing several spaces. In that context, every kitchen decision needed to deliver serious visual mileage.
The Clever Design Decisions That Made the Kitchen Look Expensive
Painting the Wood Ceiling Instead of Replacing It
The sunroom’s existing cedar ceiling and trim had an orange cast that made the room feel darker and more dated. Rather than removing sound material, the designers painted the wood white. This preserved its texture while allowing natural light to bounce around the room.
That is an important budget-remodel lesson: an unattractive finish does not automatically mean the underlying material is bad. Paint can unify mismatched trim, soften heavy woodwork, and make architectural details feel intentional. Demolition, meanwhile, has a sneaky habit of inviting disposal fees, repair work, and at least three additional problems nobody ordered.
Using Affordable Cabinet Boxes With Better-Looking Fronts
Cabinetry is frequently one of the largest expenses in a kitchen renovation. Here, standard IKEA base cabinets provided the practical interior structure, while Semihandmade beaded doors supplied a more distinctive exterior. This hybrid approach created the appearance of customized cabinetry without paying for fully bespoke boxes.
The strategy works because most people judge cabinets by what they can see: door proportions, paint color, hardware, alignment, and surrounding trim. Reliable stock boxes can disappear behind carefully selected fronts. Add consistent panels, thoughtful spacing, and accurate installation, and the kitchen reads as one complete design rather than a collection of flat-pack parts.
Letting One Oversized Island Anchor the Room
A six-by-six-foot island topped with quartz sits at the center of the new kitchen. Its scale gives the space a strong focal point while providing generous room for preparation, serving, storage, homework, and the inevitable pile of unopened mail.
Quartz also supports the high-end impression. It offers a clean, substantial surface and consistent patterning without demanding the maintenance associated with some natural stones. Using one continuous countertop material across a large island makes the room feel calmer and more polished.
Large islands must still respect circulation. Kitchen planning guidance generally recommends a work aisle of at least 42 inches for one cook and 48 inches for multiple cooks. An island should improve workflow, not become a beautifully topped obstacle course.
Creating a Statement Light Without a Designer Price Tag
The room’s most memorable feature may be the oversized paper-mâché pendant. Designed as a sculptural centerpiece, it reportedly cost about $250 to make. Its large organic shape gives the kitchen the kind of drama usually associated with custom lighting.
This is selective spending at its best. The fixture does not rely on costly metalwork, complicated glass, or an exclusive label. It relies on scale. A bold silhouette positioned over the island draws attention upward and makes the entire room seem more deliberately composed.
Budget kitchens often suffer from dozens of small decorative purchases that compete with one another. One heroic light fixture can do more than six tiny accessories, four novelty signs, and a ceramic rooster with suspiciously strong opinions.
Combining White Finishes With Natural Texture
White cabinets, a white ceiling, pale flooring, and matte-white appliances create a restrained background. Yet the kitchen avoids feeling sterile because the surfaces are not identical. Beaded cabinet fronts, wide flooring planks, handmade sconces, woven seating, and the textured pendant introduce depth.
This tone-on-tone approach is one reason the room appears expensive. Luxury interiors often use fewer colors but more material variation. Instead of asking every element to make an announcement, the design allows texture, shadow, and proportion to create interest.
Where a Budget Kitchen Should Saveand Where It Should Spend
Save on Invisible Structure When It Is Still Reliable
Stock cabinet boxes, standard-size appliances, existing architectural features, and readily available tile can all lower costs without weakening the finished design. The key is to avoid confusing “inexpensive” with “flimsy.” Cabinet boxes should be square, securely installed, and capable of supporting the planned countertop.
Keeping serviceable components is even more economical. Existing cabinet carcasses can sometimes be painted or refaced. A sound wood floor may need refinishing rather than replacement. A dated faucet can be swapped without moving the sink. Each retained element prevents several additional line items from joining the invoice.
Spend on Layout, Work Surfaces, and Daily Touchpoints
A beautiful kitchen becomes irritating very quickly when refrigerator doors collide, drawers cannot open fully, or the trash can lives in another time zone. Before selecting finishes, plan appliance clearances, work zones, storage, lighting, and traffic flow.
Spend enough to obtain durable countertops, dependable hinges, comfortable hardware, an appropriately sized sink, and fixtures that will survive daily use. These are the elements touched repeatedly, so their quality contributes more to the experience than a decorative object placed on an upper shelf.
Protect the Budget With a Contingency Fund
Older homes are excellent at hiding surprises behind drywall. Renovation specialists commonly recommend reserving roughly 15% to 20% of the project budget for unexpected electrical issues, damaged subflooring, plumbing corrections, delivery changes, and other unglamorous discoveries.
Treat the contingency as part of the budget from the beginning, not as imaginary money available for an upgraded range. When the project ends without a major surprise, the remaining reserve can fund finishing touches or return peacefully to savings.
DIY Projects That Can Deliver a High-End Finish
DIY is most valuable when it replaces labor without putting safety or structural integrity at risk. Suitable projects depend on experience, tools, local codes, and the condition of the house, but several cosmetic jobs are approachable for careful homeowners.
Cabinet Painting and Door Upgrades
Painting structurally sound cabinets can transform a kitchen for far less than replacement. The professional-looking part happens before the color goes on: doors must be labeled and removed, grease cleaned away, glossy surfaces deglossed, damage repaired, and primer applied correctly.
Changing only doors and drawer fronts is another option. Consistent reveals and accurate hinge placement matter enormously. Uneven doors can make costly materials look cheap, while well-aligned budget doors can look surprisingly refined.
A Simple Backsplash
A straightforward backsplash is one of the most practical DIY upgrades. Ceramic subway tile, beadboard, or carefully selected peel-and-stick products can add texture and protect the wall without overwhelming the room.
Beginners should choose a forgiving pattern and create a dry layout before mixing adhesive. Complicated mosaics, tiny cuts, and wildly uneven handmade tiles are charming, but they can turn a weekend project into a long-term relationship with grout.
Trim, Panels, and Finished End Pieces
Affordable cabinets often reveal their price at exposed sides, gaps near walls, awkward toe kicks, or unfinished space above the boxes. Cover panels, filler strips, base molding, and simple trim can make standard units look built in.
The goal is not to add decoration everywhere. It is to remove visual clues that the cabinetry arrived as separate modules. Caulk narrow seams, keep lines consistent, and repeat the same finish across doors, panels, and trim.
Lighting That Does More Than Look Pretty
A polished kitchen usually combines ambient, task, and decorative light. Ceiling fixtures provide general illumination, under-cabinet lighting brightens work surfaces, and pendants or sconces establish personality.
Plug-in or low-voltage lights may be suitable for DIY installation, but new circuits and hardwired fixtures should be handled by a qualified electrician. An impressive pendant is less impressive when it causes the circuit breaker to develop stage fright.
Jobs Best Left to Licensed Professionals
Budget remodeling does not mean personally performing every task. Moving supply lines, altering drains, installing gas connections, adding electrical circuits, modifying structural walls, and cutting openings for exterior ventilation can require permits and licensed trades.
Proper kitchen ventilation deserves particular attention. Cooking produces moisture, odors, grease, and airborne particles. The U.S. Environmental Protection Agency recommends using a correctly sized range hood that exhausts directly outdoors rather than merely recirculating air through the room.
Professional help can also be economical when mistakes would damage expensive materials. A fabricator should measure stone or quartz countertops after the base cabinets are permanently installed and level. A few hours of skilled labor may prevent a very large countertop from becoming a very large coffee table.
How to Recreate the Look in a More Modest Kitchen
Step 1: Define the Design in Three Words
The featured kitchen was described as having a “desert ranch” mood. A short phrase like that keeps decisions consistent. Try “warm modern cottage,” “quiet coastal workshop,” or “earthy Scandinavian farmhouse.” When a product does not support the chosen description, it probably does not belong in the cart.
Step 2: Choose a Restrained Palette
Use one dominant neutral, one natural material, and one or two small accent finishes. Warm white, pale oak, and aged brass can feel layered without becoming busy. Charcoal, cream, and walnut create a moodier version of the same principle.
Step 3: Upgrade the Most Visible Surfaces
Prioritize cabinet fronts, countertops, lighting, hardware, and the backsplash. These surfaces occupy the main sightlines and have disproportionate influence over how the room is perceived.
Step 4: Build Storage Around Real Habits
Inventory cookware, dishes, pantry goods, small appliances, recycling, and cleaning supplies before ordering cabinets. Deep drawers are often more useful than lower cupboards because contents remain visible. A narrow pullout can turn leftover space into storage for oils, spices, or sheet pans.
Step 5: Add One Memorable Feature
Choose a single element with character: an oversized pendant, a vintage door, an unusual paint color, handmade sconces, or a salvaged wood shelf. Giving one feature permission to be bold allows the remaining materials to stay simple and economical.
Step 6: Consider Operating Costs
Energy-efficient appliances can support a long-term budget as well as the initial renovation. ENERGY STAR reports that certified electric cooking products are more efficient on average than standard alternatives, while certified refrigerators and dishwashers can further reduce household energy use.
Real-World Experience Notes: What a Smart Budget Remodel Actually Feels Like
A successful budget remodel rarely feels glamorous while it is happening. The finished photographs show a spotless island and artfully placed fruit. The middle of the project usually shows cardboard boxes, missing cabinet doors, and somebody making coffee next to a power drill.
The first useful experience is learning that planning saves more money than bargain hunting. Homeowners often begin by watching for appliance sales, but the expensive mistakes usually come from incorrect measurements, rushed layout decisions, and late changes. A discounted refrigerator is not a bargain when the door hits the island. Measuring the room several times, marking cabinet depths on the floor, and testing traffic paths with boxes can reveal problems before materials are ordered.
The second lesson is that DIY work takes longer than optimistic online estimates. Painting cabinet doors may sound like a weekend job, but cleaning, sanding, priming, drying, flipping, recoating, and curing can occupy the kitchen for days. Setting up a dedicated work area and labeling every door, hinge, and drawer prevents the final installation from becoming an unusually frustrating puzzle.
Homeowners also discover that the least exciting preparations create the most professional results. Straight tile depends on a level starting line. Smooth cabinet paint depends on meticulous degreasing. Attractive trim depends on filling nail holes and sanding joints. Skipping preparation saves hours at the beginning and produces years of noticing the flaw afterward.
Another common experience is “upgrade drift.” A homeowner selects an affordable faucet, sees a slightly nicer one, and decides the difference is small. The same thing happens with tile, hardware, appliances, sinks, and lighting. Each individual upgrade seems harmless; together they can consume the contingency fund before demolition begins. A written allowance for every category keeps these decisions visible.
Living through construction also changes priorities. A temporary kitchen with a microwave, electric kettle, toaster oven, and compact refrigerator can prevent takeout costs from quietly becoming another renovation category. Packing essential utensils in clear bins is far easier than searching through twenty identical moving boxes for one can opener.
The best experience often arrives after the project is finished: realizing that a kitchen feels luxurious because it works smoothly. Drawers open without collisions. The prep area has adequate light. Frequently used tools are close to the range. The island welcomes conversation without blocking the cook. Those practical improvements produce more lasting satisfaction than any fashionable finish.
Finally, budget remodelers learn to accept a little imperfection. A handmade pendant may not be mathematically symmetrical. A vintage door may carry scratches. Natural wood may vary from one board to the next. These details can make an affordable kitchen feel personal rather than mass-produced. High-end design is not always flawless; often, it is simply confident enough to let character remain visible.
Conclusion: The High-End Look Is Really a Planning Strategy
This kitchen succeeds because its designers did not attempt to make every component expensive. They created a hierarchy. The layout and island received serious attention. Affordable cabinet boxes handled storage. Better fronts improved the visible finish. White paint transformed existing woodwork. A sculptural paper-mâché pendant supplied drama without a four-figure invoice.
That formula can be adapted to kitchens of nearly any size: preserve what works, improve what affects daily life, conceal budget materials with careful detailing, and select one unforgettable feature. The result may not fool a cabinetmaker inspecting the drawer boxes with a flashlight, but it will feel polished, welcoming, and distinctly yours.
Kitchen improvements can also provide substantial personal satisfaction. The National Association of REALTORS’ 2025 remodeling research gave kitchen upgrades one of its highest homeowner “Joy Scores,” reinforcing a practical truth: a kitchen does not need to be extravagant to meaningfully improve everyday life.