
Environmental monitoring projects have a habit of growing. What begins as a temperature sensor on a breadboard soon acquires jumper wires, a plastic enclosure, a power cable, a display, three blinking LEDs, and the physical presence of a small countertop appliance. The readings may be useful, but the finished device is about as discreet as a toaster wearing a Wi-Fi antenna.
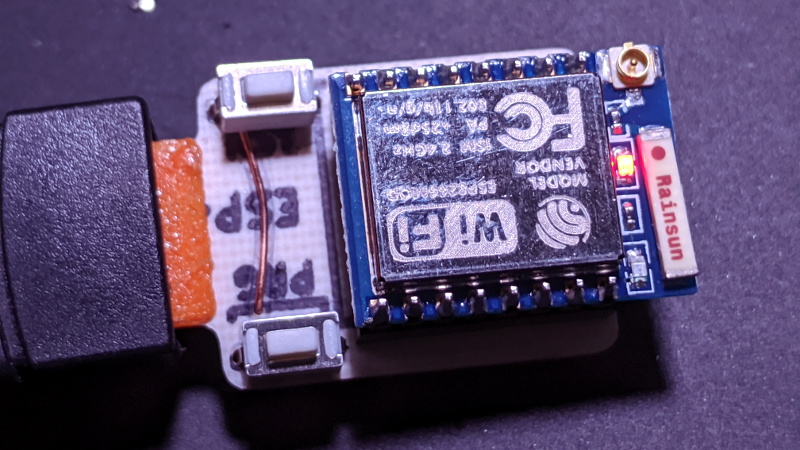
An ESP8266 environmental monitor built directly into a USB-sized circuit board takes the opposite approach. It combines a Wi-Fi microcontroller, digital sensors, power regulation, and programming hardware in a package that can plug into a wall charger, USB power strip, power bank, or extension cable. Once connected, it can measure temperature, relative humidity, and even ambient light while quietly sending data across a wireless network.
The idea is simple, compact, and delightfully practical. It is also more technically interesting than it first appears. Shrinking a Wi-Fi environmental sensor introduces questions about electrical power, airflow, heat transfer, sensor placement, firmware timing, network reliability, and whether the device is measuring the room or merely documenting how warm it has made itself.
What Is a USB ESP8266 Environmental Monitor?
A USB ESP8266 environmental monitor is a small Internet of Things device powered from a standard USB port. The USB connection may provide both electrical power and a serial programming interface, while the ESP8266 handles measurements, Wi-Fi communication, and data processing.
One notable compact design uses an ESP-12 or ESP-07 module, an AHT10 temperature and humidity sensor, a VEML7700 ambient light sensor, a CH330N USB-to-UART controller, and a 3.3-volt regulator. The circuit is built on a board measuring roughly 39 by 21 millimeters, making it similar in size to a conventional USB flash drive.
Unlike a flash drive, however, it is not intended to store vacation photographs or a mysterious folder named “Final_Final_Really_Final.” Its job is to observe the environment and transmit useful readings.
What the Monitor Can Measure
The exact measurements depend on the sensors selected, but a compact monitor can commonly track:
- Ambient temperature
- Relative humidity
- Ambient light intensity
- Barometric pressure when a BME280 or similar sensor is used
- Calculated values such as dew point, heat index, or absolute humidity
The data can be shown on a local web page, published through MQTT, uploaded to a home automation server, written to a cloud database, or sent to a dashboard such as Grafana. The ESP8266 can also trigger alerts when readings pass predetermined thresholds.
Why the ESP8266 Still Works Well for This Project
The ESP8266 is no longer the newest member of the Espressif family, but it remains an excellent fit for small wireless sensor nodes. It combines a 32-bit processor with integrated 2.4 GHz Wi-Fi, GPIO connections, I2C support, flash storage, and low-power operating modes.
For an environmental monitor, that integration matters. A separate microcontroller and Wi-Fi adapter would consume more board space and complicate the design. An ESP8266 can read a sensor, calculate values, connect to a network, run a basic HTTP server, and transmit measurements without requiring another processor to supervise it.
The mature software ecosystem is another advantage. Developers can program the chip through the Arduino environment, the Espressif SDK, or PlatformIO. Libraries are readily available for common temperature, humidity, pressure, and light sensors. The Arduino core also supports HTTP, TCP, UDP, DNS, mDNS, over-the-air updates, I2C peripherals, and flash-based file systems.
That means the hardest part of the project is rarely making the ESP8266 understand a humidity sensor. The harder part is preventing the Wi-Fi chip from turning the humidity sensor into a tiny electronic hand warmer.
Core Hardware Inside the USB Monitor
ESP-12 or ESP-07 Wi-Fi Module
The ESP-12 family is a popular choice because it packages the ESP8266, flash memory, shielding, and a PCB antenna into a compact module. The ESP-07 offers similar processing capabilities and may include options for an external antenna.
Mounting the module on headers can make it removable. That increases the thickness slightly, but it also makes replacement, troubleshooting, and separate programming much easier. A removable module is especially useful during prototypes, when a reversed connection can transform a perfectly good component into a very small smoke machine.
Temperature and Humidity Sensor
The original compact design uses an AHT10 digital temperature and humidity sensor connected through I2C. Digital sensors are convenient because the microcontroller receives calibrated measurement data rather than having to interpret a noisy analog voltage.
Other possible choices include the SHT31, BME280, and newer sensors in the AHT family. A BME280 adds barometric pressure, while an SHT31 may be attractive when temperature and humidity accuracy are the main priorities.
Sensor selection should be based on more than the number printed in an online listing. Consider accuracy tolerance, long-term drift, response time, operating voltage, availability of trusted libraries, physical package, and resistance to contamination.
VEML7700 Ambient Light Sensor
The VEML7700 is a digital ambient light sensor with an I2C interface and 16-bit output. Adding light measurement allows the monitor to detect whether a room is occupied, determine when daylight reaches a workspace, evaluate lighting schedules, or help automate blinds and lamps.
Physical orientation matters. A light sensor facing a wall, desk underside, or the interior of a charger will provide technically valid but practically useless data. The board should place the optical opening where it can see the environment without being overwhelmed by direct glare.
USB-to-UART Controller
A CH330N or similar USB-to-serial controller allows the computer to communicate with the ESP8266 UART. This makes firmware uploading and serial debugging much more convenient. Without it, the ESP module could still be programmed using an external adapter, but every update would require additional wiring or removing the module.
The onboard controller is not essential once deployment begins, yet it turns the monitor into its own programmer. That is useful when adjusting Wi-Fi credentials, sampling intervals, server addresses, or calibration offsets.
3.3-Volt Voltage Regulator
A standard USB connection supplies approximately 5 volts, while the ESP8266 and most bare digital sensors operate around 3.3 volts. A low-dropout regulator such as the HT7233 converts the USB supply to a safe voltage.
The regulator must tolerate the ESP8266’s short current bursts during Wi-Fi transmission. A regulator that appears adequate based only on average consumption may produce unstable voltage during radio activity. Good decoupling capacitors, short power traces, and adequate current capacity help prevent random resets and failed network connections.
The Biggest Challenge: Self-Heating
A compact environmental monitor places the heat source and temperature sensor on the same small circuit board. That is wonderfully efficient for manufacturing and rather inconvenient for physics.
The ESP8266 consumes significantly more power while waking, associating with Wi-Fi, requesting an IP address, and transmitting data. Some of that electrical energy becomes heat. The regulator and USB interface may also warm the board. Because the temperature sensor is only a short distance away, its reading can rise above the actual room temperature.
Even a difference of half a degree Celsius matters when the goal is comparing rooms, tracking HVAC behavior, or calculating dew point. Humidity readings can also be affected because relative humidity depends on temperature.
How to Reduce Measurement Error
The most effective strategy is to keep the ESP8266 asleep for most of the sampling cycle. When the device wakes, it should read the temperature and humidity sensor as early as possible, preferably before beginning a lengthy Wi-Fi connection.
A sensible sequence is:
- Wake from deep sleep.
- Initialize the sensor bus.
- Take environmental measurements immediately.
- Connect to Wi-Fi.
- Transmit or store the data.
- Return to deep sleep.
The sensor should be positioned as far as practical from the ESP8266, voltage regulator, and USB controller. Thermal isolation slots can reduce heat conduction through the PCB. Placing the sensor on the opposite side of the board also helps, especially when airflow can reach it.
A USB extension cable is often better than plugging the monitor directly into a desktop computer. Computer cases, laptop exhaust vents, monitors, and power adapters can create warm microclimates. A sensor installed beside a hot PC may accurately report the climate of the PC, which is probably not the scientific breakthrough anyone was hoping for.
Firmware and Data Flow
The firmware can be as simple as a sketch that reads the sensors and sends a basic HTTP request. More advanced versions may support MQTT, encrypted connections, over-the-air updates, local buffering, automatic network recovery, and configuration through a temporary access point.
Choosing a Reporting Method
For a single monitor, a local web server is easy to understand. Enter the device’s IP address in a browser and view current readings. However, a web server is less convenient for collecting long-term history because another system must repeatedly request the data.
MQTT is better suited to multiple sensor nodes. Each device publishes readings to topics such as home/office/temperature or home/basement/humidity. Home Assistant, Node-RED, or another subscriber can then store, display, and automate actions from those values.
HTTP uploads are another straightforward option. The monitor can send a compact JSON payload to a local server:
Including a device identifier, timestamp, firmware version, and Wi-Fi signal strength makes troubleshooting easier. A reading without context is merely a number wearing no name tag.
Sampling Frequency
Indoor temperature and humidity usually change slowly. Sampling every 30 seconds or every few minutes is often sufficient. Faster measurement produces more data, increases power consumption, and raises the risk of self-heating without necessarily revealing anything useful.
Sampling frequency should match the application. A greenhouse ventilation system may benefit from frequent updates. A monitor comparing overnight humidity among bedrooms can sleep for several minutes between reports.
Practical Uses for a USB Environmental Monitor
A compact Wi-Fi monitor can be deployed almost anywhere a USB power source and 2.4 GHz network are available. Useful locations include:
- Bedrooms where dry air affects comfort
- Basements where high humidity may encourage mold
- Greenhouses and indoor plant shelves
- Server closets and network cabinets
- Storage rooms containing books, instruments, or electronics
- Workshops where temperature affects adhesives and finishes
- Rental properties that need remote freeze warnings
- Home offices where lighting and HVAC schedules can be optimized
Multiple monitors can reveal differences that a central thermostat misses. A hallway thermostat might report 72 degrees while a sunlit office reaches 78 and a basement corner sits at 66 with much higher humidity. Distributed sensors turn vague complaints such as “this room always feels weird” into data that can be graphed.
Security and Reliability Considerations
An environmental monitor may be tiny, but it is still a network-connected computer. Avoid hard-coding sensitive credentials in firmware repositories. Use strong Wi-Fi security, restrict the device to the local network when cloud access is unnecessary, and protect configuration pages with authentication.
Firmware should also handle failure gracefully. Wi-Fi may disappear, the server may be offline, or a sensor may return an invalid value. Set connection timeouts so the ESP8266 does not remain awake indefinitely. Validate readings before publishing them, and record reset reasons when diagnosing unstable devices.
For long-term operation, add watchdog protection and a strategy for reconnecting after router changes. Over-the-air updates are convenient, but a physical programming interface remains valuable when an experimental firmware image enthusiastically disconnects itself from the network.
Experiences From Building and Using a USB Environmental Monitor
The first lesson from working with an ultra-compact environmental monitor is that placement matters more than expected. Plugging a prototype directly into the back of a desktop computer produced beautifully consistent readings of the warm air behind a desktop computer. The temperature stayed several degrees above the center of the room, and humidity appeared lower because the nearby electronics heated the air.
Moving the same board to a short USB extension cable changed the results immediately. Suspended away from the case, the monitor tracked a separate room thermometer much more closely. That simple test demonstrated why a compact sensor should not automatically be trusted merely because it displays several decimal places. Precision in the interface is not the same thing as accuracy in the environment.
Deep sleep made the next major improvement. An early firmware version connected to Wi-Fi, waited for DHCP, synchronized time, and only then read the sensor. By that point, the board had already begun warming. Reordering the firmware so the environmental measurement occurred immediately after boot reduced the temperature offset. Extending the sleep interval improved it further.
The project also revealed how noisy real homes can be from a data perspective. Opening a bathroom door after a shower produced a sharp humidity rise in the hallway. Morning sunlight increased the light reading long before anyone switched on a lamp. A cooking session changed both temperature and humidity, while an air conditioner created a sawtooth pattern as it cycled.
Not every unusual reading represented a meaningful event. A sudden light spike might be a phone flashlight. A brief temperature increase could come from someone standing near the sensor. A humidity jump might result from moving the monitor with a warm hand. Graphing data over several days helped separate repeatable trends from household chaos.
Calibration was another useful exercise. Placing several sensors together for 24 hours showed that inexpensive modules rarely agree perfectly. Rather than forcing every device to display identical values, small software offsets were applied only after comparing them under stable conditions. Humidity calibration was treated cautiously because airflow, condensation, and sensor aging can all influence results.
The ambient light sensor proved more useful than initially expected. Its measurements helped identify when direct sun reached a desk and how long a room remained naturally bright. That data later supported an automation rule that delayed turning on a lamp when daylight was already sufficient. The energy savings were modest, but preventing an unnecessary lamp from illuminating an already sunny room felt like a small victory over electrical silliness.
Network reliability improved when the firmware used short connection timeouts and returned to sleep after failed uploads. Earlier versions could remain awake trying to contact an unavailable server, heating the board and producing distorted readings. The improved design stored the measurement, attempted transmission for a limited period, and tried again during the next cycle.
The finished monitor was most valuable when several units were installed in different rooms. One sensor was interesting; four sensors told a story. They exposed a humid basement corner, an overheated afternoon office, and a bedroom that became surprisingly dry whenever the heating system ran overnight.
The broader experience showed that the best environmental monitor is not necessarily the one with the largest display or longest feature list. A small, reliable device that quietly collects comparable measurements can be far more useful. Its success depends on disciplined sensor placement, sensible sampling intervals, robust firmware, and respect for the inconvenient fact that electronics generate heat while attempting to measure it.
Conclusion
An ESP8266 environmental monitor in a USB port is an elegant example of practical miniaturization. It combines inexpensive components, mature software tools, wireless networking, and digital sensors in a form that can be deployed without a separate enclosure or power cable.
The compact format does introduce compromises. Self-heating must be controlled, airflow must reach the sensor, nearby equipment can distort readings, and the USB power circuit must handle Wi-Fi current bursts. Thoughtful PCB layout and aggressive deep-sleep firmware can minimize these problems.
For makers, home automation enthusiasts, and anyone curious about the invisible climate differences around a building, the project offers a satisfying balance of hardware design, embedded programming, and real-world experimentation. It is small enough to disappear behind a charger, yet capable of producing data that can improve comfort, protect stored items, guide HVAC adjustments, and settle arguments about whether the office is genuinely too warm.