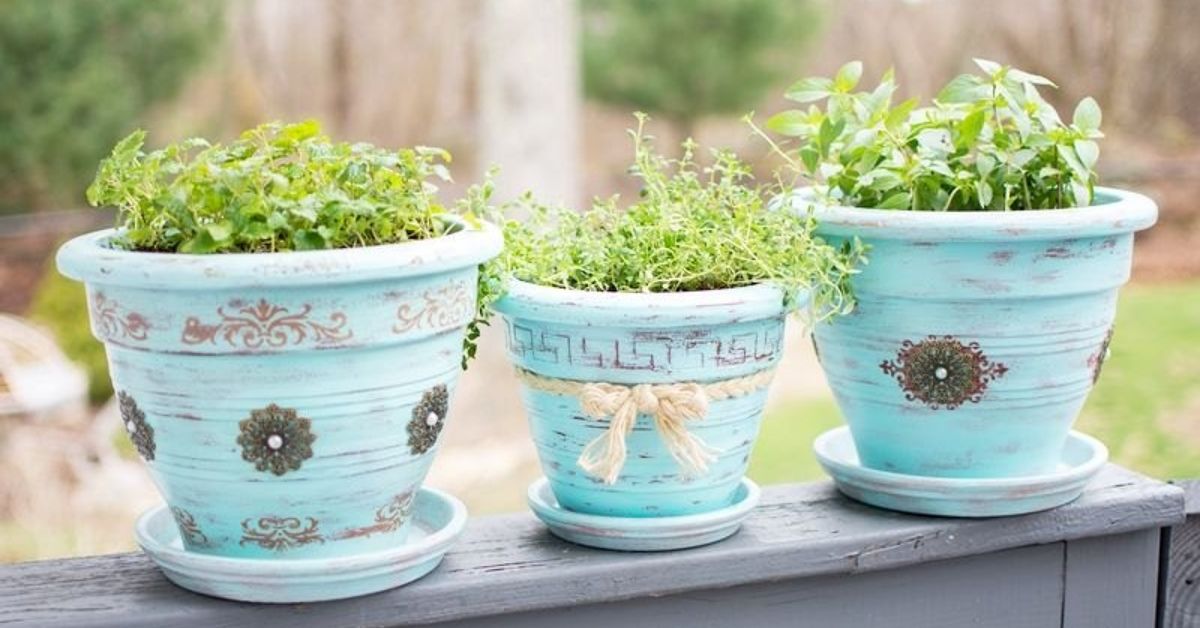

Terra cotta pots are the plain white T-shirts of the gardening world: affordable, classic, useful, and somehow always waiting for a glow-up. Their warm orange clay looks charming on its own, but with a little paint, texture, ribbon, moss, stencil work, or creative styling, these humble planters can become the star of your porch, balcony, windowsill, patio, or indoor plant shelf.
The best part? You do not need to be a professional artist, a ceramicist, or the kind of person who owns twelve different types of sandpaper. Most terra cotta pot makeovers are beginner-friendly, budget-friendly, and forgiving. A crooked stripe can become “handmade character.” A paint drip can become “abstract garden energy.” A chipped rim can become “rustic European courtyard,” which sounds much fancier than “I dropped it near the hose.”
Before decorating, remember that terra cotta is porous. It absorbs moisture, dries soil quickly, and can develop white mineral deposits over time. That is why cleaning, drying, and sealing matter, especially for outdoor painted pots. Start with a clean pot, let it dry completely, choose plant-safe materials, keep drainage holes open, and consider sealing your design if the planter will live outside. Once the prep is done, the fun begins.
Why Terra Cotta Pots Are Perfect for DIY Makeovers
Terra cotta planters are popular because they are natural, breathable, inexpensive, and easy to find in many sizes. Their earthy color pairs beautifully with herbs, succulents, flowering annuals, trailing vines, and Mediterranean plants like lavender, rosemary, thyme, and sage. But their simple surface also makes them an ideal blank canvas for paint, aging techniques, decoupage, chalkboard labels, mosaic details, and seasonal displays.
Unlike glossy ceramic pots, unfinished clay has a slightly rough texture that holds paint well when properly prepared. It also looks better with age, which is rare and slightly unfair. Most of us do not become more charming after being left outside in the rain, but terra cotta often does.
Quick Prep Before You Decorate
Whether you are painting one tiny herb pot or transforming a whole patio army, preparation makes the difference between a planter that looks lovely for one weekend and one that still looks lovely after weather, watering, and enthusiastic squirrels have had their say.
Clean the Pot
Remove soil, dust, old labels, and mineral buildup. A brush, warm water, mild dish soap, and a little diluted white vinegar can help lift stubborn chalky residue. Rinse well and let the pot dry fully before painting or sealing.
Seal When Needed
For painted outdoor pots, a clear sealer can help reduce peeling and bubbling. Many DIYers seal the inside to slow moisture transfer and seal the outside after painting to protect the finish. Always follow the product label and choose materials appropriate for planters.
Protect Drainage
Never block the drainage hole. Pretty pots are wonderful, but plants prefer not to live in decorative soup. If you are adding fabric, twine, mosaic pieces, or paint, keep the bottom opening clear.
22 Ideas to Make Your Terra Cotta Pots Look So Much Prettier
1. Paint Them in Soft Neutrals
A coat of warm white, cream, taupe, sage, charcoal, or mushroom gray can instantly turn basic terra cotta pots into sophisticated home decor. Neutral colors work especially well indoors because they let the plant be the dramatic one. Try matching the pot color to your wall, shelf, or patio cushions for a calm, designer-style look.
2. Create Color-Blocked Designs
Color blocking is one of the easiest painted terra cotta pot ideas. Use painter’s tape to divide the pot into sections, then paint each area a different shade. Try terracotta and blush, navy and white, sage and cream, or mustard and charcoal. The result feels modern without requiring freehand artistic bravery.
3. Add Whitewashed Charm
Whitewashing gives terra cotta pots a soft, aged look. Thin white paint with water, brush it over the pot, then wipe some away with a rag or paper towel before it fully dries. The clay color peeks through, creating a sun-faded finish that looks like it came from a cottage garden instead of the clearance aisle.
4. Use Chalkboard Paint for Herb Labels
Chalkboard paint is practical and cute, which is the holy grail of craft projects. Paint a band or small rectangle on each pot, then label herbs with chalk or a chalk marker. Basil, parsley, mint, cilantro, and thyme suddenly look like they belong in a charming kitchen garden rather than a chaotic windowsill jungle.
5. Try a Rustic Aged Patina
If you love old-world garden style, age new terra cotta pots with a natural-looking patina. A diluted white paint wash, mossy green dry brushing, or yogurt-aging technique can create the appearance of weathered clay. This works beautifully for cottage gardens, vintage patios, and anyone who wants their brand-new pots to look like they have been gossiping with roses for twenty years.
6. Paint Simple Geometric Patterns
Triangles, diamonds, arches, lines, and half-moons can make a small pot look custom. Use painter’s tape for crisp shapes or a paint pen for fine details. Black and white geometric designs look bold and modern, while muted pastels feel playful and soft.
7. Wrap the Rim With Jute or Twine
For a natural farmhouse look, wrap jute twine around the rim or lower third of the pot. Use outdoor-safe glue if the pot will live on a porch or patio. This idea pairs well with herbs, succulents, and trailing plants. It also hides messy paint edges, which is a service we should all appreciate.
8. Add a Metallic Accent
A little metallic paint can make terra cotta pots look expensive. Paint just the rim in gold, copper, bronze, or champagne. You can also add a thin metallic stripe around the middle. Keep it subtle for an elegant look, or go bold if your plant has main-character energy.
9. Make Polka Dot Pots
Polka dots are cheerful, beginner-friendly, and nearly impossible to mess up. Use the end of a foam brush, a pencil eraser, or a round sponge dabber to create evenly spaced dots. White dots on natural terra cotta look classic; rainbow dots turn the pot into instant porch confetti.
10. Use Stencils for a Patterned Finish
Stencils are perfect for creating floral, Moroccan, farmhouse, or tile-inspired designs. Tape the stencil in place, use a small amount of paint, and dab lightly to avoid bleeding. Stenciled terra cotta pots look especially pretty when grouped in sets of three with similar colors.
11. Paint Ombre Pots
An ombre design fades from one color to another, usually from dark at the base to light near the rim. Choose shades from the same color family, such as deep blue to pale sky, forest green to mint, or coral to blush. Blend while the paint is still damp for a soft transition.
12. Add Hand-Painted Florals
You do not need to paint museum-level roses. Simple daisies, vines, leaves, lavender sprigs, or tiny wildflowers can look charming. Use a small brush or paint pens. If your flowers come out uneven, congratulations: you have achieved whimsical cottage style.
13. Create a Drip Paint Effect
Drip painting adds energy and movement to plain pots. Pour or brush paint around the rim and let it drip naturally down the sides. This works best with bright colors, glossy finishes, or a single dramatic shade over a neutral base. Use a protected surface because gravity does not care about your table.
14. Decorate With Mosaic Pieces
Broken tiles, glass gems, mirror pieces, or ceramic fragments can turn a terra cotta pot into a mosaic planter. Apply pieces with strong adhesive, then grout between them for a finished look. Mosaic pots are heavier and more time-consuming, but they make gorgeous statement pieces near entryways and garden seating areas.
15. Use Decoupage Napkins or Tissue Paper
Decorative napkins, botanical tissue paper, and patterned paper can be applied with decoupage medium. Choose floral prints, vintage lemons, blue-and-white patterns, or leafy designs. Seal the finished pot well if it will be exposed to moisture. This is a great way to get a detailed look without painting every tiny petal yourself.
16. Paint Faces on Small Pots
Face planters are adorable for succulents and trailing plants. Paint simple closed eyes, rosy cheeks, lashes, or a tiny smile. A spiky succulent becomes hair. A trailing string of pearls becomes dramatic bangs. Suddenly your shelf has personality, and possibly opinions.
17. Add House Numbers
Large terra cotta pots can become stylish house number planters. Paint the pot in a solid color, add number decals or stencils, and fill it with seasonal flowers. This idea looks polished by the front door and is easier to update than a permanent sign.
18. Use Painter’s Tape for Crisp Stripes
Horizontal, vertical, or diagonal stripes can completely change the look of a pot. Thin stripes feel classic; wide stripes feel bold and coastal. For clean lines, press painter’s tape firmly and remove it before the paint fully cures. Pair striped pots with simple green plants so the whole display does not visually shout.
19. Try a Speckled Stone Look
A speckled finish gives terra cotta pots a modern ceramic-inspired style. Paint the pot a solid matte color, then flick small specks of darker paint using a toothbrush or stiff brush. Practice on cardboard first unless you want your patio to join the design.
20. Add Lace or Doily Patterns
Place lace, mesh, or a paper doily over the pot and dab paint through it to create a delicate pattern. White lace designs over natural clay look romantic and vintage. Darker paint over a pale base creates a bolder, more graphic effect.
21. Stack Pots for Height
Sometimes making terra cotta pots prettier is not about decorating the surface; it is about display. Stack pots in graduated sizes to create a tiered planter. Use sturdy placement, keep the structure balanced, and plant cascading flowers or herbs for a lush vertical look. This is perfect for small patios where floor space is precious.
22. Group Matching Pots for a Designer Look
A single pot is nice. A group of coordinated pots looks intentional. Use several terra cotta pots in different sizes, then repeat one design element: the same paint color, the same rim detail, the same plant type, or the same finish. Repetition creates harmony and makes even budget planters look curated.
Best Paints and Finishes for Terra Cotta Pots
Acrylic craft paint is popular for small indoor projects because it is easy to use, affordable, and available in many colors. For outdoor pots, exterior paint, spray paint designed for outdoor surfaces, or paint-and-primer formulas can offer better durability. Chalk paint creates a soft matte look, while milk paint or limewash-style finishes can create a rustic aged effect.
For long-lasting results, use thin coats instead of one thick coat. Let each layer dry fully. Finish with a clear sealer suitable for the pot’s location. If the pot will hold edible herbs, keep paint and sealers on the exterior only unless the product is clearly labeled safe for that use.
Plant Pairing Ideas for Prettier Pots
Design does not stop at the pot. The plant matters too. Terra cotta is especially attractive with plants that like good drainage and drier conditions. Succulents, cacti, snake plants, lavender, rosemary, thyme, oregano, and many Mediterranean herbs look right at home in clay planters.
For outdoor color, try pairing whitewashed pots with lavender or trailing bacopa, striped pots with geraniums, chalkboard herb pots with kitchen herbs, and metallic-rimmed pots with sculptural succulents. For a dramatic porch display, combine upright plants, mounding fillers, and trailing spillers. The classic “thriller, filler, spiller” formula works because it gives the eye height, fullness, and movement.
Common Mistakes to Avoid
The first mistake is painting a dirty or damp pot. Moisture trapped inside porous clay can push paint outward, causing bubbling or peeling. The second mistake is forgetting drainage. The third is using indoor-only materials on pots that will sit outside in sun, rain, and temperature swings. The fourth is decorating every pot differently and then wondering why the patio looks like a craft store had a sneeze.
Another mistake is choosing the wrong plant for terra cotta. Because clay dries out faster than plastic or glazed ceramic, moisture-loving plants may need more frequent watering. If you love ferns or peace lilies, consider using terra cotta indoors where you can monitor watering, or choose a glazed container that retains moisture longer.
Seasonal Terra Cotta Pot Decorating Ideas
Terra cotta pots are easy to refresh for the seasons. In spring, use pastel paint, floral stencils, and bulbs. In summer, go bold with coral, turquoise, yellow, and lush trailing flowers. In fall, lean into copper, cream, pumpkin, burgundy, and ornamental grasses. For winter, paint mini pots white, add evergreen clippings, or turn small saucers and pots into holiday decorations.
The trick is to avoid making every seasonal design permanent. Use removable ribbons, plant markers, moss, stakes, or decorative picks when you want flexibility. That way, your pot can be springy in April, summery in July, and not stuck wearing painted pumpkins in February.
Extra Experience: What Actually Makes Terra Cotta Pots Look Better in Real Life
After experimenting with terra cotta pots in real homes, patios, and plant corners, one lesson becomes obvious: the prettiest results usually come from restraint. It is tempting to paint every pot with a different pattern, color, and personality. One pot has stripes, another has dots, one has a face, one has glitter, and suddenly the plant shelf looks like it is hosting a very loud birthday party. A better approach is to choose a small color palette and repeat it.
For example, a set of five pots can look beautiful when each one is slightly different but connected. One can be natural terra cotta with a white rim. One can be whitewashed. One can have thin sage stripes. One can have a small stencil. One can be plain clay. Because the colors relate, the group looks collected rather than chaotic. This is especially useful for porches, balconies, and entryways where containers are seen together.
Another real-life tip: decorate the rim first if you are nervous. Painting only the rim is low-risk and high-impact. A black rim makes a clay pot look modern. A white rim makes it look crisp. A gold or copper rim makes it look gift-worthy. You can finish a rim-only makeover quickly, and if you hate it, repainting is easy.
Texture also matters more than people think. A matte finish often looks more expensive than a shiny one, especially on larger pots. Dry-brushed paint, limewashed effects, and lightly sanded edges create depth. If a pot looks too perfect, it can feel store-bought. If it has slight variation, it feels handmade in the best way.
For outdoor planters, weather should influence your design. In a sunny spot, very dark paint may heat up more quickly and can make soil dry faster. In a rainy area, unsealed paper, fabric, or decoupage details may not last. On windy balconies, tall stacked pots may need extra stability. A beautiful planter should still function like a planter, not a dramatic garden sculpture waiting to fall over during the first storm.
One of the easiest upgrades is also the most overlooked: raise the pots. Terra cotta planters look better when they are displayed at different heights. Use plant stands, overturned pots, bricks hidden behind larger containers, or small tables. Height creates layers, and layers make a collection feel designed. Even plain clay pots look prettier when arranged thoughtfully.
Finally, accept that terra cotta changes. Mineral marks, water stains, moss, scratches, and fading are part of its charm. Instead of fighting every sign of age, work with it. A slightly weathered pot with a healthy plant often looks better than a freshly painted pot with a sad, crispy basil plant inside. The goal is not perfection. The goal is personality, balance, and a planter that makes you smile when you water it.
Conclusion
Terra cotta pots may start out simple, but they have enormous decorating potential. With paint, stencils, twine, metallic accents, whitewash, mosaics, chalkboard labels, and thoughtful grouping, you can turn basic clay containers into charming garden decor. The key is to clean and dry the pots first, use suitable materials, protect the finish when needed, and match the design to both the plant and the space.
Whether you love modern stripes, rustic patina, cottage florals, playful faces, or elegant neutral finishes, there is a terra cotta pot idea that fits your style. Start with one pot, experiment without fear, and remember: if the first design goes sideways, there is always another coat of paint. That is not failure. That is gardening with plot development.
Note: For best results, always test paint, glue, and sealer on a small area first, especially if the pot will be used outdoors or planted with edible herbs.