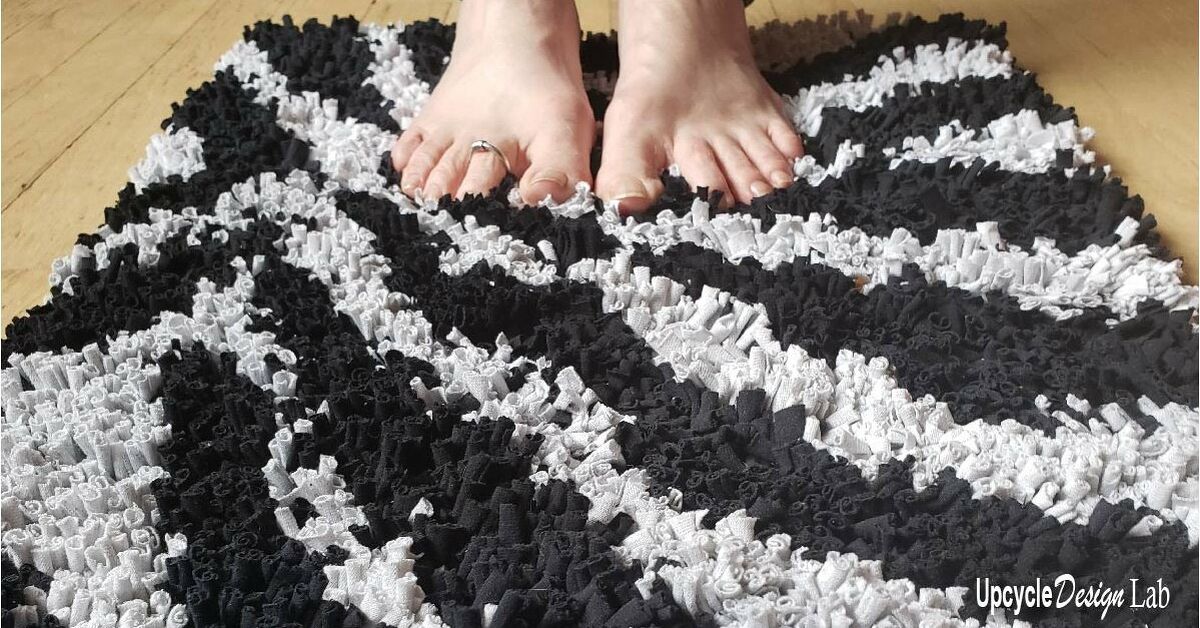

There is a particular kind of satisfaction that comes from turning a pile of old T-shirts into something that looks like it escaped from a stylish home décor store. A DIY upcycled T-shirt rug delivers exactly that feelingand this plush zebra bath mat adds a little safari drama while giving worn cotton shirts a second career.
Best of all, you do not need to know how to crochet, knit, weave on a loom, or perform any mysterious fiber-art wizardry. The basic technique involves cutting T-shirts into stretchy fabric yarn, chopping that yarn into short pieces, and tying those pieces onto a gridded non-slip rug underlay. A zebra pattern is drawn directly onto the backing first, so the project becomes a wonderfully simple exercise in filling in the lines.
The result is thick, soft, customizable, and delightfully forgiving. If one stripe wanders a little off course, congratulations: you have created a genetically unique zebra.
Why Make a Rug From Old T-Shirts?
T-shirts are unusually useful raw material for upcycled crafts. Jersey knit fabric is soft, flexible, easy to cut, and generally does not unravel into a fuzzy disaster the moment scissors touch it. When narrow strips are stretched, the edges naturally curl inward, creating a chunky cord commonly known as T-shirt yarn. Craft guides regularly use this yarn for rugs, baskets, bags, plant hangers, and bath mats.
Repurposing worn clothing also keeps usable textile material in circulation longer. The U.S. Environmental Protection Agency’s textile data illustrates just how much clothing and other textile material moves through the waste stream, making reuse an especially sensible first stop for shirts that are too stained or worn to donate.
And unlike a memory quilt, nobody needs to know that one of the black stripes used to advertise a plumbing company, a 2017 charity 5K, or your cousin’s forgotten bachelor party.
What You’ll Need for a Plush Zebra T-Shirt Rug
Materials
- Several clean old T-shirts in black and white or cream
- Non-slip rug underlay with an open grid
- Permanent marker
- Sharp fabric scissors or rotary cutter
- Ruler or cutting mat
- Optional black or coordinating fabric for covering the back
- Strong thread and needle or suitable washable fabric adhesive for finishing
- Optional non-slip rug pad if additional grip is needed
A finished bath mat around 18 by 24 to 18 by 28 inches is a practical starting size. The original zebra-inspired upcycled project used an 18-by-28-inch format, while another established T-shirt rug tutorial uses an 18-by-24-inch format. The exact number of shirts varies dramatically according to shirt size, usable fabric, knot density, and desired pile.
Which T-Shirts Work Best?
Soft cotton or cotton-rich jersey shirts are generally the easiest to handle. Shirts without side seams can produce smoother continuous T-shirt yarn, although seams are not a deal breaker for this project because the yarn will eventually be cut into short sections anyway. Printed areas can also be avoided if you want consistent black-and-white stripes.
Wash and completely dry every shirt before cutting. Mixing fabrics that shrink differently can turn your first laundry day into a small textile rebellion.
Step 1: Decide on the Size and Shape
Lay your non-slip rug underlay on a clean surface and determine the finished dimensions. A rectangle is easiest for beginners, but there is nothing stopping you from creating an oval, rounded rectangle, or free-form animal-hide silhouette.
Remember that this backing will ultimately disappear beneath hundredsor possibly thousandsof short fabric strands. Your cutting does not have to satisfy a NASA engineer, but reasonably straight edges make finishing easier.
Before going larger, consider the amount of material and time involved. A rug twice as wide and twice as long requires approximately four times the surface coverage. That innocent-looking giant bathroom rug can become your new evening hobby until Thanksgiving.
Step 2: Draw the Zebra Pattern
Use a permanent marker to sketch zebra stripes directly onto the gridded backing. The original upcycled zebra technique works particularly well because each color area simply tells you which T-shirt yarn to attach in that section.
Make the Pattern Look Natural
A convincing zebra design should not resemble perfectly spaced highway lines. Make some stripes wide, some narrow, some forked, and some tapered. Allow several black stripes to enter from one side and stop before crossing the entire rug.
Start with several large sweeping curves rather than dozens of tiny details. Once the basic pattern looks balanced, add smaller branches where necessary.
If drawing freestyle makes you nervous, print a zebra pattern, place it beside the backing, and use it as a visual reference. You are aiming for the rhythm of zebra stripes, not preparing evidence for a zoology examination.
Step 3: Make T-Shirt Yarn
Lay a shirt flat and remove the lower hem. Cut across the shirt below the sleeves so you are working primarily with the tubular torso section.
For this shag-rug method, cut the fabric horizontally into strips approximately 1/2 inch wide. Pull each strip firmly but carefully. Jersey fabric typically curls inward as it stretches, turning a flat ribbon into a more rounded cord. The original zebra rug tutorial specifically uses stretched half-inch strips before cutting them into the final pile pieces.
You can also create one continuous length of T-shirt yarn by leaving one side partially uncut and connecting the strips diagonally. That method is especially useful if you later want to crochet or braid leftover material. For this project, however, separate loops are perfectly acceptable because everything gets chopped up shortly afterward.
Keep Colors Organized
Make one container for black yarn and another for white yarn. If you are using several shadescharcoal, cream, gray, or beigesort those separately as well.
This tiny organizational step prevents the crafting equivalent of cooking dinner while searching through every cabinet for the salt.
Step 4: Cut the Yarn Into Short Pieces
Cut the stretched T-shirt yarn into approximately 3-inch lengths. Consistency helps produce an even plush surface later.
You do not need to measure every individual strand. Cut one accurate sample, then use it as a visual guide while cutting bundles.
Three inches creates enough length for tying while leaving a thick shag pile above the backing. For a shorter, denser appearance, you can eventually trim the rug after all the knots are installed.
Step 5: Start Tying the T-Shirt Yarn
Now comes the repetitive partand strangely, often the relaxing part.
Push a three-inch strip through two neighboring openings in the rug grid, bring both ends to the front, and tie them securely. A simple overhand knot is generally sufficient if it tightens cleanly against the mesh.
Work either consistently along the horizontal structure of the backing or consistently along the vertical structure rather than randomly switching directions. The original project specifically recommends attaching pieces in one grid direction instead of both.
Work From the Center Outward
Starting near the center makes it easier to control the pattern and handle the backing as the mat becomes increasingly fluffy. The reference zebra project also used a center-outward approach.
Follow your marker lines carefully:
- Attach black T-shirt pieces over black stripe areas.
- Attach white or cream pieces across the remaining background.
- Check the front every few rows.
- Fill obvious gaps before moving too far away.
At first, the backing may look suspiciously like a piece of mesh experiencing a bad hair day. Keep going. Once neighboring knots accumulate, the pile fills in and the design becomes dramatically clearer.
Step 6: Control the Density
A plush rug depends as much on density as strand length. Too few knots expose the backing; too many may make the mat unnecessarily heavy and slow to dry.
Do a small test area measuring roughly three by three inches. Run your fingers across it and separate the strands. If the mesh remains highly visible, add more knots. If the pile feels crowded enough to hide a hamster, you can probably space them slightly farther apart.
Remember that a bathroom rug needs to dry between uses. Plushness is wonderful; permanent dampness is not.
Step 7: Finish the Edges and Back
When all color areas are filled, turn the rug over and inspect your work. Tighten loose knots and remove any stray pieces.
The original zebra bath mat added black fabric to finish the back, creating a cleaner appearance. You can do something similar using washable fabric, provided your chosen attachment method remains flexible and laundering-friendly.
Alternatively, leave a suitable non-slip backing exposed. For any rug placed on smooth bathroom flooring, grip deserves serious attention. Home-improvement guidance commonly recommends slip-resistant rug backing or a compatible non-slip pad for smaller rugs that might shift underfoot.
Make sure the bathroom floor beneath the mat is also dry during use; moisture trapped underneath can reduce traction even when a mat has a gripping surface.
Step 8: Give Your Zebra a Haircut
Place the rug right-side up and fluff the fabric pile vigorously with your fingers.
Then use sharp scissors to trim obviously long strands. The original zebra project finishes by cutting the yarn to a consistent pile length, and this final grooming step makes a surprisingly big visual difference.
Do not obsess over microscopic precision. A slightly irregular shag surface creates depth and gives the rug a handmade character. Trim gradually; unlike human hair, T-shirt yarn has shown very little enthusiasm for growing back.
How to Make the Zebra Pattern Look More Professional
Use Slight Color Variation
Pure black and bright white create strong contrast. Charcoal and ivory produce a warmer, softer appearance. You can also slip a handful of gray strands into the black areas to add texture without destroying the zebra effect.
Keep Stripe Widths Uneven
Perfect repetition makes animal print look artificial. Alternate between broad curves and thin branches.
Let Some Stripes Fork
Occasional Y-shaped stripe divisions immediately make the design feel more organic.
Step Back Frequently
Close-up crafting can trick your eyes. Put the rug on the floor every so often and view it from several feet away. Pattern problems that are invisible at six inches suddenly become obvious.
Can You Wash an Upcycled T-Shirt Bath Mat?
Washability depends on the shirts, backing material, and finishing products you choose. The creator of the original upcycled zebra rug reported successfully washing the finished mat and recommended a gentle washing cycle followed by low dryer heat.
For your own version, test the materials individually first. If you have used adhesive, decorative backing, or a separate rug pad, follow the manufacturer’s care directions for those components.
Between washes, hang the rug so air can circulate around it after especially wet showers. Bath rugs are routinely designed around absorbency, machine washability, and thorough drying because a mat that remains wet is neither pleasant nor particularly fresh.
Common DIY T-Shirt Rug Mistakes
Cutting the T-Shirt Strips Too Narrow
Very thin jersey strips are more likely to become weak or fiddly. Established T-shirt yarn guidance recommends avoiding widths below about half an inch.
Making the Rug Huge on Your First Attempt
Start bath-mat size. You can always graduate to a zebra rug large enough to have its own ZIP code later.
Using Shirts That Are Still Valuable
Use clothing that is genuinely worn, stained, stretched, or unsuitable for donation. Upcycling should rescue textile material, not result in the ceremonial destruction of your favorite vintage concert shirt.
Ignoring the Backing
A beautiful rug that slides across tile like an air-hockey puck is not a successful bathroom accessory. Incorporate slip resistance into the project from the beginning.
Trimming Before the Rug Is Finished
Wait until all knots are installed. The surrounding pile changes how individual strands sit, so premature trimming often leads to extra work.
More Designs You Can Make With the Same Technique
Once you understand this method, the zebra is only the beginning. The grid becomes a giant pixel canvas, making the technique ideal for bold graphics rather than tiny details.
- Leopard-inspired rug: tan background with irregular black-and-brown spots.
- Checkerboard mat: easy to map and excellent for modern interiors.
- Rainbow rug: useful when your old-shirt collection contains every color except two that match.
- Monogram bath mat: sketch an oversized letter in the center.
- Geometric rug: triangles, arches, diamonds, and waves translate well onto a grid.
- Ombre rug: arrange related shirt colors from light to dark.
- Kids’ room rug: make a simple heart, flower, smiley face, or lightning bolt.
HGTV and other established craft resources have similarly featured worn T-shirts as material for soft recycled rugs and bath mats, demonstrating how adaptable cast-off knit fabric can be for home décor.
Why This Upcycled Rug Project Is Worth the Effort
This is not the five-minute craft that magically emerges completed after three cheerful camera cuts. Tying hundreds of pieces takes time. But that is also the appeal.
You can work in small sections while watching television, listening to podcasts, or wondering why every streaming service suddenly needs its own subscription. There are no complicated stitch counts to remember and almost no dangerous opportunity to ruin the entire project with one mistake.
Each knot converts a tiny piece of unwanted clothing into something useful. Eventually the anonymous pile of shirt scraps turns into a thick piece of home décor with genuine personality.
My Experience-Minded Tips for Making a Plush T-Shirt Rug
The biggest lesson from making a project like this is that preparation saves considerably more time than rushing into the fun part. Cutting all your fabric first may feel tedious, but stopping every five minutes to manufacture another handful of yarn makes the tying stage feel much slower.
I would prepare more strips than I think I need, particularly in the dominant background color. A zebra design can fool you because the black stripes command all the visual attention, while the white background quietly consumes most of the material. Nothing damages crafting momentum quite like discovering at 10:30 p.m. that you need another white T-shirt.
I would also make a small sample before committing to the full rug. Tie twenty or thirty pieces onto a scrap of the same backing. Experiment with strand length, spacing, and knot tension. Three-inch pieces are an excellent starting point, but different jersey fabrics behave differently. Thick cotton may stand upright with less density, while lightweight fabric can collapse into a softer shag.
Another useful discovery is that perfection matters far less than consistency. Individual knots look awkward when viewed alone. Once hundreds sit together, minor imperfections disappear into the texture. This makes the project unusually friendly for beginners.
The zebra pattern also teaches an interesting design lesson: do not overdraw. My instinct would be to sketch every stripe before beginning, but an overly complicated design creates unnecessary color changes and slows progress. Large, confidently curved stripes are easier to fill and usually look stronger from across the room.
Working from the center outward is surprisingly practical. As the rug becomes heavier and fluffier, you spend less time dragging finished sections across your workspace. Periodically shake the rug, fluff the pile, and inspect the design from the front rather than trusting what the backing tells you.
I would resist trimming until absolutely everything is tied. During construction, certain strands appear absurdly long because their neighbors have not yet been installed. Once the pile fills out, those same strands frequently settle into place. Final trimming should feel more like shaping a hedge than mowing a lawn: remove a little, inspect, then continue.
Bathroom use changes the priorities slightly compared with making a decorative bedroom rug. Softness is important, but drying and floor grip matter just as much. I would rather have a slightly less dense mat that dries reliably than an enormous cotton cloud that remains wet until Tuesday.
A removable non-slip pad can also be useful because it allows the textile portion and grip layer to be cleaned or replaced independently. Always make sure whatever pad or backing you select is compatible with your specific flooring.
Finally, expect the project to become unexpectedly sentimental. That black stripe might contain a shirt you wore while painting your first apartment. The cream section might have started as your favorite weekend tee. Upcycling does something ordinary recycling cannot always do: it preserves a small physical history of an object while changing its purpose completely.
That is probably why these rugs are so satisfying. You begin with clothes whose useful lives appear to be over and finish with something soft, functional, slightly ridiculous, and entirely yours.
Conclusion
Learning how to make a DIY upcycled T-shirt rug proves that attractive home décor does not always begin in a store. With worn shirts, a gridded rug backing, scissors, and some patient knotting, you can build a plush zebra bath mat from materials that might otherwise sit forgotten in a closet.
The process is beginner-friendly, endlessly customizable, and forgiving enough that small inconsistencies simply become part of the texture. Draw the pattern, make your T-shirt yarn, cut short strands, knot them to the backing, finish the underside, and trim the pile. Once you master the technique, the same method can produce checkerboards, geometric patterns, rainbows, initials, or almost any bold graphic you can sketch onto a grid.
Most importantly, remember that a bathroom rug is a working household item. Keep it washable, allow it to dry fully, and use an appropriate slip-resistant backing or rug pad so your handmade masterpiece stays where you put it.
Note: This guide synthesizes established techniques for T-shirt yarn, recycled rag rugs, gridded T-shirt rugs, washable bath mats, and non-slip rug use from U.S.-based craft, home-improvement, quilting, recycling, and home-care resources, including the original plush zebra upcycled rug project.