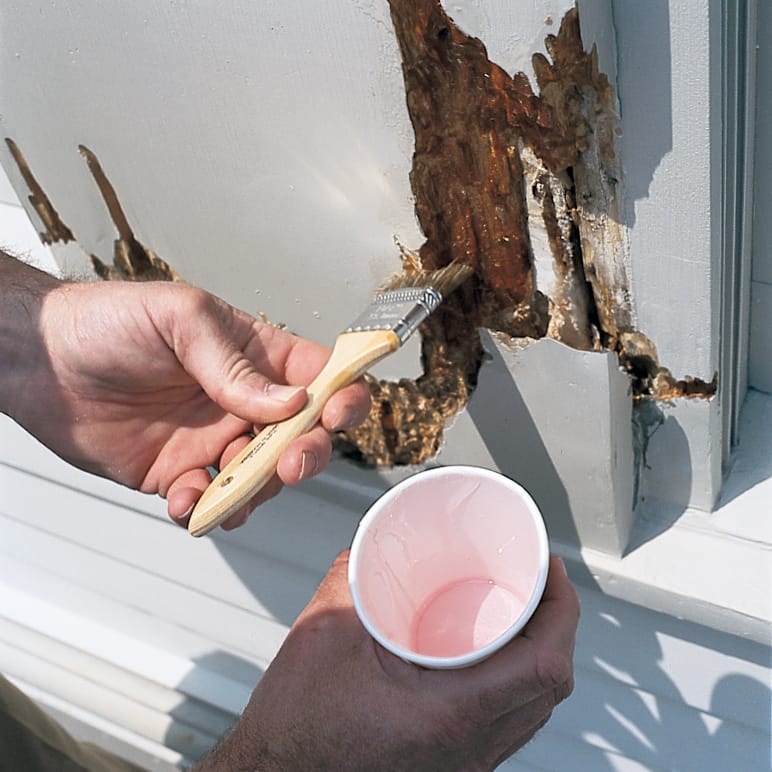

Rotted exterior trim has a talent for looking innocent until a screwdriver sinks into it like a fork entering warm cake. What appeared to be a tiny paint blister may actually be a damp, crumbly cavity hiding around a window, door, corner board, porch column, or roofline.
Fortunately, localized decay does not always require tearing off the entire board. Filling rotted trim with two-part epoxy can restore missing material, preserve decorative profiles, and create a durable surface that can be sanded, primed, and painted. The repair works especially well when the damaged area is limited, the surrounding wood remains reasonably solid, and replacing the trim would be expensive or unnecessarily destructive.
Epoxy is not magical mayonnaise that makes every bad board good again, however. A successful repair depends on stopping the moisture source, removing loose decay, drying the wood, consolidating weakened fibers, and mixing the filler according to its manufacturer’s directions. Skip those steps, and the rot may continue behind a very handsome patch.
Research basis:
How a Two-Part Epoxy Trim Repair Works
A typical wood-restoration system uses two related products. The first is a liquid consolidant that penetrates porous or weakened wood and hardens the remaining fibers. The second is a moldable epoxy filler made by combining a resin with a hardener. Once mixed, the components begin a chemical reaction that eventually creates a solid repair material.
The consolidant provides a stable base, while the thicker filler replaces the wood that was removed. Depending on the product, cured epoxy may be carved, filed, drilled, sanded, primed, and painted. Some formulations remain slightly flexible so they can better tolerate normal wood movement instead of behaving like a chunk of glass glued to a living material.
Unlike ordinary lightweight wood filler, a restoration-grade two-part epoxy is designed for deeper voids and exterior exposure. It can be shaped around curved molding, rebuilt corners, window-sill noses, column details, and other forms that would be awkward to reproduce with a replacement block of lumber.
Research basis:
Should You Repair the Trim or Replace It?
Before opening the epoxy containers, determine whether the trim is genuinely repairable. Epoxy is best suited to localized damage surrounded by sound wood. It is particularly useful on older or custom trim that would be difficult to remove without disturbing siding, flashing, masonry, or historic details.
Good Candidates for Epoxy Repair
- A rotted corner on an otherwise solid window sill
- Decay around a few nail holes or an open joint
- A damaged section of decorative molding
- The lower end of a door casing or corner board
- A shallow cavity beneath failed paint
- Localized damage where replacement would destroy original material
When Replacement Is the Better Choice
Replace the trim when decay extends through most of the board, the damage affects a load-bearing component, fasteners no longer have solid wood to grip, or the wood remains wet because of an unresolved leak. Extensive hidden rot behind siding or window frames may also require investigation by an experienced carpenter.
A wood splice, sometimes called a Dutchman repair, may be more sensible when a long section is missing but the remaining trim is worth preserving. Epoxy can still be used as an adhesive or transition material, but it should not become a substitute for sound framing where structural strength is required.
Research basis:
Tools and Materials
Gather everything before mixing epoxy. Once the resin and hardener meet, the repair develops a schedule of its own, and it does not care that your putty knife is still in the garage.
- Awl, screwdriver, or small probe
- Paint scraper and stiff brush
- Chisel, rotary tool, or drill with suitable bits
- Shop vacuum
- Moisture meter, if available
- Wood consolidant compatible with the filler
- Two-part epoxy wood filler
- Disposable mixing board or plastic container
- Measuring tools recommended by the manufacturer
- Plastic putty knives and sculpting tools
- Painter’s tape and plastic sheeting
- Rasp, file, utility knife, and sandpaper
- Exterior primer, paint, and paintable exterior sealant
- Chemical-resistant gloves, protective eyewear, and suitable dust protection
Use a consolidant and filler that are approved to work together. Do not improvise the mixing ratio or thin a product with a random solvent. Epoxy chemistry is less forgiving than pancake batter; adding “just a little extra” hardener usually does not make it cure better or faster.
Research basis:
How to Fill Rotted Trim with Two-Part Epoxy
1. Find and Correct the Moisture Source
Rot is a moisture problem before it is a filler problem. Inspect the area above, behind, and beside the damaged trim. Common causes include failed caulk, missing flashing, leaking gutters, poorly sloped sills, open end grain, roof runoff, condensation, and joints that trap water.
Repair the leak or drainage problem before rebuilding the trim. A patch placed over continually wet wood may look excellent for a season while decay keeps working behind it like a tiny demolition crew.
Horizontal surfaces should shed water rather than hold it. When rebuilding a sill or ledge, preserve or restore its outward slope. Drip grooves, intact flashing, sealed joints, and properly maintained paint all help keep water from returning.
Research basis:
2. Probe the Wood and Mark the Damage
Press an awl or screwdriver into the suspicious area. Sound wood usually resists the tool and produces longer, fibrous splinters when pried. Decayed wood feels soft and may break into short, irregular fragments. Probe beyond the visible paint failure because a thin exterior shell can hide a hollow or severely weakened center.
Outline the damaged zone with a pencil. Continue checking until you understand where the soft wood ends and solid material begins. This prevents the classic mistake of filling the first visible hole while leaving a soft, damp pocket underneath it.
Research basis:
3. Remove Paint and Excavate Loose Rot
Scrape away peeling paint, failed caulk, loose fibers, and crumbly wood. A chisel works well for controlled removal, while a rotary tool can reach irregular cavities. Work carefully near glass, flashing, siding, and decorative edges.
Do not leave material that resembles damp breakfast cereal simply because a consolidant is available. Penetrating epoxy can reinforce weakened fibers, but it performs best after very soft and detached material has been removed. The goal is to reach wood that is imperfect yet capable of forming a dependable bond.
Vacuum the cavity thoroughly. Dust, paint chips, oil, and loose debris interfere with adhesion. The surface should be clean enough that the epoxy contacts wood rather than a geological layer of old renovation history.
Research basis:
4. Let the Wood Dry
Drying is one of the least exciting steps and one of the most important. Wet wood does not absorb consolidant predictably, and sealing moisture inside the repair can encourage additional deterioration.
Protect the opening from rain and allow natural airflow to dry it. A fan can help. Gentle heat may be permitted by some product manufacturers, but excessive heat can damage nearby paint, glass, sealants, or the wood itself. Check the epoxy label for its acceptable application temperature and moisture conditions.
A moisture meter provides more confidence than touching the surface and announcing, “Feels dry to me.” Different systems publish different limits, so follow the instructions for the product being used.
Research basis:
5. Apply the Wood Consolidant
Mix the consolidant in the exact proportions specified by the manufacturer. Brush it into the remaining porous wood, paying attention to end grain, cracks, drilled pockets, and the edges of the cavity. Very absorbent wood may require more than one application.
Some repair systems allow the filler to be applied while the consolidant remains tacky. Others require a defined curing period. Treat the product instructions as the boss of the project. Advice from a different epoxy brand may use different ratios, timing, and application methods.
A shiny film may indicate that the wood has stopped rapidly absorbing the liquid, but the correct stopping point depends on the system. Avoid leaving deep pools unless the instructions specifically permit them.
Research basis:
6. Mix Small Batches of Epoxy Filler
Measure equal or specified quantities of resin and hardener using separate tools when required. Blend them until the mixture has a uniform color and consistency, scraping the mixing surface and folding the material repeatedly.
Mix only what you can place during the product’s working time. Larger batches can generate more heat and may harden sooner. Hot weather also tends to shorten working time, while cooler conditions often slow the reaction.
For a first attempt, a small batch is far easier to control. Running out and mixing more epoxy is mildly annoying. Watching an oversized batch turn into a smoking hockey puck is considerably more memorable.
Research basis:
7. Pack, Build, and Shape the Repair
Press the epoxy firmly into the cavity so it contacts the treated wood without leaving hidden air pockets. Begin with a thin layer against the surface, then add enough material to rebuild the missing area.
For large or deep repairs, follow the manufacturer’s instructions on maximum thickness and layering. Some fillers can be placed in a substantial mass, while others perform better in thinner applications. Slightly overfill the repair so there is enough material for final sanding.
Shape the epoxy while it remains workable. A plastic spreader can recreate flat trim, while a narrow putty knife works around corners. For molding, cut a flexible plastic scraper to match an undamaged part of the profile, then draw it across the fresh filler. Painter’s tape or temporary forms can support edges until the material begins to hold its shape.
Do not chase perfection while the epoxy is becoming sticky. Establish the major form, remove obvious excess, and save the final refinement for carving and sanding.
Research basis:
8. Allow the Epoxy to Cure
Cure time varies widely by formulation, temperature, repair depth, and batch size. Some fast-setting products can be worked within an hour, while slower architectural epoxies may require much longer before sanding or painting.
Do not judge curing by the clock alone. The filler should be firm throughout, not merely dry on the surface. Sanding partially cured epoxy can clog paper, tear the edges, and produce a finish resembling chewed gum with ambition.
Research basis:
9. Carve and Sand the Profile
When the filler reaches the appropriate stage, trim high spots with a utility knife, rasp, file, or sharp chisel. Some products are easiest to carve before reaching full hardness. Finish with medium-grit sandpaper and move to a finer grit for a smooth transition into the surrounding wood.
Use a sanding block on flat trim to avoid creating dips. Wrap sandpaper around a dowel for concave shapes or use a custom profile block for molding. Feather the edges without removing excessive sound wood.
Vacuum the dust rather than blowing it across the work area. Epoxy and old-paint dust should not become an unplanned seasoning for your lunch.
Research basis:
10. Prime, Seal, and Paint
Most exterior epoxy repairs should be protected from sunlight and weather with a compatible primer and high-quality exterior paint. Epoxy generally does not accept stain like natural wood, so painted trim is the ideal application.
Prime the repaired area and any exposed wood. Seal appropriate joints with a paintable exterior sealant, but do not caulk locations that need to drain. Apply the finish coats over the repair and adjacent trim so the patch disappears into a continuous protective surface.
Check the repair periodically. Paint failure, opening joints, and renewed moisture should be corrected before they develop into another excavation project.
Research basis:
Safety Precautions for Epoxy Wood Repair
Uncured epoxy components can irritate skin and may cause sensitization after repeated exposure. Wear protective eyewear and chemical-resistant gloves recommended by the product manufacturer. Avoid touching resin or hardener with bare hands, even when someone claims they have done it for years without trouble.
Work in a well-ventilated area and review the product label and safety data sheet before beginning. Use suitable protection when scraping paint, machining cured epoxy, or sanding. Keep dust controlled with local collection or a vacuum, and wash exposed skin promptly according to the manufacturer’s guidance.
Do not use solvents to clean epoxy from your skin. Use the cleaning method specified by the manufacturer, and discard contaminated mixing tools and gloves responsibly.
Research basis:
Common Epoxy Trim Repair Mistakes
Covering Rot Without Fixing the Leak
A beautiful patch cannot compensate for failed flashing or water trapped behind the trim. Moisture control comes first.
Leaving Too Much Soft Wood
Consolidant strengthens marginal fibers; it does not transform a cavity full of loose pulp into reliable lumber.
Applying Epoxy to Damp or Dirty Surfaces
Moisture, dust, grease, and loose paint weaken adhesion. Clean and dry preparation is less glamorous than sculpting, but it determines whether sculpting was worth doing.
Guessing the Mixing Ratio
Incorrect proportions can produce soft, sticky, brittle, or incompletely cured material. Measure accurately and mix until completely uniform.
Mixing Too Much at Once
Large batches may heat up and lose workability quickly. Several small batches provide more control and less waste.
Forgetting the Final Coating
Exterior epoxy repairs usually require primer and paint for ultraviolet and weather protection. Leaving the patch bare is like repairing a roof and declining to install shingles because the plywood looks cheerful.
Research basis:
Experience Notes: Lessons from Real-World Epoxy Trim Repairs
The most useful lesson from practical epoxy repair is that the visible damage rarely tells the whole story. A quarter-sized soft spot may expand into a cavity several inches wide after the paint is removed. This is not necessarily bad news. Discovering the true boundary of the decay before filling it is far better than finding it six months later when the patch begins moving.
A common first-time mistake is being too gentle during excavation. The person doing the repair removes only the wood that falls away easily, applies consolidant, and starts filling. The epoxy seems solid, but the perimeter remains attached to questionable fibers. A better approach is to keep probing until the tool consistently meets resistant wood. The finished cavity may look alarmingly large, yet the eventual bond is much more dependable.
Another experience-based lesson involves weather. Repairing a south-facing window on a warm afternoon can feel like competing on a television cooking show. The batch that seemed comfortably workable in the shade may stiffen quickly once placed on hot trim. Small batches, shaded containers, and early-morning work provide more control. In cooler weather, the opposite problem occurs: the filler may stay soft longer than expected. Patience is cheaper than loading uncured epoxy with sanding dust.
Profiles are also easier to reproduce than many homeowners expect. Consider a rotted decorative window sill with a rounded front edge. Trying to sculpt the entire curve by eye often creates a lumpy result. A more reliable method is to copy the undamaged profile onto a piece of flexible plastic and cut the edge into a template. Pulling that template across the fresh epoxy establishes the basic curve in seconds. After curing, only modest filing and sanding are needed.
Deep corner repairs teach another practical lesson: build support before adding filler. Painter’s tape, a scrap of smooth plastic, or a temporary wood form can hold the underside of a missing corner. Without support, gravity slowly turns the carefully shaped repair into an epoxy stalactite. The form should be made from a material that the product will not permanently bond to, or protected with an approved release method.
It is also wise to stop shaping at the right moment. Fresh epoxy begins smooth and cooperative, then enters a sticky stage in which every touch leaves a fingerprint, ridge, or tool mark. Continuing to fuss with the repair often makes it worse. Once the major shape is correct, step away. A cured high spot can be removed with a rasp; a sticky crater created by overworking is much more irritating.
One of the most satisfying repair scenarios involves older trim that is difficult to replace. Removing a custom sill or ornate molding may disturb siding, plaster, flashing, or historic material. Rebuilding one localized section with epoxy preserves the surrounding craftsmanship and avoids turning a small repair into a weeklong reconstruction. This is where two-part epoxy provides its greatest value: not merely filling a hole, but allowing sound original material to remain in service.
The final lesson is maintenance. After the patch has been primed and painted, inspect the area during normal exterior upkeep. Watch for cracking sealant, peeling paint, gutter overflow, or water collecting on horizontal surfaces. A five-minute inspection after a storm can prevent another afternoon spent wearing gloves and negotiating with a container of rapidly curing putty.
Experience section synthesized from established repair procedures and recurring application issues:
Conclusion
Filling rotted trim with two-part epoxy is an effective way to preserve localized sections of exterior wood without replacing an entire board. The repair can restore corners, profiles, sills, casings, and decorative details while creating a sandable and paintable surface.
The key is treating the project as moisture management and wood restoration, not merely hole filling. Correct the water source, remove loose decay, dry the remaining wood, apply a compatible consolidant, mix the filler accurately, and protect the finished repair with primer and paint. When the damage is too extensive or structurally important, replacement or a properly fitted wood splice remains the safer choice.
Done carefully, an epoxy patch can blend so well that visitors will never know the trim was once soft enough to excavate with a spoon. That is the finest kind of home repair: durable, nearly invisible, and no longer plotting against your paint job.
Research synthesis includes guidance from U.S. government preservation and safety resources, epoxy manufacturers, and established home-repair publications:
Note: Epoxy formulations differ in mixing ratio, working time, cure time, application temperature, layer thickness, and safety requirements. Always follow the current label, technical data sheet, and safety data sheet supplied with the specific products used.