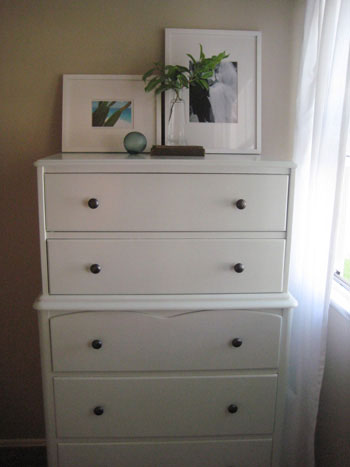

Some furniture sits in a room politely. Other furniture sulks in the corner like it knows it peaked in 1998. A tired dresser with scratched wood, mystery stains, chipped corners, and drawer bottoms that look like they have survived three apartments and one glitter phase is exactly the kind of piece worth saving. Repainting a dresser and lining the drawers with contact paper is one of those DIY projects that feels small at first, then suddenly makes the whole room look more intentional.
The beauty of this project is that it does not require a professional workshop, a design degree, or the kind of tool collection that needs its own ZIP code. With basic prep, the right paint, patience between coats, and a roll of contact paper, you can turn an outdated dresser into a clean, stylish, useful piece of furniture. Even better, drawer liner hides old drawer bottoms, protects clothing, adds pattern, and gives you a happy little surprise every time you reach for socks.
Why Repaint A Dresser Instead Of Replacing It?
Repainting a dresser is practical, budget-friendly, and often more satisfying than buying something new. Many older dressers are built from solid wood or sturdy veneer over wood, which can be stronger than inexpensive flat-pack furniture. If the drawers still slide well, the frame is square, and the piece is structurally sound, paint can do wonders.
A dresser makeover also lets you customize the color, finish, and hardware. Instead of searching for the perfect navy blue dresser with brass knobs and a clean cottage look, you can make one. Instead of settling for plain white furniture, you can choose sage green, warm cream, matte black, dusty rose, charcoal, or a cheerful yellow that says, “Yes, I own a glue gun and I am not afraid to use it.”
Lining the drawers with contact paper adds the finishing touch. It makes the inside feel clean and deliberate, especially if the drawer bottoms are stained, worn, or mismatched. A patterned liner can bring personality to a simple painted dresser, while a neutral liner can make the whole piece look polished and calm.
What You Need For Repainting A Dresser
Before opening a paint can, gather your supplies. DIY projects go much more smoothly when you are not hunting for a screwdriver with wet primer on your hands.
Basic Supplies
- Screwdriver or drill for removing hardware
- Painter’s tape
- Drop cloth or old sheet
- Mild soap, water, and clean rags
- Degreaser if the dresser is especially grimy
- Wood filler for dents or gouges
- Putty knife
- Medium-grit and fine-grit sandpaper or sanding sponge
- Tack cloth or microfiber cloth
- Primer suitable for wood, veneer, laminate, or previously painted surfaces
- Furniture paint, cabinet paint, enamel paint, chalk paint, or acrylic interior paint
- Paintbrush for corners and details
- Small foam roller or fine-finish roller for flat surfaces
- Clear protective topcoat, wax, or polyurethane if needed
- Contact paper or drawer liner
- Measuring tape
- Scissors or craft knife
- Straight edge or ruler
- Plastic scraper, old credit card, or smoothing tool
Step 1: Inspect The Dresser Before You Paint
Start by checking the dresser carefully. Pull out every drawer and look for loose joints, broken tracks, missing screws, warped drawer bottoms, peeling veneer, or wobbly legs. Paint is magical, but it is not a structural engineer. If the dresser leans like it has had a long day, fix the frame before you decorate it.
Open and close each drawer. If one sticks, check whether the track needs cleaning, sanding, tightening, or a little wax on the wooden runner. If the drawer bottom sags, reinforce it before lining it. Contact paper can hide ugly; it cannot hold up a collapsing drawer full of jeans.
If the dresser is very old or you suspect it may have lead-based paint, do not start sanding casually. Vintage painted furniture can contain lead, especially pieces made before 1978. Use a lead test kit or consult a professional before disturbing old paint. Safety is not the glamorous part of a furniture makeover, but neither is accidentally creating hazardous dust in your craft corner.
Step 2: Remove Drawers And Hardware
Take out all the drawers and remove knobs, pulls, backplates, and any decorative hardware. Place screws in a small labeled bag so they do not disappear into the same mysterious universe as missing socks. If you plan to reuse the hardware, clean it while the paint dries. If you are upgrading to new pulls, measure the existing hole spacing before shopping.
Removing hardware gives the dresser a cleaner paint finish and keeps you from painting around knobs, which usually looks like the dresser got ready in a hurry. It also prevents paint from sealing drawers shut. Few things are more humbling than realizing you have created a decorative storage box that no longer opens.
Step 3: Clean The Surface Thoroughly
Cleaning is the least exciting step, but it is one of the most important. Paint does not stick well to dust, hand oils, furniture polish, candle soot, or whatever that sticky spot is on the lower drawer. Wash the dresser with mild soap and warm water, then wipe it dry. For greasy or glossy furniture, use a suitable degreaser and rinse away residue according to the product directions.
Pay special attention to drawer fronts, corners, and the top surface. Dressers collect body oils, cosmetics, hair products, and dust. If you skip cleaning, the paint may bubble, peel, or fisheye. Translation: your “simple weekend makeover” becomes a “why is this happening to me?” situation.
Step 4: Sand For Better Adhesion
Sanding helps paint grip the surface. You usually do not need to sand down to bare wood unless the finish is damaged, peeling, or uneven. For most dressers, scuff sanding with medium-grit sandpaper followed by fine-grit sandpaper is enough. The goal is to dull the shine, smooth rough spots, and create a surface that primer can hold onto.
Sand with the grain when working on real wood. On veneer or laminate, be gentle. Thin veneer can be damaged if you sand too aggressively, and laminate needs abrasion without gouging. After sanding, wipe away every bit of dust with a tack cloth or clean microfiber cloth. Dust left behind becomes tiny bumps in the paint, and suddenly your dresser has texture you did not order.
Step 5: Fill Holes, Dents, And Old Hardware Marks
If the dresser has dents, chips, scratches, or hardware holes you no longer need, fill them with wood filler. Apply a small amount with a putty knife, smooth it flat, let it dry completely, and sand it flush. This is especially useful if you are changing from two-hole drawer pulls to single knobs or modern handles with a different spread.
Do not rush this step. Paint highlights imperfections more than you might expect, especially in satin or semi-gloss finishes. A few minutes of filling and sanding can make the difference between “custom furniture makeover” and “painted over a crime scene.”
Step 6: Prime The Dresser
Primer improves adhesion, blocks stains, and helps paint cover evenly. Choose the primer based on the dresser material. Bare wood, stained wood, laminate, glossy finishes, and previously painted furniture may all need different primer types. Bonding primer is especially helpful for laminate or slick surfaces. Stain-blocking primer is smart if the dresser has tannins, water marks, smoke odor, or dark stain that may bleed through light paint.
Apply primer in thin, even coats. Use a brush for carved trim and corners, then a small roller for flat areas. Let it dry fully. Lightly sand the primer with fine-grit sandpaper, then wipe away dust. This creates a smoother base for paint and helps eliminate brush marks or raised grain.
Step 7: Paint The Dresser In Thin Coats
Now comes the fun part: color. Apply paint in thin coats rather than one thick coat. Thick paint can sag, drip, stay tacky, and collect brush marks. Thin coats dry more evenly and usually look more professional. Brush in the direction of the wood grain where possible, and use a roller on wide flat areas such as the top, sides, and drawer fronts.
Most dressers need two coats of paint. Dark colors over light primer may need two; light colors over dark wood may need three. Let each coat dry according to the paint manufacturer’s directions. If the surface feels rough between coats, lightly sand with fine-grit sandpaper and wipe clean before painting again.
Choosing The Best Paint Finish
A matte or chalky finish can look soft and vintage, but it may need a protective topcoat on high-use surfaces. Satin is a great middle ground because it offers subtle sheen and better wipeability. Semi-gloss is durable and easy to clean, though it shows surface imperfections more clearly. For a child’s room, guest room, or daily-use dresser, durability matters. A dresser top becomes a landing strip for keys, books, jewelry, water glasses, and the occasional snack you swore you were not eating in the bedroom.
Step 8: Seal The Painted Finish
Whether you need a topcoat depends on the paint. Some cabinet and furniture paints cure to a durable finish without extra sealing. Chalk paint, milk paint, and matte paints often benefit from wax, polycrylic, or another clear protective coat. Use water-based clear coat over light colors to reduce the chance of yellowing. Apply thin coats and let each one dry completely.
Allow the dresser to cure before heavy use. Dry paint and cured paint are not the same thing. Paint may feel dry within hours but still be soft underneath. If you set lamps, books, or decor on it too soon, you may get dents, sticking, or marks. Patience here is annoying but worthwhile.
Step 9: Line The Drawers With Contact Paper
Once the paint is drying or curing, turn your attention to the drawer interiors. Contact paper can refresh old drawer bottoms, protect surfaces, and add style. Choose a pattern that complements the dresser color. Floral contact paper looks charming inside a white or sage dresser. Faux wood grain can warm up a modern painted piece. Marble, linen, geometric, peel-and-stick wallpaper, or simple solid liner can all work beautifully.
Clean The Drawer Bottoms First
Vacuum each drawer, then wipe the inside with a damp cloth. Let the drawer dry completely before applying adhesive liner. Contact paper sticks best to a clean, dry, smooth surface. If the drawer bottom is rough, splintered, or unfinished, lightly sand it and remove the dust. If it is severely stained, you can paint the drawer interior first or use a non-adhesive liner instead.
Measure And Cut Carefully
Measure the inside width and depth of the drawer bottom. Add a tiny bit extra if you prefer to trim in place, or cut exactly to size if you are confident. Many contact paper rolls have a grid on the backing, which makes straight cutting much easier. Use scissors for simple cuts or a craft knife with a ruler for crisp edges.
If your drawers are not perfectly square, make a paper template first. Old furniture often has personality, which is a polite way of saying one side may be slightly wider than the other. A template prevents wasting liner and keeps you from muttering at a rectangle that refuses to behave.
Apply Contact Paper Without Bubbles
Peel back only one or two inches of the backing at first. Align the exposed adhesive with the back edge of the drawer, press it down, and smooth it firmly. Then slowly pull away more backing while using a scraper, ruler edge, or old credit card to press the paper into place. Work from the center outward to push air bubbles toward the edges.
If a bubble appears, lift the paper gently if the adhesive allows it and smooth again. For stubborn tiny bubbles, prick them with a fine pin and press the air out. Go slowly. Contact paper rewards calm hands and punishes overconfidence.
Adhesive Vs. Non-Adhesive Drawer Liner
Adhesive contact paper is great when you want a smooth, permanent-looking finish. It stays put, wipes clean, and works well for drawer bottoms that need cosmetic help. However, it can be harder to remove later and may leave residue on delicate or unfinished wood.
Non-adhesive drawer liner is better for valuable antiques, unfinished wood, rental furniture, or anyone who changes their mind seasonally. It can be cut to fit, lifted out for cleaning, and replaced easily. For clothing drawers, smooth liners are often better than highly textured grip liners because fabric slides in and out more easily.
Hardware Makes The Makeover Feel Finished
After repainting the dresser and lining the drawers, hardware is the jewelry. Old knobs can be cleaned, polished, painted, or replaced. Brass pulls can make a navy dresser look classic. Matte black knobs can modernize a warm wood-toned or white piece. Ceramic knobs can lean cottage, vintage, or playful. Leather pulls create a soft modern look.
Before drilling new holes, place the hardware on the drawer fronts and step back. Check alignment, spacing, and scale. Oversized handles can overwhelm small drawers, while tiny knobs may look lost on a large dresser. If you are replacing pulls, use a hardware template to keep everything straight. Crooked hardware is small, but once you see it, you cannot unsee it.
Common Mistakes To Avoid
Skipping Prep
Cleaning, sanding, and priming are not optional if you want a durable result. Paint failure usually starts before the paint goes on.
Painting Too Thickly
Thick coats take longer to dry and are more likely to drip or peel. Thin coats look smoother and last longer.
Reassembling Too Soon
Let paint cure before sliding drawers in and out repeatedly. Fresh paint can stick to contact points, especially in humid weather.
Using The Wrong Liner
Adhesive liner is not ideal for every drawer. Use removable or non-adhesive liner when preserving original wood matters.
Ignoring Safety
Anchor tall dressers to the wall, especially in homes with children. A beautiful dresser should hold sweaters, not become a household hazard.
Style Ideas For Painted Dressers With Contact Paper Drawers
For a modern farmhouse dresser, paint the exterior warm white or greige and line the drawers with subtle gingham or botanical contact paper. Add dark bronze cup pulls for a classic look.
For a bold bedroom accent, paint the dresser deep green or navy and use brass hardware. Inside the drawers, choose a peel-and-stick liner with a cream floral, art deco pattern, or soft geometric print.
For a kid’s room, pick a cheerful color such as sky blue, coral, butter yellow, or mint. Use wipeable contact paper with stars, animals, rainbows, or simple stripes. The liner makes cleanup easier when tiny treasures, stickers, and mystery crumbs appear.
For a minimalist look, paint the dresser matte black, charcoal, or soft taupe. Use a linen-look drawer liner and simple bar pulls. The outside stays calm while the inside looks clean and intentional.
Maintenance Tips After The Makeover
Clean the painted dresser with a soft damp cloth. Avoid harsh chemical cleaners unless the paint or topcoat manufacturer says they are safe. Use coasters or trays on the top surface if you keep perfume, plants, candles, or water glasses there. Moisture and painted furniture are not best friends.
For contact paper drawers, wipe spills quickly. If an edge lifts, press it down again or use a small amount of removable adhesive if appropriate. If the liner gets damaged, replace just that drawer’s piece. One of the best parts of drawer liner is that it is forgiving. Unlike wallpapering a whole room, a drawer liner mistake does not require emotional support snacks.
Personal Experience: What Repainting A Dresser Actually Teaches You
The first thing this project teaches is that furniture has secrets. A dresser may look simple from across the room, but once you remove the drawers, you discover old dust, loose screws, a forgotten button, and maybe a pencil from a school year nobody wants to discuss. Cleaning it out feels strangely satisfying, like giving the piece a fresh start before the pretty part begins.
The second lesson is that prep work is where the makeover is won. I have tried the “just paint it and hope” method, and hope is not a primer. Paint over glossy furniture without sanding or priming and you may be able to scratch it off with a fingernail. That is not rustic charm; that is regret with a satin finish. Taking time to wash, sand, prime, and lightly sand again makes the paint look smoother and stay put.
Color choice is another surprisingly emotional chapter. A paint swatch that looks calm and elegant in the store can look wildly different in bedroom lighting. Soft white may turn yellow. Gray may go blue. Green may suddenly decide it is a pickle. Testing color on the dresser or on a scrap board near the room is worth it. Dressers are large enough to influence a room, so the color should work with the wall color, flooring, bedding, and existing furniture.
Contact paper also has a personality. It behaves best when you move slowly. The easiest method is to peel just a little backing, line up the edge, smooth it down, and continue inch by inch. Pulling the entire backing off at once is how a person ends up wrestling a sticky floral octopus. A smoothing tool helps, but an old gift card works perfectly. Start in the center and push outward. If the liner has a repeating pattern, check that it is straight before committing. A crooked stripe inside a drawer is not the end of civilization, but it will quietly bother detail-oriented people forever.
One useful trick is to line the drawers after painting but before reinstalling the hardware and loading everything back in. Empty drawers are easier to flip, measure, clean, and line. Another good habit is labeling drawer contents before putting them back. A refreshed dresser deserves better than returning to chaos fifteen minutes later.
The most rewarding moment comes at the end, when the drawers slide back in, the hardware is tightened, and the contact paper peeks out like a tiny design secret. The dresser no longer looks like something you meant to replace. It looks chosen. It looks cared for. And every time you open a drawer, there is that little flash of pattern reminding you that good design does not have to be expensive. Sometimes it is just paint, paper, patience, and the courage to believe an ugly dresser can have a second act.
Conclusion
Repainting a dresser and lining the drawers with contact paper is a high-impact DIY project that combines function, beauty, and budget-friendly creativity. The process is simple, but the details matter: inspect the furniture, clean it well, sand for adhesion, prime properly, paint in thin coats, protect the finish when needed, and apply drawer liner slowly for a smooth result. Whether you want a modern dresser makeover, a vintage furniture refresh, or a practical way to hide worn drawer bottoms, this project delivers. Best of all, it lets you keep a useful piece out of the landfill while creating furniture that fits your home, your style, and your sock-storage ambitions.