
Putting in a hoop nose ring sounds easy until you are standing in front of the mirror, one eye watering, one hand holding a tiny piece of jewelry, and your nose acting like it has never met you before. The good news? Once you understand the type of hoop you have, the process becomes much less dramatic. The even better news? Your nose does not need to be wrestled into submission like a suitcase zipper before vacation.
This guide explains 3 ways to put a hoop nose ring in, including how to insert a hinged clicker ring, a seamless hoop, and a captive bead or segment ring. You will also learn how to prepare your piercing, avoid common mistakes, and know when it is smarter to visit a professional piercer instead of turning your bathroom into a tiny jewelry repair shop.
Before we begin, one important rule deserves the spotlight: only change your nose jewelry when the piercing is fully healed. A nostril piercing may look calm on the outside while still healing inside. Changing jewelry too early can cause irritation, swelling, bumps, bleeding, or infection. If your piercing feels sore, crusty, hot, swollen, or angry enough to have its own personality, wait and ask a reputable piercer for help.
Before You Put in a Hoop Nose Ring
A smooth jewelry change starts before the hoop touches your nose. Think of this part as the “measure twice, insert once” stage. Your goal is to keep everything clean, calm, and correctly sized.
Wash your hands first
Always wash your hands thoroughly with soap and water before touching your piercing or jewelry. Your fingers meet keyboards, phones, door handles, snacks, pets, and the mysterious dust of everyday life. Your nose piercing does not need a souvenir from any of that.
Clean the jewelry and piercing area
Use sterile saline wound wash to gently clean around the piercing. Avoid harsh cleaners like hydrogen peroxide, rubbing alcohol, iodine, or strong fragranced products because they can dry, sting, and irritate the skin. Pat the area dry with clean gauze or a disposable paper product rather than a cloth towel, which can snag jewelry and collect bacteria.
Make sure the hoop is the right size
Nose hoops are usually measured by gauge and diameter. The gauge is the thickness of the jewelry, while the diameter is the size of the ring from one side to the other. A hoop that is too tight may press into the piercing and create irritation. A hoop that is too large may spin, snag, or feel awkward. Common nostril jewelry sizes include 18 gauge and 20 gauge, but your best size depends on your piercing and anatomy.
Choose body-safe material
For comfortable long-term wear, many professional piercers recommend high-quality materials such as implant-grade titanium, solid 14k or 18k gold, niobium, or appropriate surgical steel. Avoid mystery metal, cheap plated jewelry, and anything that contains nickel if you are sensitive. A cute hoop is not worth a red, itchy nose rebellion.
Use good lighting and a steady mirror
Set yourself up with bright lighting and a clean mirror. If you are using a bathroom sink, cover the drain. Nose jewelry is tiny, slippery, and apparently born with the survival instinct of a runaway contact lens.
Way 1: How to Put in a Hinged Clicker Nose Hoop
A hinged clicker nose ring is often the easiest hoop style for beginners. It has a small hinged section that opens and closes with a click. This design is popular because you do not need to bend the ring out of shape or chase a bead across the counter.
Best for
Hinged clicker hoops are best for healed nostril piercings, septum piercings, and anyone who wants a simple open-and-close design. They are also helpful if you have long nails or limited patience with microscopic jewelry parts.
Step-by-step instructions
Step 1: Open the hinge. Hold the ring firmly on both sides and gently pull the hinged segment open. Do not yank it backward. It should swing open from one side like a tiny door.
Step 2: Find the piercing hole. If you are inserting the hoop into a nostril piercing, gently lift or steady your nostril so you can see the opening. Some people find it easier to insert the ring from the outside inward. Others prefer inside outward, especially if the closure is easier to see on the outside. Use whichever direction lets the jewelry slide in smoothly.
Step 3: Insert the open end slowly. Place the smooth open end of the hoop into the piercing hole. Move slowly and follow the natural angle of the piercing channel. A healed piercing should not need force. If you feel sharp pain, stop.
Step 4: Rotate the hoop through. Once the end is inside the piercing, gently rotate the ring until the hinged opening is positioned where you can close it comfortably. Avoid dragging decorative parts through the piercing if the ring has gems, texture, or raised details.
Step 5: Click it closed. Line up the hinged piece with the opposite side of the ring and press until you hear or feel a soft click. Check that the closure is fully secure, but do not squeeze your nose like you are testing fruit at the grocery store.
Common mistakes with clicker hoops
The biggest mistake is trying to close the clicker before the ends are aligned. This can pinch skin or leave the hoop partly open. Another mistake is inserting decorative sections through the piercing channel. Smooth metal should pass through the piercing; gems and designs should stay outside whenever possible.
Way 2: How to Put in a Seamless Nose Hoop
A seamless nose hoop, also called a continuous ring, has a small opening where the two ends meet. It looks clean and simple when closed, but it requires careful handling. The trick is to twist the ends sideways, not pull them apart.
Best for
Seamless hoops are great for people who want a minimal, classic nose ring with no visible bead or hinge. They work well in fully healed piercings when the ring is the correct size and the wearer is comfortable handling small jewelry.
Step-by-step instructions
Step 1: Locate the seam. Look closely for the tiny split in the hoop. If you cannot find it, rotate the ring slowly under bright light.
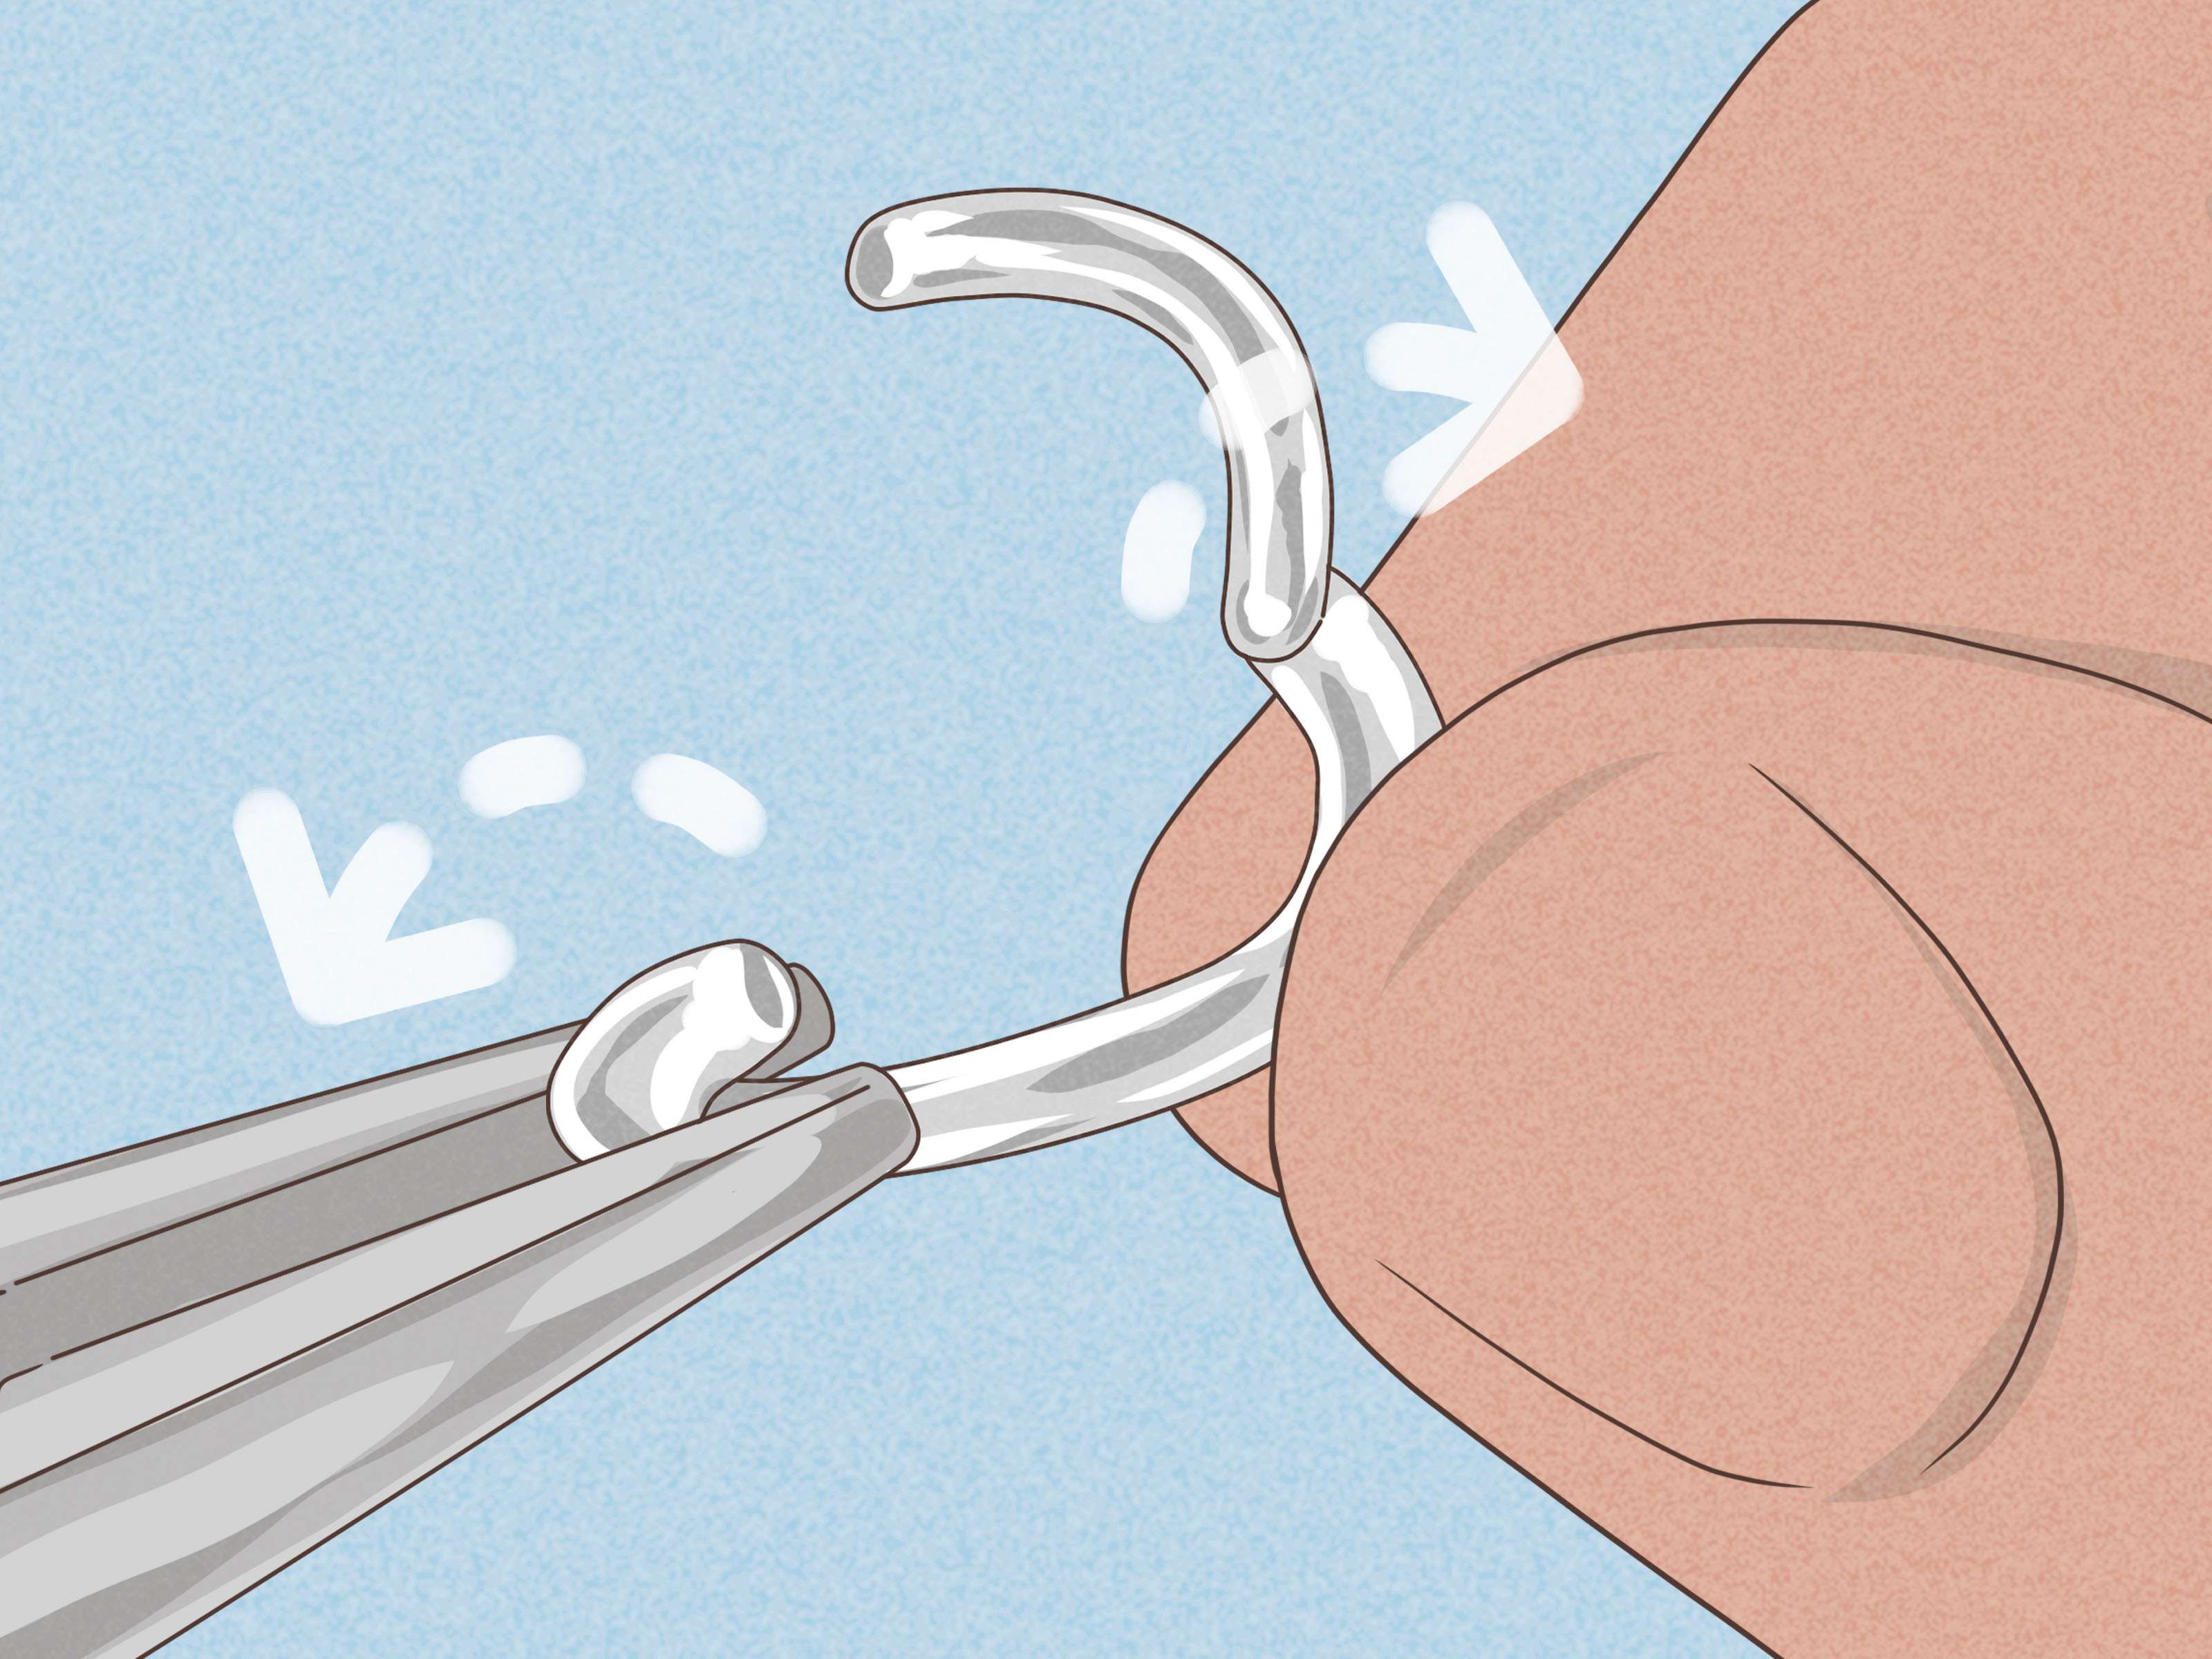
Step 2: Twist the ring open sideways. Hold one side of the ring with one hand and the other side with your other hand. Gently twist one end forward and the other end backward, like opening a spiral. Do not pull the ends straight away from each other. Pulling outward can warp the hoop into an oval or create a gap that will not close neatly.
Step 3: Insert one end into the piercing. Guide the smooth end through the piercing channel. Move slowly. If the end catches, back up slightly and adjust the angle instead of pushing harder.
Step 4: Rotate the hoop into place. Once the ring is through, rotate it until the seam is outside the piercing channel. The seam should not sit inside the hole because it may irritate the tissue.
Step 5: Twist the ends back together. Carefully reverse the opening motion and bring the ends back into alignment. The hoop should look round again, and the ends should meet evenly.
Helpful tip for seamless hoops
If the hoop does not close perfectly, do not keep bending it again and again. Metal fatigue is real, even if the ring is tiny and adorable. A professional piercer can adjust the hoop with proper tools so it keeps its shape and sits comfortably.
Way 3: How to Put in a Captive Bead or Segment Nose Ring
A captive bead ring holds a small bead in place with tension. A segment ring uses a removable curved piece that completes the circle. These rings can look sleek and secure, but they are often the trickiest to insert at home.
Best for
Captive bead and segment rings are best for people who already have experience changing body jewelry or who are willing to visit a piercer for help. They can be secure and stylish, but the small parts require patience, steady hands, and sometimes special tools.
Step-by-step instructions for a captive bead ring
Step 1: Remove the bead. Hold the ring gently and pop the bead out of the tension gap. Some beads have tiny dimples where the ring ends sit. Be careful: the bead may spring away if you use too much pressure.
Step 2: Insert one end of the ring. Guide one smooth end into the piercing hole and rotate the ring through until the opening is accessible.
Step 3: Seat one side of the bead. Place one dimple of the bead onto one end of the ring.
Step 4: Snap the other side into place. Gently push the bead so the other dimple catches the opposite end of the ring. This can take a few tries. If your hands start shaking or your language becomes spicy, pause and breathe.
Step-by-step instructions for a segment ring
Step 1: Remove the segment. Gently release the removable section from the ring. Depending on the style, it may pop out with pressure or require slight twisting.
Step 2: Insert the open ring. Slide one end through the piercing channel and rotate the ring until the gap is easy to reach.
Step 3: Replace the segment. Line up the removable segment with both open ends and snap it back into place. Make sure it is secure and smooth.
When to let a piercer handle it
If the ring is stiff, the bead will not stay in, the segment will not align, or the jewelry hurts, visit a professional piercer. There is no trophy for suffering through a difficult jewelry change. A piercer can insert it quickly, check the fit, and make sure the hoop is not irritating the piercing.
How to Know If Your Nose Piercing Is Ready for a Hoop
A nose piercing should be fully healed before you switch to a hoop. Healing time varies from person to person, and the outside can look healed before the inside is ready. A healed nostril piercing usually feels comfortable, has no swelling, does not bleed, has no ongoing crusting, and is not tender when gently touched.
If your piercing still gets irritated easily, forms bumps, drains fluid, or feels sore after sleeping on it, it may not be ready. Hoops move more than studs, and that movement can irritate a healing piercing. Many piercers start nostril piercings with a stud-style piece because it tends to stay more stable during early healing.
What to Do After Putting in a Hoop Nose Ring
Once your hoop is in, keep the area clean and leave it alone. Do not twist, spin, tug, or rotate the jewelry for entertainment. Your nose is not a fidget toy, even if the hoop is very tempting.
For the first day or two after changing jewelry, pay attention to how the piercing feels. A little awareness is normal. Sharp pain, heat, swelling, bleeding, thick discharge, or worsening redness is not normal. If symptoms do not settle quickly or seem to get worse, contact a professional piercer or healthcare provider.
Avoid applying makeup, heavy creams, sunscreen, or fragranced products directly around the jewelry immediately after changing it. These products can build up around the piercing and cause irritation. When washing your face, move gently around the hoop and pat dry instead of rubbing.
Common Problems and Easy Fixes
The hoop will not go through
Do not force it. The angle may be wrong, the jewelry may be too thick, or the piercing may have shrunk. Try relaxing your face, using better lighting, and gently adjusting the direction. If it still will not pass through, see a piercer before you create swelling.
The ring feels too tight
A tight hoop can press into the nostril and cause redness, dents, bumps, or discomfort. Switch to a larger diameter with help from a piercer.
The seam irritates the piercing
Rotate the hoop so the seam, hinge, bead, or segment is not sitting inside the piercing channel. Smooth metal should rest inside the hole whenever possible.
The piercing bleeds
Stop changing the jewelry. Clean gently with sterile saline and avoid touching it. If bleeding continues, pain increases, or swelling develops, get professional advice.
The jewelry falls out
Replace it quickly if the piercing is healed and calm. Nose piercings can shrink faster than people expect. If you cannot reinsert jewelry easily, visit a piercer as soon as possible.
Experience Notes: What It Is Really Like to Put in a Hoop Nose Ring
The first time many people change from a stud to a hoop, they expect a quick thirty-second swap. In reality, it often becomes a tiny lesson in patience, lighting, and humility. The piercing hole may be smaller than expected, the angle may feel strange, and the jewelry may seem determined to enter every direction except the correct one.
One common experience is discovering that nostril piercings are not always perfectly straight from the outside inward. The piercing channel may angle slightly upward, downward, or toward the inside of the nose. That is normal, but it means you need to follow the original path instead of pushing the hoop straight in. When the jewelry follows the correct angle, it usually slides much more comfortably.
Another real-life lesson is that hoop style matters. A hinged clicker can feel like a gift from the jewelry gods because it opens wide, slides through smoothly, and closes with a satisfying click. A seamless hoop, on the other hand, can look beautifully simple but requires gentle twisting and careful alignment. A captive bead ring may look innocent until the bead drops into the sink, bounces once, and vanishes into another dimension.
People also learn quickly that “fully healed” is not the same as “it looks fine today.” A piercing that feels calm with a stud may become irritated when a hoop is inserted because hoops move more. They can rotate, catch on towels, and shift while sleeping. If a bump appears after switching to a hoop, the issue may be movement, poor fit, low-quality jewelry, or changing too soon.
The best experience usually comes from preparing everything before starting. Wash your hands, clean the jewelry, cover the sink drain, and sit somewhere with good lighting. If you feel nervous, take a break. Rushing is how people bend seamless rings, drop beads, scratch jewelry, or irritate the piercing. Slow hands win this race.
It is also completely normal to need help. Many professional piercers are happy to change jewelry, especially if it is your first hoop or a more complicated style. This is not failure. It is wisdom with better lighting and better tools. A piercer can also confirm whether your hoop diameter fits your nostril, whether the gauge is correct, and whether your piercing is ready for a ring.
The most satisfying moment is when the hoop finally sits comfortably, the closure is secure, and the mirror confirms that yes, the look was worth the effort. A well-fitted hoop can feel light, stylish, and easy to wear. Just remember: clean hands, smooth jewelry, no force, and no panic. Your nose has been through enough drama for one accessory.
Final Thoughts
Learning how to put a hoop nose ring in depends on the style of hoop you choose. A hinged clicker is usually the easiest option, a seamless hoop gives a clean minimalist look, and a captive bead or segment ring offers secure style with a slightly higher difficulty level. No matter which method you use, the most important steps are the same: wait until the piercing is healed, wash your hands, use clean body-safe jewelry, move slowly, and never force the ring through.
If your piercing hurts, bleeds, swells, or refuses to cooperate, take that as useful feedback rather than a personal insult from your nose. Stop, clean the area gently, and ask a professional piercer for help. A good jewelry change should feel smooth, not like a battle scene in a very small war movie.
With the right hoop, careful technique, and a little patience, inserting a nose ring becomes much easier. Soon enough, you will be able to switch styles confidently and enjoy your hoop without the mirror-side panic.