
Note: This article is written as original, publish-ready web content and synthesizes practical air dry clay guidance from reputable craft, home decor, and art-supply resources without inserting source links.
If your home decor shelf is begging for something handmade, sculptural, and slightly more interesting than another candle you forgot to light, an air dry clay vase DIY project is the perfect weekend craft. You do not need a pottery wheel, a kiln, or the mysterious patience of a ceramic artist who can center clay while calmly sipping tea. Air dry clay lets beginners create beautiful vase-style decor using simple tools, a recycled container, and a little creative confidence.
The best part? Air dry clay has that soft, natural, handmade look that fits nearly every style: minimalist, boho, modern farmhouse, coastal, earthy, vintage-inspired, or “I saw this at a boutique and immediately whispered, ‘I can make that.’” Whether you want a textured bud vase for dried flowers, a sculptural mantelpiece, or a faux ceramic vase that looks expensive without requiring you to sell a kidney, this guide walks you through everything you need to know.
Before we begin, here is the honest clay truth: air dry clay is not the same as kiln-fired ceramic. It is porous, it can soften with water, and it is best used for decorative vases, dried stems, faux flowers, or as a clay-covered sleeve around a glass or plastic insert. With the right construction, drying, sanding, painting, and sealing steps, however, you can make a sturdy, stylish DIY clay vase that looks like it wandered out of a designer home catalog and into your living room.
What Is an Air Dry Clay Vase?
An air dry clay vase is a decorative vessel made from clay that hardens naturally when exposed to air. Unlike traditional pottery clay, it does not need to be fired in a kiln. This makes it beginner-friendly, affordable, and convenient for home crafting. You can build a vase entirely from clay for dry arrangements, or you can wrap clay around an existing jar, bottle, or glass vase to create a functional-looking decorative piece.
For fresh flowers, the safest method is to use a waterproof inner container, such as a glass jar, test tube, recycled spice jar, or narrow bottle. The clay becomes the beautiful outer shell, while the insert handles the water. Think of it like giving a plain jar a fabulous clay coat. Practical and stylishbasically the craft version of a trench coat.
Why Choose Air Dry Clay for a DIY Vase?
Air dry clay is popular because it is easy to shape, widely available, and forgiving for beginners. If you make a mistake, you can smooth it with a damp finger, trim it with a craft knife, or call it “organic texture” and pretend it was intentional. That last trick works alarmingly well.
Another major advantage is accessibility. You can find air dry clay at craft stores, art-supply shops, big-box retailers, and online. Common tools include a rolling pin, a craft knife, sandpaper, water, acrylic paint, and a sealant. Many of these items may already be lurking in your junk drawer, patiently waiting for their moment of glory.
A DIY air dry clay vase also gives you full control over shape, texture, and color. You can create a smooth modern cylinder, a rustic hand-built vase, a textured ribbed design, a speckled stoneware look, or a sculptural donut-style vase. The material invites experimentation, which is a polite way of saying you can mess around and still end up with something charming.
Materials You Will Need
Basic Supplies
- Air dry clay, preferably white or stone-colored
- A clean glass jar, bottle, or small vase as the base
- Rolling pin or smooth bottle
- Craft knife or clay cutting tool
- Small bowl of water
- Silicone mat, parchment paper, or wax paper
- Sandpaper or sanding sponge
- Acrylic paint
- Paintbrushes or sponge brush
- Acrylic varnish, matte sealer, or craft sealant
Optional Decorative Tools
- Comb for ribbed texture
- Toothpick or skewer for line details
- Lace, mesh, or fabric for pressed patterns
- Spackle knife or ruler for smoothing
- Gold leaf, metallic paint, or speckle paint
- Dried flowers, pampas grass, or faux stems
Step-by-Step Guide: How to Make an Air Dry Clay Vase
Step 1: Choose Your Vase Form
Start with a base shape. A recycled glass jar is great for beginners because it gives the vase structure and keeps the opening neat. Small olive jars, spice jars, sauce bottles, candle jars, and narrow drinking glasses all work well. Wash the container, remove labels, and dry it completely before adding clay.
If you want the vase to hold fresh flowers, choose a watertight insert and keep the inside free of clay. This helps prevent moisture from touching the clay layer. If you only plan to display dried stems, you can be more experimental with shape and structure.
Step 2: Prepare the Clay
Knead the air dry clay for a minute or two until it feels smooth and workable. This helps reduce stiffness and makes the clay easier to roll. Keep unused clay wrapped tightly in plastic or inside an airtight bag, because air dry clay begins drying the moment it meets air. It is dramatic like that.
If the clay feels slightly dry, add a tiny amount of water to your fingers and work it in gently. Avoid soaking it. Too much water can weaken the clay and increase the chance of cracks during drying.
Step 3: Roll Out an Even Sheet
Place the clay on parchment paper or a silicone mat and roll it into a sheet about 1/4 inch thick. Consistent thickness is important because thin areas may crack or break, while thick lumps may take much longer to dry. Aim for a slab large enough to wrap around your jar or bottle.
For an even slab, place two wooden dowels or pencils on either side of the clay and roll across them. This simple trick keeps the rolling pin from pressing the clay too thin. It is low-tech, affordable, and surprisingly satisfying.
Step 4: Wrap the Clay Around the Container
Carefully lift the clay sheet and wrap it around your clean container. Trim away extra clay with a craft knife, then press the seam together gently. Use a little water on your fingertip to smooth the joint. Do not flood the seam; a small amount of moisture is enough to blend the clay.
At the bottom, fold or trim the clay neatly around the base. If you want a perfectly flat bottom, press the vase gently onto your work surface and smooth the edge. If you prefer a rustic handmade look, leave a slightly organic base line. Imperfection is not failure hereit is personality with better lighting.
Step 5: Add Texture or Shape
This is where your air dry clay vase DIY project starts looking custom. Use a comb to drag vertical lines down the surface for a ribbed ceramic effect. Press lace into the clay for a romantic pattern. Add small clay coils, dots, arches, handles, or raised bands for a sculptural look.
For a modern organic vase, pinch and smooth the surface slightly so it looks hand-built rather than machine-made. For a minimalist design, keep the clay smooth and let the final paint color do the talking. A matte off-white finish can look beautifully expensive, especially when paired with dried eucalyptus, bunny tails, or pampas grass.
Step 6: Smooth the Surface
Dip your finger lightly in water and smooth rough edges, seams, and fingerprints. You can also use a damp sponge or soft brush. The goal is not to make the vase slippery wet; it is to soften surface marks and blend connections.
If cracks appear while you are working, make a small amount of clay slip by mixing clay with a few drops of water until it forms a paste. Rub this paste into small cracks and smooth the area. This works best before the piece is fully dry.
Step 7: Let the Vase Dry Slowly
Place the vase in a dry, well-ventilated area away from direct heat and strong sunlight. Drying time depends on clay thickness, humidity, room temperature, and the size of the vase. Many small air dry clay pieces need at least 24 to 72 hours, while thicker pieces may need longer.
Do not rush the process with a hair dryer, oven, or heater unless the clay manufacturer specifically says it is safe. Fast drying can cause cracks because the outside hardens before the inside has released moisture. Clay likes patience. Unfortunately, clay has never cared about our weekend schedule.
Step 8: Sand for a Finished Look
Once the vase is completely dry, sand rough edges and uneven areas with fine-grit sandpaper. Wear a basic dust mask and work in a ventilated area if sanding creates dust. Wipe the vase with a dry or barely damp cloth afterward to remove powder before painting.
Sanding is the step that takes a project from “cute craft” to “wait, did you buy that?” Focus on the rim, base, seam, and any areas that catch the light.
Step 9: Paint the Vase
Acrylic paint is a reliable choice for air dry clay. For a ceramic-inspired look, try warm white, stone gray, beige, terracotta, sage green, matte black, or muted blue. Apply thin coats and let each coat dry before adding the next. Thick paint can hide texture and create tacky spots.
For a speckled pottery effect, dip an old toothbrush into watered-down dark paint and flick tiny speckles onto the surface. Practice on scrap paper first unless you enjoy surprise polka dots on your table, your wall, and possibly your cat.
Step 10: Seal the Vase
After the paint is completely dry, apply a clear sealant. Matte acrylic varnish gives a natural ceramic look, while gloss varnish creates a shinier finish. Use thin, even coats and let each coat dry thoroughly. Sealing helps protect the surface from dust, handling, and light moisture, but it does not make air dry clay fully waterproof.
If you plan to use fresh flowers, place water only inside the glass insert, never directly into the clay. For long-term durability, treat the clay vase as decorative home decor rather than dishwasher-safe pottery. Wipe it gently with a dry or slightly damp cloth when needed.
Design Ideas for an Air Dry Clay Vase DIY Project
Minimalist White Bud Vase
Wrap a small glass bottle with clay, smooth the surface, and paint it matte white. Add one or two dried stems. This style looks clean, calm, and very “I have my life together,” even if there is laundry on the chair just outside the photo frame.
Textured Ribbed Vase
Use a comb, fork, or clay tool to create vertical grooves. Paint the finished piece in cream, tan, or charcoal. Ribbed texture catches shadows beautifully and gives the vase a more professional look.
Boho Terracotta Vase
Paint the vase in warm terracotta or clay orange. Add simple white line patterns, dots, or arches. Pair it with pampas grass, dried palm leaves, or wheat stems for a relaxed boho style.
Stone-Look Sculptural Vase
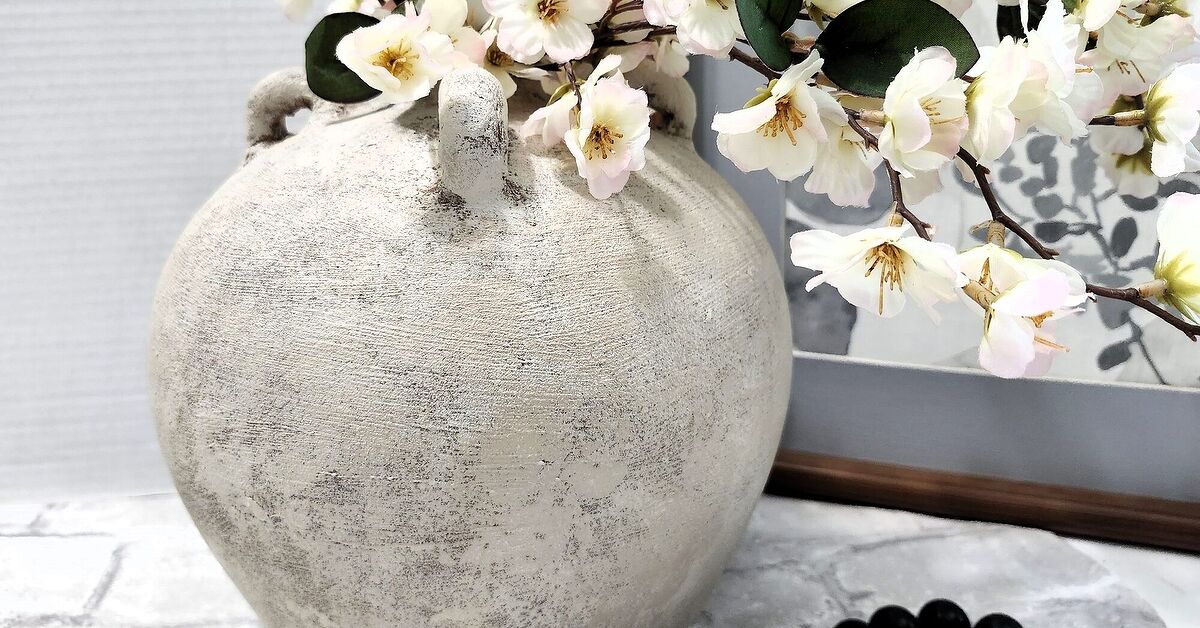
Mix beige, gray, and white paint to create a stone effect. Sponge the colors lightly over the surface and finish with a matte sealer. This works especially well on organic shapes with uneven texture.
Modern Handle Vase
Add two clay coils as side handles before the clay dries. Score both surfaces lightly, apply a little slip, attach the handles, and blend the edges. Handles can be decorative only, so avoid lifting the vase by them unless they are thick, secure, and fully dry.
Common Mistakes to Avoid
Using Too Much Water
Water helps smooth and join clay, but too much can weaken the structure. Use damp fingers rather than pouring water onto the clay. If the clay turns mushy, pause and let it firm up slightly before continuing.
Making the Clay Too Thin
Thin clay dries faster but can crack or chip more easily. For vase projects, about 1/4 inch is a practical target. Raised decorations can be slightly thicker, but avoid huge bulky areas that dry unevenly.
Drying the Vase Too Quickly
Heat is tempting, especially when you are excited to paint, but sudden drying can lead to cracking. Let the vase dry naturally in a stable environment. Good airflow is helpful; direct heat is not.
Expecting It to Hold Water Like Ceramic
Air dry clay is decorative, not kiln-fired stoneware. Even sealed pieces are not ideal for direct water exposure. Use an inner glass vessel for fresh flowers or style the vase with dried botanicals.
Skipping the Sealant
Sealant protects the paint and gives the surface a more finished look. It also makes cleaning easier. Choose matte for a handmade ceramic look or gloss for a glazed effect.
How to Style Your DIY Air Dry Clay Vase
Once your vase is dry, painted, and sealed, the fun continues. Place it on a bookshelf with stacked books, a small framed print, and a candle. Style it on a dining table with dried flowers for a simple centerpiece. Add it to a bathroom shelf with eucalyptus stems for a spa-like feel. Or group three vases of different heights together for a collected, designer-style arrangement.
For modern interiors, choose one color and keep the shape simple. For rustic or farmhouse spaces, embrace texture, uneven edges, and warm neutrals. For playful decor, paint graphic patterns, checkerboards, stripes, or colorful abstract shapes. The beauty of handmade clay decor is that it does not need to be perfect; it needs to feel personal.
Care Tips for Air Dry Clay Vases
Keep your vase indoors and away from heavy moisture. Avoid placing it outside, near a sink, or in a humid bathroom unless it is well sealed and used only decoratively. Dust it with a soft cloth and avoid scrubbing. If you use a glass insert for fresh flowers, remove the insert before changing water so spills do not run between the glass and clay.
If a small chip appears, you can often repair it with a bit of air dry clay or strong craft glue, then sand, repaint, and reseal the area. Handmade decor has a repair-friendly spirit, which is one of its quiet advantages over mass-produced pieces.
Personal Experience: What I Learned Making Air Dry Clay Vases
The first thing you learn from making an air dry clay vase is that clay has opinions. You may begin with a grand vision of a sleek museum-worthy vessel and end up negotiating with a seam that refuses to disappear. That is normal. In fact, the best results usually come when you stop fighting the material and start working with its natural texture.
One of the most useful lessons is to build around a form. Freehand vases are fun, but wrapping clay around a jar or bottle makes the project much easier for beginners. The base stays stable, the opening remains clean, and you do not have to worry about the vase collapsing like a sad pancake. A glass insert also solves the biggest practical issue: water. Instead of trying to make air dry clay behave like fired ceramic, let the glass hold the water and let the clay look beautiful.
Another lesson is that slow drying matters more than most beginners expect. It is tempting to place the vase near a sunny window or warm vent, especially when you are excited to paint it. But clay shrinks as it dries, and uneven drying can create cracks. The projects that turn out best are usually the ones left alone in a calm spot for a few days. Clay rewards patience, which is rude but true.
Texture is also your friend. A perfectly smooth vase can look elegant, but it shows every bump, fingerprint, and seam. A ribbed texture, pressed fabric pattern, or lightly hand-smoothed surface hides imperfections while adding character. If you are new to air dry clay, try a textured design before attempting a flawless minimalist cylinder. Your confidence will thank you.
Paint can completely change the final result. Plain white clay may look crafty at first, but a few thin coats of matte acrylic paint can create a high-end ceramic effect. Warm white, mushroom beige, soft gray, terracotta, and muted olive are especially forgiving colors. Speckling adds another layer of realism. A tiny flick of dark paint can make a simple clay vase look like handmade stoneware from a boutique shop.
Sealing is the final step that many people skip, but it makes a noticeable difference. A matte varnish gives the vase a soft, finished surface and helps protect the paint. Gloss sealant can be beautiful too, especially if you want a faux glazed look. The key is to use thin coats. Heavy sealer can pool in grooves, stay tacky, or make the surface look plastic instead of ceramic.
Perhaps the biggest experience-based tip is to make more than one vase. The first vase teaches you how the clay behaves. The second vase is usually better. By the third, you start experimenting with handles, sculptural curves, pressed textures, and custom colors. Small bud vases are great practice because they use less clay, dry faster, and look lovely in groups.
Air dry clay vase DIY projects are also surprisingly relaxing. There is something satisfying about shaping a plain lump of clay into an object that belongs on a shelf, table, or nightstand. It is creative without being intimidating, affordable without looking cheap, and flexible enough for both beginners and experienced crafters. Plus, when someone compliments your vase, you get to say, “Thanks, I made it,” which is one of the finest sentences in the English language.
Conclusion
An air dry clay vase DIY project is one of the easiest ways to create custom home decor without a kiln, pottery wheel, or professional studio. With a simple container, a slab of clay, a few basic tools, acrylic paint, and sealant, you can make a vase that feels personal, stylish, and genuinely handmade. The key is to keep the clay thickness consistent, dry it slowly, use a waterproof insert for fresh flowers, and finish the surface with care.
Whether you prefer a minimalist white bud vase, a rustic terracotta piece, a ribbed modern design, or a sculptural statement vase, air dry clay gives you room to experiment. It is beginner-friendly, budget-conscious, and wonderfully adaptable. Your first vase may not be perfect, but it will be yoursand honestly, that is the charm. Handmade decor should look like a human made it, not like it was assembled by a suspiciously talented robot in a warehouse.