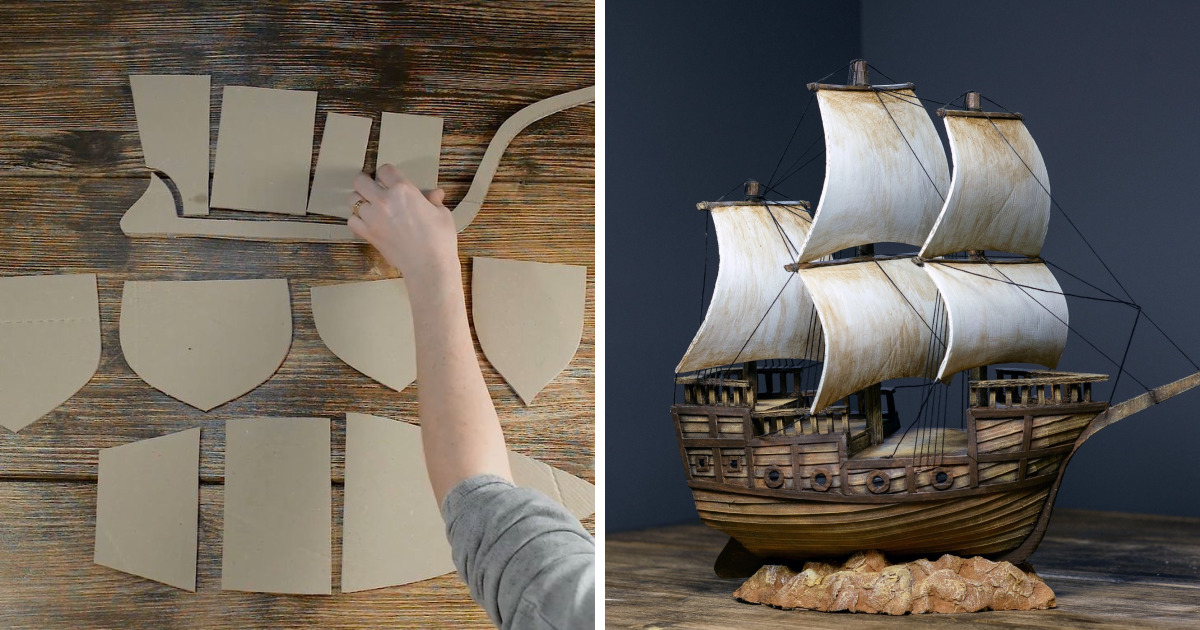

Every great adventure begins with a questionable decision. Mine started with three empty pizza boxes, a table full of crumbs, and the dangerous sentence, “I could totally turn this into a pirate ship.” The next thing I knew, I was elbows-deep in cardboard, hot glue, paint, paper sails, and the kind of creative confidence usually found in toddlers and shipwrecked billionaires.
The good news? A pizza box pirate ship is one of those DIY cardboard crafts that looks wildly impressive but begins with materials most people already have. Pizza boxes offer broad, flat panels for hull walls, decks, sails, windows, and tiny decorative pieces. Add egg cartons, paper towel tubes, skewers, thread, paint, and a little patience, and suddenly yesterday’s dinner container becomes a miniature vessel ready to terrorize the high seasor at least the bookshelf.
This project combines upcycling, cardboard engineering, model-making, and imaginative play. It is budget-friendly, family-friendly, and surprisingly satisfying. It also proves that craft supplies do not have to come from a fancy store with mood lighting and $9 stickers. Sometimes the best material is sitting by the recycling bin, smelling faintly of pepperoni.
Why Pizza Boxes Make Excellent Pirate Ship Material
Pizza boxes are usually made from corrugated cardboard, which means they have a fluted inner layer sandwiched between flat paper surfaces. That hidden wavy layer gives the cardboard strength without making it too heavy. For a pirate ship model, this is perfect. The material is rigid enough to stand upright, light enough to cut with scissors or a craft knife, and flexible enough to curve when scored correctly.
The wide, flat panels are especially useful. Unlike small cereal boxes, pizza boxes provide long sections that can become the side walls of the hull. Their corners are already folded, which gives you natural edges to reuse. Even better, the printed side can be painted over or turned inward so the outside of the ship looks clean and intentional.
Before building, inspect the boxes. Clean, dry cardboard works best. If the bottom has heavy oil stains or stuck-on cheese, cut around those areas and use the cleaner sections. Slight grease marks are not a disaster for crafting, but wet, soft, or food-covered cardboard will bend badly and make the ship smell like a haunted pizzeria. Nobody wants a pirate ship that attracts ants before it attracts applause.
Materials I Used
You can keep this project simple or turn it into a full weekend masterpiece. I aimed for the sweet spot: detailed enough to look cool, but not so complicated that I needed a naval architecture degree.
Basic Supplies
- 2 to 4 clean pizza boxes
- Egg cartons for cannons, barrels, and texture
- Paper towel tubes or cardboard tubes for masts
- Wooden skewers, dowels, or chopsticks
- Hot glue gun and glue sticks
- School glue or tacky glue for lighter details
- Scissors
- Craft knife and cutting mat
- Ruler and pencil
- Masking tape or painter’s tape
- Acrylic paint or washable craft paint
- Black marker, white marker, or paint pens
- Thread, yarn, or thin string for rigging
- Construction paper or scrap fabric for sails
Optional Decorative Extras
- Buttons for portholes
- Beads for treasure
- Toothpicks for railings
- Aluminum foil for a shiny anchor
- Air-dry clay for a ship wheel or figurehead
- Brown paper bags for aged-looking sails
Planning the Pirate Ship Design
The first mistake I almost made was cutting before planning. Cardboard is forgiving, but it is not magical. Once you slice the ship wall too short, it will not grow back, no matter how dramatically you shout “Arrr!”
I started by sketching a simple pirate ship shape: a long curved hull, a raised stern deck at the back, a smaller raised bow at the front, and two masts in the middle. The goal was not historical perfection. Real pirate ships came in different forms, from sloops to brigantines, but my pizza-box version only needed to communicate one clear message: this vessel has questionable legal intentions and excellent snack-based origins.
The easiest design is a display ship rather than a floating boat. Cardboard can be made water-resistant with coatings, but a pizza box pirate ship is better as a tabletop model, toy, party centerpiece, classroom project, or photo prop. If you want a floating craft, use plastic containers, foam, or waterproof materials for the base. If you want charm, detail, and dramatic sails, cardboard wins.
Step-by-Step: How I Made the Pirate Ship
Step 1: Cut the Hull Walls
I opened the pizza boxes flat and chose the cleanest panels. Using a pencil, I drew two matching side pieces shaped like long canoes with higher ends. The middle stayed lower, while the bow and stern rose upward for that classic pirate silhouette. Then I cut the two sides carefully, using scissors for the long curves and a craft knife for tighter corners.
To keep both sides symmetrical, I cut the first side, placed it on another piece of cardboard, traced it, and cut the second side. This simple trick saved the ship from looking like it had survived a kraken attack before construction even began.
Step 2: Add the Base
The base was a long rectangle of cardboard with slightly pointed ends. I glued the side walls along the edges of the base and used masking tape to hold them while the glue cooled. Hot glue works quickly, but it also has a personality: dramatic, stringy, and occasionally rude. Press pieces together firmly and use small glue lines instead of giant blobs.
For extra strength, I added small tabs along the inside seams. Tabs are little folded cardboard extensions that create more surface area for glue. They are one of the best cardboard construction tricks because they make joints stronger without adding much bulk. A pirate ship may be decorative, but it still deserves structural dignity.
Step 3: Build the Decks
Next came the raised decks. I cut two smaller cardboard rectangles: one for the back deck and one for the front. To support them, I glued short pieces of paper towel tube underneath like columns. You can also fold small cardboard boxes or strips into supports. The important thing is to avoid leaving the deck floating in midair like a pirate-themed pancake.
Once the supports were glued in place, I attached the deck pieces and reinforced the edges with strips of cardboard. This gave the ship more dimension and created little areas for details like a captain’s wheel, treasure chest, and tiny cannons.
Step 4: Shape the Bow and Stern
The bow is the front of the ship, and the stern is the back. I added curved pieces of cardboard to both ends to make the ship look less like a box and more like something that could chase merchant vessels across a bathtub-sized ocean.
Scoring helped here. Scoring means pressing a shallow line into cardboard without cutting all the way through. Once scored, cardboard bends more cleanly. I used the back of a butter knife and a ruler to create gentle fold lines. This worked especially well for curved railings and the back wall of the captain’s cabin.
Step 5: Make the Masts
For masts, I used cardboard tubes and wooden skewers. The tubes gave height and thickness, while the skewers helped support the sails. I created small flanges at the bottom of the tubes by cutting short slits around the base and folding the tabs outward. Then I glued those tabs to the deck. This made the masts stand upright instead of leaning like they had spent too much time at a pirate tavern.
If you only have skewers or chopsticks, those work too. Just reinforce the bottom with a small mound of air-dry clay, stacked cardboard squares, or a bottle cap glued to the deck.
Step 6: Add Sails and Rigging
The sails gave the project its personality. I cut rectangles and triangles from brown paper bags and construction paper, then gently crumpled and flattened them to create an aged texture. A few marker lines suggested seams. For the classic pirate look, I added a black flag with a hand-drawn skull and crossbones. Was the skull anatomically correct? Absolutely not. Did it look threatening from across the room? Surprisingly, yes.
I punched small holes near the top and bottom of each sail, slid them onto skewers, and glued the skewers across the masts. Then I tied thread from mast to mast and from mast to hull. The rigging did not need to be functional; it only needed to suggest nautical complexity. This is a useful rule for many crafts: when in doubt, add string and call it authentic.
Step 7: Create Cannons, Windows, and Details
Egg cartons became cannons. I cut the little cups apart, painted them black, and glued them along the ship’s sides. Small cardboard circles became portholes. Thin strips became railings. A scrap of foil wrapped around a cardboard shape became an anchor. A tiny rectangle with a lid became a treasure chest.
This is where the project became genuinely fun. The ship started to feel like a tiny world. Every scrap suggested something: a bottle cap could be a barrel, a toothpick could be a railing, a bead could be treasure, and a torn cardboard strip could become weathered planking. Upcycled crafts reward the ability to look at trash and say, “You, my friend, are now a cannon.”
Step 8: Paint the Ship
I painted the hull brown first, then dry-brushed darker and lighter shades over the surface. Dry brushing is simple: dip a brush in paint, wipe most of it off, then drag it lightly across the cardboard. The raised areas catch the color and create a wood-grain effect. Suddenly, flat pizza cardboard looked like aged timber. Not museum-quality timber, perhaps, but definitely “cartoon pirate with flair” timber.
Black paint went inside the portholes and cannons. Gold paint highlighted the treasure chest. Red accents made the stern look dramatic. I left the sails slightly uneven because perfect sails felt too polite. A pirate ship should look like it has stories, bad weather, and at least one captain with a suspicious mustache.
Design Tips That Made the Ship Stronger
Use Tabs Instead of Butt Joints
A butt joint is when one edge is glued directly to another surface. It is easy, but it can break quickly. Tabs are stronger because they create more contact area. Whenever I attached a wall, deck, or mast support, I added folded tabs wherever possible.
Layer Cardboard for Thick Details
Single cardboard pieces are fine for walls, but layered cardboard looks better for raised decorations. I glued two or three layers together for the anchor, ship wheel, and nameplate. Layering creates depth and helps small details survive handling.
Score Before Bending
Trying to bend cardboard without scoring often creates ugly wrinkles. A shallow score line gives the material a clear place to fold. This is especially useful for railings, curved stern pieces, cabin walls, and decorative trim.
Paint in Thin Coats
Too much wet paint can warp cardboard. Thin coats dry faster and keep the structure crisp. If the ship starts to curl, let it dry completely and gently press it under a book overnight. Choose a book that does not mind being promoted to shipyard supervisor.
Safety Notes for Kids and Families
This pizza box pirate ship is a great project for kids, but some steps need adult help. Craft knives, hot glue guns, and sharp skewers should be handled carefully. Younger children can paint, decorate sails, draw flags, sort materials, and glue lightweight pieces with school glue. Older kids can help with measuring, scoring, and assembling under supervision.
Set up a protected work surface before starting. Cardboard scraps multiply quickly, and hot glue strings somehow travel farther than science can explain. Keep a small trash bowl nearby for cutoffs, a damp cloth for paint spills, and a safe spot for pieces to dry.
Why This Project Is More Than Just a Cute Craft
Making a pirate ship from pizza boxes is fun, but it also teaches useful creative problem-solving. You learn how to plan a structure, test balance, reinforce weak points, reuse materials, and revise when something collapses. That is basic engineering wearing a pirate hat.
It also encourages sustainable thinking. Upcycling gives used materials a second life before disposal. Instead of buying a plastic model kit, you transform packaging into something personal. The final ship may not last forever, but the process teaches resourcefulness. It reminds kids and adults that creativity is not about having perfect supplies. It is about seeing possibilities in ordinary things.
There is also a storytelling benefit. Once the ship is finished, it invites play. Who is the captain? What treasure is hidden below deck? Is the crew brave, sneaky, or mostly interested in snacks? A handmade toy carries the personality of its maker, glue bumps and all.
Common Mistakes I Would Avoid Next Time
Using Weak Cardboard for the Base
The base carries the whole ship. If it is too thin, the model twists. Next time, I would double-layer the bottom from the beginning. A strong base makes every later step easier.
Skipping Dry Time
I wanted to keep building while glue and paint were still drying. This was bold, foolish, and sticky. Letting sections dry fully prevents pieces from sliding out of place and keeps the paint from smearing.
Making the Sails Too Heavy
Thick cardboard sails looked cool at first, but they made the masts wobble. Paper, fabric scraps, or thin cardstock are better. A sail should look dramatic without turning the mast into a bendy straw.
Forgetting the Back View
I decorated the front and sides first, then realized the back looked plain. Since models are often viewed from all angles, add details to the stern early. A captain’s cabin, tiny windows, or a ship name can make the rear view feel finished.
Creative Variations to Try
Once you understand the basic structure, you can customize the ship in dozens of ways. Make a ghost pirate ship with gray paint, torn white sails, and glowing paper lanterns. Build a royal navy ship with blue and gold trim. Create a silly pizza pirate theme with a flag shaped like a slice and a treasure chest full of cardboard pepperoni. For a classroom or party activity, prepare pre-cut hull pieces and let each person decorate their own mini ship.
You can also turn the project into a STEAM challenge. Ask builders to design the tallest mast that stays upright, the strongest deck that can hold coins, or the most creative use of recycled materials. Add simple moving parts like a rotating ship wheel or a drawbridge-style gangplank. The project can be as simple or complex as the builder wants.
My Experience Making a Pirate Ship Using Pizza Boxes
The most surprising part of making this pirate ship was how quickly the project went from “small craft idea” to “I live in a shipyard now.” At first, I thought I would spend an hour cutting cardboard and maybe paint a cute little boat. Then I started adding decks. Then the decks needed railings. Then the railings needed cannons. Then the cannons needed dramatic placement. By the time I was tying thread between the masts, I had fully accepted my new identity as Admiral of the Dining Table.
The pizza boxes were both helpful and hilarious. Helpful because their large panels made the hull easy to build. Hilarious because every now and then I would flip a piece over and see a giant sauce stain or a printed coupon advertising garlic knots. There is something deeply funny about painting “weathered oak” over a former extra-large cheese pizza container. It gives the ship character. It also gives the maker humility.
I learned that cardboard has moods. Some pieces bent gracefully after scoring. Others cracked like they were offended by the request. The cleanest, driest panels worked best for the hull, while smaller, imperfect scraps were great for details. I stopped trying to make every piece perfect and started choosing materials based on function. Strong flat pieces became walls. Thin strips became trim. Lumpy egg carton cups became cannons. Odd scraps became mysterious pirate equipment that probably had a name in 1712.
The biggest challenge was balance. The masts looked fantastic, but once I added sails, the ship leaned slightly to one side. Instead of starting over, I reinforced the mast bases with layered cardboard and added extra glue around the flanges. That fixed most of the wobble. It also taught me that miniature shipbuilding is basically a negotiation between ambition and gravity.
Painting was the moment the whole project came alive. Before paint, it looked like cardboard taped into a boat-ish shape. After paint, it became a pirate ship. Brown layers gave the hull warmth. Black portholes created depth. A few messy dry-brushed streaks made the sides look like wooden planks. The imperfections helped. A perfectly smooth pirate ship would look suspicious, like it had never survived a storm or a snack spill.
My favorite detail was the flag. I drew a skull that looked less like a fearsome warning and more like a confused marshmallow, but once it was glued to the mast, it worked. That is the magic of handmade crafts: individual parts may look ridiculous up close, yet together they create something charming. The final ship had personality. It looked adventurous, scrappy, and slightly chaoticwhich feels appropriate for a vessel made from pizza boxes.
If I made it again, I would start with a stronger base, pre-cut more tabs, and plan the stern details earlier. I would also invite friends or kids to decorate separate sections because this project is perfect for collaboration. One person can paint the hull, another can make sails, another can design treasure, and someone with excellent dramatic instincts can name the ship. Mine would probably be called The Saucy Barnacle, which is either a pirate ship or a questionable seafood restaurant.
In the end, the best part was not the finished model, although I was very proud of it. The best part was the transformation. A pile of pizza boxes became something imaginative, funny, and surprisingly sturdy. It reminded me that creativity often begins after the “real” use of an object is over. The pizza was gone, but the adventure was just beginning.
Conclusion
Making a pirate ship using pizza boxes is the kind of DIY project that delivers more joy than its humble materials suggest. It is affordable, flexible, eco-conscious, and packed with opportunities for creativity. With clean cardboard, a few smart construction techniques, and a willingness to embrace charming imperfection, you can build a ship that looks ready for treasure hunts, bedroom shelves, classroom displays, or rainy-day storytelling.
This project proves that upcycled cardboard crafts are not just a way to keep kids busy. They are a hands-on lesson in design, patience, problem-solving, and imagination. Pizza boxes may begin life carrying dinner, but with a pencil, glue, paint, and a little pirate spirit, they can sail straight into DIY legend.
Note: This article was created from real craft-building practices, cardboard construction principles, upcycling ideas, and current pizza box reuse and recycling guidance, rewritten in an original, web-ready style without source links or citation placeholders.