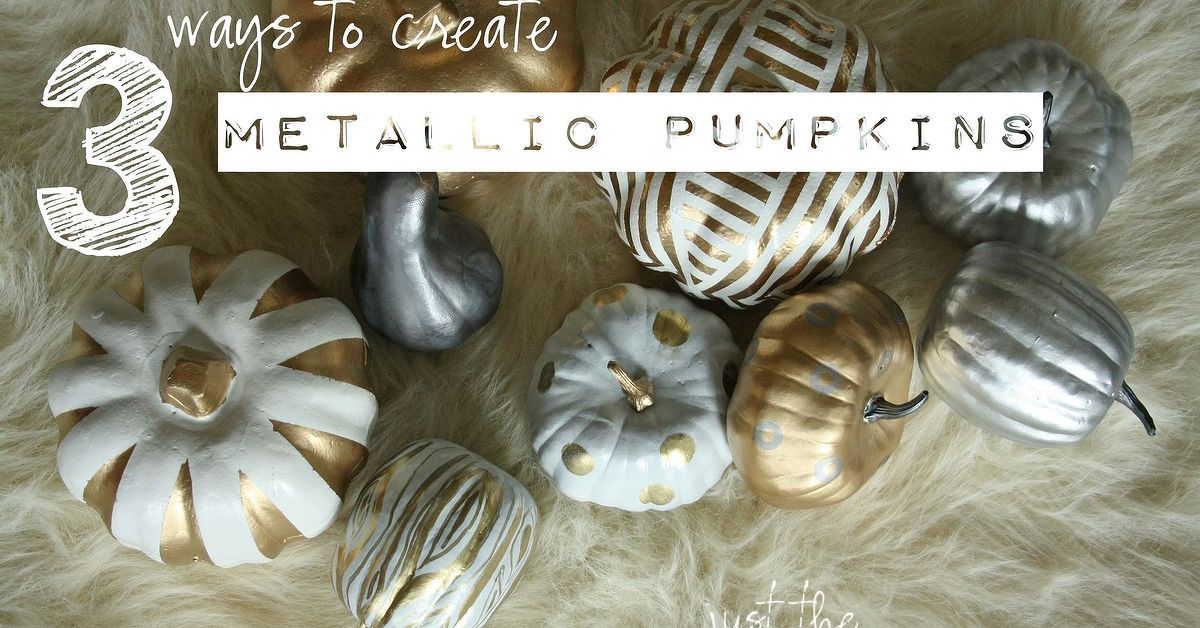

Pumpkin season has two types of people: the “I carved a spooky face” crowd…and the “I want my porch to look like a boutique hotel lobby” crowd.
If you’re reading this, congratulationsyou’re clearly in the second group (or you’re shopping for that vibe on a budget, which is even smarter).
The good news: you don’t need fancy tools, a design degree, or a glitter tolerance level of 10/10 to make pumpkins look expensive.
With the right metallic finishesthink gold, silver, copper, champagne, bronze, or rose goldyou can turn ordinary pumpkins into glam decor
that works for Halloween and stays classy through Thanksgiving.
Before You Start: Pick the Right Pumpkin + Prep Like a Pro
Real vs. Faux Pumpkins
- Faux pumpkins (foam/plastic/paper mache) are easiest for metallic finishes, last for years, and are perfect for spray paint and leafing.
- Real pumpkins can absolutely be painted toojust know they’re still organic, so they’ll eventually soften or rot. Keep them dry and display them indoors or under cover for best results.
Quick Prep Checklist (Don’t Skip This)
- Wipe off dust and grime with a damp cloth; let dry fully.
- If it’s a real pumpkin, dry it well and avoid soaking it. (Water + pumpkin = surprise science experiment.)
- Protect your workspace with cardboard or a drop cloth.
- If you’ll be using spray paint or sealant, work outside or in a well-ventilated area and consider a mask.
Color Planning That Looks “Styled,” Not “Craft Store Explosion”
A simple formula: pick one metal (gold or silver or copper) and add one neutral (black, white, cream, or soft gray).
Or go “metal family”: mix warm metals (gold + brass + copper) or cool metals (silver + pewter + gunmetal). The secret is consistency, not chaos.
Way #1: Metallic Painted Pumpkins with Rub ’n Buff Highlights (Fast + Luxe)
This method is the “I want designer pumpkins by dinner” approach. You lay down a metallic base (paint or spray),
then add subtle wax highlights that make the ridges pop like actual metal. It’s glam, forgiving, and beginner-friendly.
Best For
- Foam or plastic pumpkins (especially Dollar Store finds)
- Modern, minimal, or “restoration hardware but make it fall” decor
- People who want shine without glitter fallout for the next six months
Supplies
- Metallic acrylic paint or metallic spray paint (gold, bronze, copper, champagne, etc.)
- Rub ’n Buff (antique gold, silver leaf, Spanish copper, ebonychoose your vibe)
- Soft cloth or glove, small short-bristle brush (or a cheap makeup brush for crevices)
- Optional: painter’s tape for stripes/blocks, clear sealer spray for extra durability
Step-by-Step
- Base coat: Paint or spray your pumpkin in a thin, even layer. If spraying, do several light coats to avoid drips. Let it dry.
- Add dimension: Put a tiny dab of Rub ’n Buff on a cloth (or gloved finger). Lightly rub along the raised ridges and around the stem area.
- Buff to glow: Gently buff with a clean part of your cloth. The finish gets more lustrous as you bufflike magic, but socially acceptable.
- Optional design upgrade: Use painter’s tape to block off geometric sections. Paint one section a different metallic (say, champagne + bronze), then peel tape for crisp lines.
- Seal (optional): If pumpkins will be handled a lot, a clear sealer can help. Test firstsome sealers slightly change sheen.
Pro Tips That Make It Look Expensive
- Less wax is more: Rub ’n Buff is concentrated. Start with a tiny amount and build slowly.
- Fake “antique brass” in seconds: Paint the pumpkin bronze, then add a light touch of ebony wax into grooves and buff the highs. Instant depth.
- Don’t forget the stem: A stem brushed with antique gold or ebony instantly upgrades the whole piece.
Way #2: Gilded Leaf (or Foil) “Dipped” Pumpkins (High-End Boutique Shine)
If you’ve ever seen those glossy, gilded pumpkins on a mantel and thought, “That costs $79 and comes with free shipping,”
this is the method that says, “Actually, it cost me less than a fancy coffee habit.”
Leafing creates that unmistakable hammered-metal lookslightly imperfect in the best way.
Best For
- Statement pumpkins for mantels, entry tables, and centerpieces
- Gold, silver, copper, or rose-gold “dipped” designs
- Anyone who enjoys crafts that feel weirdly royal
Supplies
- Faux pumpkin (smooth surfaces are easiest)
- Gilding adhesive (also called “sizing”) or Mod Podge for simpler leafing
- Gilding sheets/metal leaf (gold/silver/copper) or craft foil
- Painter’s tape or washi tape (for a clean “dipped” line)
- Soft dry brush (or leafing brush) for buffing away flakes
- Optional: clear acrylic sealer spray
Step-by-Step: Classic “Dipped” Look
- Mark the dip line: Wrap tape around the pumpkin where you want the metallic to stop. Smooth it into the grooves so leaf doesn’t sneak under.
- Apply adhesive: Brush a thin layer of gilding adhesive below the tape. Avoid puddlesthin and even is the goal.
- Wait for tack: Let it dry until tacky (not wet). This is the sweet spot where leaf sticks like it means it.
- Press on the leaf: Place a sheet onto the tacky area and press gently. Peel away backing if your leaf has one. Patch gaps as neededoverlaps are fine.
- Buff the excess: Use a dry brush to remove loose flakes and smooth the finish. Touch up any bare spots with adhesive + leaf.
- Reveal the crisp edge: Peel the tape carefully.
- Seal (optional): A light clear sealer can reduce flaking, especially if you’ll move or store the pumpkin.
Design Variations (Same Supplies, Different Mood)
- Diagonal dip: Tape on a slant for a modern look.
- Leaf only the ridges: Brush adhesive on the raised lines for a subtle “gilded contour” effect.
- Two-tone glam: Leaf the bottom in gold and paint the top a creamy mattesuper chic, very “catalog cover.”
Way #3: Faux Mercury Glass Metallic Pumpkins (Vintage Glam, No Carving Required)
Mercury glass has that old-world sparklelike your pumpkin belongs in a historic mansion, casually hanging out near a crystal chandelier.
This technique creates a speckled, distressed mirror effect that looks complex… but it’s basically a controlled “mist and wipe” situation.
Best For
- Foam pumpkins (even bright orange ones)
- Vintage, traditional, or “antique store fall” styling
- People who love a little imperfection with their shine
Supplies
- Foam pumpkin
- Gray spray paint (for a base coat that peeks through nicely)
- Mirror-effect spray paint (often silver)
- Spray bottle with a 50/50 mix of water + white vinegar
- Soft cloth rag (not paper towelstexture can transfer)
- Optional: clear gloss sealer for extra shine
Step-by-Step: Speckled Mirror Finish
- Base coat: Spray the pumpkin gray. Let it dry fully (this keeps the “peek-through” spots elegant instead of neon orange).
- Mix your mist: Fill a spray bottle with half water and half white vinegar.
- Spritz lightly: Mist the pumpkin so droplets form, but don’t let them run.
- Mirror coat: Immediately spray a very light layer of mirror-effect spray paint over the whole surface. Don’t drench itlight coats protect the droplets.
- Wait, then wipe: Let it sit briefly (about 1–2 minutes), then gently wipe away droplets with a soft cloth. This reveals the speckled look.
- Control the distressing: Wipe sooner for more “distressed,” wait longer for more defined droplet spots. Repeat the spritz + spray + wipe cycle a few times for depth.
- Optional finishing coat: Add clear gloss if you want more shine.
Alternative (No Spray Paint Needed)
If sprays aren’t your thing, you can fake a mercury-glass vibe by layering different metallic acrylic paints using a dry-brush technique.
Use thin coats, keep strokes mostly vertical, and vary coverage so multiple tones show through. The result reads “vintage metallic” without needing aerosols.
Styling Ideas: Make Your Metallic Pumpkins Look “Designed,” Not “Random”
- Go odd-numbered: Groups of 3 or 5 look intentional (interior designers love this trick).
- Mix finishes: Pair one glossy pumpkin with one satin and one textured (leafed or mercury glass) for depth.
- Add soft lighting: Metallics glow under warm string lights or candlesinstant ambiance, zero renovation.
- Use a neutral anchor: Put metallic pumpkins on a tray with greenery, dried leaves, or a soft runner so the shine feels curated.
Troubleshooting + Care
- Drips in spray paint: You sprayed too close or too heavy. Sand lightly (faux pumpkins), then re-spray in lighter coats.
- Leaf won’t stick: Adhesive wasn’t tacky yet (or got too dry). Reapply thin adhesive and try again.
- Mercury glass looks dull: Add another spritz + mirror cycle, or finish with clear gloss for extra shine.
- Want them to last: Keep real pumpkins dry and indoors/covered. Store faux pumpkins wrapped in tissue so metallic finishes don’t scratch.
Bonus: Experience Notes (500-ish Words of “Wish Someone Told Me That”)
Metallic pumpkins are one of those crafts that look effortless in photosand then reality shows up with a wet sleeve, a floating piece of gold leaf,
and a mysterious sparkle that has teleported onto your face. The good news? Most “oops” moments are predictable, fixable, and honestly kind of funny
once your pumpkins are sitting there looking expensive.
First, the biggest difference between “wow” and “why is this sticky?” is dry time. People tend to rush because the pumpkin looks dry
on top, but metallic finishes love to play games. If you handle a pumpkin too soon, you’ll get fingerprints that show up like little crime-scene clues
in the shine. The fix is simple: plan your craft time like you plan baking cookiesthere’s the fun part, and then there’s the waiting part that makes
everything actually work.
Second, light coats beat heavy coats every single time. With spray paint, a thick coat feels efficientuntil it drips and you’re
watching a gold teardrop slowly slide down the pumpkin like it’s starring in a soap opera. Light coats dry faster, look smoother, and give you more
control. If you’re crafting with a friend, this is also the moment where one person becomes the “spray coach” saying, “Back up… lighter… lighter… okay
NOW stop.” It’s a role. It’s important. Embrace it.
Third, leafing (gold/silver/copper) is delightfully chaotic. The first time you use metal leaf, you expect it to behave like paper. It does
not. It behaves like a dramatic butterfly that refuses to land where you want. The trick is to work in small sections, keep your hands relatively
clean, and accept that tiny cracks and overlaps are not mistakesthey’re texture. That slightly broken, hammered look is part of what makes leafed
pumpkins read as “high-end decor” instead of “perfectly flat craft paint.”
Fourth, Rub ’n Buff is basically the “expensive shortcut” in a tube. The first time someone uses it, they usually apply too much.
Then they panic because it looks smudgy. Then they buff it and it suddenly looks like antique brass. The learning curve is mostly about learning to
start with a tiny dab and build up slowly. Once you get it, you’ll start looking around your house like, “So… do we have any other objects that
deserve to look more expensive today?”
Finally, metallic pumpkins are extremely sensitive to lightinglike celebrities. Under cool white lights they can look harsher; under warm lighting
they glow. If your pumpkins look “meh” on the table, try moving them near a lamp, adding candles, or placing them on a darker tray for contrast.
Sometimes the craft isn’t the problem; the stage is.
Conclusion
If you want glam fall decor without carving chaos, metallic pumpkins are the sweet spot: easy, stylish, and wildly customizable.
Go fast with metallic paint + Rub ’n Buff highlights, go luxe with gilded leaf “dips,” or go vintage with faux mercury glass.
Pick one method for a cohesive lookor mix all three in the same color family for a display that looks curated, not cluttered.