
Note: This article is based on real furniture-painting, upholstery, IKEA-hack, indoor safety, and wood-finishing guidance from reputable home-improvement and design sources, then fully rewritten in an original, web-ready style.
Every dining room has at least one chair quietly begging for a glow-up. Maybe it came from IKEA, maybe it survived three apartments, two roommates, and one spaghetti incident, or maybe it still looks fine but feels about as exciting as plain oatmeal. The good news? A DIY Ikea hack dining chair makeover idea can turn a basic flat-pack seat into a custom-looking piece without requiring a design degree, a garage full of tools, or the emotional stamina of a home renovation TV host.
IKEA dining chairs are popular for a reason: they are affordable, simple, and usually built with clean lines that make them easy to personalize. That same simplicity is also why they can sometimes look a little too familiar. With paint, fabric, cushioning, trim, or even a small change in finish, you can make an IKEA chair look boutique, vintage, modern farmhouse, Scandinavian, coastal, maximalist, or “I found this at a tiny design shop and absolutely will not reveal the price.”
This guide walks through a practical dining chair makeover that works for many IKEA-style chairs, especially wooden, laminate, or upholstered-seat designs. You will learn how to plan the look, prep the chair, paint it correctly, reupholster the seat, protect the finish, and avoid the mistakes that make DIY furniture look like it had a minor argument with a paintbrush.
Why IKEA Dining Chairs Are Perfect for a DIY Makeover
The best furniture hacks begin with a piece that has good bones. IKEA chairs often have exactly that: simple silhouettes, removable seats, straightforward construction, and a price point that makes experimentation less terrifying. If you make a mistake on a $40 chair, you will survive. If you make a mistake on a family heirloom, Thanksgiving may become awkward.
Many IKEA dining chairs are made from solid wood, molded plastic, veneer, particleboard, fiberboard, or upholstered components. Each material needs slightly different handling, but the makeover logic stays the same: clean, prep, improve, protect. A wooden chair may respond beautifully to sanding and paint. A laminate chair needs a bonding primer. A padded seat can often be refreshed by removing the cushion, replacing the fabric, and stapling everything back into place.
The real beauty of an IKEA chair hack is control. Instead of settling for whatever color or fabric is available in-store, you can match your dining room rug, wall color, table finish, curtains, or personal obsession with olive green. No judgment. Olive green has been carrying interiors on its back for years.
Best IKEA Chair Styles to Hack
Not every chair is equally easy to transform, so start by choosing the right candidate. A basic wooden dining chair with a removable seat is the easiest. A chair with a flat or slightly curved frame can be painted with minimal drama. Upholstered seat pads are beginner-friendly because they usually come off with a screwdriver, and the fabric can be replaced without sewing.
Wooden Dining Chairs
Wooden IKEA chairs are excellent for painting, staining, color-dipping, distressing, or adding a clear protective coat. If the chair has a natural finish, light sanding helps the primer and paint grip better. If the finish is glossy, sanding becomes even more important because paint does not enjoy sticking to shiny surfaces. It is stubborn like that.
Laminate or Veneer Chairs
Laminate and veneer pieces can still be painted, but they need proper prep. The goal is not to sand aggressively until the chair looks like it lost a bar fight. Instead, scuff the surface lightly to dull the sheen, clean away dust, and apply a bonding primer made for slick surfaces. This is the difference between a long-lasting finish and paint that peels off like a sunburn.
Upholstered Seat Chairs
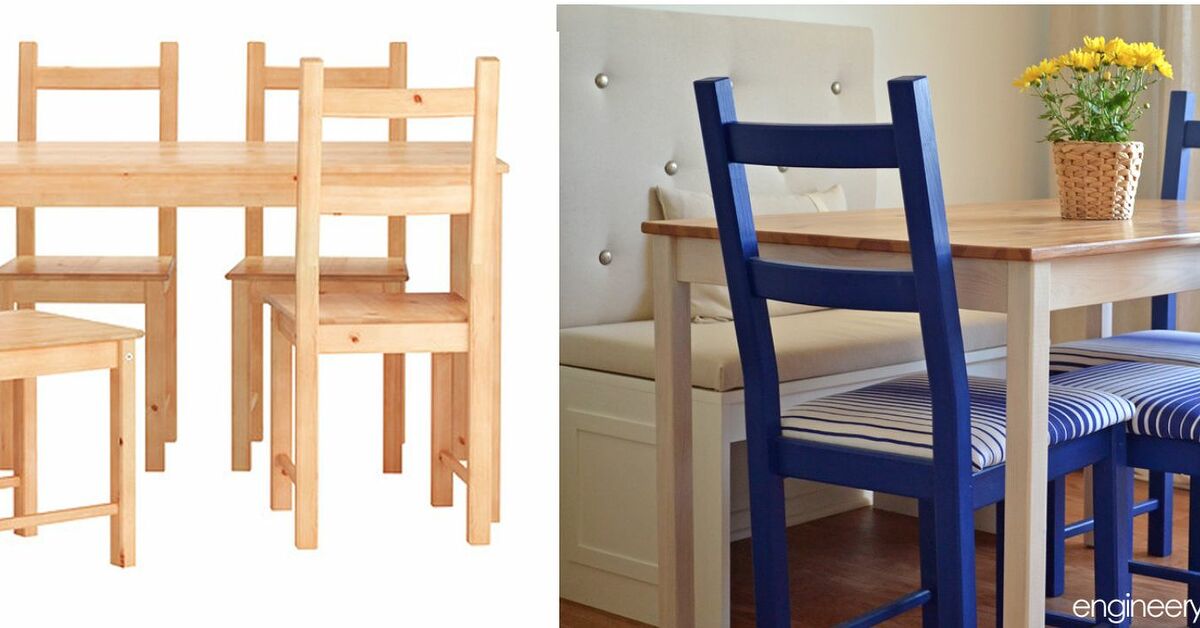
Dining chairs with padded seats are ideal for a fast makeover. Fabric does a lot of visual work. A plain black chair with a striped seat feels modern. A white frame with floral fabric feels cottage-inspired. A walnut-toned frame with boucle or linen-look fabric feels expensive, even if the project budget was mostly funded by leftover coffee money.
Before You Begin: Choose a Design Direction
A successful IKEA dining chair makeover starts before you open a paint can. First, decide what the chair needs to become. Do you want it to blend into the dining room or stand out? Are you updating a full set of six chairs or creating a charming mismatched look? Will the chair be used daily by children, guests, pets, or that one person who sits down like they are landing a helicopter?
For a cohesive dining room, repeat at least one element from the surrounding space. Match the chair frame to the table legs, echo the fabric color in the rug, or choose a paint finish that complements nearby cabinets. If you love a collected, designer-style dining area, consider painting all chair frames the same color but using two coordinating fabrics, such as ticking stripe on side chairs and a solid performance fabric on end chairs.
Easy Style Ideas
Modern farmhouse: paint the frame matte black or warm white, then add a neutral linen-look seat.
Scandinavian minimal: keep the wood light, add a clear coat, and use soft gray, beige, or cream upholstery.
Colorful apartment chic: paint each chair a different muted color, such as dusty blue, terracotta, sage, and mustard.
Paris bistro inspired: use a black frame with striped fabric or a woven-look seat cover.
Bold maximalist: choose jewel-tone paint and a patterned fabric. Your dining room deserves a little drama that does not involve assembling a flat-pack cabinet at midnight.
Tools and Materials You May Need
You do not need every item on this list for every chair, but it helps to gather supplies before you begin. Nothing ruins momentum like discovering you own three screwdrivers and none of them fit the seat screws.
- Screwdriver or drill
- Drop cloth or old sheet
- Mild soap, degreaser, or furniture cleaner
- Lint-free cloths
- Fine-grit sandpaper, usually 180 to 220 grit
- Tack cloth or microfiber cloth
- Bonding primer or wood primer
- Furniture paint, enamel paint, chalk-style paint, or acrylic paint suitable for furniture
- Small foam roller and angled brush
- Clear topcoat, polyurethane, polycrylic, or furniture wax
- Staple remover or pliers
- Staple gun and staples
- Upholstery fabric or durable home-decor fabric
- Batting and foam, if replacing cushion padding
- Fabric scissors
- Optional trim, nailheads, piping, or decorative tape
Step-by-Step DIY IKEA Dining Chair Makeover
Step 1: Inspect the Chair
Before painting or upholstering, inspect the chair carefully. Tighten loose screws, check wobbly joints, and look for cracks, peeling veneer, damaged seat boards, or old staples sticking out like tiny metal gremlins. A makeover should improve a chair, not disguise a structural problem. If the chair is unstable, repair it first or choose another candidate.
Step 2: Remove the Seat
If your IKEA chair has a removable padded seat, flip the chair over and unscrew it from the frame. Put the screws in a cup or small bag. Do not trust yourself to “remember where they are.” That is how screws migrate to another dimension.
Once the seat is removed, decide whether to keep the old fabric as a template. If the existing fabric is clean and flat enough, remove it carefully and use it to cut the new fabric. If the cushion is still supportive, you may only need new fabric and batting. If the foam is flattened, crumbly, or smells like mystery, replace it.
Step 3: Clean the Frame
Cleaning is the least glamorous step, but it is one of the most important. Dining chairs collect fingerprints, cooking oils, dust, crumbs, and invisible evidence of daily life. Paint will not bond well to grease or grime. Wipe the frame with mild soap and water or a furniture-safe degreaser, then let it dry completely.
For wood chairs, avoid soaking the surface. For laminate, be extra careful around seams and edges. Moisture can damage composite materials if it sneaks under a finish. A damp cloth is helpful; a chair bath is not.
Step 4: Sand Lightly
Use fine-grit sandpaper to scuff the surface. The goal is to create grip, not remove the entire finish. Sand glossy areas until they look dull. Smooth chipped spots or raised edges. If you are working with veneer, use a gentle hand because veneer is thin. Once sanding is complete, wipe the chair with a tack cloth or microfiber cloth to remove every bit of dust.
Step 5: Apply Primer
Primer is the quiet hero of a good furniture makeover. For raw or painted wood, use a quality wood primer. For laminate, melamine, or slick IKEA surfaces, choose a bonding primer. Apply a thin, even coat with a foam roller and use a brush for corners, spindles, and joints.
Let the primer dry according to the product instructions. Then lightly sand with 220-grit sandpaper if the surface feels rough. This small step can make the final paint finish look smoother and more professional. Yes, waiting for primer to dry is boring. No, rushing it is not worth it.
Step 6: Paint in Thin Coats
Apply paint in thin coats. Thick paint may look satisfying at first, but it can drip, bubble, stay tacky, or leave brush marks. Two or three thin coats usually look better than one heroic glob. Use a foam roller for flat areas and an angled brush for detailed spots.
For dining chairs, durability matters. Semi-gloss, satin, or enamel furniture paints often perform well because they resist scuffs better than flat wall paint. Chalk-style paint can work beautifully, but it usually needs a protective topcoat. If your chair will be used daily, protect it like it has a job, because it does.
Step 7: Seal the Finish
A clear topcoat protects the painted frame from scratches, moisture, and repeated use. Water-based polycrylic or polyurethane is popular for indoor furniture because it dries clear, has lower odor than many oil-based products, and cleans up with water. Oil-based polyurethane is very durable, but it can amber over time and has a stronger smell, so ventilation is important.
Apply the topcoat in thin layers and let each coat dry fully. Light sanding between coats can help create a smooth finish. For high-touch areas like chair backs, arms, and front legs, consider two or three coats. Dining chairs work hard. They are scooted, grabbed, bumped, wiped, and occasionally used as temporary step stools, even though everyone knows they should not be.
Step 8: Reupholster the Seat
Lay your new fabric face down on a clean surface. Place the seat cushion upside down on top of it. If you are adding batting, place it between the cushion and the fabric. Cut the fabric with enough extra material to wrap around the edges and staple underneath.
Start by stapling the center of one side, then pull the opposite side tight and staple its center. Repeat with the remaining two sides. Work outward from the centers, pulling the fabric evenly as you go. Corners are the trickiest part. Fold them neatly like wrapping a gift, except the gift is a chair and nobody is pretending the corners are easy.
If you use patterned fabric, check alignment before stapling everything. Stripes should run straight, large motifs should be centered, and directional prints should face the same way on every chair. A crooked pattern is not a “design choice” unless you are very committed to chaos.
Step 9: Add Decorative Details
Once the paint and upholstery are finished, small details can make the chair look custom. Add black or brass nailhead trim around the seat edge. Attach decorative fabric tape beneath the cushion. Paint the bottom two inches of each chair leg in a contrasting color for a dipped effect. Use cane webbing, leather straps, or removable chair pads to add texture.
Just keep function in mind. Dining chairs need to be comfortable, wipeable, and sturdy. A chair covered in delicate silk may look elegant until taco night. Choose fabric and finishes that match real life, not the fantasy version of life where nobody spills salsa.
Fabric Ideas for an IKEA Chair Hack
Fabric changes the entire personality of a dining chair. For everyday use, choose upholstery-grade or home-decor fabric rather than thin quilting cotton. Performance fabrics, canvas, denim, faux leather, indoor-outdoor fabric, and tightly woven linen blends can work well. If the chair is used by kids, pets, or enthusiastic dinner guests, stain resistance is your friend.
Here are a few reliable combinations:
- Black frame + tan faux leather: modern, clean, and easy to wipe.
- White frame + blue ticking stripe: coastal, cottage, and cheerful.
- Natural wood + cream boucle: soft, Scandinavian, and very current.
- Sage green frame + floral fabric: vintage garden-party energy.
- Navy frame + brass nailheads: polished without feeling too formal.
- Warm beige frame + rust velvet: cozy, stylish, and slightly dramatic.
Paint Color Ideas That Make IKEA Chairs Look Expensive
The fastest way to make IKEA furniture look less “just assembled” is to choose a thoughtful paint color. Basic white and black are always useful, but richer tones often look more custom. Try mushroom beige, charcoal, forest green, deep navy, warm taupe, oxblood, terracotta, dusty blue, or creamy ivory.
If you are painting a full set, test the color on one chair first. Colors look different under dining room lighting than they do on a tiny paint chip at the store. A beige can suddenly become pink. A gray can become blue. A white can become “why does this look like printer paper?” Always test before committing.
Common Mistakes to Avoid
Skipping Prep
The biggest mistake is painting directly over a dirty or glossy surface. The finish may look fine for a week, then start peeling around edges and high-touch areas. Clean, sand, prime, and then paint. Prep is not optional; it is the foundation.
Using Wall Paint Without Protection
Wall paint is made for walls, which usually do not get pulled across floors or grabbed during dinner. If you use leftover wall paint, seal it with a durable topcoat. Otherwise, the finish can scuff quickly.
Choosing the Wrong Fabric
Thin fabric may stretch, tear, or show stains. Dining chairs need stronger material. If you love a delicate print, consider using it on a decorative chair, not the seat where people eat barbecue ribs.
Rushing Dry Time
Paint can feel dry before it is fully cured. If you reassemble or use chairs too soon, the finish may dent or stick. Let painted chairs cure as long as the product recommends before heavy use.
Budget Breakdown: How Much Does This IKEA Chair Makeover Cost?
A basic chair makeover can be surprisingly affordable, especially if you already own tools. For one chair, you might spend around $10 to $25 on fabric, $5 to $15 on batting or foam, $15 to $30 on primer, $15 to $35 on paint, and $10 to $25 on a clear topcoat. If you are making over a set of four or six chairs, the cost per chair usually drops because one can of primer, paint, or sealer can cover multiple frames.
Compared with buying new dining chairs, especially upholstered ones, a DIY makeover can save a significant amount of money. It also keeps furniture out of the landfill and lets you create a look that fits your space exactly. That is a rare combination: budget-friendly, sustainable, and stylish enough to make guests ask where you bought it.
How to Care for Your Finished Chairs
After your IKEA chair makeover is complete, protect your work with simple habits. Wipe spills quickly. Use a soft cloth and mild cleaner instead of harsh chemicals. Avoid dragging chairs across rough floors. Add felt pads under the legs if needed. Tighten screws every few months, especially if the chairs are used daily.
If the seat fabric is removable or treated with fabric protector, maintenance becomes easier. For busy households, faux leather, vinyl, or indoor-outdoor fabric can be the difference between “quick wipe” and “why is there pasta sauce in the upholstery?”
Real-Life Experience: What This Makeover Teaches You
A DIY Ikea hack dining chair makeover idea sounds simple on paper: paint the frame, staple new fabric, celebrate. In reality, the project teaches you several useful lessons. First, patience matters more than fancy tools. A careful beginner can get better results than an impatient expert with a premium brush. The chair does not care how expensive your supplies are if you slap paint over dust.
Second, fabric selection is more emotional than expected. You may walk into the fabric store planning to buy plain beige and leave debating between green velvet, striped canvas, and a print featuring birds that look judgmental. The best choice is usually the one that balances style with daily life. If the dining area is used every day, pick something durable and easy to clean. If the chair is mostly decorative, go ahead and let the dramatic fabric have its moment.
Third, the first chair is the slowest. By the second chair, you understand how the seat comes off, how the paint behaves, how much fabric to pull, and which corner fold looks neatest. By the fourth chair, you may briefly consider starting a furniture makeover business. This feeling is normal. Wait until the cleanup is finished before ordering business cards.
Fourth, small imperfections are not failure. A tiny brush mark or slightly imperfect underside staple will not ruin the chair. Handmade pieces have character. The goal is not factory perfection; the goal is a chair that looks intentional, feels sturdy, and makes your dining room more personal. Most people will notice the beautiful new fabric and color long before they inspect the underside with a flashlight.
One practical experience worth remembering: always label seats if you are working on multiple chairs. Even chairs from the same set can have tiny differences in screw placement or fit. Use painter’s tape to mark “Chair 1,” “Chair 2,” and so on. This prevents the classic DIY comedy scene where you are crawling under a chair, holding a seat that almost fits, wondering whether furniture is secretly plotting against you.
Another lesson is to protect your workspace better than you think necessary. Paint travels. Staples bounce. Foam crumbs multiply. A drop cloth, a cardboard spray area, a trash bowl for old staples, and a dedicated drying zone will make the project calmer. Dining chair makeovers are fun, but stepping on a rogue staple in socks is the kind of character development nobody requested.
Finally, this project builds confidence. Once you successfully transform one IKEA chair, other furniture starts looking suspiciously hackable. A side table might need new legs. A bookshelf might need trim. A bench might need a cushion. This is how DIY begins: one chair, one staple gun, one “I can probably do that” moment. The dining chair is small enough to be manageable but impactful enough to change the room. That makes it one of the best beginner furniture makeover projects.
Conclusion: A Small Chair Hack With Big Dining Room Energy
A DIY IKEA dining chair makeover is one of the smartest ways to refresh a dining room without replacing everything. With the right prep, paint, fabric, and finish, a basic chair can become a custom-looking piece that reflects your style and stands up to real daily use. The process is approachable for beginners, flexible for different design styles, and affordable enough to try without panic.
The secret is not complicated: clean thoroughly, sand lightly, prime properly, paint patiently, upholster neatly, and seal the finish. Add fabric that suits your lifestyle, choose a color that complements your space, and give the chair time to cure before putting it back into dinner-duty rotation. In return, you get a dining chair that looks fresh, personal, and far more expensive than it actually was.
So before you donate, replace, or side-eye your old IKEA chairs, consider hacking them first. A little paint and fabric can turn “basic dining chair” into “custom design moment.” And if anyone asks where you bought them, you can smile mysteriously and say, “Oh, these? I made them over myself.” That sentence alone is worth the price of primer.