
Note: HTML body only, in standard American English, with no source links included in the article body.
If you run a Discord server and you are still assigning roles one member at a time, first of all: bless your patience. Second: there is a better way. Reaction roles let people choose their own roles by clicking an emoji on a message, which means less admin work for you and way fewer “hey, can you give me the movie-night role?” messages at 1:13 a.m.
Whether you want members to pick game roles, pronouns, color tags, notification pings, region labels, or interest-based access, reaction roles can turn your server from “mildly chaotic group chat” into “surprisingly organized digital kingdom.” The good news is that on PC or Mac, the setup is straightforward once you understand one important truth: modern Discord usually handles classic reaction roles through bots, not through a built-in native reaction-role switch.
That sounds dramatic, but it is actually helpful. Once you know the real workflow, you can build a cleaner server, avoid permission headaches, and create a role system your members will actually use instead of staring at like it is a tax form.
What Are Reaction Roles on Discord?
Reaction roles are self-assigned roles that members get by reacting to a message with a specific emoji. For example, someone clicks 🎮 and gets the Gamer role. Someone clicks 🎬 and gets the Movie Club role. Someone clicks 🟢 and suddenly becomes Team Green, which is either a fun color choice or the first step toward server civil war.
They are popular because they help automate role assignment, keep channels organized, and let members personalize their experience without waiting for a moderator to step in. On desktop or web, this works especially well because the server settings, role hierarchy tools, and bot dashboards are easier to manage on a larger screen.
Can You Add Reaction Roles on Discord Without a Bot?
Here is the honest answer: not in the classic “click an emoji on a message and receive a role” sense. If you want that exact reaction-based setup, most servers use a bot.
That said, Discord now offers built-in alternatives that may work even better for some communities. If your goal is simply to let members choose channels or roles, Community Onboarding can do that natively. If your goal is to make people accept the rules before chatting, Rules Screening is the cleaner native option. So reaction roles are still very much alive, but they are no longer the only game in town.
Why People Still Use Reaction Roles
Even with newer built-in tools, reaction roles remain popular because they are simple, familiar, and visible. Members can look at one message, click one emoji, and get what they need. No menus. No onboarding maze. No “where do I change my interest tags?” detective work.
They are especially useful for:
- Color roles
- Game or fandom roles
- Platform roles like PC, Mac, Xbox, or PlayStation
- Announcement pings
- Region or timezone tags
- Pronoun roles
- Event access or temporary community groups
What You Need Before You Start
Before setting up reaction roles on PC or Mac, make sure you have the following:
- A Discord server you own or manage
- Permission to manage roles
- The roles already created in your server
- A reaction-role bot added to your server
- A dedicated channel for role selection, such as #roles or #pick-your-roles
If you skip the role-creation step and invite the bot first, you are not doomed, but you are volunteering for extra work. Create the roles first. Future You will be grateful.
How to Add Reaction Roles to a Discord Server on PC or Mac
The exact buttons vary slightly by bot, but the overall setup is very similar across popular tools like Carl-bot, Dyno, MEE6, and other reaction-role apps. Think of this as the universal desktop method.
Step 1: Open Discord on Your PC or Mac
Launch the Discord desktop app or open Discord in your browser. For this task, both work fine. Once you are in your server, click the server name in the upper-left corner and open Server Settings.
Step 2: Create the Roles You Want Members to Pick
In Server Settings, click Roles, then create the roles you want members to assign to themselves. Keep the names clear and useful. “Announcements,” “PC Players,” “Book Club,” and “Valorant” are much better than “Role 1,” “Role 2,” and “Mystery Eggplant.”
As you create each role, decide whether it is just a label or whether it should unlock channel access. If the role is meant to control access, update the relevant channel permissions too. A role that exists but does nothing is basically decorative confetti.
Step 3: Put the Bot’s Role Above the Roles It Needs to Assign
This is the step that trips up a shocking number of server admins.
Discord uses role hierarchy. That means a bot can only assign roles that sit below the bot’s own role in the server’s role list. So if your reaction-role bot is lower than the Gamer or Announcements roles, the bot will fail, shrug silently, and leave you wondering why nothing works.
Go back to Server Settings > Roles and drag the bot’s role above every self-assignable role it needs to manage. Do not put it above your owner role unless you truly have a taste for danger. High enough to work, low enough to stay civilized.
Step 4: Add a Reaction-Role Bot to Your Server
On desktop, one of the easiest ways to do this is through Discord’s App Directory. Open your server settings, find App Directory, search for a reaction-role bot, and authorize it for your server.
Popular options often include tools that support classic emoji reactions, buttons, dropdowns, or a combination of all three. Some bots focus heavily on customization. Others focus on speed. If you want the most straightforward beginner-friendly experience, choose a bot with a clear dashboard and a dedicated reaction-role module.
Step 5: Give the Bot the Right Permissions
Most reaction-role bots need at least:
- Manage Roles
- Access to the channel where the role message lives
- Permission to send messages and add reactions in that channel
Some bots may also use buttons or dropdown components instead of old-school emoji reactions. If so, follow that bot’s prompts. Reaction roles are no longer just a one-trick emoji pony.
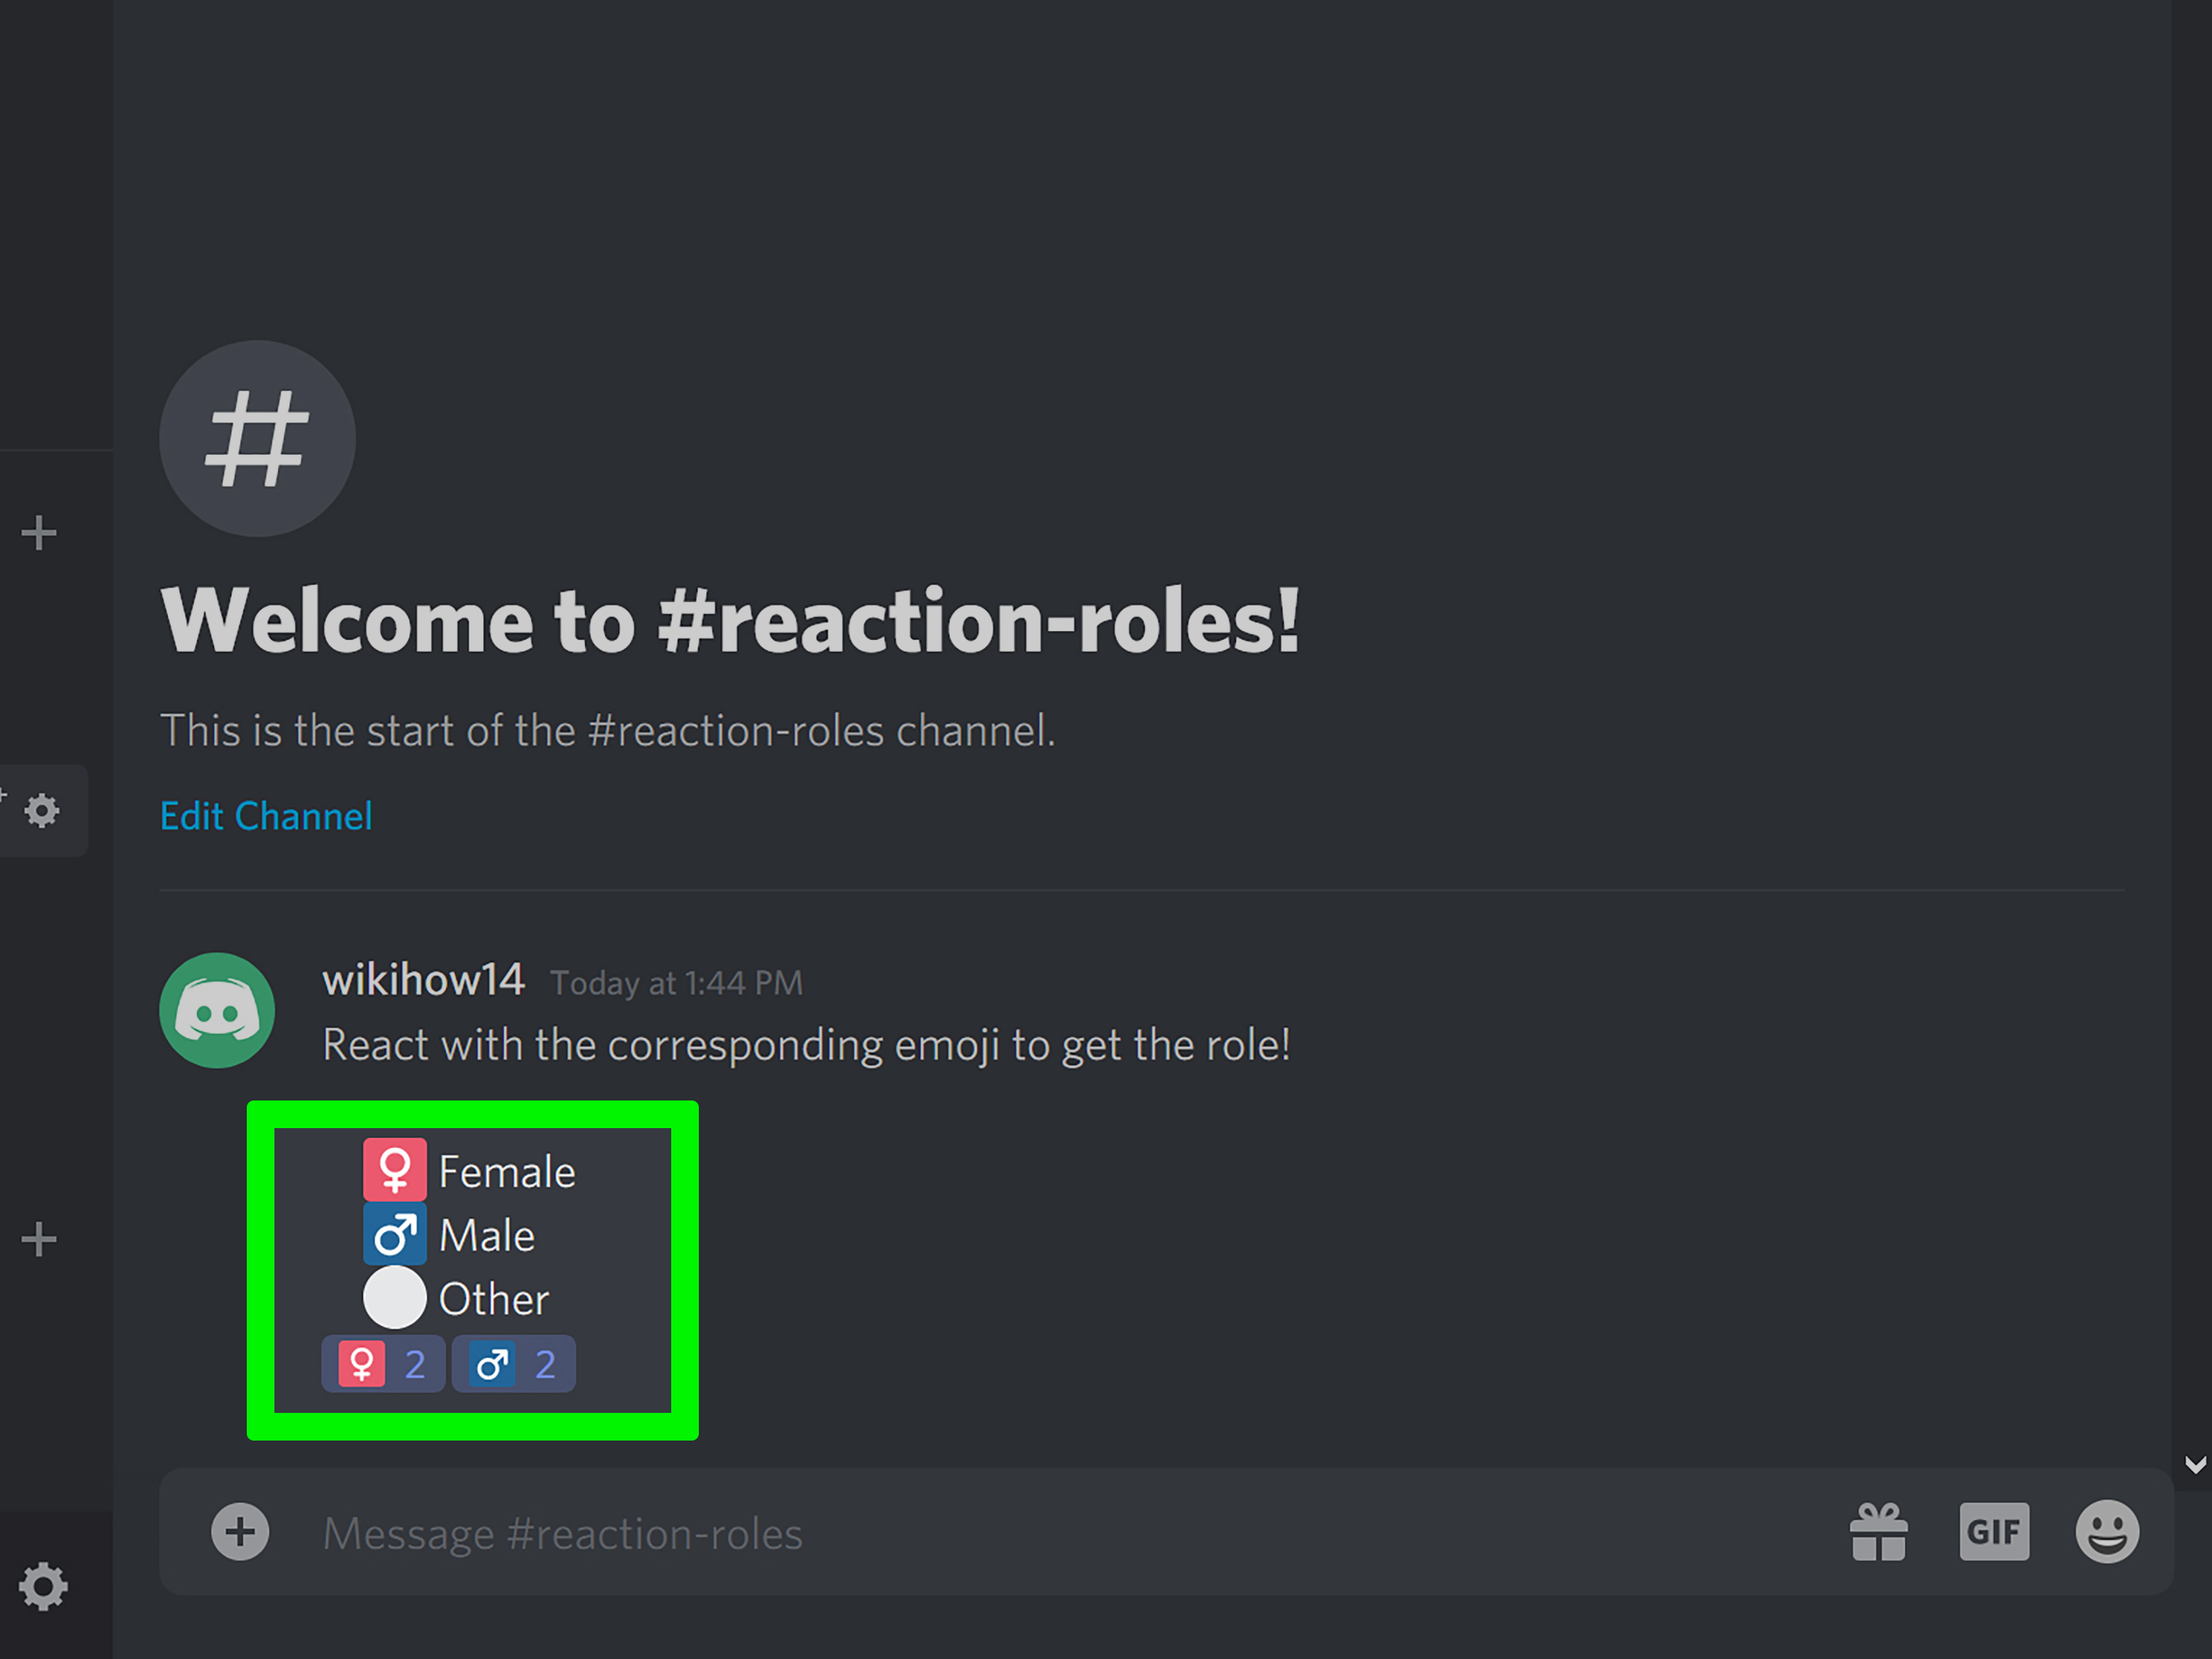
Step 6: Create a Dedicated Roles Message
Now create a message in your chosen roles channel. This should clearly tell members what each emoji means. For example:
Pick your roles below:
🎮 = Gamer
🎨 = Creative Corner
🔔 = Announcement Pings
🌎 = International Chat
Keep it short, readable, and obvious. If members need a decoder ring and a legal team to understand your role post, it is too complicated.
Step 7: Map Each Emoji to a Role in the Bot Dashboard or Command Setup
Open the bot’s dashboard or run its setup command, then choose the message you want to use for reaction roles. Next, assign each emoji to the corresponding role.
This is where you define the actual logic:
- 🎮 gives the Gamer role
- 🎨 gives the Creative Corner role
- 🔔 gives the Announcements role
Some bots let you make these roles exclusive, which is great for color roles where members should only choose one. Others allow multiple role selections, which is better for interest tags, game titles, or notification pings.
Step 8: Test Everything
React to the message yourself or ask a moderator to test it. Make sure the role appears correctly, the right channels unlock, and removing the reaction behaves the way you expect.
Testing matters. A role panel that looks perfect but assigns the wrong permissions is like a pretty door that opens into a wall.
Best Practices for a Cleaner Reaction-Role Setup
Use a Dedicated Roles Channel
Do not bury your reaction-role message under memes, game screenshots, and a heated debate about whether pineapple belongs on pizza. Put it in its own channel, pin it if needed, and keep that channel tidy.
Offer Useful Roles, Not Decorative Chaos
People are more likely to use reaction roles when the choices feel meaningful. Good role categories include interests, game preferences, content pings, pronouns, regions, and event access. Twenty-six color roles named after obscure shades of fog? That may be a niche delight, but make sure your members actually want it.
Keep the Menu Short
Too many options create friction. If your role message reads like a restaurant menu with 90 smoothie variations, people will skip it. Break roles into separate messages or channels if needed.
Use Simple Emojis
Standard emojis are easier to recognize and less likely to cause confusion. They are also easier to explain quickly. If your custom emoji looks like a startled avocado with a helmet, not everyone will know what role it is supposed to represent.
Common Problems and How to Fix Them
The Bot Is Not Assigning Any Roles
This is usually a role hierarchy issue. Make sure the bot’s role is above every role it needs to assign. Also check that the bot has Manage Roles enabled.
The Reaction Appears, but Nothing Happens
Double-check that the emoji was mapped correctly in the bot dashboard. Also confirm that the message ID or message link is correct if your bot uses those during setup.
Members Can See the Role Message but Not the Channels
The role may be assigning correctly, but the channels are not configured to allow that role. Go to the affected channels and update permissions so the role can view or participate as intended.
Members Say They Cannot React
If the bot preloads the emoji onto the message, users can often click the existing reaction without needing permission to add a brand-new one themselves. But if your channel permissions are too restrictive, reactions can still become messy. Review channel settings and make sure your setup is not accidentally over-locked.
The Bot Has Too Much Power
Do not hand out full administrator access unless the bot truly needs it. In most cases, it does not. Give it the minimum permissions required to manage roles and post in the role channel. Your security posture should not be “we’ll just hope nothing weird happens.”
Reaction Roles vs. Discord Onboarding
If you are building a modern server, this is worth thinking about.
Use reaction roles if:
- You want a classic emoji-based self-selection system
- You want a visible roles channel anyone can revisit
- You prefer simple, low-friction role assignment
Use Community Onboarding if:
- You want a native Discord experience
- You want members to choose roles and channels during joining
- You want a cleaner long-term structure without relying on a reaction message
Onboarding is excellent for communities that want a polished native experience. Reaction roles are still excellent for servers that want a quick, obvious, and familiar self-assign system. One is a tailored welcome desk. The other is a giant helpful sign with emojis. Both can work.
If Your Goal Is Rule Verification, There Is a Better Native Option
A lot of server owners use reaction roles as a “click ✅ to confirm you read the rules” gate. That can work, but Discord’s built-in Rules Screening may be the smarter choice now.
Rules Screening requires new members to explicitly agree to your rules before they can talk, react, or message other server members. In other words, if your only reason for building a reaction-role gate is rule acceptance, the native feature is often cleaner, simpler, and less confusing for new arrivals.
Examples of Smart Reaction Roles
Need inspiration? Here are a few practical setups:
Gaming Server
🎮 FPS Games, 🧙 RPG Fans, 🛡️ MMO Players, 🔔 Patch Notes
Creator Community
🎥 Video Editors, 🎙️ Podcasters, ✍️ Writers, 📢 Livestream Alerts
Study Group
📚 Biology, ➗ Math, 💻 Coding, ⏰ Exam Reminders
Social Server
🌍 Region Roles, 🎉 Event Pings, 🎨 Hobbies, 🗣️ Pronouns
The best role systems solve real navigation or communication problems. If a role exists only because it seemed funny at 2 a.m., maybe let that one rest.
Experiences From Real-World Discord Communities
One of the most interesting things about reaction roles is how differently they feel depending on the kind of server you run. On a small friend server, they can feel almost unnecessary at first. You think, “There are only 20 of us. I can assign roles manually.” And that works right up until those 20 people become 80, then 200, and suddenly you are spending your evenings handing out notification tags like a very tired digital camp counselor.
In gaming communities, reaction roles usually become useful almost immediately. People want quick access to game-specific channels, LFG groups, patch notes, and event pings. A smart role panel keeps the server from becoming one giant hallway with 40 doors and no signs. Members click what they play, and the server becomes more relevant in about five seconds.
Creator and hobby communities often have a different experience. There, reaction roles are less about access and more about identity. A writer might want the Poetry tag, a designer might want Illustration, and someone else might only want to be pinged for critique nights. When the system is well organized, members feel like they can shape their own experience instead of being dropped into a random pile of channels and told, “Good luck, champ.”
But reaction roles are not magic. Poor setups cause confusion fast. One common experience is the server owner who creates too many options on day one. Ten interest roles become 25, then 40, then a giant wall of emojis that nobody reads. The result is a server that technically has self-assignment but practically feels cluttered. The better approach is to start lean, watch what people actually use, and expand only when there is a clear reason.
Another very common experience is the classic permission disaster. The bot is invited. The message is posted. Everyone is excited. A member reacts… and nothing happens. Cue the silence. Cue the admin sweating. Nine times out of 10, the issue is not the bot being broken. It is the role hierarchy, missing permissions, or a role sitting above the bot where it should not be. Once you fix that, the whole system suddenly behaves like it always meant to work.
There is also the human side of reaction roles, which is easy to overlook. A clean role menu makes a server feel more welcoming. New people understand where to go. Longtime members can subscribe only to what matters to them. Moderators spend less time answering repetitive questions. That may not sound glamorous, but in community management, reducing friction is basically superhero work in sweatpants.
Over time, the best servers usually treat reaction roles as part of a bigger organization strategy. They combine them with clear channel categories, sensible permissions, a short onboarding path, and maybe native Discord features where those make more sense. The result is a server that feels intentional instead of accidental. And that is really the goal: not just adding roles, but building a space that is easier, friendlier, and far less likely to make new members immediately get lost and wander into the meme channel forever.
Final Thoughts
If you are on a PC or Mac, adding reaction roles to a Discord server is one of the best upgrades you can make for organization and member experience. The workflow is simple once you know the order: create roles, place the bot correctly in the hierarchy, build a clear roles message, map emojis to roles, and test everything before calling it done.
And if you discover halfway through that what you really want is native role selection or rule acceptance rather than classic reaction-based assignment, Discord’s built-in Onboarding and Rules Screening tools are worth a serious look. The best setup is not always the flashiest one. It is the one your members understand in seconds.
In other words, make it easy, make it useful, and make sure your bot is not sitting below the very roles it is supposed to hand out. That little detail has ruined many a brave admin’s afternoon.