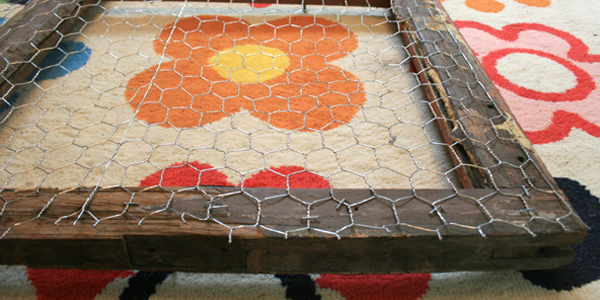

An old window accessory holder is one of those DIY projects that makes people say, “Wait, that used to be a window?”which is exactly the reaction we want. Instead of letting a salvaged window frame gather dust in the garage, you can turn it into a charming, practical organizer for jewelry, hair bows, belts, scarves, hats, keys, sunglasses, craft supplies, or tiny daily essentials that otherwise vanish like socks in a dryer.
This project blends vintage decor, home organization, and upcycling into one surprisingly useful wall piece. It works beautifully in bedrooms, entryways, bathrooms, craft rooms, kids’ rooms, mudrooms, and even boutique-style closets. Better yet, an old window frame already has character: worn paint, divided panes, old hardware, and that “I have stories” look no new plastic organizer can fake without trying way too hard.
In this guide, you’ll learn how to make an old window accessory holder, what materials work best, how to style it, where to hang it, and how to make sure it is safe, sturdy, and actually usefulnot just another cute thing leaning against a wall while quietly judging your clutter.
What Is an Old Window Accessory Holder?
An old window accessory holder is a repurposed vintage or salvaged window frame converted into a storage and display piece. Depending on how you build it, the frame can hold earrings, necklaces, bracelets, hair clips, bows, headbands, hats, belts, scarves, keys, photos, notes, or lightweight decor.
The basic idea is simple: take a solid old window, clean and repair it, add functional materials like chicken wire, mesh, fabric backing, hooks, knobs, clips, or small shelves, then mount it securely on a wall. The result is part organizer, part wall art, and part conversation starter.
Unlike a store-bought accessory rack, an old window accessory holder can be customized to fit your style. Rustic farmhouse? Leave the distressed paint. Cottagecore? Add floral fabric behind the frame. Modern vintage? Paint it matte black or warm white. Kids’ room? Use cheerful fabric and colorful knobs. Entryway? Add hooks for keys and sunglasses. Jewelry station? Add mesh for earrings and hooks for necklaces.
Why Old Windows Make Great Organizers
Old windows have built-in structure. The wooden frame gives you a sturdy border, while the divided panes naturally create sections. That makes them perfect for organizing accessories by category: earrings in one section, necklaces in another, hair bows on the mesh, bracelets on hooks, and small photos or notes clipped to string.
They also add warmth to a room. Many modern organizers are efficient but visually bland. An old window frame brings texture, age, and personality. It feels collected rather than purchased. It whispers “architectural salvage” instead of shouting “clearance bin plastic.”
There is also a sustainability bonus. Repurposing an old window keeps usable material out of the landfill and gives a second life to something that might otherwise be discarded during a renovation. Upcycling is not only budget-friendly; it also lets you decorate with pieces that feel personal and one-of-a-kind.
Best Uses for an Old Window Accessory Holder
Jewelry Organizer
One of the most popular uses for an old window accessory holder is jewelry storage. Chicken wire or decorative metal mesh works well for earrings because the small openings let hooks slide in easily. Cup hooks, small knobs, or screw-in hooks can hold necklaces and bracelets. This setup prevents tangles and makes jewelry visible, which means you may finally remember that necklace you bought three years ago and wore once to “save it for something nice.”
Hair Bow and Headband Holder
For a child’s room, an old window frame can become a sweet hair accessory station. Add chicken wire for clip-on bows, hooks for headbands, and a fabric backing for softness and color. It keeps accessories off the dresser and makes morning routines easier, especially when everyone is looking for the one pink bow that has apparently joined a secret society.
Entryway Catch-All
In an entryway, the holder can organize keys, sunglasses, dog leashes, light scarves, and small reminders. Add sturdy hooks along the bottom rail and use clips or twine across the panes for notes. It becomes a mini command center without looking like office equipment invaded your foyer.
Bathroom Storage
In a bathroom, use the frame for lightweight accessories like hair ties, necklaces, clips, and small hanging baskets. If the bathroom is humid, seal the wood carefully with a moisture-resistant finish and avoid leaving raw, flaky paint exposed.
Craft Room Display
Crafters can use an old window accessory holder for scissors, ribbons, measuring tapes, thread cards, washi tape, and small tools. Add S-hooks, binder clips, and mini baskets for flexible storage. It keeps supplies visible, and visibility is half the battle when your craft drawer looks like a raccoon packed for summer camp.
Materials You’ll Need
You do not need a professional workshop to make this project. Most supplies are available at home improvement stores, thrift shops, craft stores, or your own “I might need this someday” drawer.
- One old wooden window frame
- Gloves and safety glasses
- Mild soap, water, and cleaning cloths
- Sandpaper or sanding block
- Lead paint test kit if the window may be pre-1978
- Clear sealer, primer, or paint
- Chicken wire, hardware cloth, decorative mesh, cork, or fabric
- Staple gun and staples
- Small hooks, cup hooks, knobs, or drawer pulls
- Picture hanging hardware, D-rings, or wall anchors
- Drill and screwdriver
- Wire cutters if using mesh or chicken wire
- Optional: clothespins, ribbon, twine, small baskets, labels, or decorative trim
Safety First: Check the Window Before You Start
Before you fall in love with a chippy old window, check its condition. Vintage character is wonderful; mystery dust is not. If the frame came from an older home, especially one built before 1978, it may have lead-based paint. Lead paint can become hazardous when it chips, flakes, or creates dust during sanding or scraping.
If the paint is peeling badly, test it before sanding. Use a lead paint test kit or consult a professional if you are unsure. If lead is present, do not dry-sand or scrape it casually. You can often preserve the look by gently cleaning the frame and sealing the surface with an appropriate encapsulating sealer, but badly deteriorated pieces may not be worth using indoors, especially in a child’s room.
Also inspect the glass. If the panes are cracked, loose, or sharp, remove them carefully or replace them with safer backing materials. Many accessory holder designs remove the glass entirely and use wire mesh or fabric instead. That option is lighter, safer, and more practical for hanging earrings, clips, and hooks.
How to Make an Old Window Accessory Holder
Step 1: Choose the Right Window Frame
Look for a wooden frame that feels solid, not crumbly. A little surface wear is fine; deep rot is not. Check corners, joints, and mullions. The frame should not wobble dramatically when you lift it. If it does, you may need to reinforce the back with small metal corner braces or wood glue before adding accessories.
Size matters, too. A small two-pane window works well for jewelry or keys. A tall multi-pane frame is better for belts, scarves, hats, or children’s hair accessories. Before buying or rescuing a window, measure the wall where you plan to hang it. DIY confidence is great, but it cannot bend physics or shrink a six-foot window into a tiny hallway.
Step 2: Clean the Frame Gently
Wipe away dust, cobwebs, and grime with a damp cloth and mild soap. Avoid soaking the wood, especially if it is old or unfinished. A soft brush can help clean corners and grooves. If the frame has old hardware you want to keep, clean around it carefully.
Let the frame dry completely before moving on. Moisture trapped under paint or sealer can lead to bubbling, warping, or musty smells. Nobody wants an accessory holder that smells like a haunted basement with ambition.
Step 3: Repair and Reinforce
Tighten loose screws, add corner brackets if needed, and secure any wobbly pieces. If you want to preserve old nails or screws as extra hanging points, make sure they are not sharp or rusty in a way that could snag fabric or scratch skin.
Fill large holes with wood filler if you want a cleaner finish. For a rustic look, leave minor dents and imperfections. Those marks are part of the charm. The goal is not to make the frame look factory-new; the goal is to make it safe, stable, and useful.
Step 4: Sand or Seal the Surface
If the paint is safe and stable, lightly sand rough edges only where needed. If you love the distressed look, seal it with a clear matte or satin finish to prevent further flaking. If you prefer a fresh color, prime and paint the frame.
White, cream, sage green, charcoal, navy, and natural wood tones all work well. For a farmhouse accessory holder, soft white and distressed edges are classic. For a modern look, black paint with brass hooks is sharp and elegant. For a kid’s room, pastel paint and colorful knobs can make the piece cheerful without turning it into a circus tent.
Step 5: Add Mesh, Chicken Wire, Fabric, or Cork
Turn the window face down and attach your backing material to the rear of the frame. Chicken wire is excellent for hair bows and earrings. Hardware cloth offers a cleaner grid and a slightly more modern look. Fabric backing adds color and hides the wall behind the frame. Cork makes the holder useful for notes, photos, and pins.
Cut the material slightly larger than the opening, pull it tight, and staple it to the back. If using chicken wire, wear gloves and use wire cutters carefully. Fold or trim sharp edges so they do not poke out. For fabric, pull evenly from all sides to avoid sagging. A saggy backing looks tired, and this project has already had one life as a windowit deserves a strong second act.
Step 6: Install Hooks, Knobs, and Clips
Decide what you want the holder to store, then add hardware accordingly. Cup hooks are great for necklaces, bracelets, keys, and belts. Small knobs can hold headbands or lightweight scarves. Clothespins can clip photos, children’s artwork, or reminder cards. Ribbon or twine stretched across a pane can hold sunglasses or cards.
Pre-drill small pilot holes before adding hooks, especially if the old wood is dry. This helps prevent splitting. Keep heavier items near the lower rail or frame edges, where the wood is stronger. Do not overload the mesh with heavy accessories; it is meant for lightweight storage.
Step 7: Add Proper Hanging Hardware
The finished holder may be heavier than it looks, especially if the frame is large or still contains glass. Use sturdy D-rings, picture hangers, or a French cleat for larger pieces. Wall anchors are helpful when studs are not available, but for heavy frames, mounting into studs is best.
Before hanging, test the hardware by gently lifting the piece from the hangers. Once mounted, give it a careful tug. If it shifts or feels unstable, fix it before loading it with accessories. Gravity has no appreciation for your vintage aesthetic.
Design Ideas for Different Rooms
Bedroom Jewelry Station
Use decorative mesh in the panes and install hooks along the bottom rail. Add a small tray or shelf below the holder for rings and perfume. This setup turns daily accessorizing into a boutique-style moment, even if you are just choosing earrings while wearing pajama pants.
Kids’ Hair Accessory Holder
Choose a bright fabric backing and add chicken wire for bows. Hooks can hold headbands, hats, belts, and small bags. Add clothespins for artwork or school reminders. It is practical, cute, and easier than digging through a drawer full of tangled ribbons before school.
Entryway Organizer
Paint the frame in a color that matches your hallway. Add hooks for keys and dog leashes, plus a small chalkboard or cork section for notes. If the frame has divided panes, label each section for different family members.
Craft Room Tool Holder
Use hardware cloth for strength and add S-hooks for scissors, rulers, and small tools. Attach mini baskets for glue sticks, thread, or markers. A craft room version should be more functional than delicate, because creativity gets messy and occasionally involves glitter with no known exit strategy.
Styling Tips for a Polished Look
To keep your old window accessory holder from looking cluttered, group similar items together. Put earrings in one section, necklaces on hooks, scarves on lower knobs, and photos or notes in a separate area. Leave a little empty space so the piece can breathe visually.
Choose hardware that matches your room’s style. Brass hooks feel warm and vintage. Black hooks feel modern. White hooks blend into painted frames. Glass knobs add a romantic touch. Wooden pegs feel simple and natural.
If the frame is already very rustic, keep the accessories simple. If the frame is freshly painted, you can add more decorative touches like patterned fabric, ribbon, or labels. Balance is key. A weathered window, floral fabric, bright knobs, lace, twine, and ten kinds of ribbon can quickly go from charming to “craft store sneezed.”
Common Mistakes to Avoid
The biggest mistake is skipping safety checks. Old windows can have lead paint, cracked glass, rusty nails, or weak joints. Always inspect before decorating.
Another mistake is using weak hanging hardware. A finished window holder can be heavy, and accessories add weight over time. Use proper wall anchors or studs whenever possible.
Do not overload the mesh. Chicken wire is great for clips and earrings, but it is not meant to hold heavy bags or thick belts unless it is strongly supported. Add hooks directly into the wooden frame for heavier items.
Finally, avoid making the holder too busy. The window frame itself is already decorative. Let it shine by organizing items neatly and choosing a consistent color palette.
Personal Experiences With an Old Window Accessory Holder
The first time I made an old window accessory holder, I underestimated two things: how dusty an old window can be and how emotionally attached a person can become to a piece of wood with peeling paint. I found the frame at a local resale shop. It was leaning behind a stack of mismatched shutters, looking both forgotten and slightly offended. The paint was chipped, the corners were dusty, and one pane was missing. Naturally, I decided it was perfect.
At home, the project started with cleaning. This part was not glamorous. There was no magical DIY montage, no sunlight streaming through a studio window while cheerful music played. There was just me, a bucket of soapy water, and a surprising amount of grime. But once the frame was clean, the character came through. The worn edges looked intentional. The old latch, though no longer functional, added charm. It felt less like junk and more like a small architectural souvenir.
I tested the paint because the frame looked old enough to have opinions about modern appliances. Once I was comfortable using it safely, I sealed the surface instead of repainting it. That turned out to be the right choice. The clear finish kept the distressed look but stopped the paint from flaking. It also made the piece easier to wipe down later.
For the backing, I used chicken wire on one side and fabric on the other. The chicken wire became the perfect spot for earrings, hair clips, and small hanging items. The fabric side softened the look and made the holder feel more finished. Pulling the fabric tight was the trickiest part. At first, it sagged in the middle like it had given up on life. After removing a few staples and trying again, I learned to staple from the center outward, alternating sides as I pulled. That made the fabric smooth and firm.
Adding hooks was the most satisfying step. I installed small cup hooks along the lower rail for necklaces and a few larger hooks on one side for headbands and lightweight scarves. Pre-drilling the holes helped a lot because old wood can split easily. This is the kind of lesson you learn either from advice or from making a cracking sound that causes immediate regret.
Once mounted on the wall, the holder changed the room more than expected. It was not just storage; it became a display. Jewelry that had been tangled in a drawer suddenly looked intentional. Hair accessories stopped migrating around the room. Keys had a place to land. Even the empty sections looked good because the old frame acted like wall art.
The best part was how flexible it became over time. At first, it held jewelry. Later, it held sunglasses, a small dried flower bundle, a favorite photo, and a reminder card. During the holidays, I clipped a tiny garland across one pane. In spring, I swapped in lighter scarves and pastel accessories. The old window kept adapting, which is what makes this project so useful.
If I were making another one, I would choose the hanging hardware earlier in the process. It is easier to install strong hangers before the mesh and fabric are attached. I would also plan the layout on paper first, especially for a larger frame. Still, the beauty of an old window accessory holder is that it does not need to be perfect. A slightly uneven hook or a weathered corner only adds to the story.
This project is especially rewarding because it solves a real problem while adding personality to a room. It organizes the little thingsbows, bracelets, keys, clips, necklaces, and notesthat tend to create daily clutter. But unlike ordinary organizers, it feels warm and personal. It has history. It has texture. It has the quiet confidence of something that has already survived decades and is now helping you find your earrings before coffee.
Conclusion
An old window accessory holder is a smart, stylish, and sustainable way to organize everyday items while adding vintage charm to your home. With a sturdy salvaged window, a few hooks, some mesh or fabric, and careful mounting, you can create a custom organizer for jewelry, hair bows, scarves, keys, craft tools, or entryway essentials.
The key is to balance beauty with safety. Clean the frame, test questionable old paint, seal or repaint the surface, remove cracked glass if needed, and use strong hanging hardware. From there, the creative options are wide open. Whether your style is farmhouse, cottage, rustic, modern vintage, or playful and colorful, an old window frame can become a practical display piece that looks collected, not cluttered.
Best of all, this project proves that organization does not have to be boring. Sometimes the most useful item in the room starts as something someone else almost threw away. Give an old window a second life, and it may return the favor by saving your necklaces from becoming one giant metal spaghetti knot.
Note: This article is written for web publishing in standard American English and is based on real DIY, home organization, upcycling, and safety practices.