
Note: This guide is written for crafters who want a beginner-friendly, web-ready tutorial for making fabric kanzashi flowers at home. It blends traditional inspiration with modern DIY methods, so you can create beautiful folded fabric flowers without needing a ceremonial kimono closet, a professional studio, or a dramatic craft montage.
Fabric kanzashi flowers are the kind of craft that looks wildly impressive but starts with something almost suspiciously simple: a square of fabric. Fold it, pinch it, stitch or glue it, repeat a few times, and suddenly you have a flower that can dress up a hair clip, brooch, tote bag, gift box, wreath, headband, pillow, or wedding accessory. It is fabric origami with personality.
The word “kanzashi” refers to traditional Japanese hair ornaments, while the flower-making technique many crafters know today is often inspired by tsumami zaiku, a Japanese craft that uses small folded fabric pieces to create petals, leaves, and decorative motifs. Traditional artisans often use silk and precise tools, but modern fabric kanzashi flowers can be made with cotton, satin, ribbon, linen, or fabric scraps hiding in your craft drawer and judging you quietly.
In this complete guide, you will learn how to choose fabric, cut accurate squares, fold basic pointed and round petals, assemble a flower, finish the back neatly, troubleshoot common mistakes, and use your handmade fabric flowers in stylish projects. Whether you are making your first kanzashi flower or trying to upgrade from “cute but chaotic” to “I meant to do that,” this tutorial will walk you through the process step by step.
What Are Fabric Kanzashi Flowers?
Fabric kanzashi flowers are decorative flowers made from folded fabric petals. Each petal usually begins as a square, which is folded into shape and then stitched, glued, or gathered with other petals to form a bloom. The finished flower may be simple, with five or six petals and a button center, or elaborate, with layered petals, contrasting fabrics, beads, dangling accents, and leaves.
Traditional tsumami-style work is known for its delicate detail and careful construction. In modern DIY crafting, the technique has become popular because it is flexible, inexpensive, and surprisingly addictive. Once you make one flower, your brain may immediately say, “Great. Now make twelve in different colors.” This is normal. Do not be alarmed.
Supplies You Need to Make Fabric Kanzashi Flowers
You do not need a huge supply list to begin. Start with basic tools, then add specialty items as your confidence grows.
Basic Materials
- Fabric squares, usually 2 inches to 4 inches wide
- Sharp fabric scissors or a rotary cutter
- Cutting mat and ruler for accurate squares
- Needle and thread
- Fabric glue or hot glue
- Tweezers or clips for holding small folds
- Iron or finger-pressing tool
- Felt circle or fabric circle for the backing
- Button, bead, pearl, rhinestone, or covered button for the center
Optional Tools
- Kanzashi flower maker template
- Fray check or clear fabric sealant
- Hair clip, barrette, brooch pin, headband, or magnet
- Floral wire and floral tape for stems
- Small pliers if adding jewelry findings
A kanzashi flower maker can make the process faster and more consistent, especially for beginners. However, you can absolutely make kanzashi flowers by hand. The old-fashioned square-folding method is budget-friendly and gives you more control over petal shape.
Best Fabrics for Kanzashi Flowers
The best fabric for kanzashi flowers depends on the look you want. Cotton is excellent for beginners because it is stable, easy to cut, and holds a crease. Satin creates a shiny, dressy flower but can be slippery, which means it occasionally behaves like it has somewhere else to be. Silk is beautiful and traditional, but it is usually better once you have practiced. Linen gives a soft, natural texture, while ribbon works well for small accessories and layered designs.
Beginner-Friendly Fabric Choices
- Quilting cotton: Easy to fold, widely available, and great for crisp petals.
- Cotton poplin: Smooth, lightweight, and tidy for small flowers.
- Satin: Elegant and glossy, ideal for hair accessories and formal projects.
- Linen blends: Slightly rustic and perfect for home decor.
- Scrap fabric: A smart way to practice without feeling precious about mistakes.
For your first project, choose a medium-weight cotton and cut larger squares, such as 3 inches or 3.5 inches. Larger pieces are easier to fold and hold. Tiny squares are charming, but they can turn your fingers into confused little cranes until you get used to the technique.
How Many Fabric Squares Do You Need?
Each petal usually requires one fabric square. A simple flower can have five petals, while fuller designs often use six, seven, eight, or more. For a balanced beginner flower, use six or eight petals. Odd numbers can look natural and floral, while even numbers often create a symmetrical, polished shape.
Simple Size Guide
- 2-inch squares: Small flowers for clips, cards, jewelry, or mini embellishments.
- 3-inch squares: Medium flowers for brooches, headbands, hats, and gift toppers.
- 4-inch squares: Larger flowers for bags, pillows, wreaths, or statement accessories.
Before cutting your favorite fabric, make one test flower from scrap fabric. This helps you understand the finished size. Kanzashi petals shrink visually after folding, so the final flower will be smaller than the original square size suggests.
Step-by-Step: How to Make a Basic Fabric Kanzashi Flower
This beginner tutorial makes a simple round-petal kanzashi flower. It is soft, pretty, and forgiving, which is exactly what we want from both crafts and houseplants.
Step 1: Cut Your Fabric Squares
Cut six or eight equal fabric squares. For a beginner flower, 3-inch squares are a comfortable size. Use a ruler and rotary cutter if you have one, because accurate squares make neater petals. If the squares are slightly uneven, your flower will still work, but you may need to adjust the petals during assembly.
If your fabric frays easily, apply a tiny amount of fray sealant to the edges or use pinking shears. Do not soak the fabric with sealant. A little goes a long way, and too much can make the edges stiff.
Step 2: Fold the First Square Into a Triangle
Place one square wrong side up. Fold it diagonally so the opposite corners meet and the right side of the fabric faces out. You now have a triangle. Finger-press the fold or use a warm iron for a sharper crease.
For patterned fabric, check that the design faces outward before you continue. This is the step where stripes, florals, and tiny polka dots like to test your patience.
Step 3: Bring the Side Corners to the Top
Take the left corner of the triangle and fold it up to meet the top point. Repeat with the right corner. You should now have a small diamond shape with folded edges. Press the folds gently to keep everything in place.
This creates the rounded structure of the petal. Try to keep the corners aligned, but do not panic if they are not perfect. Handmade flowers should look polished, not manufactured by a robot with a ruler obsession.
Step 4: Fold the Side Corners Back
Turn the folded piece over. Fold the left and right corners toward the center back. The petal should begin to look thicker and more dimensional. Hold the base firmly with your fingers or tweezers.
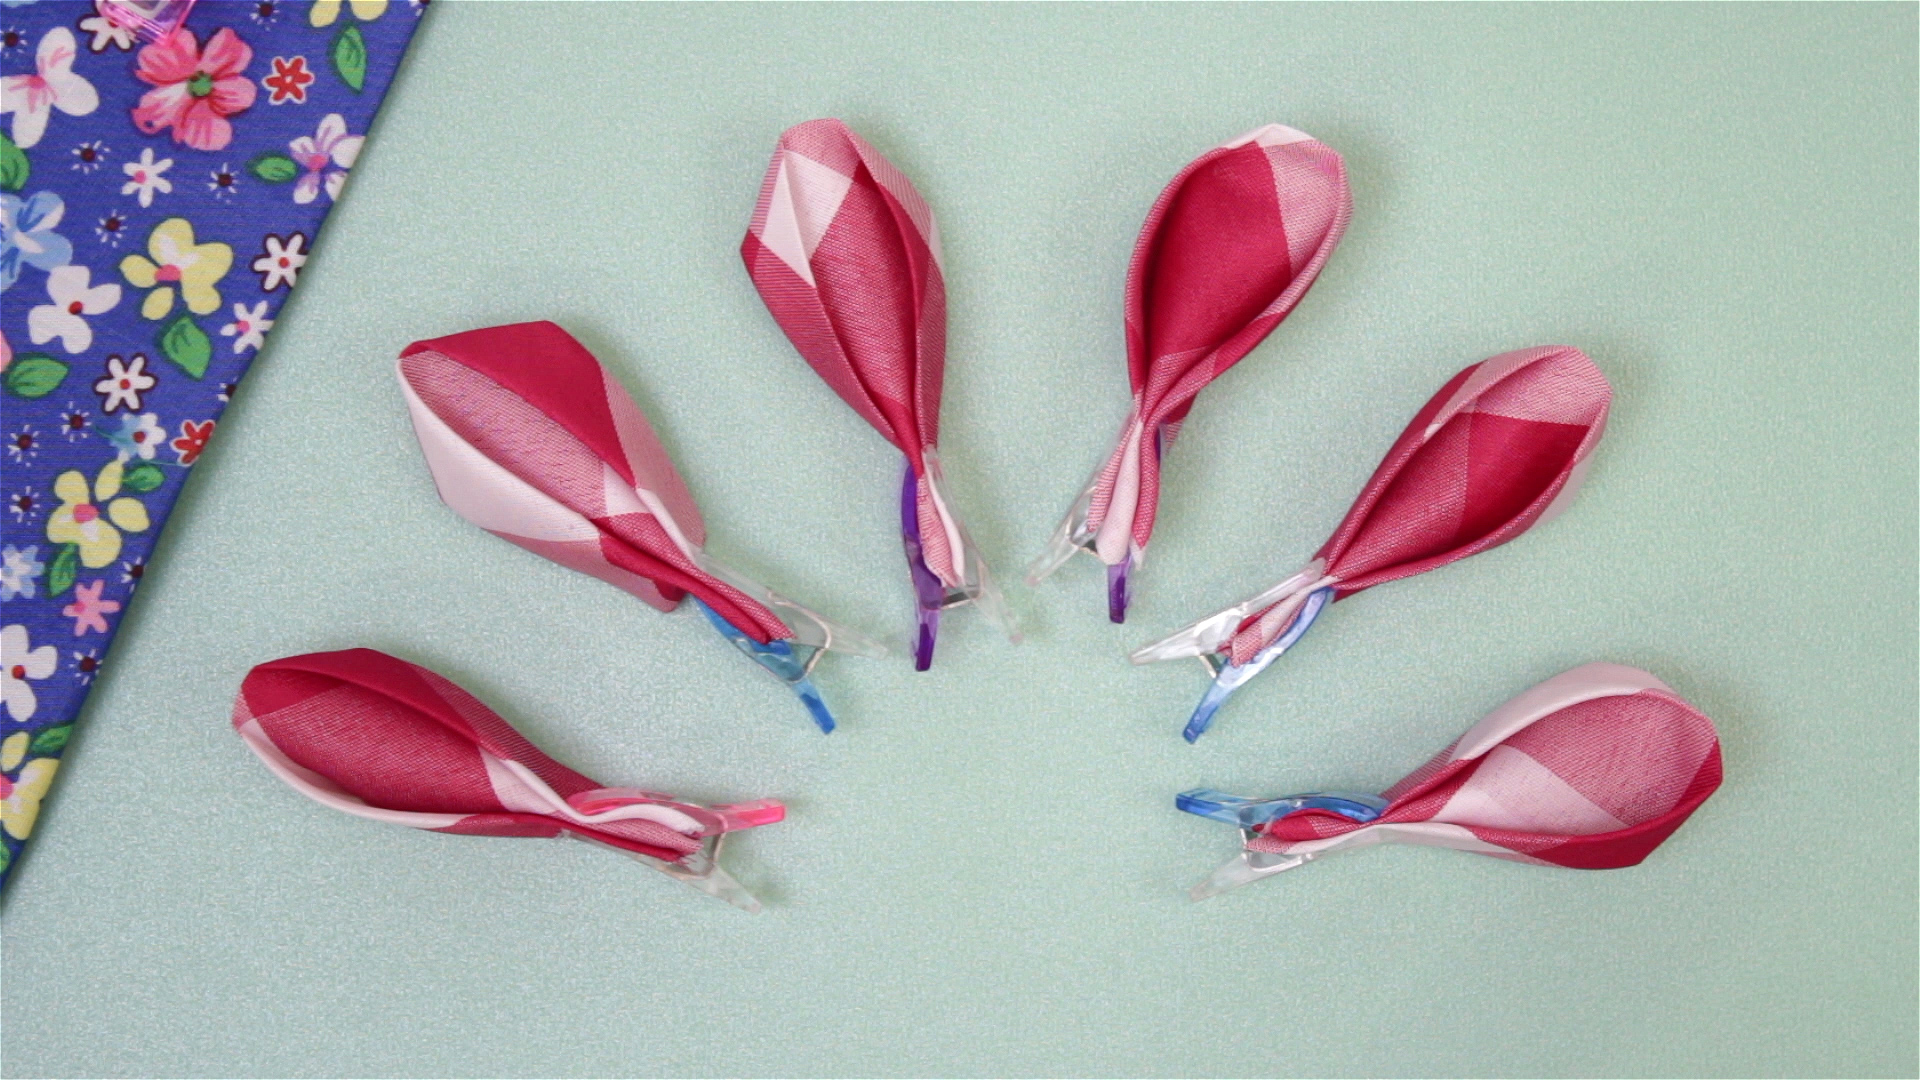
If the fabric slips, use a small clip to hold the petal while you prepare the others. Satin and silk often need clips, while cotton usually behaves better.
Step 5: Trim and Secure the Petal Base
Trim the raw base of the petal so it is even. You can secure it with a few stitches, a dot of fabric glue, or a tiny line of hot glue. If using hot glue, use the smallest amount possible. Kanzashi flowers should not look like they survived a glue volcano.
Repeat the same folding process until all petals are made.
Step 6: String or Glue the Petals Together
Thread a needle and knot the end. Run the needle through the base of each petal, adding one petal after another to the same thread. Once all petals are on the thread, gently pull the thread to gather them into a circle. Adjust the petals so they spread evenly.
Stitch through the first petal again to close the circle, then knot securely. For a no-sew method, glue the petal bases around a small felt circle. Sewing gives more flexibility for shaping; glue is faster and works well for decorative projects that will not be handled heavily.
Step 7: Add the Center
Cover the middle of the flower with a button, bead, pearl, rhinestone, fabric-covered button, or small felt circle. This hides the joins and instantly makes the flower look finished. A dramatic center can make a simple fabric flower look boutique-worthy.
Step 8: Finish the Back
Cut a felt circle slightly smaller than the flower. Glue or stitch it to the back to cover raw edges and add strength. Then attach your chosen hardware, such as a hair clip, brooch pin, headband, magnet, or gift-wrap tie.
Let the flower dry fully before wearing or attaching it to anything. This is not the moment to test gravity, enthusiasm, or impatient crafting energy.
How to Make Pointed Kanzashi Petals
Pointed petals are sharper and more dramatic than round petals. They are ideal for dahlias, starburst flowers, layered blooms, and bold hair accessories.
- Cut one fabric square for each petal.
- Fold the square diagonally into a triangle.
- Fold the triangle in half again, bringing the two sharp corners together.
- Fold it in half once more to create a narrow pointed petal.
- Trim the base evenly.
- Stitch or glue the base to secure it.
For crisp pointed petals, press each fold firmly and keep the layers aligned. If you want a fuller flower, use eight to twelve pointed petals. For a layered look, make one flower from larger squares and another from smaller squares, then stack the smaller flower on top.
Design Ideas for Fabric Kanzashi Flowers
Once you learn the basic folds, you can experiment with color, scale, and layering. A single fabric creates a clean, classic flower. Two coordinating prints create a playful handmade look. Ombre petals can mimic real flowers, while metallic or satin centers add a formal finish.
Creative Variations
- Two-tone petals: Use different fabrics for alternating petals.
- Layered blooms: Stack a small flower on top of a larger one.
- Leaf accents: Fold green pointed petals and place them behind the flower.
- Ribbon kanzashi: Use satin ribbon pieces instead of square fabric scraps.
- Seasonal flowers: Try red and green for holiday decor or pastels for spring crafts.
- Wedding accents: Use ivory satin, pearls, and lace for bouquets or hairpieces.
Common Mistakes and How to Fix Them
The Petals Look Uneven
Uneven petals usually come from uneven fabric squares or inconsistent folds. Cut carefully and fold every square in the same direction. Before knotting the thread, spread the petals out and adjust the spacing.
The Fabric Keeps Fraying
Choose tighter-weave fabric, use pinking shears, or add a small amount of fray sealant. You can also choose cotton for practice before moving to satin or silk.
The Flower Will Not Lie Flat
The petal bases may be too bulky. Trim the base of each petal evenly before gathering. If using thick fabric, reduce the number of petals or make a larger flower.
The Glue Shows
Use less glue and apply it only to hidden areas. Hot glue is convenient, but fabric glue often gives a cleaner finish. A center button or bead can hide minor glue mistakes because crafting is partly creativity and partly strategic camouflage.
How to Use Fabric Kanzashi Flowers
Fabric kanzashi flowers are wonderfully versatile. Attach one to a plain barrette for an instant hair accessory. Sew a cluster onto a tote bag. Add them to handmade cards, nursery decor, fabric wreaths, gift boxes, holiday ornaments, or throw pillows. Smaller flowers can become earrings, pendants, magnets, or scrapbook embellishments.
For wearable projects, stitch whenever possible instead of relying only on glue. A brooch or hair clip gets handled often, so secure construction matters. For wall art, wreaths, and gift toppers, glue is usually enough.
Care Tips for Handmade Kanzashi Flowers
Fabric flowers should be handled gently. Keep them dry unless the fabric and glue are washable. Dust them with a soft brush or lint roller. Store hair accessories in a small box so the petals do not get crushed. If a petal bends, gently reshape it with your fingers or use light steam from a safe distance, depending on the fabric type.
For gifts, include a small care note. It makes the handmade item feel more thoughtful and helps the recipient avoid tossing your delicate flower into a drawer with keys, coins, and other tiny agents of destruction.
Experience-Based Tips for Better Fabric Kanzashi Flowers
After making several fabric kanzashi flowers, one lesson becomes obvious: accuracy matters, but confidence matters more. The first flower may look a little lopsided. The second will look better. By the third, you will start judging buttons like a professional floral stylist. That is the magic of this craft. It improves quickly with repetition.
One of the best experiences for beginners is making a “practice garden.” Instead of trying to create the perfect flower immediately, cut several sets of squares from scrap cotton and make one flower with five petals, one with six, and one with eight. Compare the shapes. Five petals often look simple and sweet. Six petals feel balanced. Eight petals look fuller and more decorative. This small experiment teaches more than reading instructions alone.
Another helpful tip is to prepare all pieces before assembling. Cut every square, press every fold, and make every petal first. Then assemble the flower. When you stop halfway to cut more fabric, your folds may become inconsistent. Batch preparation keeps the rhythm smooth, and smooth rhythm makes neater flowers. It also makes you feel wonderfully organized, even if your craft table says otherwise.
Fabric choice can change the whole mood of the finished flower. Cotton creates a cheerful everyday look, especially with gingham, calico, dots, or tiny florals. Satin feels dressier and works beautifully for wedding hair clips, formal brooches, and holiday decorations. Linen is understated and elegant for rustic decor. If a fabric is slippery, use clips and work slowly. If a fabric is too thick, make larger petals or reduce the number of folds.
Color planning also makes a big difference. Beginners often reach for bold prints first, but small-scale patterns usually work better because each petal shows only a folded portion of the design. Large prints can disappear into abstract patches. Solid colors are great for learning because they highlight the petal shape. Once your folding is consistent, mix prints and solids for a more designed look.
For a professional finish, never ignore the back of the flower. A felt backing hides thread, glue, and trimmed edges. It also gives you a stable surface for attaching clips or pins. This one step can turn a “homemade experiment” into a polished handmade accessory. Think of the backing as the flower’s behind-the-scenes manager: not glamorous, but absolutely necessary.
If you are making kanzashi flowers for sale, gifts, or events, create a sample first and test it. Clip it to hair, pin it to fabric, or attach it to a bag and gently handle it. If anything loosens, reinforce it with stitches. A pretty flower is nice, but a pretty flower that survives real life is better.
Finally, allow room for personality. Traditional inspiration gives this craft its roots, but your fabric choices, colors, centers, and uses make each flower your own. A kanzashi flower can be elegant, playful, vintage, modern, romantic, or delightfully extra. Make one for a hair clip, then make another for a gift box, then make three more because the fabric scraps were just sitting there looking useful. That is not a problem. That is a hobby becoming a lifestyle.
Conclusion
Learning how to make fabric kanzashi flowers is a rewarding way to turn simple fabric squares into beautiful handmade decorations. With a few folds, a little stitching or glue, and a decorative center, you can create flowers for hair accessories, brooches, bags, home decor, gifts, and special occasions. Start with cotton, use larger squares, practice round and pointed petals, and finish each flower with a neat backing. Once you understand the basic technique, you can experiment endlessly with fabric, color, size, and layering.
The best part is that fabric kanzashi flowers do not require perfection. They reward patience, creativity, and a willingness to make “just one more.” Whether your style is classic, colorful, romantic, or boldly crafty, these folded fabric flowers are a charming project you can customize again and again.