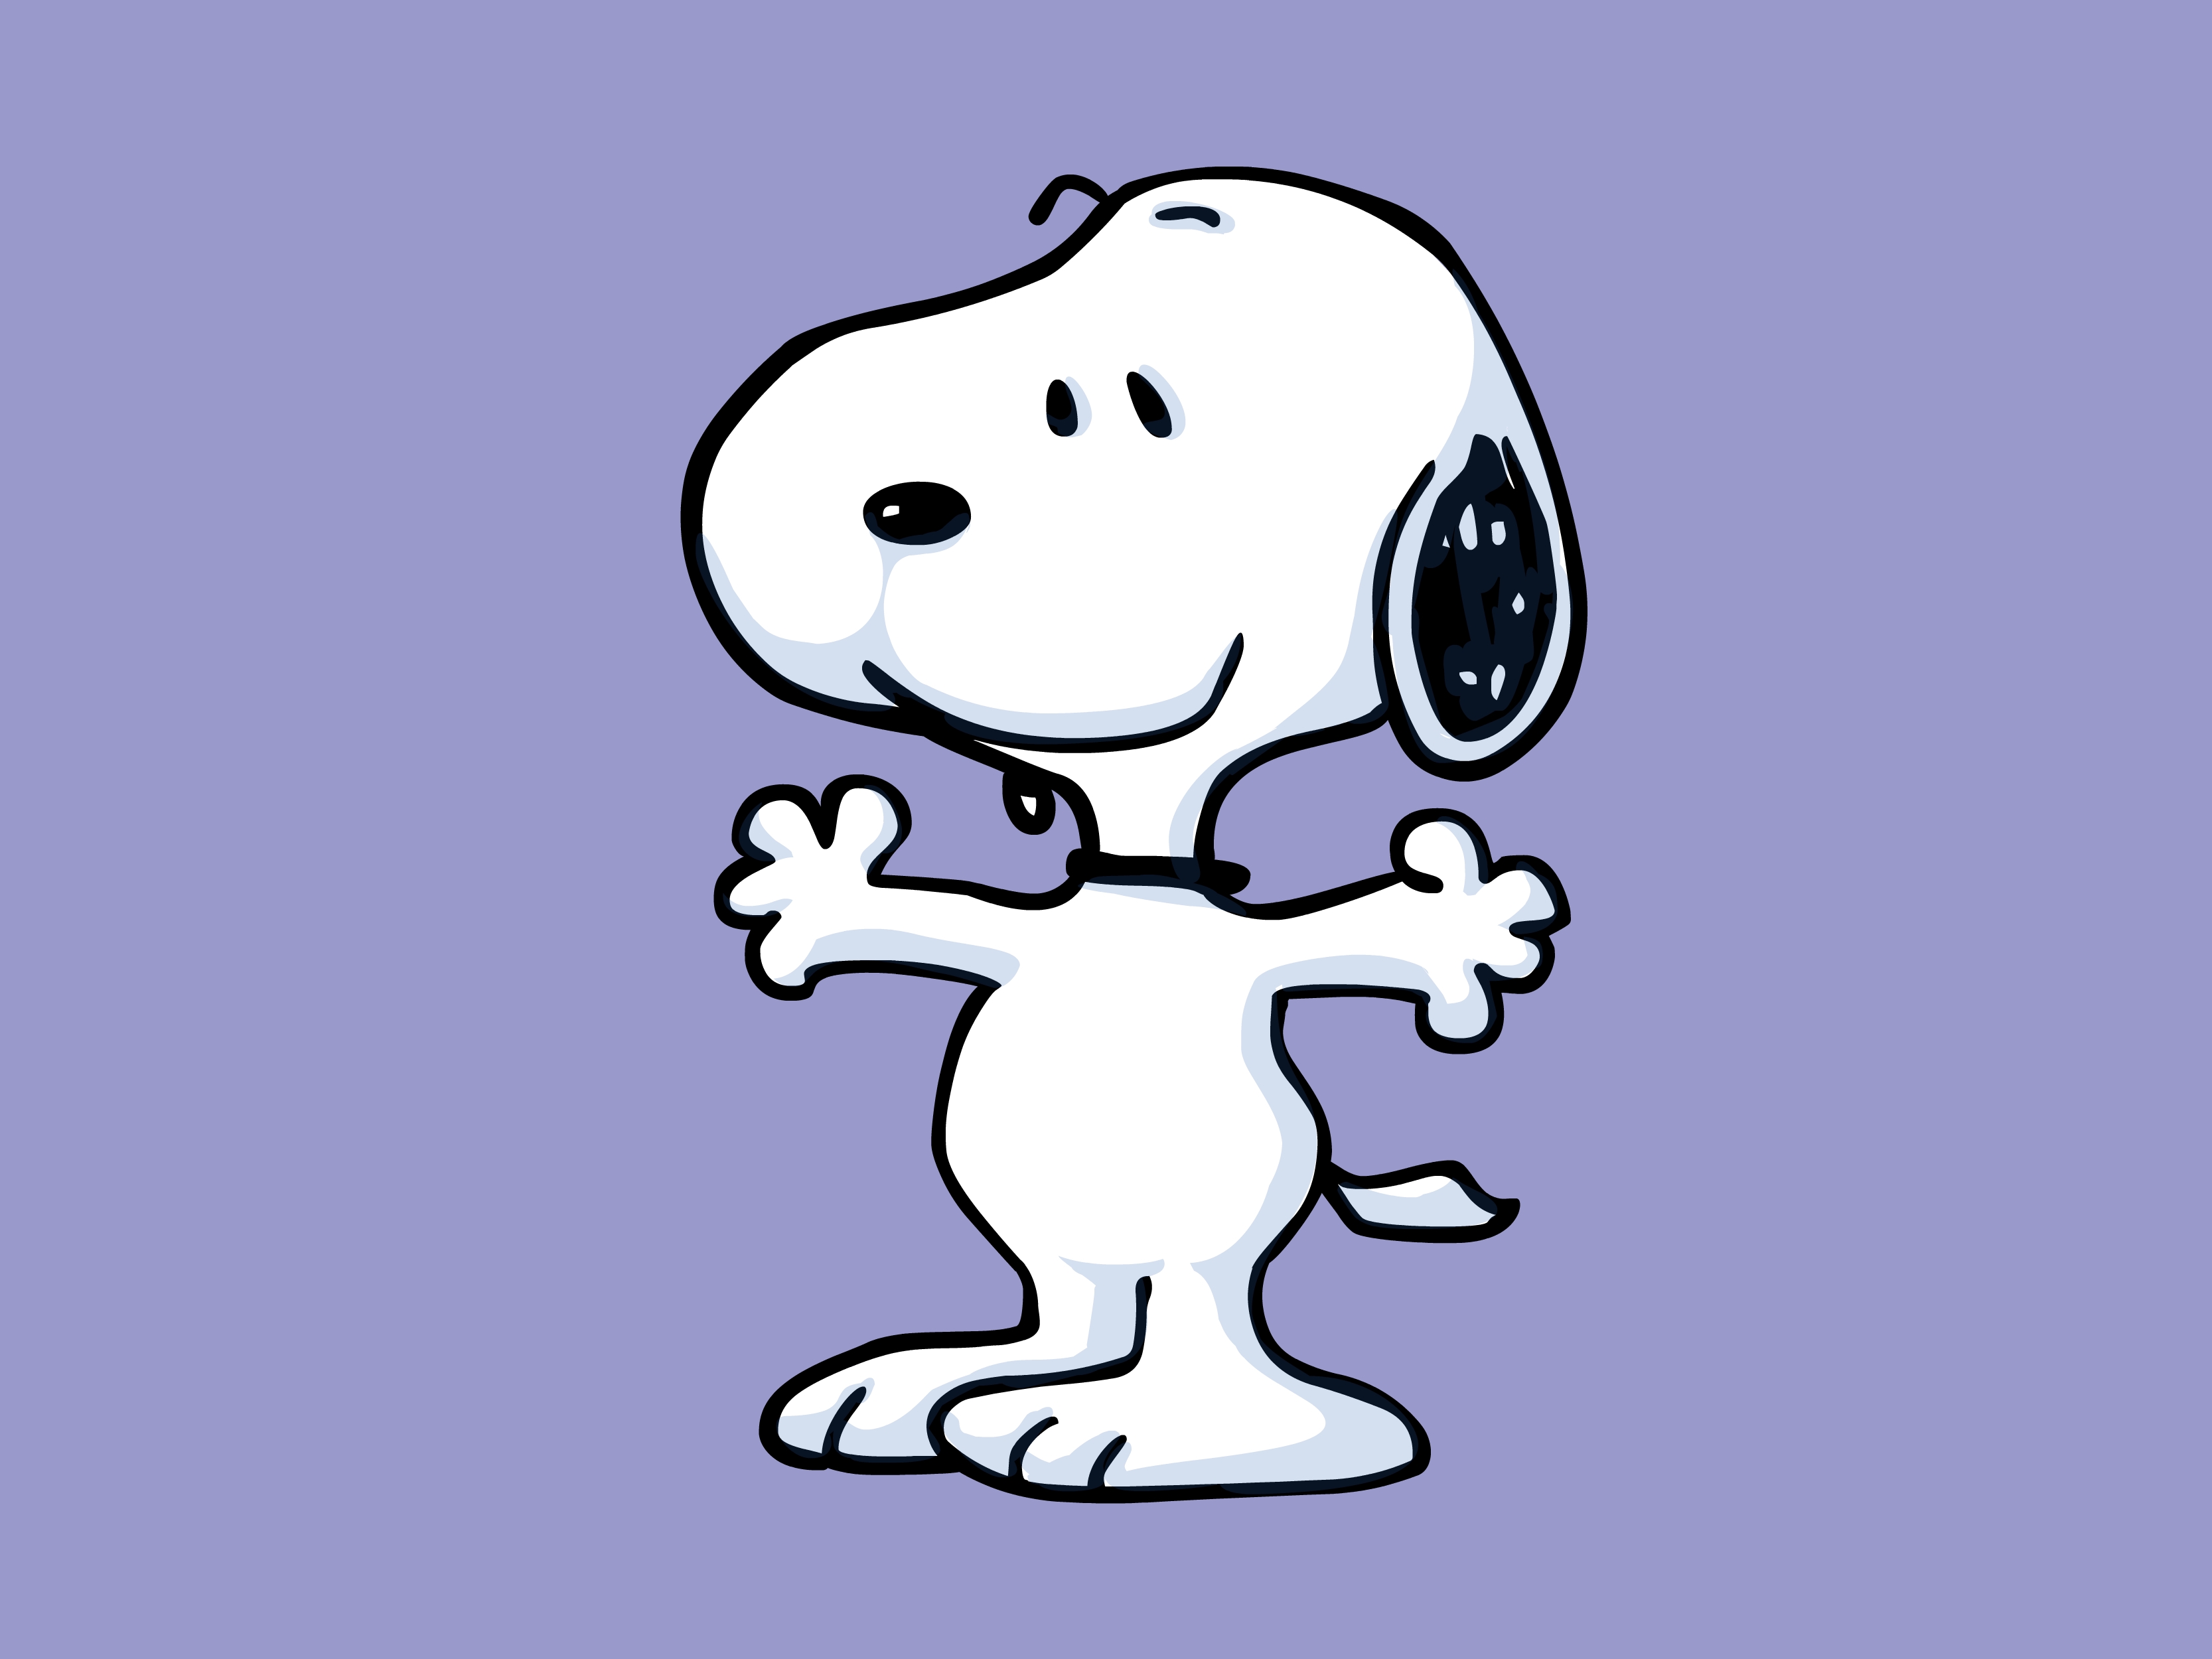

Snoopy looks wonderfully simple: a white body, black ears, a bean-shaped nose, and the confidence of a dog who has flown imaginary combat missions from a backyard doghouse. Yet many beginners discover that drawing him is a little trickier than expected. Move the nose too far, make the head too round, or shorten the ears, and Snoopy may suddenly resemble a confused seal.
The good news is that you do not need advanced art skills to capture his personality. This beginner-friendly Snoopy drawing tutorial breaks the character into easy shapes and teaches two recognizable poses. First, you will draw Snoopy sitting in a classic side view. Then you will create an upright, cheerful version that looks ready to dance.
Both methods use circles, ovals, curved guidelines, and patient observation. Work lightly at first, refine the proportions gradually, and remember that an imperfect line is not a catastrophe. It is simply a line that has not found its final job yet.
Why Snoopy Is a Great Character for Beginners to Draw
Charles M. Schulz created Peanuts with an economical visual style. The characters communicate through clean outlines, carefully placed facial features, and expressive poses rather than complicated shading. Snoopy is especially useful for learning cartoon drawing because his design can be reduced to several manageable forms.
His head resembles a long, rounded bean. His muzzle flows outward rather than appearing as a separate snout. The body is smaller than many beginners expect, while the black ears, nose, back marking, and tail help make the silhouette immediately recognizable.
Snoopy’s appearance also evolved during the decades-long run of Peanuts. Early versions behaved and stood more like an ordinary four-legged dog. Later, he walked upright, danced, typed stories, became Joe Cool, and imagined himself as the World War I Flying Ace. That evolution gives artists permission to study different poses while keeping the same essential character.
Supplies You Will Need
- Plain drawing paper or a sketchbook
- An HB or No. 2 pencil for construction lines
- A soft eraser
- A black fine-tip marker, felt-tip pen, or dark pencil
- Optional colored pencils or markers
- An official Snoopy image for personal reference
Ordinary printer paper is perfectly acceptable for practice. If you plan to ink the finished drawing, choose paper thick enough to prevent the marker from bleeding through. Keep a spare sheet beneath your work unless you want your tabletop to receive an unexpected Snoopy tattoo.
Understand Snoopy’s Basic Shapes and Proportions
The head
Snoopy’s head is not a perfect circle. Think of it as a soft peanut or bean shape positioned horizontally. The back of the skull is rounded, while the face projects forward into a broad muzzle. Avoid attaching a separate circular snout to the head; the forehead, muzzle, and cheek should feel like one flowing form.
The facial features
The nose is a small, solid black oval at the front of the muzzle. In a side view, the eye is usually a short vertical oval or dark dash placed high on the face. A curved eyebrow can change the expression dramatically. The mouth is understated, often requiring only one short curve.
The ears and body
Snoopy’s ears are long, floppy, and black. They hang from the rear side of the head and taper gently near the bottom. His torso is compact and pear-shaped, with a fuller lower half. In many familiar poses, the head is nearly as visually important as the entire body, so do not make the torso enormous.
The limbs and tail
The arms and legs are narrow, rounded tubes rather than realistic canine anatomy. His feet are soft ovals with tiny toe marks. The tail is short, curved, and usually contains a black marking near its base. These small dark areas balance the larger black ear and nose.
Method 1: How to Draw Snoopy Sitting in a Classic Side View
This is the easier of the two methods. The seated pose has a stable silhouette and fewer overlapping limbs, making it an excellent first Snoopy sketch.
Step 1: Sketch the head guide
Draw a light horizontal oval near the upper half of the page. Extend the front of the oval outward with a second curved line to form the muzzle. The complete guide should resemble a sideways bean rather than a balloon.
Add a faint horizontal guideline through the head. This helps you position the eye and nose without making Snoopy appear to be staring in two directions at once.
Step 2: Shape the muzzle and nose
Refine the upper outline from the forehead to the tip of the muzzle using one smooth curve. Draw a small oval at the very front and fill it with black. Leave a tiny white highlight if you want a shinier, more animated nose.
Curve the lower muzzle gently back toward the neck. Keep it rounded and avoid creating a sharp jawline. Snoopy is many thingswriter, pilot, philosopherbut square-jawed action hero is generally not one of them.
Step 3: Add the eye, eyebrow, and smile
Place one narrow vertical eye above the center of the muzzle. Draw a short eyebrow just above it. A slight upward eyebrow creates a cheerful expression, while a flatter one gives him his familiar calm confidence.
Add a tiny curved smile below the eye. If you want an open mouth, draw a small sideways curve with a dark interior, but keep it restrained. Oversizing the mouth can change the character’s gentle expression.
Step 4: Draw the floppy ear
Begin the ear near the back of the head. Draw a long shape that hangs downward and widens slightly before rounding at the bottom. Fill it with black later. The ear should overlap the neck area, which helps connect the head and body naturally.
Step 5: Build the seated body
Below the head, sketch a small pear-shaped torso. Make the chest narrow and the lower body fuller. The body should lean slightly backward in a relaxed seated position.
Add the visible arm as a slim curved shape resting along the front of the torso. Round the paw and separate it with a short interior line.
Step 6: Add the legs and feet
Draw one bent thigh as a rounded bulge at the base of the body. Extend an oval foot forward. Add the far foot behind it, allowing part of the shape to be hidden. Two or three short curves can suggest toes without turning the paw into a human hand.
Step 7: Draw the tail and back marking
Add a short tail behind the body. It should curve upward slightly and end in a rounded point. Draw a small black patch near its base. You may also add Snoopy’s irregular black spot on the back, depending on the angle of your pose.
Step 8: Clean up and ink the drawing
Check the silhouette before tracing. Is the head larger than the torso? Does the nose sit at the front of a broad muzzle? Does the ear hang from the back of the head?
When the proportions feel right, trace the final lines with a black pen. Wait until the ink dries, then erase the pencil guides. Fill the ear, nose, tail patch, and visible back marking evenly.
Method 2: How to Draw Snoopy Standing and Dancing
This second easy Snoopy drawing uses more movement. The secret is to sketch a gesture line before adding the body. That single line establishes the pose and prevents the character from looking as stiff as a dog-shaped refrigerator magnet.
Step 1: Draw a curved action line
Make a faint S-shaped line from the top of the head to the lower body. Lean it slightly to one side. This becomes the center of the dancing pose and gives Snoopy a sense of rhythm before you draw any details.
Step 2: Construct the head
Draw the familiar sideways bean shape at the top of the gesture line. Tilt the muzzle slightly upward to create a joyful expression. Add the oval nose at the front and a long black ear behind the head.
Place the eye high on the face. For a delighted look, draw it as a small curved line, as though Snoopy has closed his eye while enjoying the music playing entirely inside his imagination.
Step 3: Create the upright torso
Sketch a vertical pear-shaped body beneath the head. Keep the shoulders narrow and the belly rounded. Connect the head to the chest with two short neck curves, allowing the ear to overlap one side.
Step 4: Position the arms
Draw one arm raised diagonally and the other extending outward or downward. Use narrow curved shapes with rounded ends. A slight bend at each elbow adds energy.
Before finishing the paws, look at the negative space between the arms and body. Unequal spaces often make a pose feel more natural than perfectly symmetrical arms.
Step 5: Add dancing legs
Use the bottom of the torso as the hip area. Draw one leg supporting the body and bend the other backward or lift it forward. Make each foot a long, soft oval. The raised foot can point downward to emphasize motion.
If the pose seems unstable, imagine a line dropping from the torso to the supporting foot. Keeping the body over that foot makes the dance look lively without appearing ready to topple off the page.
Step 6: Finish the expression and markings
Add a small open smile, an eyebrow, and perhaps two short motion lines near the arms or feet. Draw the tail extending in the direction opposite the torso’s lean. This counterbalance makes the pose more convincing.
Ink the strongest contour lines, fill the black features, and erase the construction marks. For extra personality, add musical notes, Woodstock cheering nearby, or a simple ground shadow beneath the supporting foot.
How to Color Your Snoopy Drawing
Traditional Snoopy artwork relies heavily on black and white, so coloring should remain simple. Leave most of the head and body white. Fill the ears, nose, back spot, and tail marking with solid black. Use light blue or pale gray shadows sparingly if you want more depth.
A red collar provides a small burst of color. For the classic doghouse setting, use warm red walls and a darker roof edge. If you are drawing a Flying Ace theme, add a brown aviator cap and a bright red scarf. Keep backgrounds less detailed than the character so Snoopy remains the focal point.
Common Snoopy Drawing Mistakes and Easy Fixes
- The head looks too circular: Extend the muzzle and flatten the curve slightly beneath it.
- The character looks like a generic dog: Enlarge the head, simplify the limbs, and emphasize the long black ear.
- The body feels too large: Reduce the torso and compare it with the head before inking.
- The face looks crowded: Move the eye higher and give the muzzle more open white space.
- The pose feels stiff: Tilt the head, bend the action line, and make the arms asymmetrical.
- The outline looks scratchy: Practice each curve in the air, then draw it with one controlled motion.
- The black areas appear streaky: Fill them slowly with overlapping strokes after outlining their edges.
Ways to Practice After Completing the Tutorial
Redraw each pose at three different sizes. Small drawings teach simplification, while larger versions reveal proportion problems. You can also change only one feature at a time: raise an eyebrow, tilt the muzzle, rotate an arm, or reposition a foot. This shows how tiny adjustments create different emotions.
Another useful exercise is to study Snoopy from different eras of Peanuts. Compare an early four-legged version with the later upright character. Look for changes in the nose, body length, feet, and posture. Observation is more valuable than memorizing a rigid formula because cartoon characters are designed to move and act.
For personal practice, try placing your finished drawing in a simple scene. Snoopy might nap on his doghouse, write at a typewriter, balance a supper dish, or gaze at the moon. His famous connection with space exploration even makes an astronaut pose feel perfectly natural.
A Beginner’s Experience: What Usually Happens While Learning to Draw Snoopy
The first attempt commonly begins with confidence. Snoopy appears to be made from a few curves, so how difficult could it be? Five minutes later, the page may contain a large-headed creature with a tiny nose and an ear that seems to belong to a basset hound. This is normal. Simple cartoon designs expose proportion errors because there are few details available to distract the eye.
The most helpful breakthrough usually comes when the artist stops trying to draw “Snoopy” and starts drawing shapes. A bean becomes the head. A pear becomes the torso. Narrow tubes become the limbs. Once those forms are arranged correctly, the character seems to appear almost by himself. It feels less like performing artistic magic and more like assembling a very cheerful puzzle.
Beginners also tend to press too hard with the pencil. Dark construction lines become difficult to erase, and correcting the muzzle leaves a gray cloud around Snoopy’s face. Using lighter pressure changes the entire experience. The sketch becomes flexible, mistakes feel temporary, and the final ink lines remain clean. A relaxed grip helps create smoother curves as well.
The sitting pose often succeeds first because the body has a clear base. The dancing pose may require several revisions. One raised leg can make the figure look energetic, but moving it only half an inch may make Snoopy appear to be falling. Drawing the gesture line and supporting foot before the details usually solves that problem.
Facial features create another memorable lesson. A beginner may redraw the head repeatedly when the real problem is simply an eye placed too low. Moving that tiny mark upward can instantly restore Snoopy’s familiar expression. The same is true of the nose: its position defines the length and direction of the muzzle, so it deserves more attention than its size suggests.
Inking can feel intimidating after a successful pencil sketch. A useful approach is to begin with a less important area, such as the back or one foot, rather than immediately tracing the face. This gives the hand time to settle. Rotating the paper also helps; pulling a curve toward the hand is often easier than forcing the wrist through an awkward angle.
By the third or fourth drawing, most people notice that they no longer need every construction line. They begin anticipating where the ear connects, how far the muzzle extends, and how small the torso should be. The drawings may still differ from one another, but that variation is evidence of learning rather than failure.
The best final exercise is to keep the earliest attempt beside the newest one. The comparison usually reveals progress that was invisible from drawing to drawing: cleaner curves, better balance, and a more expressive pose. Snoopy has always been a character with an enormous imagination, so a drawing lesson inspired by him deserves the same playful spirit. Practice seriously, but do not make the experience solemn. Even a slightly wobbly Snoopy can still dance.
Conclusion
Learning how to draw Snoopy becomes much easier when you focus on shape, proportion, and gesture. Begin with light construction lines, build the head as a flowing bean shape, keep the torso compact, and position the black features carefully. The seated method develops control and proportion, while the dancing method introduces movement and balance.
Do not judge success by whether the first drawing looks professionally printed. Judge it by whether the second drawing improves on the first. With a few practice pages, your Snoopy will move from “mysterious white dog” to “world-famous beagle”and that is a promotion worth celebrating with a happy dance.
Note: Snoopy and Peanuts are protected intellectual properties associated with Peanuts Worldwide LLC. This independent tutorial is intended for educational and personal fan-art practice. Obtain appropriate permission before using character artwork commercially.