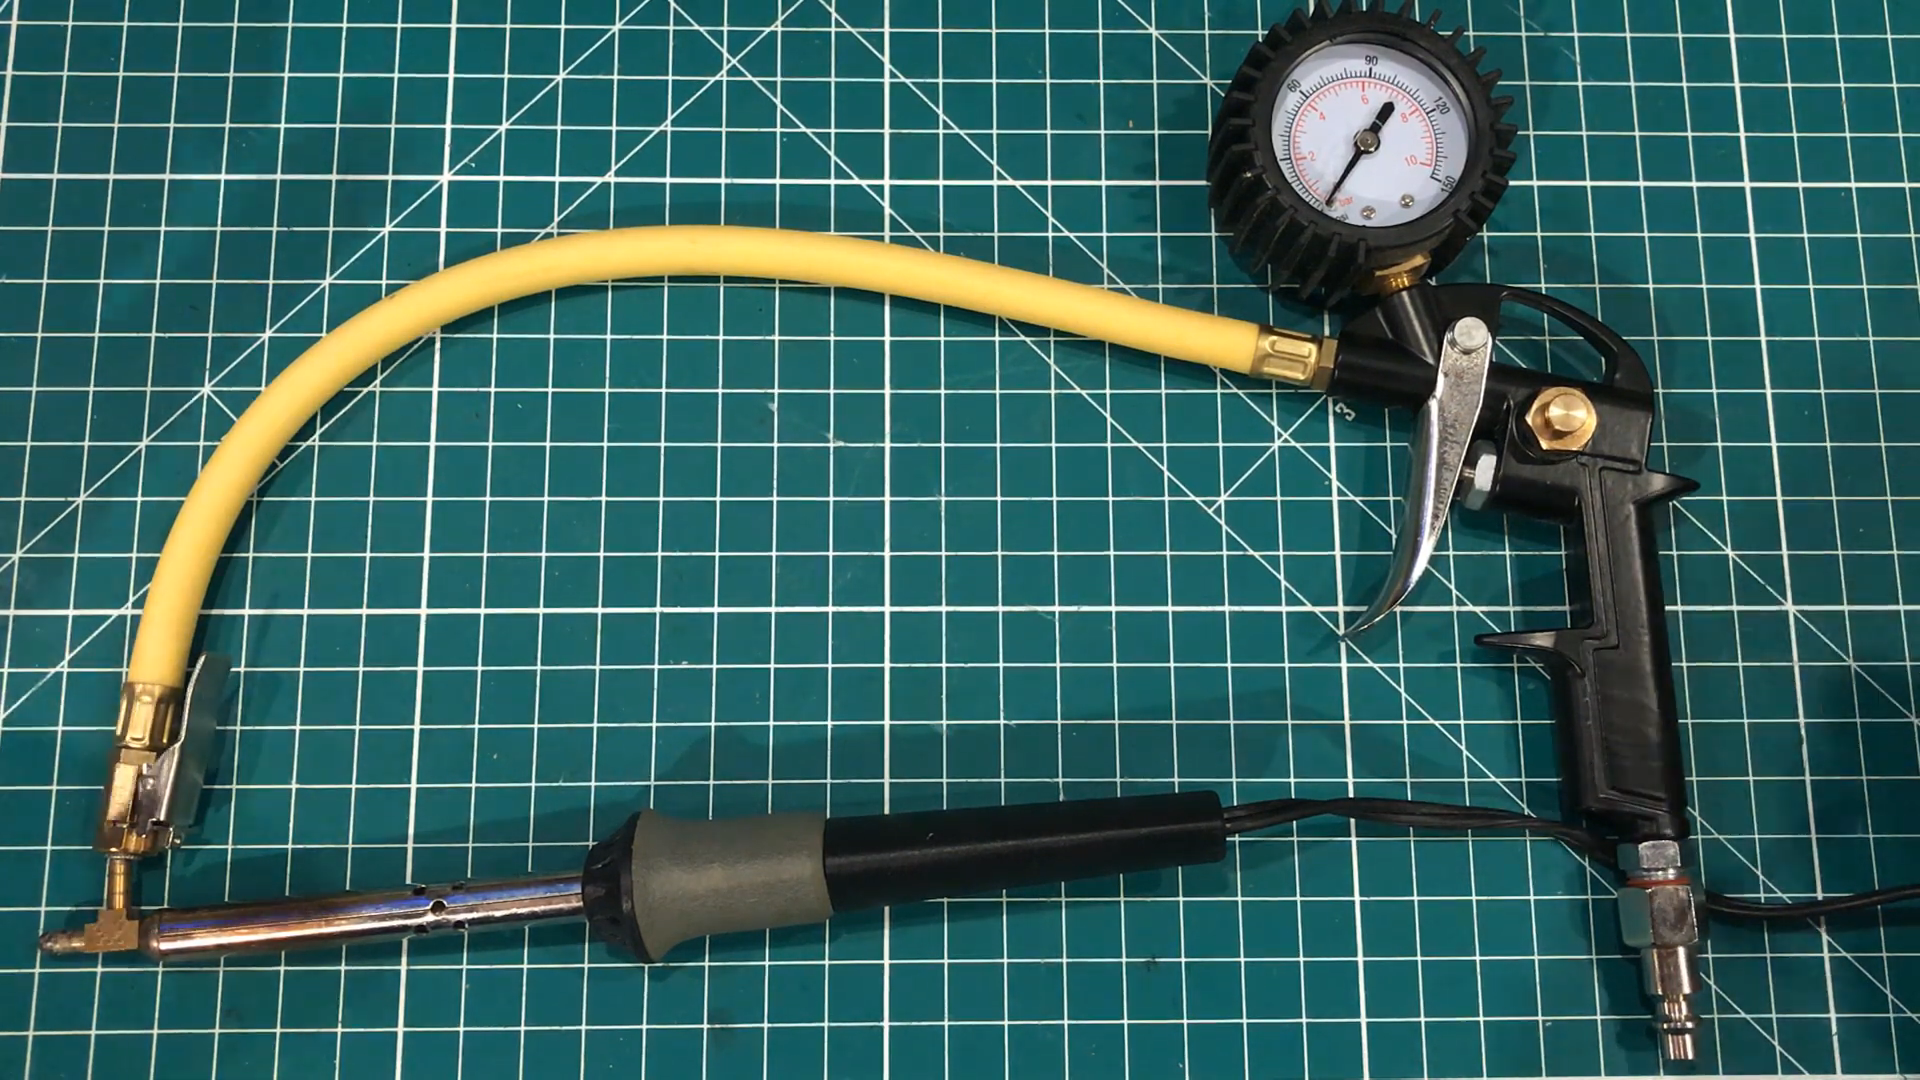

Every electronics bench has a few ideas that begin with, “This is probably a terrible plan,” and end with either a useful tool, a scorch mark, or a new respect for safety glasses. The phrase “bad idea for desoldering actually might be pretty smart” fits that tradition perfectly. It describes the kind of workshop experiment that makes experienced repair techs raise one eyebrow, beginners lean closer, and everyone else wonder whether the fire extinguisher is within arm’s reach.
The basic concept sounds wonderfully unwise: instead of using a normal desoldering pump, solder wick, or vacuum desoldering station, someone heats the solder joint and uses air pressure to blast molten solder out of the hole. On paper, that is a tiny cannon full of hot metal. In practice, the idea points toward something genuinely useful: controlled airflow, suction, and clever tool design can make desoldering faster, cleaner, and less frustrating.
So is it genius, nonsense, or the classic maker-space combination platter? Let’s take it apart carefullypreferably without spraying solder confetti across the room.
Why Desoldering Is Harder Than It Looks
Soldering gets all the glory. You heat the joint, feed in solder, admire the shiny little volcano, and pretend you meant to make it that tall. Desoldering, however, is where electronics repair reveals its true personality. Removing a component from a printed circuit board sounds simple until the solder refuses to melt evenly, the component lead clings to the plated through-hole like it signed a long-term lease, and the copper pad threatens to lift if you look at it rudely.
Good desoldering depends on three things: heat control, solder movement, and patience. Heat must be high enough to melt the joint but not so high that it burns the board, loosens pads, or damages nearby components. The molten solder must be removed before it solidifies again. And patience matters because forcing a component out of a half-melted joint is one of the fastest ways to turn a repair job into an archaeological dig.
Common Tools for Removing Solder
Most technicians and hobbyists rely on a few standard desoldering tools:
- Solder wick: braided copper that absorbs molten solder when heated with an iron.
- Manual desoldering pump: a spring-loaded solder sucker that pulls liquid solder away from a joint.
- Vacuum desoldering gun: a heated hollow tip connected to a vacuum pump.
- Hot air rework station: controlled hot air used mainly for surface-mount components.
- Low-melt alloy: a specialty alloy that keeps solder liquid longer so components can be removed gently.
- Desoldering tweezers: heated tweezer tips for removing small two-terminal surface-mount parts.
Each tool has a place. Solder wick is excellent for cleaning pads after a part is removed. A pump works well on chunky through-hole joints. A vacuum desoldering gun is a joy when removing rows of pins from old boards. Hot air is ideal for many surface-mount components. Low-melt alloy feels like wizardry when an IC refuses to come free. The trick is knowing which “undo button” belongs to which mistake.
The “Bad Idea”: Blowing Molten Solder Away
The controversial desoldering idea is simple: heat the solder, then use compressed air to clear the hole. The appeal is obvious. Air moves quickly. Molten solder is liquid. Put those facts together and the solder exits the joint in a hurry. Unfortunately, it may also exit toward your fingers, your face, your keyboard, your cat, or the mysterious corner of the workshop where dropped screws go to start new lives.
From a safety standpoint, uncontrolled air blasting is a mess. Hot solder can burn skin. Tiny solder droplets can hit eyes. Leaded solder residue should not be scattered around a workspace. Air pressure can fling conductive bits onto the board, creating shorts that are difficult to diagnose later. Even with lead-free solder, nobody needs metallic shrapnel seasoning the bench like industrial glitter.
That said, the idea is not completely absurd. It correctly identifies a real problem: desoldering is often less about melting solder and more about moving it away at the exact moment it becomes liquid. The dangerous part is not the idea of using airflow; it is using the wrong kind of airflow in the wrong direction with too much enthusiasm.
Why the Concept Might Actually Be Smart
The smart version of this idea is not “blast solder everywhere.” The smart version is controlled pneumatic desoldering. Commercial desoldering stations already combine heat and suction. A hollow heated tip melts the joint, and a vacuum pulls molten solder into a chamber or filter. That is the civilized cousin of the wild compressed-air experimentthe one that wears shoes indoors and owns a label maker.
The interesting leap is this: compressed air can also create vacuum through a venturi effect. In a venturi system, fast-moving air passes through a shaped restriction and creates a low-pressure region that can draw air from another port. Industrial tools use this principle for vacuum pickup, automation, and material handling. In a desoldering context, the concept could be adapted so shop air does not blast solder outward but instead creates suction that pulls solder inward into a safe catch chamber.
That is where a “bad idea” becomes a design prompt. Instead of asking, “Can I blow the solder off the board?” the better question is, “Can I use available air pressure to create a controlled vacuum, catch the solder, protect the operator, and avoid clogging?” Now we are not playing molten-metal dodgeball. We are engineering.
Air Pressure vs. Vacuum: The Crucial Difference
Blowing and sucking may sound like opposite ends of the same shop-air hose, but in desoldering they produce very different outcomes.
Blowing Solder Out
Blowing molten solder away from a joint can clear a through-hole quickly, especially on scrap boards. It is crude and effective in the same way kicking a stuck drawer is sometimes effective. The problem is control. You do not know exactly where the solder will go, how far it will travel, or whether it will bridge two traces on the board before cooling. It is best reserved for the category labeled “things people admit doing once, then immediately follow with a safety lecture.”
Pulling Solder In
Vacuum desoldering is cleaner because it gives molten solder a destination. The solder travels through the hollow tip and into a chamber, filter, glass tube, or collection reservoir. This reduces mess, improves repeatability, and protects the board from random solder beads. A good vacuum system also removes solder quickly enough that the plated through-hole is left open rather than half-filled with a stubborn silver plug.
In other words, the clever part of the bad idea is not the air blast. It is the realization that airflow can solve the “where did the molten solder go?” problem. The answer should be “into a container,” not “somewhere near the coffee mug.”
What Makes a Desoldering Method Good?
A good desoldering method is not simply the one that removes the part fastest. Speed is useful, but repair work rewards control. The best method protects the component, the board, the operator, and nearby parts.
1. It Controls Heat
Excessive heat can lift pads, soften adhesives, delaminate PCB layers, and cook components. Too little heat causes another problem: the user keeps pushing, pulling, and reheating until the board finally gives up. Temperature-controlled tools are popular because they reduce guesswork. Fresh solder and flux can also help transfer heat into old oxidized joints.
2. It Moves Solder Efficiently
Solder has to leave the joint while it is molten. Wick uses capillary action. Pumps use suction. Vacuum guns combine both timing and suction in one hand. Low-melt alloys keep the joint liquid longer, making removal less frantic. Air-based systems can be useful only when the flow is controlled and the solder is contained.
3. It Protects the PCB
A pad lifted from the board is the repair equivalent of dropping a taco filling-side down. You may recover, but the mood changes. To protect pads, avoid prying, use flux, apply heat only as long as necessary, and let the soldernot forcerelease the part.
4. It Keeps the Workspace Safe
Desoldering creates fumes from flux, hot surfaces, sharp leads, and sometimes lead-containing residue. A good setup includes eye protection, ventilation or fume extraction, a stable board holder, a heat-resistant work surface, and the humility to stop before a “quick fix” becomes a bench-clearing event.
When the Weird Method Makes Sense
There are situations where aggressive desoldering techniques are not completely irrational. The key word is context. Are you repairing a rare vintage synthesizer board? Do not use it as a pneumatic target. Are you stripping components from a dead power supply board outside, wearing eye protection, and planning to recycle the remaining board? That is a different level of risk and value.
For salvage work, the priorities may shift. If the board is already scrap and the goal is to recover large through-hole parts, connectors, transformers, or chunky components, speed matters. People have used hot plates, heat guns, solder pots, and gravity tricks for years. Some methods are ugly but effective. The smarter approach is to borrow the useful principlefast removalwhile removing the unnecessary chaos.
For repair work, however, controlled tools win. A solder sucker, wick, low-melt alloy, or proper vacuum desoldering gun is almost always a better choice. If the component and PCB both need to survive, do not choose the method that sounds like it was invented during a dare.
A Safer Way to Think About DIY Desoldering Tools
The maker instinct is valuable. Many excellent tools began as questionable prototypes. But when heat, pressure, electricity, and molten metal share the same project, the design needs boundaries.
Use Vacuum, Not Projectile Solder
If air power is part of the design, aim for suction. A venturi vacuum generator, diaphragm pump, or salvaged vacuum source can be more sensible than direct compressed air at the solder joint. The system should pull solder into a container with a filter or trap, not launch it onto the bench.
Include a Catch Chamber
Molten solder cools quickly and can clog narrow passages. A proper catch chamber gives solder droplets a place to land before they reach the pump, venturi, tubing, or operator. Commercial desoldering guns often use filters and collection tubes for this reason.
Keep the Electrical Side Boring
Boring is beautiful when mains voltage is involved. Any DIY heated tool should avoid exposed conductors, questionable insulation, mystery cords, and “temporary” wiring that becomes permanent because it still works. Use approved equipment whenever possible. A cheap tool that risks shock or fire is not cheap; it is just invoicing you later.
Test on Scrap Boards
No experimental desoldering method belongs on a valuable PCB first. Practice on junk boards. Observe pad lifting, heat spread, solder splatter, clogging, and how long the joint must be heated. Scrap boards are teachers with low emotional overhead.
Choosing the Right Desoldering Method for the Job
The smartest desoldering decision is often the least dramatic one. Before inventing a tool that sounds like it needs a waiver, match the job to a proven method.
For Through-Hole Resistors, Capacitors, and Headers
Use a soldering iron with a manual solder sucker. Add fresh solder and flux if the old joint is dull or stubborn. Heat the joint thoroughly, trigger the pump close to the molten solder, and repeat if needed. Finish with solder wick if the hole still has residue.
For Multi-Pin ICs and Connectors
A vacuum desoldering gun is ideal. If you do not have one, combine flux, fresh solder, wick, and patience. For parts that do not need to survive, cutting the leads and removing them one at a time can save the board. It feels brutal, but it is often kinder to the PCB.
For Surface-Mount Components
Hot air rework, tweezers, or low-melt alloy usually make sense. Shield nearby plastic connectors and heat-sensitive components. Use controlled airflow; too much air can blow tiny resistors into the next zip code.
For Salvage From Dead Boards
Salvage work allows more aggressive methods, but safety still matters. Work in a ventilated area, wear eye protection, avoid breathing fumes, and contain solder debris. Even if the board is junk, your lungs and eyeballs are not consumables.
Why Flux Is the Unsung Hero
Many desoldering failures are really flux failures wearing a fake mustache. Flux cleans oxidation, improves heat transfer, and helps solder flow. Old joints often contain oxidized solder that melts reluctantly and behaves like it has a personal grudge. Add flux and a little fresh solder, and suddenly the joint remembers it is supposed to be metal, not concrete.
Flux also helps solder wick work properly. Without flux, braid may sit on top of the joint and do very little. With flux and the right iron temperature, the solder flows into the braid cleanly. This is why experienced technicians seem to use flux constantly: not because they enjoy sticky amber residue, but because it works.
The Hidden Risk: Pad Damage
The most painful desoldering mistake is not destroying the component. Components can often be replaced. The bigger problem is damaging the board. Lifted pads, broken vias, torn traces, and overheated laminate can turn a simple repair into a delicate reconstruction project.
Pad damage usually happens when heat and force team up. If the solder is not fully molten and the component is pulled, the copper pad can separate from the fiberglass board. This is especially common on older boards, low-cost PCBs, single-sided boards, or boards that have already been reworked. The cure is simple but emotionally difficult: stop pulling. Add flux. Reheat. Remove solder. Try again.
The Environmental Angle: Salvage Is Not Silly
Desoldering is not only about fixing mistakes. It also helps recover useful components from electronics that would otherwise become waste. Connectors, switches, transformers, displays, sensors, and mechanical parts can often be reused in prototypes. That does not mean every old board deserves three hours of heroic extraction, but component reuse is a practical way to reduce waste and stretch a hobby budget.
The smarter version of the “bad idea” supports that goal. A fast, controlled, safe desoldering method could make salvage easier and encourage repair rather than replacement. When a tool helps people recover parts without damaging themselves, the component, or the workspace, it moves from questionable hack to useful innovation.
So, Is It Actually Smart?
The original compressed-air concept is smart in the same way a raccoon opening a cooler is smart: impressive, effective, and not something you want happening unsupervised in your kitchen. Blasting molten solder with high-pressure air is not a recommended repair technique. It is messy, risky, and unpredictable.
But the underlying insight is solid. Desoldering improves when heat and airflow work together. If the airflow becomes vacuum, if the solder is captured, if the tool is electrically safe, and if the operator uses proper protection, the wild idea becomes a practical one. That is how many workshop inventions evolve: first it is a questionable trick, then it is a prototype, then someone adds a filter, a switch, a guard, and a warning label, and suddenly it looks like a product.
Practical Lessons From a “Bad” Desoldering Idea
The lesson is not “go blast your PCB with compressed air.” Please do not. The lesson is that weird ideas can expose real needs. In this case, the need is obvious: hobbyists want affordable, reliable ways to desolder components without buying expensive stations or destroying boards.
A good DIY desoldering concept should solve five problems: deliver heat efficiently, remove solder quickly, contain debris, protect the board, and keep the user safe. Any design that fails one of those tests needs revision. Any design that fails three of them belongs in the “funny story” folder.
The best repair mindset is experimental but not reckless. Test, observe, improve, and know when to use the correct tool. A soldering iron and wick may not look exciting, but they have saved more circuit boards than most dramatic hacks ever will. Still, a clever pneumatic vacuum tool built from safe parts? That might deserve a spot on the bench.
Experience Addendum: What This Topic Teaches at the Workbench
Anyone who has spent enough time around electronics eventually develops a private museum of desoldering memories. There is the first board you saved, the first pad you lifted, the first time solder wick worked perfectly, and the first time you realized that “just a little more heat” can become “why does the board smell like burnt toast?” These experiences are what make the phrase “bad idea for desoldering actually might be pretty smart” feel so familiar. It captures the messy learning curve of repair.
One common beginner experience is fighting a through-hole component that will not come out. You heat one pin, then the other, then the first one freezes again. You add force. The part tilts. The board flexes. Somewhere in the distance, an experienced technician whispers, “Use flux,” but you are too busy negotiating with a capacitor. Eventually you learn the trick: add fresh solder, use enough heat, remove solder while it is fully liquid, and let the joint release naturally. Suddenly the job that felt impossible becomes routine.
Another memorable lesson comes from old consumer electronics. Vintage boards can be both generous and cruel. They often have large components worth salvaging, but the solder may be oxidized, the pads fragile, and the holes stubborn. A manual solder sucker can work beautifully on one joint and fail completely on the next. That is when technique matters. Re-tinning the joint, adding flux, cleaning the tip, and using the correct pump angle can change the result. The tool is only half the story; timing is the other half.
Surface-mount work teaches a different kind of humility. Hot air looks magical until a tiny resistor skitters away like it just heard bad news. Too much airflow is a real problem. So is heating a board unevenly. The better approach is controlled temperature, moderate airflow, preheating when appropriate, and patience. The best surface-mount removals are almost boring: the solder softens, the part slides away, and nobody has to search the floor with a flashlight.
Salvage work is where experimental ideas become tempting. If the board is dead and the parts are useful, speed feels more important than elegance. Many hobbyists have tried questionable techniques on scrap boards: heat guns, improvised clamps, gravity, tapping, and yes, airflow. These methods can teach real lessons about how solder behaves, but they also show why containment matters. The first time a tiny bead of solder lands somewhere unexpected, the value of eye protection becomes extremely obvious.
The smartest experience-based rule is simple: separate learning from repairing. Experiment on scrap. Practice clearing holes. Try wick sizes. Compare a pump with a vacuum gun. Observe what overheats first. Learn how much solder is too much, how much flux is just enough, and how long a pad can tolerate heat. Then, when a valuable board arrives, use the calm method instead of the dramatic one.
In the end, the “bad idea” is valuable because it reminds us that repair is practical problem-solving. Sometimes a silly-looking trick reveals a real engineering principle. Sometimes it just makes a mess. Wisdom is knowing the difference before the molten solder starts flying.
Conclusion
Bad Idea For Desoldering Actually Might Be Pretty Smart is more than a funny workshop headline. It is a useful reminder that innovation often starts with an ugly prototype and a nervous laugh. Blowing molten solder around with compressed air is not a safe or recommended technique, but the deeper conceptusing controlled airflow to remove solderhas real merit. Vacuum desoldering tools, venturi systems, solder traps, flux, and smart heat control all show that the idea can be refined into something practical.
For everyday electronics repair, stick with proven methods: solder wick, a good solder sucker, a temperature-controlled iron, hot air rework, low-melt alloy, and proper ventilation. For experimentation, use scrap boards, eye protection, and common sense. A clever hack should make repair easier, not turn your bench into a tiny foundry accident with USB ports.