
A DIY mosaic garden table can turn an ordinary patio corner into a colorful outdoor retreat. It is practical enough to hold lemonade, flowerpots, or a suspiciously large plate of grilled food, yet artistic enough to become the centerpiece of your garden. Better still, you do not need to be a professioe.
This project involves decorating a strong tabletop with small pieces of ceramic, porcelain, glass, stone, or repurposed china. The pieces are arranged into a pattern, bonded with exterior-rated mortar or adhesive, filled with grout, and protected against moisture. The basic prontly punishes anyone who says, “I’ll just eyeball everything.”
The following guide explains how to choose a table, create a mosaic pattern, install the tiles, grout the surface, protect it from outdoor weather, and avoid the mistakes that commonly lead to cracks or loose pieces.
Why Make a DIY Mosaic Garden Table?
A mosaic table is more than an outdoor furniture makeover. It is an opportunity to create something that fits your exact garden style rather than settling for another mass-produced beige table that looks as enthusiastic as a tax form.
You can coordinate the tabletop with patio cushions, flowers, planters, painted fencing, or nearby architectural features. A blue-and-white design creates a Mediterranean atmosphere, while green and yellow fragments complement a pollinator garden. Terracotta, cream, and cobalt pieces work well in a Southwestern setting. Bright mixed colors can give a balcony or small patio a playful personality.
The project is also ideal for using leftover tiles, chipped plates, discontinued samples, and thrift-store ceramics. However, outdoor durability should remain the priority. A beautiful mosaic made from unsuitable materials may look wonderful for one summer and then begin shedding pieces like a ceramic autumn tree.
Choosing the Right Table Base
The finished mosaic will be heavier than the original tabletop, so begin with a stable table that does not wobble. Metal patio tables, concrete tables, and solid wood frames with reinforced tops are common choices. An old bistro table can work particularly well because its small surface keeps the project manageable.
Check the Frame
Tighten loose screws, repair weak joints, and remove rust before adding the mosaic. A tabletop that flexes under pressure can cause grout and tile to crack. Press down gently at several points. If the surface bends, reinforce it before continuing.
Select a Weather-Resistant Surface
Concrete and cement backer board provide stable surfaces for outdoor tile. Exterior-grade plywood can be used in some table designs, but bare plywood should not be treated as a permanent weatherproof substrate. Wood expands and contracts as moisture and temperature change, while tile and grout are comparatively rigid.
For a wooden tabletop, a more durable approach is to reinforce the frame and install exterior-rated cement backer board according to the board and mortar manufacturers’ instructions. Seal exposed edges carefully so rainwater cannot enter the assembly.
Consider the Finished Weight
Tile, mortar, grout, backer board, and edging can add considerable weight. A lightweight folding table may not be suitable. The legs should remain wide enough and strong enough to support the finished top without becoming unstable.
Materials and Tools
Exact supplies depend on the table and tile type, but most DIY mosaic garden table projects require the following:
- A sturdy table frame or reinforced table base
- Exterior-rated cement backer board, if needed
- Exterior-rated porcelain, ceramic, glass, or stone mosaic pieces
- Polymer-modified thin-set mortar approved for exterior use
- Exterior-rated grout or high-performance grout
- Penetrating grout and tile sealer, when required
- Tile nippers or a suitable tile-cutting tool
- A notched trowel or small notched spreader
- A rubber grout float
- Tile spacers, toothpicks, or temporary spacing guides
- Grout sponges and clean buckets
- A measuring tape, pencil, and straightedge
- Safety glasses, gloves, and closed-toe shoes
Read the labels before purchasing mortar, grout, or sealer. A product designed only for indoor backsplashes is not automatically suitable for a table exposed to rain, sun, freezing temperatures, or summer heat.
Choosing Mosaic Tiles for Outdoor Use
Porcelain is one of the strongest choices for an outdoor mosaic tabletop because it is dense and absorbs very little water. Low water absorption is especially important in climates where moisture can enter the installation and freeze.
Exterior-rated ceramic tile may also work, but not every ceramic product is approved for outdoor conditions. Check the manufacturer’s specifications rather than judging by appearance. A tile printed with adorable lemons can still be completely unprepared for winter.
Glass mosaic tile offers vivid color and does not fade easily, but the correct mortar must be used because some glass is translucent. Dark or uneven adhesive may show through. Natural stone creates an earthy appearance but may be porous, prone to staining, or sensitive to certain cleaners. It often requires sealing before or after grouting.
Can You Use Broken Plates?
Broken china and ceramic dishes can create a charming recycled mosaic. Use pieces with similar thicknesses whenever possible so the finished tabletop remains reasonably level. Avoid fragments with sharp raised edges, weak crazing, or decorations that may not tolerate outdoor exposure.
Do not smash plates while holding them or scatter fragments across the driveway like an overly dramatic cooking-show contestant. Wrap each item in a thick towel or place it inside a sturdy container before breaking it, then shape the pieces with tile nippers while wearing eye protection.
Planning the Mosaic Design
A successful design should look attractive from several directions because people will view a garden table while walking around it. Circular patterns, sunbursts, spirals, flowers, geometric borders, and abstract color fields work particularly well.
Measure the Surface
Measure the length and width of a rectangular table or the diameter of a round table. Calculate the surface area, then purchase approximately 10 percent more tile than the exact measurement requires. Extra pieces allow for breakage, cutting, and design adjustments.
Create a Full-Size Template
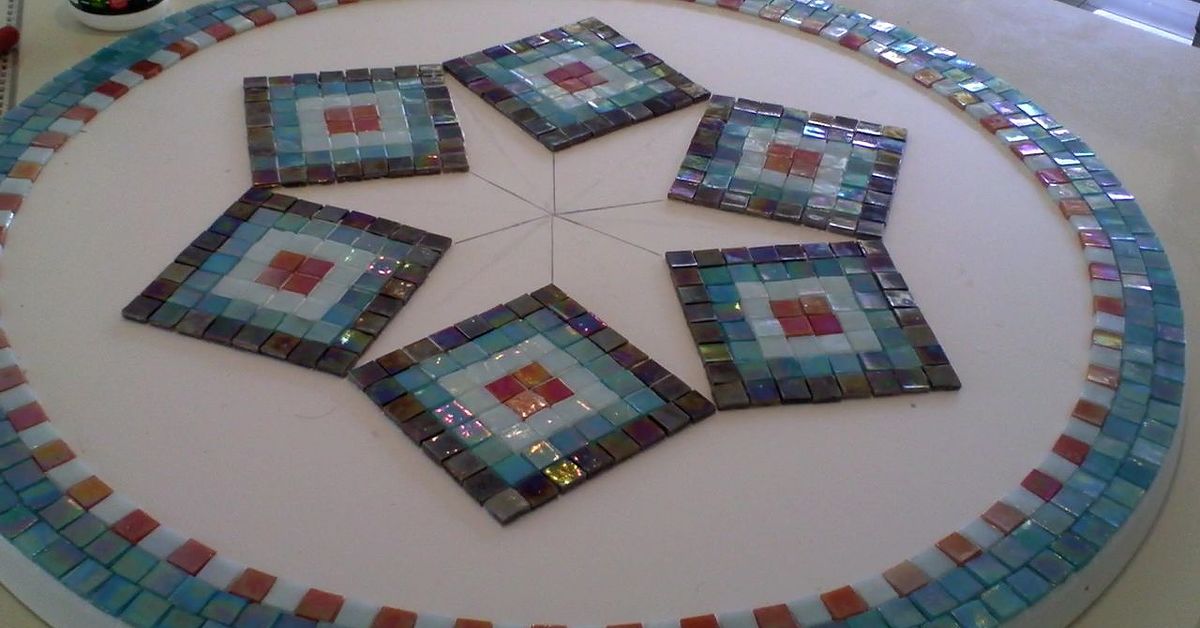
Trace the tabletop onto kraft paper or tape several sheets of paper together. Draw the main pattern on the template and arrange the mosaic pieces over it. This dry layout allows you to experiment without mortar setting the deadline.
Begin with important focal elements, such as a central flower, compass, bird, or medallion. Add borders and background pieces afterward. Leave consistent spaces between pieces for grout. Tiny variations are part of the handmade character, but very wide or irregular gaps can dominate the finished design.
Choose the Grout Color Early
Grout is not merely filler. It changes how the entire mosaic appears. Light grout makes dark pieces stand out but may show soil and stains more quickly. Dark grout creates strong outlines and can unify a collection of mixed colors. A grout color close to the tile color produces a softer, more continuous appearance.
Test several tile pieces against a grout color sample before making the final decision. The difference can be surprisingly dramatic.
How to Make a DIY Mosaic Garden Table
Step 1: Prepare the Table
Remove dirt, grease, peeling paint, rust, and loose material. Repair the table frame and verify that it stands level. Sand painted or glossy surfaces only when appropriate for the substrate and installation system. Wipe away all dust.
If using cement backer board, cut it to fit the tabletop, attach it as directed by its manufacturer, and reinforce or waterproof edges as required. The top must be flat, rigid, and securely supported.
Step 2: Transfer the Design
Mark the center of the table and lightly draw reference lines. Transfer the major features of your paper pattern onto the prepared surface. Do not draw every tiny fragment unless organizing tiny fragments is your favorite way to spend an entire afternoon.
Place the tiles onto the dry tabletop once more. Confirm that the border fits and that important shapes remain centered.
Step 3: Apply the Mortar
Mix only as much exterior-rated thin-set mortar as you can use within the product’s working time. Follow the specified water ratio and mixing instructions. Adding extra water to make mortar easier to spread can reduce performance.
Work in small sections so the mortar does not form a dry skin before the pieces are installed. Spread a thin, even layer with the flat side of the trowel, then comb it with the notched side. Keep excess mortar away from the upper portions of the grout joints.
Step 4: Set the Mosaic Pieces
Press each piece firmly into the mortar using a slight twisting motion. Keep the tile faces reasonably even. Mosaic pieces do not need to be laboratory-flat, but dramatic height differences can catch glasses, plates, sleeves, and unsuspecting elbows.
Clean mortar from the tile faces and joints before it hardens. Frequently step back to inspect the overall pattern. A design can look balanced from six inches away yet strangely lopsided from across the patio.
After the tiles are installed, leave the table undisturbed for the full curing period recommended by the mortar manufacturer. Protect it from rain, direct midday heat, freezing temperatures, pets, children, and curious household members who insist that touching wet mortar is “just checking.”
Step 5: Apply the Grout
Once the mortar has cured, remove loose material from the joints. Pre-seal porous stone or unglazed tile when recommended for the material.
Mix the grout precisely according to the package directions. Use a rubber float held at an angle to force grout diagonally across the mosaic and deep into every joint. Work in manageable sections and scrape off as much excess as possible with the float.
When the grout begins to firm, wipe the surface with a damp grout sponge. Use light passes and rinse the sponge frequently. Too much water can weaken cement-based grout, alter its color, and pull material from the joints.
After the grout develops a dry haze, buff the tile gently with a clean cloth. Follow the manufacturer’s instructions regarding additional cleaning and curing time.
Step 6: Seal and Protect the Surface
Some high-performance or epoxy grouts do not require a separate sealer, while traditional cement-based grout generally benefits from one. Apply a penetrating exterior sealer only after the grout has cured for the stated period.
Wipe excess sealer from glazed tile so it does not create streaks or a cloudy film. Porous natural stone may need treatment across the entire surface. Always test sealer in an inconspicuous area first.
Also protect any exposed wood or metal in the table base. Paint or coat metal to limit rust, and use an exterior finish on wooden components. The mosaic may be the star, but the frame still has to carry the show.
Weatherproofing Tips for a Longer-Lasting Table
No outdoor mosaic is completely immune to weather. However, thoughtful construction and routine protection can dramatically extend its life.
- Use only tile, mortar, grout, backer board, and sealers approved for exterior conditions.
- Keep the table slightly protected from constant roof runoff and standing water.
- Design the surface so water cannot pool around raised edges.
- Cover or store the table during severe winter weather when practical.
- Do not wrap a wet table in an airtight cover; trapped moisture can create additional problems.
- Inspect grout, edges, and joints each season and repair small cracks before water enters them.
- Reapply penetrating sealer according to the product’s maintenance schedule.
In freeze-thaw climates, drainage and full mortar coverage are especially important. Even frost-resistant tile can fail if water enters voids beneath the pieces, freezes, and expands.
Common DIY Mosaic Table Mistakes
Using an Unstable Tabletop
Tile cannot compensate for a flexing or wobbling structure. Reinforce the table first, or cracks are likely to appear later.
Using Indoor Adhesive Outdoors
Premixed wall-tile adhesive may be convenient for an indoor backsplash, but outdoor tabletops require products specifically rated for their exposure conditions.
Creating Uneven Tile Heights
Mixing thick stone, thin glass, and curved plate pieces can create an uncomfortable tabletop. Sort materials by thickness or adjust the setting bed carefully.
Letting Mortar Fill the Grout Joints
Mortar squeezed high between the pieces leaves insufficient room for grout. Clean the joints while the mortar remains workable.
Cleaning Grout With Too Much Water
A dripping sponge can weaken grout and wash out pigments. The sponge should be damp, not auditioning for a role as a garden hose.
Skipping Manufacturer Instructions
Curing times and temperature limits vary by product. Generic advice cannot replace the instructions printed on the mortar, grout, backer board, or sealer package.
Creative Mosaic Garden Table Ideas
For a botanical design, create a central sunflower with yellow ceramic petals and a brown glass center. Surround it with green leaves against a cream background.
A coastal table can combine turquoise glass, white porcelain, and sand-colored stone. Use shells sparingly because some are fragile or too deeply curved for a functional tabletop.
For a modern design, arrange black, white, and gray pieces into irregular geometric blocks. A charcoal grout can reduce visual clutter and make the surface feel cohesive.
A memory mosaic can include fragments from old family dishes, vacation tiles, house numbers, and small ceramic keepsakes. Select only pieces that can be installed safely and withstand outdoor conditions.
You can also make a seasonal table with autumn colors, a celestial table with stars and moons, or a pollinator-themed table featuring bees and flowers. The best design is one you will still enjoy after placing the eight-hundredth tiny tile.
Experiences and Lessons From Making a DIY Mosaic Garden Table
The most valuable lesson from making a mosaic garden table is that the creative stage and the construction stage require two different personalities. During the design stage, experimentation is helpful. Colors can move, patterns can change, and a broken tile can unexpectedly become the perfect flower petal. Once mortar is mixed, however, the project benefits from order, clean tools, and a clear sequence.
Dry-laying the complete pattern may feel like extra work, but it saves time later. On an early mosaic project, it is easy to begin with an exciting centerpiece and assume the background will somehow solve itself. Then the outer edge arrives, and the remaining space is too narrow for the planned border. A full-size paper template exposes these problems while they are still harmless.
Photographing the dry layout is also extremely useful. Pieces will inevitably shift while being transferred. A reference photo makes it easier to restore the original arrangement without relying on memory. Human memory is excellent at recalling embarrassing conversations from 15 years ago and surprisingly poor at remembering where a blue triangle sat five minutes earlier.
Another practical discovery is that small batches of mortar and grout are easier for beginners to control. Mixing an entire bag may seem efficient, but the material continues to cure while each mosaic piece is being positioned. A modest batch provides enough working time to make careful adjustments and clean the joints before the mortar hardens.
Keeping two water buckets during grouting makes cleanup easier. One bucket can be used for the first dirty rinse, while the second provides cleaner water for final wiping. Even then, the sponge should be wrung thoroughly. Repeated gentle passes produce better results than aggressively scrubbing the fresh grout.
Edge treatment deserves more attention than it usually receives. The center of a mosaic may look flawless, but exposed backer board or an uneven tile perimeter can make the project appear unfinished. A metal rim, exterior trim, narrow border tile, or carefully finished mortar edge can frame the design and help protect vulnerable areas.
It is also wise to decide how the table will be used before choosing the mosaic texture. A decorative plant stand can tolerate an irregular surface, while a dining or beverage table should remain flatter. Deeply curved china, thick stones, and raised decorative objects may look beautiful but can make cups wobble. When functionality matters, save dramatic pieces for a central section that will not regularly hold dishes.
Outdoor placement affects longevity more than many first-time makers expect. A table under a covered porch experiences less water and temperature stress than one left beneath a gutter or sprinkler. After completing the table, observe how rain moves across it. If water gathers in one area, adjust the table level or address the raised edge causing the puddle.
Seasonal inspection is much easier than major restoration. At the beginning and end of the outdoor season, clean the tabletop and examine the grout lines. A small crack can often be repaired before moisture loosens multiple pieces. Check the underside and frame as well, especially where metal parts may rust or wooden parts may absorb water.
Finally, minor imperfections usually make a handmade mosaic more interesting. One slightly crooked leaf or an asymmetrical ring of tiles is not necessarily a failure. The goal is a safe, durable, and visually balanced table, not a machine-produced surface. Handmade character is part of the appealas long as “character” is not being used as a polite term for loose tiles and structural collapse.
Conclusion
A DIY mosaic garden table combines practical furniture restoration with genuine creative freedom. The project can be completed with new mosaic sheets, leftover tile, broken china, or a carefully selected mixture of materials. Long-term success depends on more than the visible pattern: the table must have a rigid base, exterior-rated materials, proper mortar coverage, well-filled grout joints, sufficient curing time, and protection from trapped moisture.
Plan the design before opening the mortar, work in small sections, clean as you go, and resist rushing the curing stages. With those habits, an ordinary table can become a colorful garden feature that serves drinks, displays plants, starts conversations, and makes its plain plastic neighbors feel deeply inadequate.
Note: Product compatibility, curing times, temperature limits, sealing requirements, and freeze-thaw suitability vary. Follow the written instructions supplied by each tile, mortar, grout, backer board, and sealer manufacturer.