
Some home décor projects whisper, “I have taste.” A log floor lamp walks into the room wearing flannel, smelling faintly of cedar, and says, “Yes, I personally wrestled a tree into becoming mood lighting.” That is the charm of a DIY log floor lamp: it feels rustic, sculptural, cozy, and slightly heroic, yet it can be built with basic woodworking tools, a safe lamp kit, and a little patience.
This guide explains how to make a spectacular floor lamp with logs from start to finish: choosing the right wood, drying and preparing the pieces, designing the structure, drilling safely, wiring the lamp, finishing the surface, and styling it like it belongs in a boutique lodge instead of a garage corner next to a mystery bucket of screws.
The goal is not merely to stack logs and hope electricity feels generous. The goal is to build a stable, beautiful, safe, and long-lasting rustic floor lamp that brings warm light into a living room, reading nook, cabin, bedroom, studio, or entryway.
Why a Log Floor Lamp Is Worth Building
A floor lamp made from logs has something factory furniture often lacks: personality. Every knot, crack, growth ring, saw mark, and color variation tells a tiny story. Even two lamps made from the same tree will never look exactly alike. That natural imperfection is the whole point.
Log lamps also fit many interior styles. In a farmhouse living room, they look cozy and honest. In a modern home, they create contrast against clean walls and smooth floors. In a cabin, they look like they showed up early and helped build the place. In a bohemian space, they blend beautifully with woven baskets, wool rugs, plants, and warm-toned bulbs.
Another advantage is sustainability. If you use fallen branches, storm-damaged wood, leftover firewood, or responsibly sourced logs, the project becomes a creative way to reuse natural material. Instead of buying a generic lamp, you turn wood that might have been discarded into functional art.
Project Overview: What You Are Building
This project creates a tall floor lamp using stacked log slices or short log sections mounted around a central lamp pipe or threaded rod. The electrical cord runs safely through the center or back channel, depending on your design. At the top, a lamp socket holds an LED bulb and shade. A heavy base keeps the whole piece stable.
You can make the lamp clean and polished, with evenly cut log rounds, or rugged and organic, with irregular pieces stacked like a woodland sculpture. Both approaches work. The important parts are stability, dry wood, safe wiring, proper spacing, and a finish that protects the lamp without making it look like it was dipped in plastic.
Materials You Will Need
Wood and Structural Parts
- Dry logs, branches, or log slices, ideally 3 to 7 inches in diameter
- A heavy wood or metal base, about 12 to 16 inches wide
- Threaded lamp pipe or all-thread rod
- Washers and nuts that fit the rod
- Wood glue or construction adhesive
- Felt pads for the bottom of the base
- Optional wood dowels for extra alignment
Lighting Parts
- UL-listed lamp socket kit
- 18-gauge lamp cord or cord included with the kit
- Plug, switch, and socket hardware
- Lamp harp, finial, and shade
- LED bulb, preferably warm white, 2700K to 3000K
Tools
- Miter saw, handsaw, or chainsaw for cutting logs
- Drill or drill press
- Long drill bit or spade bit
- Clamps
- Measuring tape
- Pencil or marker
- Sandpaper: 80, 120, 180, and 220 grit
- Chisel or rotary tool for cord channels
- Screwdriver
- Wire stripper
- Safety glasses, hearing protection, and dust mask
Step 1: Choose the Right Logs
The best logs for a floor lamp are dry, solid, and visually interesting. Look for hardwoods such as oak, maple, walnut, birch, cherry, or ash. Softwoods like pine and cedar can also work, but they may dent more easily and release resin if not fully dry. Cedar smells wonderful, but if your lamp begins aromatherapy without permission, it may need more drying time.
Avoid logs with active insect damage, soft rot, deep punky areas, mold, or loose bark that crumbles when touched. Small cracks and checks are fine. In fact, they often make the lamp more beautiful. Large splits that weaken the piece are a problem, especially near drilled holes or load-bearing areas.
If you collect wood outdoors, choose pieces that have been off the ground or recently fallen. Wood sitting directly on soil absorbs moisture and may invite insects. If you are unsure, remove the bark and inspect the surface. A good log should feel firm, not spongy.
Step 2: Dry the Wood Properly
Moisture is the sneaky villain of this project. Green wood shrinks as it dries, and that movement can cause cracks, warping, loose joints, and an unstable lamp. A log that looks perfect today can become a split personality in a few weeks.
For best results, use wood that has already been seasoned. If you are drying logs yourself, store them in a covered, well-ventilated space away from direct rain and harsh sun. Air should move around the pieces, but they should not bake too quickly. Fast drying can cause surface checking and end splits.
For small log slices, let them dry for several weeks or months, depending on thickness and species. Thicker sections take longer. If you own a moisture meter, aim for wood that is close to indoor equilibrium, typically around 8 to 12 percent moisture content for interior furniture projects. If you do not have a meter, give the wood extra time. Patience is cheaper than rebuilding a lamp that suddenly develops the emotional stability of a potato chip.
Step 3: Design the Shape Before Cutting
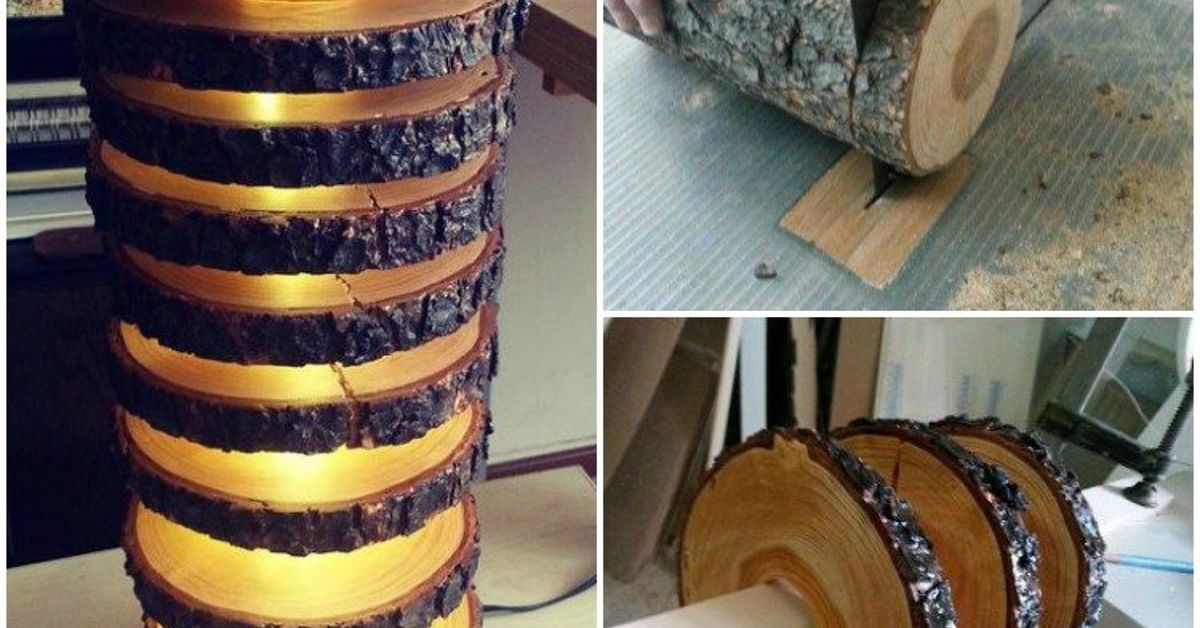
Before firing up the saw, decide what style you want. A stacked-round lamp uses slices cut from logs and arranged like natural wooden beads. A column lamp uses larger log sections stacked vertically. A branch-cluster lamp uses several slim branches attached to a central support. A cracked-log lamp uses light shining through cuts or natural openings.
For a beginner-friendly floor lamp, the stacked log design is the most manageable. Cut several slices between 2 and 5 inches thick. Vary the diameters slightly for an organic look, or keep them similar for a clean column. Lay the pieces on the floor and experiment with the order. Put heavier and wider pieces near the bottom. Save the prettiest slice for eye level, where guests can admire it and pretend they understand woodworking.
A finished floor lamp usually stands 55 to 65 inches tall, including the shade. The log column itself may be 36 to 48 inches tall, with the socket and shade adding height. Keep the proportions balanced: too short and it looks like a table lamp having a growth spurt; too tall and it becomes a lighthouse for squirrels.
Step 4: Cut the Logs Safely and Evenly
Secure the wood before cutting. Round logs love to roll, and saw blades do not appreciate surprises. Use clamps, a saw horse, a vise, or a simple cradle to hold each log steady. Wear eye protection, hearing protection, and a dust mask. Wood chips have no respect for your weekend plans.
Cut the log slices as evenly as possible. Perfect uniformity is not required, but each piece should sit flat enough to stack securely. If a slice rocks badly, sand or trim the high points. You can also embrace slight irregularity as part of the rustic look, but the lamp still needs a straight central structure.
After cutting, brush off sawdust and let the pieces rest indoors for a few days. This helps reveal any immediate cracking or movement before assembly.
Step 5: Remove Bark or Keep It?
Bark gives a log lamp a rugged woodland look, but it can loosen over time. It can also hide insects, dirt, and soft spots. For a long-lasting indoor lamp, removing most or all bark is usually the safer choice. Use a chisel, drawknife, putty knife, or stiff brush.
If you love the bark look, keep only bark that is tightly attached. Clean it thoroughly and seal it with a clear finish. Still, understand that bark is nature’s flaky pastry. It may shed eventually, especially in dry indoor air.
Step 6: Drill the Center Hole
Most log floor lamps need a vertical hole through each log slice so the threaded rod or lamp pipe can pass through. Mark the center of each piece. A drill press makes this easier, but a handheld drill can work if you go slowly and keep the bit straight.
Use a bit slightly larger than your rod or lamp pipe. For example, if your lamp pipe is 3/8 inch, drill a hole just large enough for easy passage. Do not force the pipe through a tight hole, or the wood may split.
For thick sections, drill halfway from one side, then flip the piece and drill from the other side. This reduces tear-out and helps keep the hole aligned. Number the pieces after drilling so you remember the stacking order.
Step 7: Create a Cord Path
The cord needs a safe path from the socket to the plug. The cleanest method is running it through the lamp pipe. Many lamp kits are designed for this. If your design does not allow a center cord route, carve a shallow channel down the back of the log column and secure the cord inside it with clips or a cover strip.
Never pinch, staple through, crush, or bury the cord where it cannot be inspected. Do not run the cord under the base in a way that makes the lamp wobble. Add a notch at the bottom rear of the base so the cord exits smoothly.
Step 8: Build a Stable Base
A floor lamp must not tip easily. Logs are heavy, but height creates leverage. Use a wide, heavy base made from hardwood, plywood, metal, or a thick wood round. A base around 12 to 16 inches wide works for many designs, but larger lamps may need more.
Drill a center hole through the base for the threaded rod. Add a counterbore underneath so the nut and washer can sit recessed. This lets the lamp stand flat. Tighten the rod securely to the base before stacking the log pieces.
If the lamp still feels top-heavy, add weight to the underside of the base with a steel plate or hidden weights. Felt pads protect the floor and help the lamp sit level. A spectacular lamp is wonderful; a spectacular lamp that slowly leans into your sofa like a tired lumberjack is less wonderful.
Step 9: Stack and Assemble the Logs
Slide the first log slice over the rod and down to the base. Add a small amount of wood glue or construction adhesive between layers if you want a permanent stack. Continue adding pieces in your planned order. Rotate each slice until the grain, knots, and cracks look attractive from the front.
Check alignment as you go. A little organic movement is fine, but the lamp should not lean dangerously. Use washers between irregular pieces if needed, or sand contact points to improve fit. Once the stack is complete, add a washer and nut at the top to compress the column gently.
Do not overtighten. Wood can crack under too much pressure. The goal is snug, not “medieval torture device.”
Step 10: Sand the Wood
Sanding turns a rough log project into a piece of furniture. Start with 80-grit sandpaper to remove saw marks, splinters, and rough patches. Move to 120 grit, then 180, and finish with 220 grit for a smoother touch.
Sand with the grain where possible. End grain absorbs stain differently than side grain, so spend extra time smoothing the cut faces. For natural cracks, use a folded piece of sandpaper or a small brush to remove dust and loose fibers.
After sanding, wipe everything with a tack cloth or slightly damp rag. Let the wood dry fully before applying finish.
Step 11: Stain, Seal, or Keep It Natural
You have several finishing options. Clear polyurethane provides strong protection and a slight sheen. Tung oil or Danish oil gives a warmer, hand-rubbed appearance. Matte water-based finish keeps the wood looking natural. Stain can deepen pale wood or unify mismatched pieces.
If staining, test on a scrap piece first. End grain can become much darker than expected. Apply stain lightly, wipe off excess, and let it dry according to the product directions. Follow with a clear protective topcoat.
For a dramatic rustic floor lamp, try a satin finish. Glossy finishes can make logs look artificial, as if the forest opened a nail salon. Satin or matte finishes usually preserve the natural character better.
Step 12: Wire the Lamp Safely
Use a new UL-listed lamp kit, not mystery wiring from a drawer labeled “probably fine.” Follow the kit instructions exactly. Basic lamp wiring usually involves threading the cord through the pipe, tying an underwriter’s knot near the socket for strain relief, connecting the ribbed neutral wire to the silver screw, connecting the smooth hot wire to the brass screw, and snapping the socket shell securely in place.
If you are not comfortable identifying wires, making connections, or checking the socket, ask a qualified electrician for help. This is not the moment to freestyle. Wood is combustible, and a lamp is an electrical device. Beauty matters, but not as much as avoiding indoor fireworks.
Use an LED bulb rather than an incandescent bulb. LEDs use far less energy, produce less heat, and are a smarter choice around wood. Choose a bulb within the socket’s wattage rating. Never exceed the maximum wattage listed on the socket or shade.
Step 13: Add the Shade
The shade changes the entire mood of the lamp. A linen drum shade gives a modern rustic look. A burlap shade feels farmhouse and casual. A black or charcoal shade adds drama. A white shade keeps the lamp bright and clean.
For a log floor lamp, choose a shade wide enough to balance the visual weight of the base. A tiny shade on a chunky log column looks like a hat bought during a panic sale. In most cases, a shade 14 to 18 inches wide works well.
Make sure the shade sits far enough from the bulb for ventilation. Use the correct harp height so the bulb is hidden but airflow remains open.
Step 14: Test the Lamp
Before placing the lamp in its final location, test it carefully. Set it on a flat surface. Check for wobble. Make sure the cord exits cleanly and does not get pinched. Confirm that the socket is secure, the shade is level, and the switch works smoothly.
Leave the lamp on for 30 minutes while you are nearby. Touch the area around the socket and upper wood column. It may feel slightly warm, but it should never feel hot. If anything smells burnt, flickers, sparks, or heats up oddly, unplug the lamp immediately and inspect the wiring.
Design Ideas for a Spectacular Log Floor Lamp
Stacked Birch Lamp
Use pale birch slices with the bark partially intact. Pair the column with a white linen shade and warm LED bulb. This style works beautifully in Scandinavian, cottage, and winter-inspired interiors.
Dark Walnut Statement Lamp
Use walnut or stained hardwood rounds for a richer look. Add a black drum shade and brass socket hardware. The result feels upscale, moody, and expensive enough to make guests ask where you bought it.
Live-Edge Branch Cluster Lamp
Attach several slim branches vertically around a central pipe. Keep the shapes irregular. This design looks sculptural and works well in artistic spaces, cabins, and nature-themed rooms.
Cracked Log Glow Lamp
Use a larger log section with carved vertical slits, allowing light to escape through the cracks. This style is dramatic, but it requires extra care with heat, ventilation, and internal lighting. Use only cool-running LED components and keep wiring protected.
Common Mistakes to Avoid
Using Wet Wood
Wet wood shrinks, cracks, twists, and may grow mold. It can also loosen the lamp structure over time. Dry first, build second. The tree waited years to grow; your lamp can wait a few months to behave.
Making the Base Too Small
A tall lamp needs a wide, heavy base. If the base is too narrow, the lamp can tip when bumped by a person, pet, vacuum, or enthusiastic toddler with no respect for craftsmanship.
Ignoring Cord Protection
The cord should never rub against sharp wood edges. Smooth drilled holes, use bushings if needed, and avoid tight bends. Electrical cords deserve comfort too.
Overdoing the Finish
Too much stain or glossy coating can hide the natural beauty of the logs. Build up thin coats instead of slathering on finish like barbecue sauce.
Using the Wrong Bulb
Always use an LED bulb within the lamp kit’s rating. Avoid hot incandescent bulbs, especially in enclosed or wood-heavy designs.
Where to Place Your Log Floor Lamp
A log floor lamp works well beside a reading chair, next to a sofa, in a bedroom corner, or near an entryway bench. Place it where the texture can be seen. Natural wood looks best when light grazes across the grain and highlights the knots.
Pair the lamp with materials that complement it: leather, linen, wool, stone, black metal, ceramic, jute, or woven baskets. Avoid crowding it with too many other rustic pieces unless you are intentionally going for “luxury woodland cabin owned by a very stylish bear.”
Maintenance Tips
Dust the lamp regularly with a soft cloth or brush. Avoid soaking the wood with water. If the finish becomes dull, refresh it with a compatible polish or another light coat of finish. Check the cord and plug occasionally for wear. If the lamp becomes wobbly, unplug it and tighten the hardware.
Keep the lamp away from damp areas, fireplaces, heaters, and direct sunlight. Wood expands and contracts with humidity, so stable indoor conditions help preserve the structure.
Extra Experience: Lessons Learned From Making a Log Floor Lamp
The first thing you learn when making a floor lamp with logs is that wood has opinions. You may think you are in charge because you own the drill, but the log has been preparing its personality for decades. One slice may drill perfectly. The next may reveal a hidden knot exactly where your bit needs to go, as if the tree left a booby trap. This is why layout matters. Before drilling, study each piece. Look for cracks, knots, soft spots, and grain direction. A few minutes of inspection can save an hour of repair.
Another practical lesson is that “rustic” should not mean “careless.” A handmade log lamp can look organic and still be carefully built. The best rustic projects have controlled imperfection. The edges may be natural, but the base is level. The grain may vary, but the column is stable. The bark may remain in places, but it is sealed and clean. That balance is what makes the final piece look intentional rather than accidental.
When cutting log slices, it helps to make more pieces than you think you need. Some will crack, wobble, or simply look wrong in the stack. Having extra pieces gives you creative freedom. You can arrange the lamp like a sculpture, choosing the best faces for the front and hiding less attractive areas toward the back. Think of it as casting actors for a small wooden drama. Not every log slice gets the lead role.
Drilling is usually the most stressful part. A long bit can wander, especially through irregular grain. If you do not have a drill press, build a simple guide block from scrap wood. Drill a straight hole through the guide block first, then clamp it to each log slice and use it to steer the bit. This small trick makes the whole project feel less like a wrestling match.
Sanding takes longer than expected, but it is also where the lamp begins to look special. Rough logs look like firewood. Sanded logs look like design. Do not skip the progression from coarse to fine grits. Jumping straight to fine sandpaper is like trying to mop a gravel driveway. Start rough, remove saw marks, then refine the surface. The end grain may need extra attention because it absorbs finish quickly and shows scratches easily.
Finishing is also worth slowing down for. A clear matte or satin coat often looks better than a heavy stain. Many beginners stain too dark and lose the natural rings and color variation. If the wood already has character, let it speak. Your job is to give it a microphone, not a disguise.
The electrical work is the part where confidence should never outrun knowledge. A lamp kit is simple compared with household wiring, but it still needs respect. Use new listed parts, follow instructions, secure strain relief, and choose an LED bulb. If anything feels confusing, ask an electrician. There is no shame in getting help; there is only shame in explaining to guests why your beautiful log lamp briefly became a smoke machine.
The final reward is surprisingly big. When you plug in the lamp and warm light falls across the wood grain, the whole project changes from “pile of logs with ambition” into a real piece of home décor. It becomes a conversation starter, a reading companion, and a reminder that good design does not always come from a store. Sometimes it comes from a fallen branch, a Saturday afternoon, and the stubborn belief that your living room deserves a little forest magic.
Conclusion
Learning how to make a spectacular floor lamp with logs is part woodworking project, part lighting upgrade, and part love letter to natural materials. With dry wood, a sturdy base, careful drilling, safe wiring, a warm LED bulb, and a finish that highlights the grain, you can create a rustic floor lamp that looks custom, cozy, and impressively expensive.
The most important rules are simple: choose solid dry logs, build for stability, protect the cord, use quality lamp parts, and do not rush the finishing work. The beauty of this project comes from the natural character of the wood, but the success comes from the details you cannot always see.
Note: This guide is for educational DIY purposes. If you are unsure about wiring, socket connections, grounding, cord protection, or local electrical requirements, consult a qualified electrician before using the lamp.