
Note: Windows 7 is no longer supported by Microsoft, so this guide is best used for legacy software testing, training labs, offline experimentation, or recovering access to older programs. Use a legitimate Windows 7 ISO and product key, and avoid using an outdated operating system for everyday browsing, banking, email, or sensitive work.
Introduction: Why Install Windows 7 in VMware Workstation?
Installing Windows 7 on VMware Workstation is a practical way to run an older operating system without digging an ancient laptop out of the closet and hoping it still remembers how to breathe. A virtual machine, or VM, lets Windows 7 run inside a safe, separate environment on your modern Windows or Linux computer. You can test old software, open legacy files, practice IT skills, or explore classic Windows behavior without replacing your main operating system.
VMware Workstation Pro is one of the most popular desktop virtualization tools because it gives you a clean wizard, flexible hardware settings, snapshots, virtual networking, shared folders, and VMware Tools for improved performance. In plain English: it gives Windows 7 a pretend computer to live in, and that pretend computer can be customized without touching your real one.
Before starting, keep one thing in mind: Windows 7 reached the end of mainstream security support years ago. That does not mean you cannot install it in a VM, but it does mean you should treat it like a museum exhibit with a power button. Keep it isolated when possible, use NAT networking instead of exposing it directly to your local network, avoid random downloads, and create snapshots before making changes.
What You Need Before You Start
To install Windows 7 on VMware Workstation, prepare the following items first:
- A working installation of VMware Workstation Pro on your host computer.
- A legitimate Windows 7 ISO file or original installation DVD.
- A valid Windows 7 product key for the edition you plan to install.
- At least 2 GB of RAM for the virtual machine, though 4 GB feels smoother.
- At least 40 GB to 60 GB of free disk space for the virtual hard drive.
- A host computer with virtualization enabled in BIOS or UEFI.
- Optional but recommended: a backup folder where you can store VM files safely.
Windows 7 can technically run on modest hardware, but a virtual machine benefits from extra breathing room. If your host computer has 8 GB of RAM, give the VM 2 GB. If your host has 16 GB or more, assigning 4 GB to Windows 7 usually makes installation and updates much less grumpy.
How to Install Windows 7 on VMware Workstation: 10 Steps
Step 1: Install and Open VMware Workstation
First, install VMware Workstation Pro on your host computer. After installation, restart your computer if VMware asks you to do so. This helps VMware networking services, virtual adapters, and system drivers load correctly.
Open VMware Workstation and look for the option that says Create a New Virtual Machine. This launches the New Virtual Machine Wizard, which is where your Windows 7 VM begins its digital life. Think of this as building a new PC, except there are no tiny screws, no cable mess, and no mysterious leftover bracket that makes you question your life choices.
Step 2: Choose Typical or Custom Setup
VMware usually offers two setup options: Typical and Custom. For most users, Typical is the best choice because it automatically selects sensible defaults. Choose Custom only if you want detailed control over hardware compatibility, firmware type, virtual disk controller, or advanced settings.
If your goal is simply to install Windows 7 and get it running, choose Typical. You can still adjust memory, processors, networking, display, USB, and other hardware settings later.
Step 3: Select the Windows 7 Installation Media
Next, VMware asks where the guest operating system installer is located. If you have a Windows 7 ISO file, choose Installer disc image file (ISO) and browse to the file. If you are using a physical DVD, choose the installer disc option and select your DVD drive.
VMware may detect the Windows version automatically. If it recognizes your ISO, it may offer Easy Install, which can automate parts of the Windows setup process. Easy Install is convenient, but manual installation gives you more control over partitioning, edition selection, user account setup, and product key timing.
Step 4: Choose the Guest Operating System
If VMware does not automatically detect the ISO, select the guest operating system manually. Choose Microsoft Windows as the guest OS family, then choose Windows 7 or Windows 7 x64, depending on your installation media.
Use 64-bit Windows 7 if your ISO and product key support it and your host computer has enough resources. A 64-bit VM can use more memory and usually performs better with modern host hardware. Use 32-bit only if you need compatibility with a very old application or driver.
Step 5: Name the Virtual Machine and Pick a Location
Give your VM a clear name such as Windows 7 Legacy Apps, Windows 7 Testing Lab, or Win7 Offline VM. A boring name like “Windows 7” is fine until you create five more VMs and suddenly your library looks like a drawer full of identical keys.
Choose a storage location with enough free space. If possible, store virtual machines on an SSD for faster boot times, smoother performance, and less waiting during installation. Avoid placing VM files in temporary folders or cloud sync folders that may interrupt large virtual disk files.
Step 6: Allocate Processor and Memory
Now configure the virtual CPU and RAM. For most Windows 7 virtual machines, start with:
- Processors: 1 processor with 2 cores, or 2 virtual processors.
- Memory: 2 GB minimum, 4 GB recommended for 64-bit Windows 7.
- Graphics memory: Leave the default at first, then increase later if needed.
Do not assign too much RAM or too many CPU cores unless your host computer can spare them. A VM should be comfortable, not greedy. If your host starts lagging while the VM runs, reduce the VM’s resources slightly.
Step 7: Create the Virtual Hard Disk
VMware will ask you to create a virtual hard disk. For Windows 7, choose a disk size between 40 GB and 60 GB. A clean installation can use much less, but applications, updates, browser files, and snapshots can quickly expand the space needed.
You may see two storage options: store virtual disk as a single file or split virtual disk into multiple files. A single file can offer slightly better performance, while split files are easier to move between drives formatted with file size limits. For most modern systems, a single file is fine. If you plan to copy the VM to external drives often, split files may be more convenient.
Step 8: Configure Network and Hardware Settings
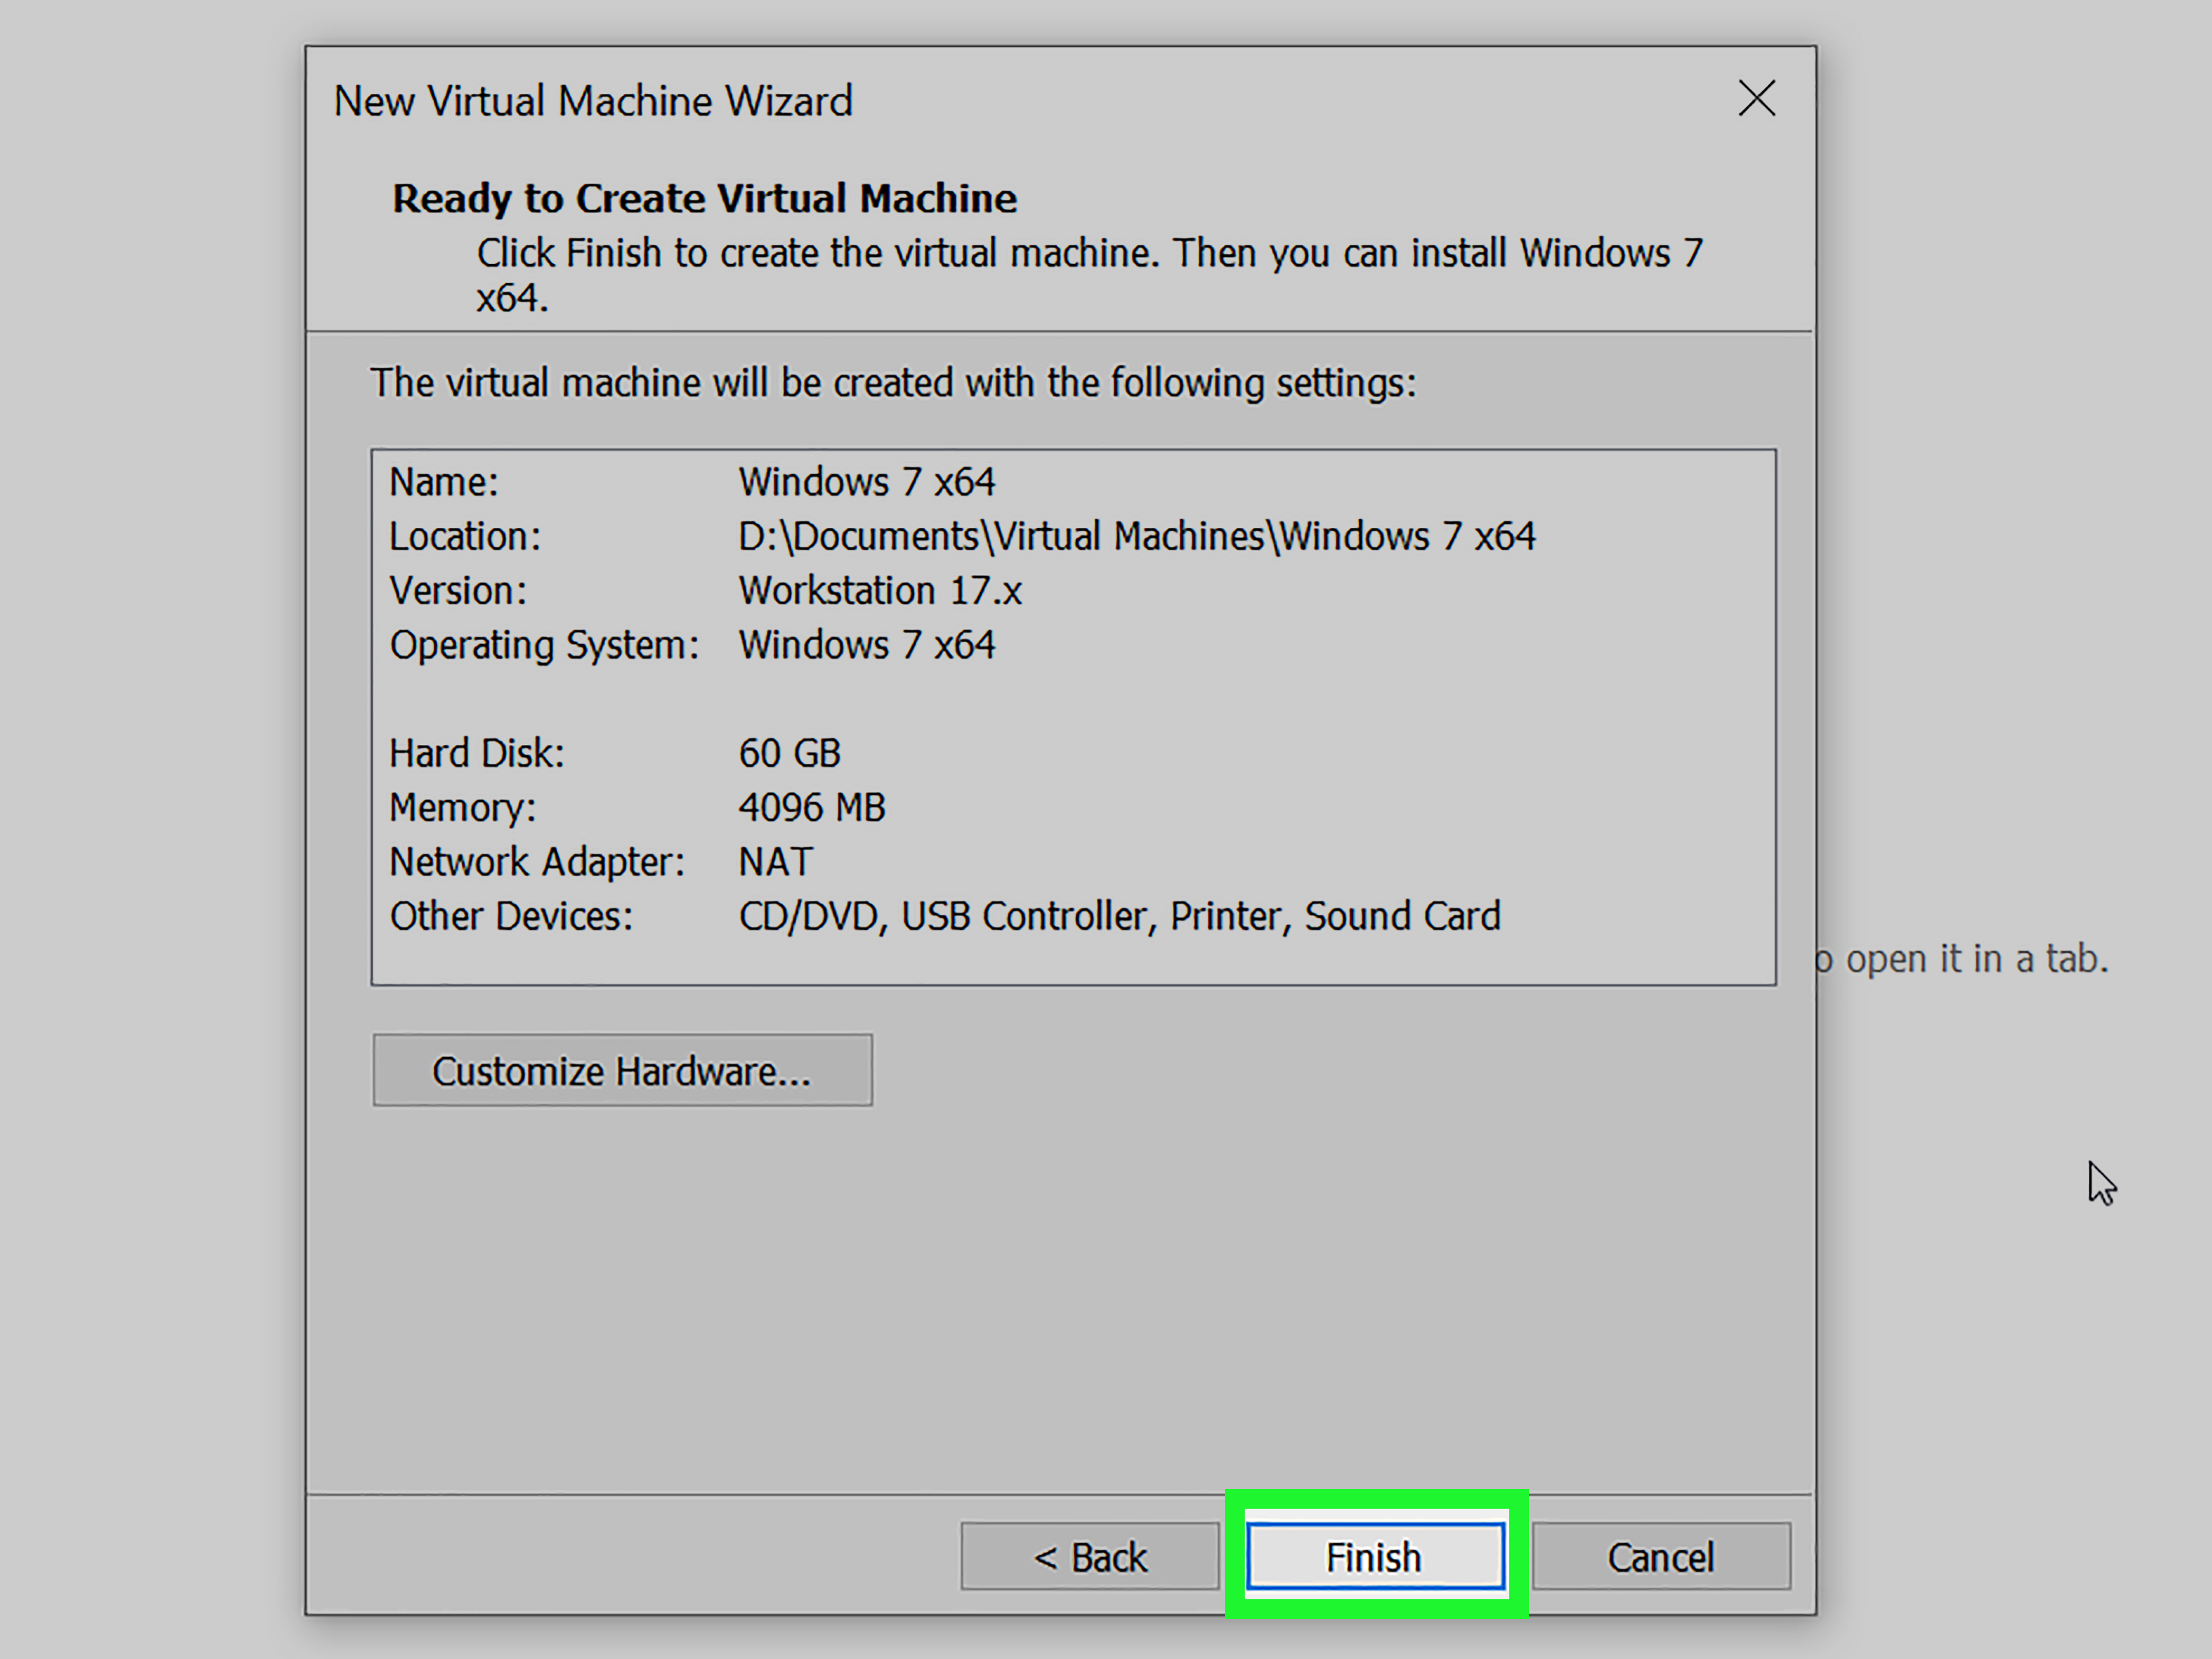
Before powering on the VM, click Customize Hardware. This is where you can fine-tune the virtual machine before Windows 7 setup begins.
For networking, choose NAT unless you have a specific reason to use Bridged mode. NAT lets the Windows 7 VM share the host computer’s network connection while staying less exposed than a directly bridged machine. Bridged networking can be useful for lab testing, but it places the VM more directly on your local network.
Also check that the Windows 7 ISO is connected to the virtual CD/DVD drive and set to connect at power on. If you do not want internet access during installation, disconnect the network adapter temporarily. This is a smart choice for an outdated operating system.
Step 9: Start the VM and Install Windows 7
Click Finish, then power on the virtual machine. The VM should boot from the Windows 7 ISO or DVD. When the Windows Setup screen appears, choose your language, time and currency format, and keyboard layout. Click Install Now.
Accept the license terms, then choose Custom: Install Windows only. You should see the empty virtual hard disk. Select it and click Next. Windows Setup will create the needed partitions and begin copying files.
During installation, the VM may restart several times. Do not press a key to boot from the ISO again after the first stage unless setup specifically requires it. If you accidentally restart the installer, simply let the VM boot from the virtual hard disk or adjust the boot order in VM settings.
After setup finishes, create a username, computer name, password, time zone, and update preference. Because Windows 7 is unsupported, you should be cautious with internet-connected updates and online activity. For many legacy-use cases, keeping the VM offline is safer.
Step 10: Install VMware Tools and Create a Snapshot
After Windows 7 reaches the desktop, install VMware Tools. In VMware Workstation, go to VM > Install VMware Tools. This mounts a virtual CD inside Windows 7. Open it from Computer, run the installer, and restart the VM when prompted.
VMware Tools improves display resizing, mouse movement, graphics behavior, shared clipboard, drag-and-drop support, and general driver performance. Without VMware Tools, Windows 7 may feel clunky, as if it just woke up from a 2009 nap and cannot find its glasses.
Once VMware Tools is installed and Windows 7 is working properly, shut down the VM and create a snapshot. Name it something clear, such as Fresh Windows 7 Install. A snapshot lets you return to this clean state if a driver, app, update, or experiment breaks something later.
Recommended VMware Settings for Windows 7
The best VMware Workstation settings depend on your host computer and the purpose of the VM, but the following configuration works well for most users:
- Guest OS: Windows 7 x64
- Memory: 4096 MB if available
- Processors: 2 virtual cores
- Virtual disk: 60 GB, single file
- Network: NAT for safer general use
- USB compatibility: USB 2.0 for older devices, USB 3.0 only if needed
- Snapshots: Create one before installing old software or drivers
If you are installing Windows 7 to run one specific old program, keep the VM simple. Extra devices and features can introduce compatibility quirks. If you need old USB hardware, install VMware Tools first, then connect the USB device through the VMware removable devices menu.
Common Problems and Easy Fixes
The VM Does Not Boot from the ISO
Check the virtual CD/DVD settings and confirm the ISO is connected at power on. If the VM skips the installer, open the virtual machine settings and make sure the CD/DVD drive is enabled. You can also enter the VM boot menu during startup and manually choose the virtual CD/DVD drive.
Windows 7 Setup Cannot Find a Disk
This usually happens when the virtual disk controller is not compatible with the installer. In VMware settings, try a standard SATA or LSI Logic SAS controller. Recreate the VM with Windows 7 selected as the guest OS if necessary, because VMware uses that selection to choose better defaults.
The Screen Resolution Looks Wrong
Install VMware Tools. After restarting, Windows 7 should support automatic resizing and higher display resolutions. If it still looks odd, right-click the desktop, open screen resolution settings, and choose a suitable resolution manually.
The Internet Does Not Work
First, confirm the VM network adapter is connected. NAT is usually the easiest mode. If Bridged mode fails, switch to NAT and restart the VM. Also remember that Windows 7 may not work well with modern websites and security protocols, so internet access should be limited and intentional.
VMware Tools Will Not Install
Open Computer inside Windows 7 and manually run the installer from the mounted VMware Tools CD. If nothing appears, cancel and choose VM > Install VMware Tools again. Restarting the VM before retrying can also help.
Security Tips for Running Windows 7 in VMware Workstation
Running Windows 7 in a VM is safer than running it directly on physical hardware, but “safer” does not mean “magically invincible.” Treat the VM like an old car: fun to restore, useful in the right situation, but not something you should drive into a modern cyberstorm without a seatbelt.
- Use NAT networking instead of Bridged mode for general use.
- Disconnect the network adapter when the VM does not need internet access.
- Avoid logging into sensitive accounts from Windows 7.
- Do not use Windows 7 for banking, shopping, or password management.
- Create snapshots before installing unknown legacy programs.
- Keep a clean backup copy of the VM folder.
- Use shared folders carefully, especially when testing old files.
If the purpose of the VM is to run one old application, consider keeping the system offline permanently. You can transfer files through controlled shared folders, ISO images, or temporary drag-and-drop only when necessary.
When Should You Use Windows 7 in a VM?
A Windows 7 virtual machine makes sense when you need to run old business software, test legacy installers, access archived projects, study operating system history, or support older equipment that does not work correctly on Windows 10 or Windows 11. It is also useful for students learning virtualization, IT support, or software compatibility testing.
However, if your goal is everyday computing, Windows 7 is not the right tool anymore. A supported operating system is safer, faster, and more compatible with modern browsers, drivers, and applications. Use Windows 7 in VMware Workstation as a controlled workspace, not as your main digital home.
Extra Experience: Lessons Learned from Installing Windows 7 on VMware Workstation
The first big lesson is that the installation itself is usually easier than people expect. The New Virtual Machine Wizard does most of the heavy lifting. The real difference between a smooth Windows 7 VM and a frustrating one comes from small choices made before the first boot: selecting the correct ISO, choosing the right guest OS version, giving the VM enough RAM, and using a sensible disk size.
One common mistake is assigning too few resources. Yes, Windows 7 was designed for older computers, but that does not mean it enjoys being squeezed into the smallest possible VM. A 1 GB Windows 7 virtual machine may technically start, but it often feels sluggish after installing updates, VMware Tools, browsers, or legacy applications. Giving it 2 GB to 4 GB of RAM makes the experience feel far more usable.
Another lesson is to install VMware Tools as soon as Windows reaches the desktop. Before VMware Tools, mouse movement may feel awkward, screen resizing may not behave correctly, and the display may look trapped in the past. After VMware Tools, the VM feels much more polished. It is one of those steps that seems optional until you skip it and wonder why everything feels like a computer lab from 2010.
Snapshots are also incredibly helpful. Before installing an old accounting program, a strange device driver, or a mystery utility found on a dusty DVD, create a snapshot. If the software works, great. If it breaks Windows, you can roll back instead of reinstalling the whole operating system. This is one of the biggest advantages of using VMware Workstation instead of physical hardware.
Networking deserves extra attention. Many users instinctively choose Bridged mode because it sounds more powerful. For Windows 7, NAT is usually the wiser default. NAT lets the VM access the internet through the host while reducing direct exposure on the local network. If the VM does not need internet access, disconnect it entirely. A legacy operating system should not be left wandering around the modern web unsupervised.
Finally, keep your purpose clear. A Windows 7 VM is excellent for legacy compatibility, software testing, old games, archived files, and controlled labs. It is not ideal for daily browsing, online accounts, or modern productivity. Used carefully, Windows 7 on VMware Workstation is like having a time machine in a window: useful, nostalgic, and occasionally charmingbut best operated with a few safety rails in place.
Conclusion
Installing Windows 7 on VMware Workstation is a straightforward process when you prepare the right ISO, choose the correct guest OS settings, allocate enough resources, and install VMware Tools after setup. In just 10 steps, you can create a functional Windows 7 virtual machine for legacy apps, testing, learning, or controlled offline use.
The most important advice is simple: keep it legal, keep it isolated, and keep snapshots. Windows 7 still has practical value in a virtual lab, but it should be handled carefully because it no longer receives regular security support. VMware Workstation gives you the flexibility to run it safely, experiment freely, and roll back mistakes without turning your main computer into a troubleshooting soap opera.