
Note: This guide is for educational and workflow-improvement purposes. Always follow your facility’s approved standard operating procedure, laboratory policy, state requirements, and test-specific instructions. Blood sample labeling is not the place to “wing it”the tube is tiny, but the consequences of a mix-up are not.
Introduction: Why Blood Sample Labeling Matters More Than People Think
Labeling a blood sample may look like the easy part of phlebotomy. After all, compared with finding a vein, calming a nervous patient, and keeping the collection process organized, sticking a label on a tube seems simple. But in real clinical practice, the label is the blood sample’s passport. Without it, the specimen cannot safely tell the laboratory where it came from, who it belongs to, when it was collected, or whether it matches the test order.
A correctly labeled blood sample protects the patient, the collector, the laboratory, and the provider who will use the results to make decisions. A mislabeled or unlabeled tube can lead to specimen rejection, delayed diagnosis, repeated blood draws, inaccurate results, or in high-risk areas such as transfusion testing, potentially serious patient harm. That is why hospitals, reference laboratories, and patient safety organizations consistently emphasize two patient identifiers, bedside or point-of-collection labeling, and exact agreement between the tube label and the lab order.
The good news? Proper labeling is not complicated. It simply requires a calm routine, attention to detail, and a refusal to let shortcuts sneak into the process like a raccoon into a snack cabinet. Below is a practical, clear, and SEO-friendly guide to how to label a blood sample in 9 steps, with examples, common mistakes, and real-world tips for smoother specimen handling.
What Information Usually Goes on a Blood Sample Label?
Specific requirements vary by facility and test type, but most blood specimen labels include at least two patient-specific identifiers and key collection details. Common identifiers include the patient’s full legal name, date of birth, medical record number, accession number, or another unique ID assigned by the healthcare system. In many settings, the label also includes the collection date and time, collector initials or ID, specimen type, test name, barcode, and sometimes collection site or source.
The most important concept is this: the information on the tube must match the requisition, electronic order, or laboratory information system record. Almost right is not right. “John A. Smith” and “Jon Smith” may look close during a busy morning draw, but the lab cannot safely rely on vibes. Specimen identification must be clear, complete, and consistent.
How to Label a Blood Sample: 9 Steps
Step 1: Review the Test Order Before Collection
Before collecting the sample, review the laboratory order or requisition. Confirm the ordered test, tube type, patient information, special handling notes, and whether the sample requires timing information such as fasting status, peak/trough drug level timing, or collection at a specific hour.
This step prevents a classic laboratory headache: collecting the right patient’s blood into the wrong tube or labeling a specimen for the wrong test. For example, a complete blood count usually requires an EDTA tube, while many chemistry tests may require serum or plasma. If the wrong tube is collected, even a perfect label cannot rescue the sample. The label tells the story, but the tube has to be the correct character in that story.
Check whether your facility uses preprinted barcode labels, bedside printing, handwritten downtime labels, or electronic scanning. If a computer system is down, follow the official downtime procedure rather than inventing one on the fly. “I thought this would probably work” is not a laboratory policy; it is how chaos puts on a lab coat.
Step 2: Identify the Patient Using Two Identifiers
Use at least two approved patient identifiers before collection. Common examples are full name and date of birth, full name and medical record number, or another facility-approved unique identifier. Ask the patient to state their information when possible instead of asking yes-or-no questions.
For example, say, “Please tell me your full name and date of birth,” rather than “Are you Maria Johnson?” A nervous, distracted, hard-of-hearing, or confused patient may agree automatically. Open-ended identification gives you a safer match.
Never use room number, bed location, or a nearby visitor’s confirmation as a patient identifier. Rooms change. Beds move. Family members guess. The blood sample must belong to the patient, not to the geography of the building.
Step 3: Match the Patient to the Order or Requisition
After confirming the patient’s identity, compare the identifiers with the lab order, requisition, wristband, or electronic record according to your facility’s procedure. The identifiers on the order must match the patient being collected from. If anything does not match, stop and resolve the discrepancy before collecting.
Small mismatches matter. A missing middle initial may not always be a rejection issue, but a different date of birth, wrong medical record number, misspelled surname, or mismatched barcode can create a serious identification problem. In a busy clinic, two patients may have similar names. In a hospital, patients may be unable to speak. In pediatrics, twins can share a birthday and last name. This is why unique identifiers are not decorative; they are essential.
Step 4: Collect the Blood Sample According to Procedure
Collect the blood sample using your approved phlebotomy procedure and the correct tube or container for the ordered test. This article focuses on labeling, not venipuncture technique, but collection and labeling are closely connected. The tube type, fill level, additive, order of draw, and handling requirements all affect whether the sample can be tested accurately.
Keep only the labels and tubes needed for the patient you are collecting from. Avoid stacking several patients’ labels in the same workspace. A cluttered draw station is where label mix-ups go to make friends. When multiple patients are scheduled back-to-back, finish one patient completely before beginning another, including labeling and checking the specimens.
Step 5: Label the Tube Immediately at the Point of Collection
Label the blood tube immediately after collection, while still in the presence of the patient whenever possible. This is one of the most important rules in specimen safety. The tube should not travel unlabeled to a desk, counter, cart, pocket, or “I’ll do it in a second” zone. That second has a sneaky way of becoming a specimen identification problem.
Point-of-collection labeling helps ensure that the sample in your hand is matched to the patient in front of you. Many facilities prohibit pre-labeling blood tubes before seeing the patient because pre-labeling creates the risk that a tube may be used for the wrong person. Even if the collector has good intentions, the process is unsafe.
The safest habit is simple: collect, activate any safety device as required, secure the tube, apply the correct label, and verify the labeled tube before leaving the patient area.
Step 6: Use the Required Patient Identifiers
Apply a label that includes the required patient identifiers. In many U.S. healthcare settings, a blood sample label must contain at least two identifiers, such as:
- Patient’s full first and last name
- Date of birth
- Medical record number or unique patient ID
- Accession number or laboratory order number
- Barcode tied to the electronic order
Do not rely on only one identifier. A tube labeled only “Michael” or even “Michael Brown” is not enough in a real laboratory environment. There may be several patients with the same or similar names. A second identifier reduces the chance of assigning results to the wrong person.
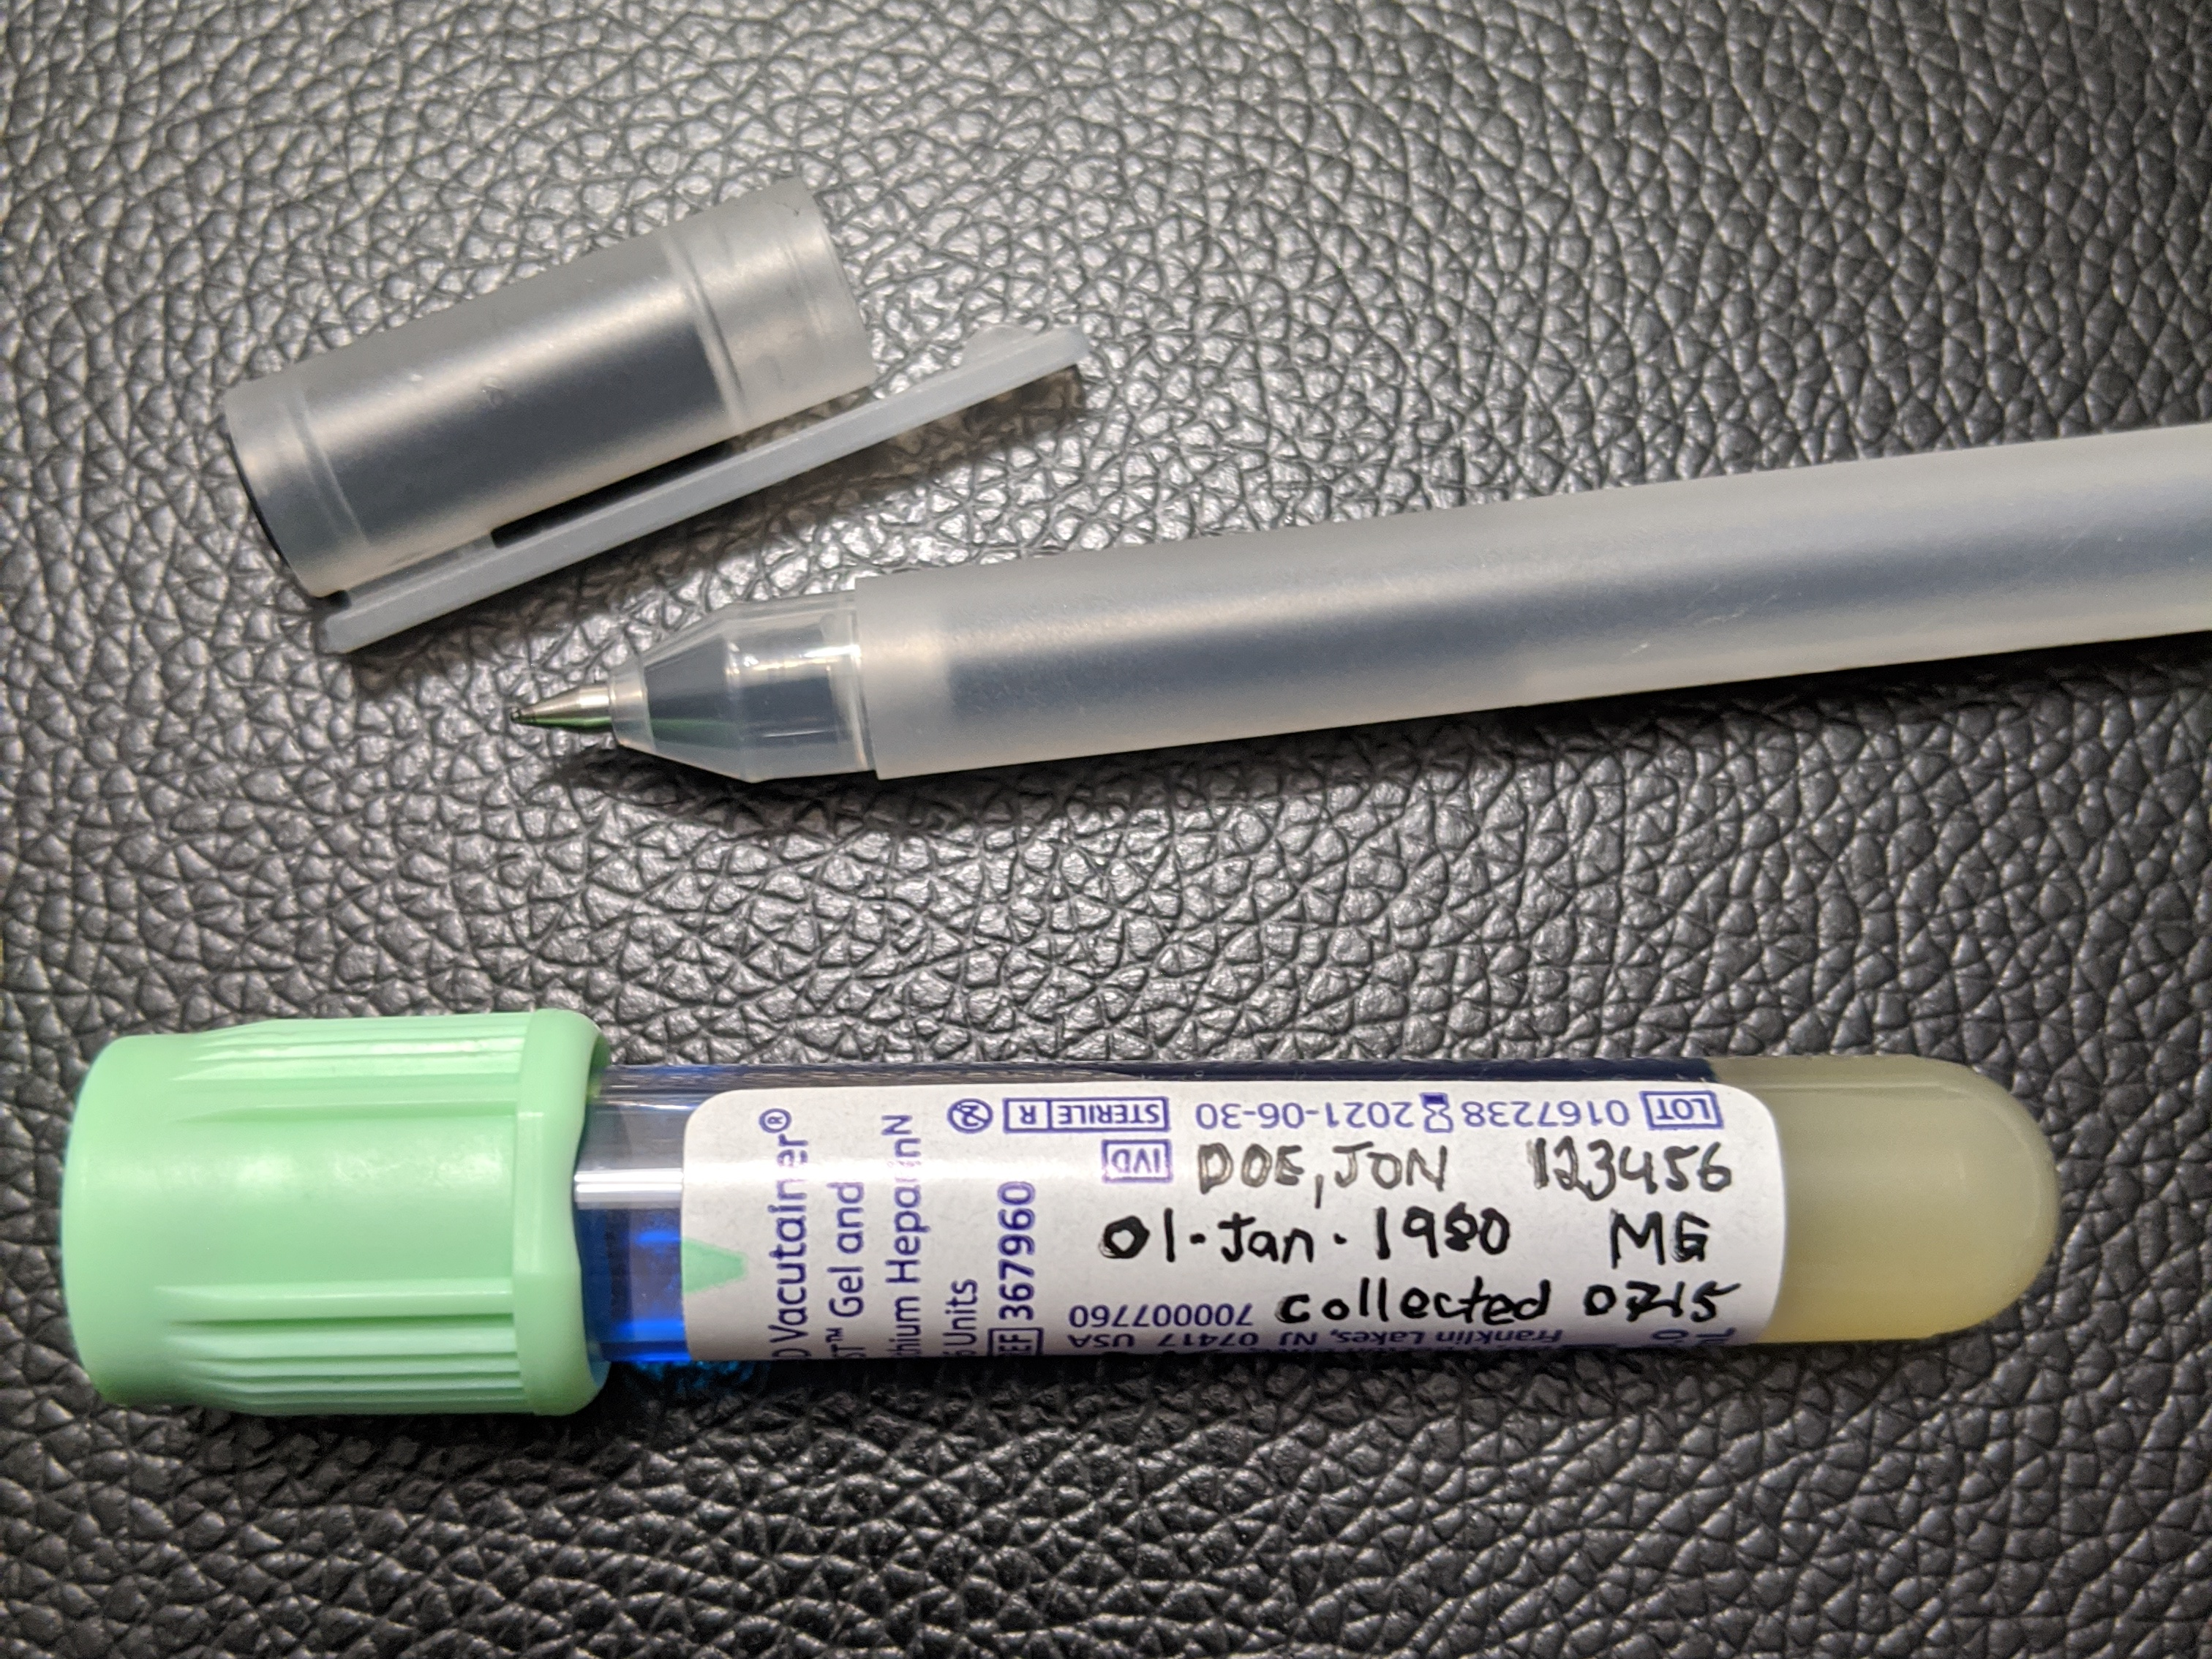
If handwriting is required during downtime, write clearly using permanent ink approved by your facility. Avoid smudges, abbreviations, nicknames, and mystery scribbles that require a detective with a microscope. If the lab cannot read the label, the specimen may be rejected.
Step 7: Add Collection Date, Time, and Collector Information When Required
Many blood samples require the collection date and time, especially when test interpretation depends on timing. Drug levels, glucose testing, blood cultures, coagulation studies, and time-sensitive chemistry tests may be affected by when the sample was drawn. Some facilities encode this information in a barcode; others require it to be printed or handwritten.
Collector initials, employee ID, or another approved collector identifier may also be required. This creates accountability and supports traceability if a question arises later. For certain specimens, including transfusion medicine samples, requirements are often stricter. Blood bank specimens may require precise identification, collection time, collection date, and collector verification because the result may be used to select blood products for transfusion.
When in doubt, follow the stricter rule or check the test directory before collection. The best time to confirm requirements is before the patient has been poked, not after the tube has been rejected and everyone is suddenly having a very educational afternoon.
Step 8: Place the Label Correctly on the Tube
A label is only useful if it stays attached and can be scanned or read. Place the label directly on the blood tube, not on the transport bag, requisition, lid, or outer packaging. The container itself must be identified. A label floating in the bag beside an unlabeled tube is not a labeled specimen; it is a tiny paperwork hostage situation.
Apply the label smoothly and lengthwise when possible, following your facility’s tube-labeling rules. Do not cover important fill lines, tube expiration information, or areas the lab must inspect. If the tube has a barcode label, make sure the barcode is not wrinkled, folded around the cap, torn, or placed where the scanner cannot read it. Leave a viewing window when required so laboratory staff can inspect sample volume, clotting, hemolysis, or separation.
For small pediatric tubes or microtainers, space can be limited. Use facility-approved labels and placement instructions. Do not improvise by attaching the label only to the bag or paperwork because the tube is small. The lab needs a reliable way to connect the actual container to the actual patient.
Step 9: Verify the Labeled Sample Before Sending It to the Lab
Before leaving the patient area or sending the specimen, perform a final check. Confirm that each tube is labeled, the identifiers match the order, the date and time are correct if required, and the tube type matches the requested test. If multiple tubes were collected, check every tube individually. One correct label does not magically bless the entire batch.
Also verify that the requisition or electronic order is complete. The laboratory may need diagnosis codes, provider information, collection site, specimen source, fasting status, or special handling instructions. Place the specimen in the correct transport bag, separate paperwork from the tube if required, and follow temperature, light protection, or delivery-time instructions.
If you discover a labeling problem, do not quietly “fix it” unless your facility has a specific policy allowing correction. Many labs reject mislabeled or unlabeled specimens, especially if recollection is possible. For irreplaceable or difficult-to-recollect specimens, special exception procedures may exist, but they must be documented and approved. Patient safety comes first, even when the redraw conversation is awkward.
Common Blood Sample Labeling Mistakes to Avoid
Pre-Labeling Tubes
Pre-labeling may seem efficient, but it increases the risk that a labeled tube will be used for the wrong patient. The safer practice is to label the tube after collection, at the bedside or point of care, while the patient identity is actively confirmed.
Using Only One Identifier
A single name is not enough. Even full names can repeat, especially in large health systems. Always use the required number of patient-specific identifiers and make sure they match the order.
Labeling the Bag Instead of the Tube
The label belongs on the specimen container. A label on the bag does not identify the tube once the tube is removed from that bag. The laboratory must be able to identify the sample itself.
Covering the Barcode or Fill Line
Barcode scanners are helpful only when the barcode can be scanned. Tube fill lines are helpful only when staff can see them. Apply the label carefully so the lab can process the sample without peeling, guessing, or silently judging your sticker placement.
Ignoring Special Requirements
Some tests require exact collection time, special tube handling, light protection, chilling, or immediate delivery. Labeling and handling work together. A beautiful label on a mishandled sample is like a tuxedo on a raccoon: memorable, but not useful.
Examples of Correct Blood Sample Labeling
Example 1: Routine Outpatient Blood Test
A patient named Angela Marie Carter arrives for routine blood work. The collector asks Angela to state her full name and date of birth, then compares that information with the electronic order. After collection, the collector applies a barcode label to each tube at the chair. The label includes Angela Carter’s full name, date of birth, unique order number, collection date, collection time, and barcode. Before Angela leaves, the collector checks that every tube matches the order.
Example 2: Hospital Blood Draw
A hospitalized patient is unable to speak. The collector uses the wristband and approved electronic scanning process to confirm two identifiers. After collecting the specimen, the collector labels the tube at the bedside, verifies the label against the wristband and order, and sends the specimen through the approved transport route. Because the patient cannot self-identify, following the facility’s patient identification policy becomes even more important.
Example 3: Downtime Labeling
The label printer is temporarily unavailable. The collector follows the facility’s downtime policy, handwrites the patient’s full name, date of birth, medical record number, date and time of collection, and collector initials on an approved label. The collector confirms the handwritten label against the requisition before sending it. Downtime is not a free pass for incomplete labeling; it is when careful labeling matters even more.
Why Blood Sample Labeling Is a Patient Safety Issue
Blood test results influence medical decisions. A provider may adjust medication, diagnose infection, monitor anemia, evaluate organ function, prepare for surgery, or make transfusion decisions based on laboratory data. If the blood sample belongs to the wrong patient, the result may be clinically misleading. The patient whose blood was tested may not receive needed care, while another patient may receive unnecessary or incorrect treatment.
Specimen labeling is also part of laboratory quality management. Laboratories must maintain specimen identity from collection through testing and reporting. That chain of identity begins at the moment the sample is collected. Once a tube arrives unlabeled or mislabeled, the lab may have no safe way to prove whose blood it contains. That is why many facilities reject questionable specimens rather than risk reporting results on the wrong patient.
For patients, this may feel frustrating because rejection can mean another needle stick. But a redraw is usually safer than guessing. In healthcare, “probably the right tube” is not a standard anyone wants attached to their medical record.
Practical Tips for Better Blood Sample Labeling
Create a consistent routine and follow it every time. Review the order, identify the patient, collect the sample, label immediately, verify, and transport. Repetition builds safety. The goal is not to be slow; the goal is to be reliably correct.
Keep the collection area organized. Work with one patient’s labels and tubes at a time. If you are interrupted, pause and restart your verification step. Interruptions are a major enemy of accurate labeling because they break concentration at exactly the wrong moment.
Use technology wisely. Barcode scanning, bedside label printing, and electronic medical record systems can reduce errors, but they do not replace human attention. A scanner can confirm a match only if the user scans the correct patient and applies the correct label to the correct tube.
When handwriting labels, slow down. Clear writing is not old-fashioned; it is a safety tool. Use the patient’s full legal name, not nicknames. Write dates in the format required by your facility. Include collection time when required. If the label becomes wet, torn, or unreadable, follow policy before sending it.
Finally, treat every specimen as important. A “routine” tube may still guide medication changes, diagnosis, or follow-up care. There is no such thing as a casual blood sample. The tube may be small, but it carries big responsibility.
Experience-Based Insights: What Real-World Blood Sample Labeling Teaches You
Anyone who has spent time around clinical laboratories, phlebotomy teams, or busy outpatient draw stations quickly learns that blood sample labeling is less about stickers and more about habits. The collectors who make the fewest errors are not always the fastest people in the room. They are the ones who use the same careful sequence every time, even when the waiting room is full, the printer is grumbling, and someone nearby is asking where the extra tourniquets went.
One useful experience-based lesson is to never trust memory when labels are involved. A collector may think, “I know this patient; I just drew them yesterday.” That familiarity can be helpful for comfort, but it should never replace identification. Patients with similar names, repeat visits, family members attending together, and copied orders can all create opportunities for confusion. The best collectors verify each patient as if it is the first time. It may feel repetitive, but repetition is the seatbelt of laboratory safety: boring until the moment it matters.
Another lesson is that interruptions are more dangerous than they look. Imagine labeling three tubes after a draw when a coworker asks a question, the phone rings, or the patient suddenly feels lightheaded. In that moment, attention shifts. A safe response is to stop, address the immediate issue, then return to the label check from the beginning. Do not resume halfway through and assume you remember where you left off. The tube will not be offended if you verify it twice. In fact, if tubes had feelings, they would probably appreciate the attention.
Downtime situations also teach humility. When barcode printers and electronic systems work well, labeling can feel automatic. But when the system goes down, staff must rely on written procedures, clear handwriting, and careful cross-checking. This is when training shows. A good downtime process includes approved labels, required identifiers, collection date and time, collector identification, and a clear way to match the specimen to the order. The worst downtime process is panic plus a pen.
Experience also shows that specimen rejection, while frustrating, is often a sign that the safety system is working. Nobody enjoys calling for a redraw. Patients may be annoyed, clinicians may be rushed, and collectors may feel embarrassed. Still, rejecting an unlabeled or mismatched specimen prevents a much bigger problem: reporting a result that may belong to someone else. A redraw can be inconvenient; a wrong result can be dangerous.
Finally, strong labeling culture depends on teamwork. Phlebotomists, nurses, medical assistants, laboratory staff, and providers all play a role. The lab should communicate rejection reasons clearly. Collection staff should feel comfortable asking questions before sending uncertain specimens. Supervisors should train new employees with real examples, not just policy pages. And everyone should understand that the goal is not blame; the goal is reliable patient care.
In practice, the best blood sample labeling routine is simple: identify carefully, label immediately, check completely, and ask when unsure. That small routine saves time, prevents redraws, supports accurate testing, and keeps patients safer. It is not glamorous, but neither are brake padsand everyone is grateful when they work.
Conclusion
Learning how to label a blood sample correctly is one of the most important skills in safe specimen collection. The process may seem small, but it connects the patient, the order, the tube, the laboratory, and the final result. A correct label helps ensure that the right test is performed on the right specimen for the right patient.
The 9 steps are straightforward: review the order, identify the patient with two identifiers, match the order, collect the proper tube, label immediately at the point of collection, include required identifiers, add date and time when needed, place the label correctly, and verify before transport. Add a calm routine, organized workspace, and respect for facility policy, and you have a strong defense against specimen errors.
In short, blood sample labeling is not just paperwork. It is patient safety in sticker form. And yes, that sticker has a very serious job.
SEO Tags