
A linoleum cutter set looks innocent enough: a small handle, a few shiny blades, maybe a tidy little storage cap. Then you press one gouge into a block of lino and suddenly you understand why printmakers talk about carving like it is part art, part meditation, and part tiny wrestling match with rubbery flooring material. The good news? With the right lino cutter set, even beginners can create crisp greeting cards, handmade posters, fabric prints, art journals, stamps, and wall-worthy linocut prints without needing a professional studio or a dramatic black beret.
This guide explains what a linoleum cutter set is, how the different blades work, what to look for before buying one, how to use it safely, and how to keep your tools carving clean lines instead of chewing through your design like a hungry squirrel. Whether you are a student, hobby artist, classroom teacher, small business crafter, or weekend printmaking explorer, the right set can make the difference between “Wow, I made that!” and “Why does my bird look like a potato?”
What Is a Linoleum Cutter Set?
A linoleum cutter set is a group of hand tools used to carve designs into linoleum blocks, soft carving blocks, rubber blocks, and sometimes wood or vinyl-like printmaking surfaces. The carved block is then inked and pressed onto paper or fabric to create a relief print. In relief printing, the raised areas hold ink, while the carved-away areas stay blank. Think of it like making your own giant handmade stamp, except with more personality and fewer office-supply vibes.
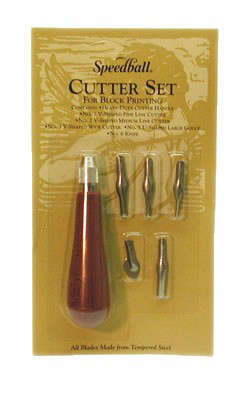
Most beginner linoleum cutter sets include one handle and several interchangeable cutting tips. Common blade shapes include small V gouges, large V gouges, U gouges, square gouges, and knife-style cutters. More advanced sets may include multiple handles, palm tools, professional steel gouges, Japanese carving tools, or safety-style pull cutters designed for younger users and classrooms.
Why a Good Linoleum Cutter Set Matters
Linocut printmaking rewards patience, but it also punishes dull tools. A sharp, well-designed cutter glides through the block with control. A poor cutter drags, slips, tears, and makes you question your life choices. The best linoleum cutter set does not need to be expensive, but it should feel secure in your hand, hold the blade firmly, and offer enough blade variety for both fine lines and broader clearing.
For beginners, a reliable starter set is often better than buying one professional tool at a time. You get to test different marks, learn how V and U gouges behave, and discover whether you enjoy detailed carving, bold graphic shapes, or the deeply satisfying act of clearing large blank areas. For experienced printmakers, upgrading individual tools later can improve precision, comfort, and sharpening potential.
Common Tools Included in a Linoleum Cutter Set
Small V Gouge
The small V gouge is the detail hero. It creates thin lines, outlines, textures, hatching, hair, grass, lettering details, and all the tiny marks that make a print look alive. If your design has whiskers, stars, feathers, or delicate borders, this is the blade you will reach for often.
Large V Gouge
A large V gouge cuts wider angular lines. It is useful for bold outlines, expressive marks, and carving channels around shapes before clearing larger areas. It can give your print a handmade energy that feels lively rather than overly polished.
Small U Gouge
The small U gouge makes rounded cuts and smooth grooves. It is helpful for curved lines, organic textures, waves, leaves, clouds, and controlled background marks. Many beginners find U gouges slightly more forgiving than V gouges because the marks feel softer.
Large U Gouge
The large U gouge is built for clearing. When you need to remove open background areas, carve away negative space, or reduce a block before the next color layer, this tool saves time. It is not the blade for eyelashes; it is the blade for “let’s move some lino.”
Square Gouge
A square gouge can create flat-bottomed cuts and geometric marks. It is useful for blocky textures, architectural designs, borders, and clearing with a more even base. Not every beginner uses it immediately, but it becomes handy once you start experimenting with mark variety.
Knife Cutter
A knife-style cutter is often used to outline shapes, trim details, or define edges before removing surrounding material. It requires control and respect because it can cut deeply. Used carefully, it helps sharpen the boundaries between printed and unprinted areas.
Best Uses for a Linoleum Cutter Set
A lino cutter set is surprisingly versatile. Artists use it to make fine art prints, handmade cards, bookplates, gift tags, wrapping paper, textile designs, logos, journal covers, posters, and limited-edition prints. Teachers use lino cutter sets in art classrooms because students can learn design, positive and negative space, mirror imaging, pressure control, and printing in one project. Crafters use them for custom stamps and small-batch products. Small business owners use linocut-style art for packaging, branding, and rustic handmade visuals.
The most common project for beginners is a single-color print. You draw a design, transfer it to the block, carve away the white areas, roll ink over the raised surface, and press paper on top. Once you understand that process, you can try multi-color printing, reduction printing, fabric printing, repeating patterns, or hand-colored prints.
How to Choose the Best Linoleum Cutter Set
1. Look for Secure Blade Holding
If the handle uses interchangeable blades, the chuck or tightening system should hold the cutter firmly. A blade that wiggles while carving is not just annoying; it can ruin lines and increase slipping risk. A good handle should make blade changes easy while still locking each cutter in place.
2. Choose the Right Blade Variety
A useful beginner set should include at least a small V, large V, small U, large U, and a knife or clearing tool. These shapes cover detail work, outlines, curves, and background removal. More blades are nice, but five well-chosen cutters can do a surprising amount.
3. Consider Comfort
Printmaking involves repeated pressure. If the handle feels awkward after five minutes, imagine how it will feel after carving a full 8-by-10-inch block. Rounded handles, palm-friendly shapes, and smooth grip surfaces reduce fatigue. For longer sessions, comfort matters as much as sharpness.
4. Think About the Material You Will Carve
Soft carving blocks are easier for beginners and younger artists. Traditional battleship gray linoleum holds crisp details but can feel firmer, especially when cold or old. Rubber blocks are flexible and forgiving, while some vinyl or wood surfaces require sharper, stronger tools. Match your cutter set to the material instead of expecting one tiny blade to behave like a superhero.
5. Decide Between Starter and Professional Tools
Starter sets are affordable, easy to find, and excellent for learning. Professional tools, such as individual palm gouges or Japanese carving tools, often offer better steel, sharper edges, and longer-term value. Beginners do not need to start with premium tools, but serious printmakers often upgrade once they know their favorite blade shapes.
Linoleum Cutter Set vs. Professional Gouges
A standard interchangeable linoleum cutter set is convenient and budget-friendly. It usually stores extra blades inside the handle, which is great if your workspace is the corner of a kitchen table and your cat believes every loose object is a toy. These sets are also ideal for classrooms because replacement blades are easy to manage.
Professional gouges, on the other hand, usually have fixed blades and individual handles. They may be sharper, more comfortable, and easier to control for detailed carving. Many professional tools can also be stropped and sharpened for years. The tradeoff is cost. A beginner set might include multiple blades for the price of one or two professional tools.
The smartest approach is simple: start with a good beginner linoleum cutter set, learn which blades you love, then upgrade slowly. Buy the tool your hand actually wants, not the one that looks fanciest in an online photo.
How to Use a Linoleum Cutter Set
Step 1: Prepare Your Design
Start with a bold drawing. Linocut loves contrast, pattern, and strong shapes. Fine details are possible, but beginners should avoid designs that depend on microscopic lines. Remember that your final print will be reversed, so flip text and directional images before transferring them to the block.
Step 2: Transfer the Image
You can draw directly on the lino block, use graphite transfer paper, trace from the back of a pencil drawing, or print a reversed image and transfer it. After transferring, go over important lines with a permanent marker so they do not disappear while carving.
Step 3: Test Your Blades
Before attacking your final design like an over-caffeinated beaver, test each blade on a scrap corner. Notice how deep it cuts, how wide the mark is, and how much pressure it needs. This quick practice prevents surprises later.
Step 4: Carve Away From Your Body
Always push the cutter away from yourself and keep your other hand behind the blade path. Turn the block instead of twisting your wrist into awkward angles. A bench hook or non-slip mat helps hold the block steady so your hand does not become the emergency brake.
Step 5: Work From Detail to Clearing
Begin with outlines and delicate details using smaller V or U gouges. Then move to larger tools for open areas. Carve slowly and remove shallow layers rather than digging deep trenches immediately. You can always carve more, but you cannot put linoleum back once it has flown across the table like a tiny gray noodle.
Step 6: Ink and Print
After carving, roll a thin, even layer of block printing ink onto a flat surface with a brayer. Then roll the ink over the raised surface of the block. Place paper on top and press with a baren, wooden spoon, clean hand pressure, or printing press. Peel carefully and admire the result. If it looks imperfect, congratulations: you have made a real print, not a sterile computer icon.
Safety Tips for Linoleum Cutting
Linoleum cutters are small, but they are sharp enough to demand respect. The golden rule is simple: never carve toward your body, fingers, or holding hand. Keep both hands behind the cutting edge, rotate the block to change direction, and use a bench hook or non-slip mat for stability. If children are using lino tools, choose safety-style cutters, soft blocks, and direct adult supervision.
Do not force a dull blade. Excessive pressure leads to slips. If the lino feels too hard, warm it gently with your hands or place it in a warm room before carving. Do not overheat it. Warm and flexible is good; scorched and crumbly is not the goal unless your artistic theme is “disaster pancake.”
Maintenance: How to Keep Linoleum Cutters Sharp
Sharp tools are safer and cleaner because they require less pressure. Wipe blades after use to remove debris, ink, and moisture. Store them in a case, handle compartment, or blade roll so the edges do not bang into each other. If your tools are designed for sharpening, use a strop and honing compound carefully, matching the blade angle. If you are using replaceable starter blades and one becomes dull, replacing it may be easier than attempting advanced sharpening.
Never toss loose blades into a drawer. That is how a peaceful studio becomes a suspense movie. Keep blades organized by size and shape, and check them before each session. A nicked or bent tip can create ragged cuts and unpredictable slips.
Common Mistakes Beginners Make
Cutting Too Deep Too Soon
Deep cuts can make the block unstable and remove more detail than planned. Start shallow. Build the cut gradually. Your future self will send a thank-you note.
Using Too Much Ink
Thick ink fills carved lines and makes prints look muddy. Aim for a thin, even layer that sounds slightly tacky when rolled. If the brayer looks like it is wearing frosting, scrape some ink away.
Forgetting the Mirror Image
Text must be carved backward so it prints correctly. This is the classic beginner mistake, and almost everyone does it once. Some people do it twice. We do not judge; we simply label it “learning.”
Holding the Block With the Wrong Hand Position
If your hand is in front of the blade, stop immediately. Use a bench hook, turn the block, and keep fingers behind the cutting path. Good carving posture prevents injuries and improves control.
Who Should Buy a Linoleum Cutter Set?
A linoleum cutter set is perfect for beginners who want to explore printmaking without spending a fortune. It is also useful for teachers, homeschool art projects, card makers, stamp carvers, textile artists, illustrators, and designers who want a handmade look. If you enjoy slow creative processes, tactile materials, and the drama of peeling paper from an inked block, linocut may become your new favorite rabbit hole.
For younger artists, look for classroom-friendly safety cutters, softer blocks, and simple designs. For adults and serious beginners, a standard interchangeable cutter set with multiple blades is a practical starting point. For professional artists, individual high-quality gouges may be worth the investment after the basic technique feels comfortable.
Specific Example: A Simple First Linocut Project
Try a 4-by-6-inch botanical card. Draw one large leaf with bold veins. Transfer the design to a soft carving block. Use a small V gouge for the veins, a large V gouge around the outside edge, and a large U gouge to clear the background. Roll black or dark green ink onto the block and print onto folded cardstock. The result is simple, elegant, and much more impressive than telling people, “I bought this card in aisle seven.”
Once you are comfortable, repeat the same design with two colors. Print a pale background shape first, let it dry, then print the detailed leaf layer on top. This teaches registration, ink control, and patiencethe three noble virtues of printmakers and people waiting for toast.
Hands-On Experience With a Linoleum Cutter Set
The first time you use a linoleum cutter set, the tool may feel both simple and slightly intimidating. The handle is small, the blade is tiny, and the block just sits there looking harmless. Then you make the first cut and realize the whole process depends on pressure, angle, and rhythm. Push too hard and the blade dives. Push too lightly and it skips. Hold it just right and a clean curl of linoleum lifts away like a tiny ribbon. That moment is strangely addictive.
One of the best experiences with a linoleum cutter set is learning how different blades create different personalities. A small V gouge feels sharp and energetic. It makes nervous little lines, perfect for fur, leaves, stars, and crosshatching. A U gouge feels smoother and friendlier, almost like drawing with a rounded spoon. The large gouge is the workhorse, clearing background areas while making you feel productive. The knife blade, meanwhile, demands manners. It does beautiful edge work, but it does not tolerate careless hands.
A practical lesson comes quickly: rotate the block, not your body. Beginners often try to twist their wrist around curves, which makes the tool wobble. Turning the block keeps the cutter moving away from you and makes curves cleaner. Another lesson is that carving is not a race. The best prints often come from slow, repeated decisions. You carve a little, brush away crumbs, look again, then carve more. It is a conversation with the image, except the image occasionally says, “Oops, that line is permanent.”
Inking the carved block is another experience entirely. Too much ink turns detail into soup. Too little ink creates dry, patchy prints. When the ink is right, the brayer makes a soft sticky sound and the block looks evenly coated without being flooded. Pulling the first print is the reward. Even if it has flaws, it feels handmade in the best way. The texture, pressure marks, and slight irregularities give the print warmth that digital graphics cannot imitate.
After several projects, you start noticing your preferences. Maybe you like bold black-and-white designs. Maybe you enjoy botanical details. Maybe you secretly love clearing backgrounds because it is cheaper than therapy. A linoleum cutter set teaches more than technique; it teaches patience, planning, and how to turn mistakes into style. A stray carved line can become texture. A rough edge can become charm. A slightly uneven print can become the reason someone says, “This feels real.”
That is the magic of the linoleum cutter set. It is affordable, portable, and humble, but it opens the door to an art form with endless possibilities. With a few blades, a block, ink, paper, and a safe workspace, you can make something personal, repeatable, giftable, and proudly imperfect. Not bad for a tool that fits in your hand.
Conclusion
A linoleum cutter set is one of the most approachable tools in printmaking. It gives beginners a complete path into carving, inking, and printing while offering enough depth for years of experimentation. The best set includes secure blades, comfortable handling, useful V and U gouges, and safe storage. Start with simple designs, carve away from your body, use the right blade for each mark, and keep your tools sharp.
Whether you are making handmade cards, art prints, classroom projects, textile patterns, or custom stamps, a lino cutter set turns basic materials into expressive artwork. It is not about perfect lines; it is about deliberate marks, bold choices, and the satisfying reveal of a fresh print. Once you hear that first peel of paper from inked linoleum, there is a good chance you will be hooked.
SEO Tags