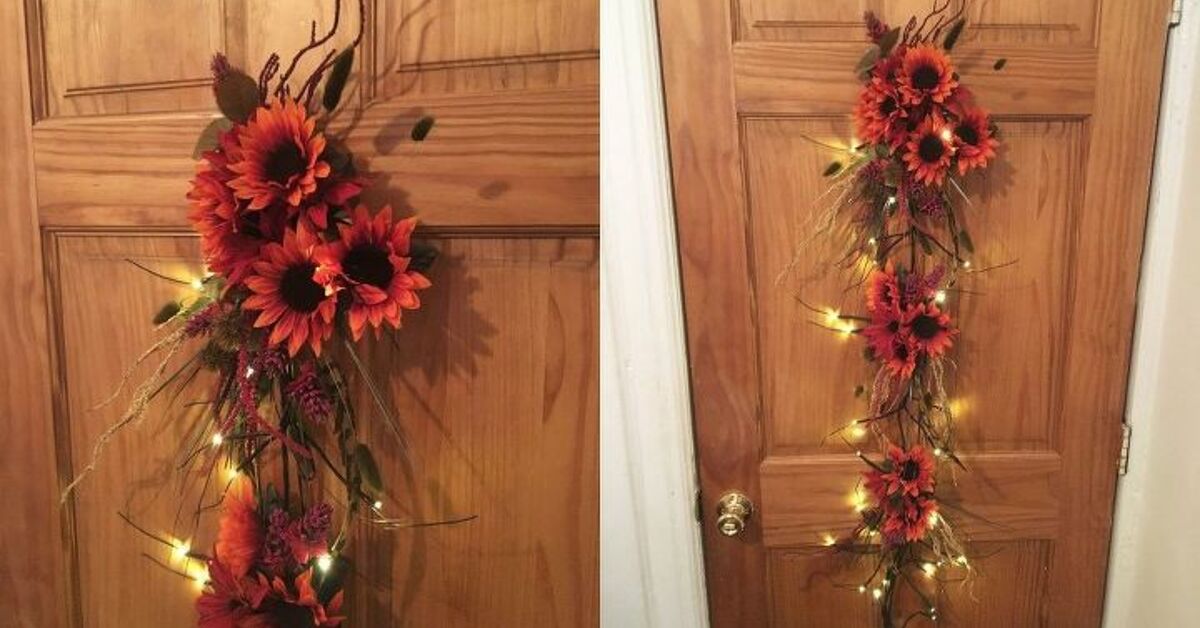

If autumn had a mascot, it would probably be a sunflower wearing a plaid scarf and holding a pumpkin spice latte. Sunflowers bring that golden, cheerful, “hello, I am thriving even though it gets dark at 5:30” energy to fall décor. That is why an autumn sunflower door hanger DIY is one of the easiest ways to make your front door feel warm, welcoming, and seasonally polished without buying an expensive premade wreath.
This project blends the sunny charm of sunflowers with classic fall textures like burlap, buffalo check ribbon, faux maple leaves, berries, wheat stems, pinecones, and rustic wood. You can make it farmhouse, modern, boho, neutral, colorful, or full “harvest festival but make it cute.” Better yet, this DIY door hanger is beginner-friendly, budget-conscious, and customizable enough to match your porch, entryway, apartment door, classroom, craft booth, or Thanksgiving display.
Below, you will learn how to make a durable, beautiful autumn sunflower door hanger from start to finish, including materials, design planning, step-by-step assembly, styling ideas, troubleshooting tips, and real crafting experience from the kind of project where hot glue strings appear out of nowhere like tiny craft cobwebs.
Why Make an Autumn Sunflower Door Hanger?
A sunflower door hanger works beautifully because it sits right between late summer and fall. It is not too spooky for September, not too pumpkin-heavy for August, and not too formal for Thanksgiving. It offers a cheerful seasonal update that can stay up for weeks, especially if you use faux flowers and weather-resistant materials.
Unlike a traditional round wreath, a door hanger can be made with a wood round, cutting board shape, grapevine base, metal hoop, flat sign, basket, tobacco basket, embroidery hoop, or even a lightweight foam form. That flexibility makes the project easier to personalize. You can add your family name, a “hello fall” phrase, a plaid bow, a small scarecrow hat, mini pumpkins, or a simple jute loop for a clean handmade look.
Supplies You Will Need
Before you begin, gather your supplies. The exact materials depend on your style, but the following list works well for most autumn sunflower door hanger designs.
Basic Materials
- One wood round, grapevine wreath, foam wreath form, metal hoop, or flat door hanger base
- Faux sunflowers in yellow, burnt orange, cream, or mustard tones
- Faux fall leaves, eucalyptus, wheat stems, berry picks, or small greenery sprigs
- Burlap ribbon, gingham ribbon, buffalo check ribbon, velvet ribbon, or wired plaid ribbon
- Hot glue gun and glue sticks
- Floral wire or pipe cleaners
- Wire cutters
- Scissors
- Jute twine, ribbon, or a metal hanger for hanging
Optional Decorative Extras
- Mini faux pumpkins or gourds
- Pinecones or acorns
- Wooden words such as “Welcome,” “Gather,” or “Hello Fall”
- Acrylic paint or chalk paint
- Paintbrush or foam brush
- Mod Podge or clear outdoor sealer
- Stencil or vinyl lettering
- Small craft sign, bow center, or sunflower center accent
If your door is exposed to rain, choose faux florals labeled for outdoor or covered outdoor use. A protected porch gives your hanger a much longer life. Direct sun, heavy rain, and strong wind can fade petals, loosen glue, and turn a perfect bow into a dramatic ribbon noodle.
Step 1: Choose the Right Base
The base controls the entire personality of your autumn sunflower door hanger. A wood round gives you a polished farmhouse sign. A grapevine wreath feels natural and rustic. A metal hoop creates a modern, minimalist design. A foam form is lightweight and easy for beginners. A basket-style hanger looks charming if you want flowers to spill upward like a tiny front-door bouquet.
For a classic design, use a 14- to 18-inch wood round or grapevine wreath. This size is large enough to be visible from the sidewalk but not so large that it wrestles your storm door every time you come home with groceries.
Step 2: Pick Your Autumn Color Palette
Sunflowers usually bring yellow to the party, but you do not have to stop there. For a traditional fall look, pair yellow sunflowers with orange leaves, burgundy berries, brown pinecones, and burlap. For a modern farmhouse style, use cream sunflowers, muted eucalyptus, black-and-white buffalo check ribbon, and a natural wood base. For a boho fall hanger, try mustard sunflowers, dried grass, pampas stems, rust ribbon, and copper accents.
The easiest rule is to choose three main colors and repeat them. For example: mustard yellow, burnt orange, and ivory. Or cream, sage green, and warm brown. Repetition makes your DIY project look intentional instead of like your craft bin sneezed on the table.
Step 3: Prepare the Base
If you are using a wood base, lightly sand rough edges and wipe away dust. Paint or stain the wood if desired. A dark walnut stain creates a cozy rustic look, while white chalk paint makes sunflowers pop. Let paint dry completely before adding flowers or ribbon.
If you are using a grapevine wreath, shake it gently outside to remove loose bits. Trim any wild twigs that stick out too far. You want rustic charm, not a wreath that looks like it just fought a squirrel.
If you are using foam, wrap it with burlap, ribbon, yarn, or fabric first. This hides the foam and gives the flowers a finished background. Secure the ribbon on the back with hot glue, then wrap tightly around the form until the base is covered.
Step 4: Create a Layout Before Gluing
This is the step that saves you from craft regret. Place your base flat on the table and arrange the sunflowers without glue. Try a cluster on one side, a crescent shape around the bottom, or a full sunflower border. For a wood round, a popular option is to place three large sunflowers in the lower left corner, add leaves and berries around them, and place a bow at the top or side.
Take a quick photo with your phone once you like the arrangement. That photo becomes your roadmap when everything inevitably shifts because one sunflower stem refuses to behave.
Step 5: Trim the Flower Stems
Use wire cutters to trim faux sunflower stems to about two to four inches, depending on your base. For grapevine wreaths, leave enough stem to tuck into the woven branches. For wood rounds, trim stems shorter so the flowers sit flatter. If a bloom has a bulky plastic stem, remove extra leaves and thin the stem where possible.
Do not throw away the leaves. Faux sunflower leaves are useful for filling gaps, hiding glue spots, and adding dimension around the main blooms.
Step 6: Attach the Sunflowers
Start with the largest sunflowers first. Add hot glue to the stem and back of the flower head, then press it firmly onto the base. If you are using a grapevine wreath, push the stem into the vines and secure it with floral wire for extra strength. If you are using a wood round, glue the flower in place and hold it until the glue begins to set.
Place the main flowers in odd numbers, such as three or five. Odd-numbered groupings usually look more natural and balanced. Angle each bloom slightly differently so the design feels full and relaxed rather than stiff.
Step 7: Add Leaves, Greenery, and Texture
Once the sunflowers are secure, add fall leaves, eucalyptus, wheat stems, berries, and small floral picks around them. Tuck larger leaves behind the flowers and smaller pieces in front. This layering creates depth and makes the hanger look professionally styled.
For a harvest-inspired look, add wheat stems radiating outward from the flower cluster. For a farmhouse design, add lamb’s ear or eucalyptus. For a Thanksgiving look, include mini pumpkins, pinecones, or berry clusters. Keep stepping back to view the hanger from a distance. A door decoration should look good from three feet away and from the sidewalk.
Step 8: Make a Bow That Does Not Look Sad
A bow can make or break your autumn sunflower door hanger. Wired ribbon is the easiest choice because it holds shape. Use two or three ribbon styles for a fuller bow, such as burlap, plaid, and solid rust velvet.
To make a simple bow, cut several ribbon strips between 10 and 14 inches long. Layer them in an X shape, pinch the center, and secure with floral wire. Add shorter loops on top and dovetail the ribbon ends by folding each tail in half and cutting diagonally from the folded edge to the outer corner. Fluff the loops until the bow looks full.
Attach the bow with floral wire instead of only hot glue when possible. Wire gives the bow more staying power, especially on a front door that opens and closes often.
Step 9: Add Lettering or a Sign
If you are using a wood round, consider adding simple lettering. Popular phrases include “Hello Fall,” “Welcome,” “Gather,” “Thankful,” or “Bless This Home.” You can paint the words by hand, use a stencil, apply vinyl lettering, or glue on a premade wooden word.
Keep the lettering readable. A beautiful script font is lovely, but if guests have to squint like they are solving a secret autumn code, choose something cleaner. Place text in the open space opposite the flower cluster so the design feels balanced.
Step 10: Create a Strong Hanger
Use jute twine, ribbon, wire, or a sawtooth hanger depending on your base. For wood rounds, staple or glue a jute loop to the back, then reinforce it with a small strip of felt or cardboard. For grapevine wreaths, loop floral wire through the top and twist tightly. For metal hoops, tie ribbon directly to the hoop.
Before hanging it on your door, test the hanger by holding it up for a few seconds. Give it a gentle shake. If anything wiggles, reinforce it now. It is much easier to fix on a table than after your sunflower makes a dramatic escape onto the porch.
Step 11: Seal and Protect the Door Hanger
If your hanger includes painted wood, paper elements, or natural materials, spray it with a clear sealer suitable for crafts. Use light coats and let each coat dry. Avoid spraying directly on delicate faux petals unless the sealer is safe for fabric or silk flowers.
For outdoor display, hang the project on a covered porch or protected door. If rain reaches your entry, bring the hanger inside during storms. Store it flat in a plastic bin after the season, and place tissue paper around the bow so it does not get crushed by December decorations with very strong opinions.
Step 12: Style It on Your Front Door
Once your autumn sunflower door hanger is complete, style it with a few simple porch accents. A doormat, a pair of potted mums, a lantern, or a small pumpkin stack can make the whole entry feel finished. You do not need to decorate the entire porch like a magazine shoot. One strong focal point on the door plus two supporting pieces nearby is enough.
For a cohesive look, repeat colors from the door hanger in your porch décor. If your bow has black-and-white plaid, use a buffalo check rug. If your hanger includes burgundy berries, add burgundy mums. If your sunflowers are cream and mustard, choose neutral pumpkins and warm brass lanterns.
Design Variations for Different Styles
Farmhouse Sunflower Door Hanger
Use a stained wood round, yellow sunflowers, cotton stems, burlap ribbon, and a “Welcome” sign. Add a buffalo check bow for that classic cozy farmhouse feel.
Modern Autumn Sunflower Hanger
Use a thin gold or black metal hoop, three cream sunflowers, eucalyptus, and a rust velvet ribbon. Keep the flowers arranged on only one side for an airy, elegant look.
Budget-Friendly Dollar Store Version
Start with a foam wreath or small wood plaque. Use faux sunflower bunches, ribbon, leaves, and berries from a discount craft aisle. Wrap the base with ribbon, glue the flowers in a cluster, and add a simple twine hanger.
Thanksgiving Sunflower Door Hanger
Use deeper colors: burnt orange, cranberry, brown, gold, and olive green. Add mini pumpkins, wheat, pinecones, and a “Thankful” sign to make the piece feel ready for the harvest table season.
Common Mistakes to Avoid
The first mistake is using too many large flowers. Sunflowers are bold, and too many of them can overwhelm the design. Mix large blooms with smaller filler pieces for balance.
The second mistake is gluing everything flat. A good door hanger needs layers. Place leaves behind blooms, berries between petals, and ribbon slightly above the flower cluster. Dimension makes the project look fuller and more expensive.
The third mistake is forgetting door function. If you have a storm door, measure the space between doors before making a bulky design. A hanger that gets squished every time the door closes will not stay pretty for long.
The fourth mistake is skipping reinforcement. Hot glue is useful, but floral wire adds strength. For heavy items like pinecones, mini pumpkins, or large bows, use both glue and wire whenever possible.
Helpful Experience Notes: What I Learned While Making Autumn Sunflower Door Hangers
The biggest lesson from making an autumn sunflower door hanger is that the project looks best when you stop trying to make it perfect. Fall décor has a relaxed, gathered-from-the-garden feeling. A slightly tilted sunflower, a loose wheat stem, or a ribbon tail that curves naturally can make the finished piece look more charming than a design where every element is lined up like it is reporting for duty.
One practical experience tip is to buy more filler greenery than you think you need. Sunflowers are the stars, but greenery is what makes them look intentional. A hanger with only sunflowers can feel flat, especially on a wood round. Once you add eucalyptus, maple leaves, wheat, or berry sprigs, the whole design starts to look layered and complete. The filler pieces also hide stems, glue, and awkward empty spots.
Another lesson is to test the design vertically before finalizing it. A layout can look amazing on the table and slightly strange once it is hanging on the door. Gravity changes how ribbon tails fall and how flower heads face forward. Before gluing the final pieces, hold the base upright or lean it against a wall. This quick check helps you spot heavy areas, gaps, and flowers that need a better angle.
Ribbon choice matters more than many beginners expect. Thin ribbon can disappear next to large sunflowers, while very stiff ribbon may look too formal. Wired ribbon in a two-and-a-half-inch width is a reliable choice because it creates full loops and holds its shape outdoors. Mixing one patterned ribbon with one solid ribbon also makes the bow look custom without becoming too busy.
Hot glue strings are almost guaranteed. Keep a hair dryer nearby and use it on a low warm setting for a few seconds to soften and remove stray glue webs after the project is finished. Do this carefully and do not overheat the flowers. You can also use tweezers to remove visible glue strings around petals and ribbon.
For wood rounds, painting the base before decorating makes the final hanger feel more polished. A black, cream, sage, or stained brown background can dramatically change the mood. Black makes yellow sunflowers pop. Cream feels soft and farmhouse-friendly. Stained wood feels rustic and cozy. Sage green looks beautiful with muted fall florals.
Storage is another real-world detail that matters. Do not toss the finished hanger into a holiday bin under heavier décor. Place it in a shallow storage box, support the bow with tissue paper, and keep it away from heat. Faux petals can bend if crushed, and ribbon can wrinkle if stored tightly. With careful storage, the same autumn sunflower door hanger can return next year looking like it spent the off-season at a tiny craft spa.
Finally, the best part of this DIY is how forgiving it is. If the bow looks too large, trim the tails. If one side looks empty, add berries. If the sign feels plain, add a small sunflower or a jute bow. If the colors feel too bright, tuck in neutral leaves or dried-looking stems. The project gives you room to adjust as you go, which makes it ideal for beginners and experienced crafters alike.
Conclusion
Crafting an autumn sunflower door hanger DIY is a simple, satisfying way to welcome the season with color, texture, and personality. With a sturdy base, a balanced sunflower arrangement, layered fall greenery, a full bow, and a reliable hanging loop, you can create a front-door decoration that looks handmade in the best possible way. Whether your style is farmhouse, modern, rustic, neutral, or full harvest charm, this project gives you a flexible foundation for beautiful fall décor.
The secret is not expensive materials. It is thoughtful layering, strong attachment, and a color palette that feels warm and inviting. Add a few porch pumpkins or potted mums nearby, and your door will be ready for crisp mornings, cozy evenings, Thanksgiving guests, and every delivery driver who deserves a little seasonal cheer.