
A good pyrography power supply is the quiet hero of wood burning. The pen gets the glamour, the tip makes the mark, and the artist gets the compliments, but the power supply decides whether your lines are silky, smoky, stubborn, or wildly dramatic for no good reason. If you have ever tried to shade a feather with a burner that behaves like a toaster with mood swings, you already know why temperature control matters.
This guide explores what a DIY pyrography power supply does, what features make it useful, and how to think about building or adapting one safely. It is written for makers, woodworkers, electronics hobbyists, and curious artists who want to understand the “box behind the pen” without pretending that mains electricity is a casual weekend snack. A pyrography burner uses controlled electrical power to heat a metal tip or wire nib. The better the control, the easier it becomes to create fine lines, soft shading, lettering, stippling, and textured backgrounds without scorching your project into a dramatic little campfire.
Before we go further, here is the big safety note: a DIY pyrography power supply should be treated as an electrical and heat-related project, not just a craft accessory. Work on the low-voltage side whenever possible, use certified power components, avoid exposed conductors, and do not modify mains-powered equipment unless you are trained and qualified. The goal is beautiful wood art, not a surprise lesson in emergency response.
What Is a Pyrography Power Supply?
A pyrography power supply is the control unit that delivers power to a wood-burning handpiece. In simple solid-point wood burners, the tool often plugs directly into a wall outlet and heats like a small soldering iron. In more advanced wire-nib systems, the control box delivers low-voltage, high-current power to a fine wire tip. That wire heats quickly, cools quickly, and responds better to changes in the control dial.
For artists, that responsiveness is everything. A cool tip drags and leaves pale, scratchy marks. An overheated tip scorches, sinks, and creates dark edges faster than you can say, “That was supposed to be a leaf.” A controlled power supply helps you match heat to wood species, stroke speed, tip shape, and the effect you want.
Why Build or Customize One?
Commercial pyrography machines are convenient and often the best choice for beginners. They are designed for the task, usually include safety testing, and come with compatible pens and tips. So why would anyone consider a DIY pyrography power supply?
The first reason is control. Makers may want a wider adjustment range, a clearer display, a more comfortable enclosure, or separate outputs for different pens. The second reason is repairability. A thoughtfully designed unit can be easier to diagnose and maintain than a sealed black box. The third reason is learning. Building a safe low-voltage controller teaches useful electronics concepts: voltage, current, resistance, heat, pulse width modulation, current limiting, fusing, and thermal management.
Cost is another reason, although it should not be the only one. A bargain-bin power supply that overheats, hums, sparks, or lacks protection is not a bargain. It is a tiny metal audition for disaster. A good DIY project uses safe parts, sensible ratings, proper insulation, strain relief, ventilation, and a conservative design.
How a Pyrography Power Supply Works
At the basic level, a wire-nib pyrography pen is a resistive heater. Electrical current flows through a small metal wire or tip. Because the tip resists that current, it heats up. Increase the delivered power, and the tip becomes hotter. Reduce it, and the tip cools.
Many DIY discussions focus on low voltage and high current because wire tips often need only a few volts but may draw several amps. That combination is common in resistive heating projects. The power supply must be able to deliver enough current without sagging, overheating, or losing control. This is why a random phone charger is not suitable. It may be low voltage, but it is not built for a demanding hot-wire load.
Voltage, Current, and Heat
Voltage is the electrical pressure, current is the flow, and resistance is the opposition. Together, they decide the heat produced at the tip. In practice, pyrography artists do not think in equations while drawing whiskers on a fox. They think in results: Is the line too light? Increase heat slightly. Is the wood smoking too much? Lower the power, move faster, or improve ventilation.
A useful DIY pyrography power supply gives fine adjustment instead of crude jumps. Smooth control helps with shading, where tiny differences in heat can turn a flat patch into a soft gradient. It also protects delicate tips from being overdriven.
Why Current Capacity Matters
Current capacity is one of the most important specifications. A supply that cannot deliver enough current may cause the tip to heat slowly or cool down during long strokes. A supply with no current limit, on the other hand, can damage tips, wires, connectors, or the controller if something goes wrong.
A safe design should include current limiting or overcurrent protection. That may come from a quality bench power supply, a properly rated DC supply module, a fuse, or a controller designed for the load. The exact method depends on the design, but the principle is simple: the system should fail safely, not heroically.
Core Features of a Good DIY Pyrography Power Supply
1. Low-Voltage Output
The handpiece side should use low voltage. This reduces shock risk and makes the tool easier to handle. Low voltage does not mean “risk-free,” especially when high current and heat are involved, but it is far safer than putting mains voltage anywhere near a handheld pen.
2. Smooth Heat Adjustment
A good controller should allow gradual adjustment. Some designs use variable voltage. Others use pulse width modulation, often called PWM, which switches power rapidly on and off to control average heating. PWM is common in electronics because it can control power efficiently without wasting as much energy as a simple resistor.
3. Current Limiting or Fusing
Every serious power supply needs protection. A fuse, resettable protection device, current-limited supply, or electronic protection circuit can help prevent a minor fault from becoming a major problem. Protection should be rated for the actual load, not chosen by vibes, wishful thinking, or whatever was rolling around in a drawer.
4. Heat-Resistant Connectors and Leads
The handpiece leads should be flexible, well insulated, and rated for the expected current. Silicone-insulated wire is popular in maker projects because it stays flexible and handles heat better than many common plastics. Connectors should fit securely. Loose connectors create resistance, and resistance creates heat in places where you absolutely do not want bonus heat.
5. A Safe Enclosure
The enclosure should protect users from electrical parts, keep wiring secure, and allow ventilation where needed. It should also be sturdy enough for real workshop life. A pyrography station lives near wood blanks, sandpaper, pencils, clamps, coffee mugs, and sometimes one mysterious screw that no one can identify. The enclosure should not crack the first time it gets bumped.
6. Clear Controls and Displays
A power knob with a clear scale is useful. A voltage or current display can be even better, especially while testing different tips. Labels matter. “Output,” “Power,” “Pen,” and “Standby” labels prevent confusion. Good labeling is not glamorous, but neither is plugging a handpiece into the wrong socket and inventing modern abstract smoke art.
Choosing the Power Source
The safest route for most hobbyists is to start with a certified, enclosed, low-voltage DC power supply or a quality current-limited bench power supply. A bench supply is especially helpful during experiments because it lets you set voltage and current limits before connecting a load. That makes testing more controlled and reduces the chance of instantly sacrificing a tip to the electronics gods.
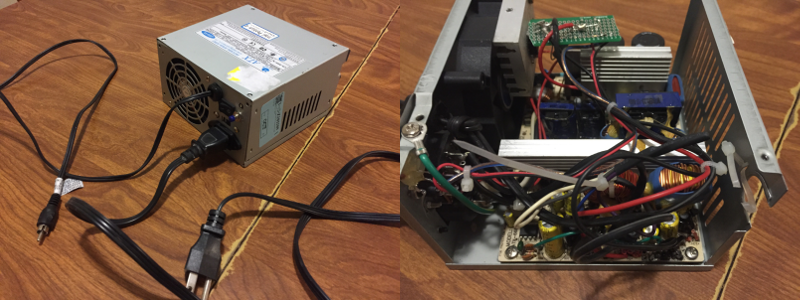
Some online DIY projects discuss repurposing computer ATX power supplies. These supplies can deliver high current at low voltages, which sounds attractive. However, modifying or repackaging an ATX supply introduces important safety concerns, especially around grounding, insulation, ventilation, and exposed mains-side components. If you are not experienced with electrical safety, do not open or modify one. Use an external certified supply instead.
Another option is a prebuilt low-voltage supply paired with a separate DC power controller that is rated for resistive loads. This approach keeps the hazardous AC-to-DC conversion inside a certified unit and lets the DIY work focus on the safer low-voltage side. Even then, ratings, wiring, fusing, connectors, and enclosure quality still matter.
Design Concept: A Safer DIY Architecture
A sensible DIY pyrography power supply can be thought of in four zones. First is the certified AC-to-DC adapter or bench supply. Second is the control section, such as a rated DC controller or PWM module. Third is the output section, including current protection, connectors, and leads. Fourth is the handpiece and tip.
This architecture keeps mains voltage sealed inside a tested power unit. The DIY portion deals with low-voltage DC. That does not eliminate risk, but it makes the project more appropriate for a home workshop. The enclosure should keep all terminals covered, include strain relief for cables, and allow airflow around components that warm up.
For example, a maker might use a certified DC supply feeding a rated PWM controller, then route the controlled output to a properly rated jack for the pyrography pen. A panel meter could show voltage or current. A master switch and indicator light could make operation clearer. This is a design overview, not a wiring diagram. The details should be matched to the exact parts and reviewed by someone qualified if there is any doubt.
Safety Rules That Belong on the Workbench
Safety is not the boring part of pyrography. Safety is what lets you keep making things. A wood-burning station combines electricity, heat, smoke, dry wood, and sometimes dust. That list deserves respect.
Use Ventilation
Burning wood creates smoke and fine particles. Some woods and manufactured boards are especially problematic. Avoid burning pressure-treated lumber, painted wood, stained wood, plywood, MDF, particleboard, plastics, or anything with mystery coatings. These materials may release irritating or toxic fumes when heated. Use clean, unfinished wood, and work with fresh air or local smoke capture.
Control the Workspace
Keep paper, shavings, solvents, finishes, and cloth away from the hot pen. Use a proper pen stand. Never set the hot tip directly on the bench. The tiny burn mark may look harmless, but it is also your workbench quietly judging you.
Respect Cords and Power Strips
Do not overload power strips. Do not use damaged cords. Do not run cords under rugs or through pinch points. Plug the supply into a suitable outlet, and unplug the unit when it is not in use. A switched power strip can be convenient, but it must be properly rated and used correctly.
Test Before Long Sessions
Before using a new or modified setup for a long burn, test it briefly at low power. Check for abnormal heating at connectors, wires, the controller, and the enclosure. Warm is expected in some components. Hot, softening, buzzing, smelling, or flickering is a sign to stop.
Common Mistakes to Avoid
Using an Underrated Supply
An underrated supply may work for a minute and then sag, overheat, or shut down. Choose components with comfortable headroom. If your tip needs several amps, the supply, controller, wire, connectors, and protection devices all need to handle that current.
Skipping Strain Relief
Cables get pulled. That is not a theory; it is workshop gravity. Strain relief prevents a tug on the cable from pulling directly on internal terminals. Without it, a cable can loosen, short, or expose conductors.
Leaving Terminals Exposed
Exposed terminals invite accidental shorts, burns, and confusion. Use covers, insulated connectors, and a proper enclosure. A DIY project can look handmade without looking like it escaped from a science fair in 1987.
Assuming All Tips Behave the Same
Different wire tips have different resistance and mass. A fine writing tip may heat quickly with little power, while a heavy shading tip may need more. Always start low and increase gradually. Your wood will tell you what it wants, usually by either not marking at all or suddenly going espresso-dark.
Best Woods for Testing a New Pyrography Setup
For testing, choose light-colored, clean, untreated wood. Basswood is a favorite because it is soft, pale, and has a fine grain. Birch, maple, and poplar can also work, though harder woods may require slower strokes or more heat. Avoid oily woods at first, because they can behave unpredictably and may produce stronger smoke.
Create a test board with lines, dots, curves, shading patches, and lettering. Mark the approximate control setting beside each test. Over time, this becomes a practical heat map for your machine. It also prevents you from experimenting directly on a finished gift, which is how many “custom rustic effects” are born.
How to Tune Heat for Better Burn Results
Heat control is not only about the knob. Burn darkness depends on four things: temperature, stroke speed, pressure, and wood type. If the mark is too light, you can increase heat slightly, slow down, or use a tip better suited to the line. If the mark is too dark, reduce heat, move faster, or lighten pressure.
For clean lines, let the heat do the work. Pressing harder usually makes the tip dig into the wood rather than burn better. For shading, use a lower setting and build tone gradually. Multiple light passes look smoother than one aggressive pass that turns the wood into a tiny barbecue stripe.
Maintenance Tips for a DIY Pyrography Power Supply
Inspect the unit regularly. Look for loose connectors, darkened insulation, cracked cables, dust buildup, and any signs of overheating. Keep vents clear. Dust inside electronics can trap heat and create problems over time. If your enclosure uses a fan, make sure it spins freely and does not sound like a bee trapped in a soda can.
Clean pyrography tips according to the tip manufacturer’s recommendations. Carbon buildup changes how heat transfers to the wood. A clean tip gives more predictable results. Store pens and tips carefully so delicate wire nibs do not bend.
Who Should Build One and Who Should Buy One?
A DIY pyrography power supply makes sense for someone who already understands basic electronics, component ratings, insulation, and safe low-voltage wiring. It is also a good project for a maker working with an experienced mentor. It is not ideal as a first electronics project if the design involves opening mains-powered equipment.
Beginners who mainly want to burn wood should consider a commercial pyrography station first. Learn the art, understand heat behavior, and then decide whether custom equipment is worth the effort. There is no shame in buying a reliable tool. The wood does not care whether your controller was handcrafted, store-bought, or blessed by a committee of engineers. It cares whether the tip is hot enough and steady enough.
Real-World Experience: Lessons from Building and Using a DIY Pyrography Power Supply
The first lesson many makers learn is that heat control feels more important than raw power. A supply that can get a tip blazing hot is not automatically a good pyrography machine. The best results often come from a controller that responds predictably in the middle range. That is where shading, lettering, fur texture, feather detail, and soft outlines become easier. Extreme heat has its place, but it is a blunt instrument. Most pyrography work happens in the subtle zone.
The second lesson is that connectors matter more than expected. On paper, a connector is just a connector. In the shop, it is the place that gets twisted, bumped, plugged, unplugged, and occasionally attacked by a dangling sleeve. If the connector is loose or underrated, the pen may heat inconsistently. Even worse, the connector itself may get hot. Many experienced builders eventually upgrade the output jack, shorten messy cable runs, and choose flexible leads that do not fight the handpiece.
The third lesson is that a display is useful, but it is not magic. A voltmeter or ammeter helps repeat settings, compare tips, and notice abnormal behavior. Still, the wood remains the final judge. A setting that works beautifully on basswood may be too pale on maple or too dark on soft pine. Keep sample scraps near the station and test before starting a serious piece. This habit saves projects. It also saves your mood, which is an underrated shop supply.
The fourth lesson is that the enclosure design affects how often you actually enjoy using the tool. A controller with a smooth knob, stable feet, readable labels, and a clear power switch feels better than a cluttered box with mystery wires and a knob that turns like a pepper grinder full of gravel. Ergonomics matter. Place the control where your hand naturally reaches. Make the power indicator visible. Give the pen cable enough length to move freely without dragging the unit across the bench.
The fifth lesson is ventilation. When people start pyrography, they often focus on the beautiful brown marks and forget that those marks come from controlled burning. Even clean wood produces smoke. A small fan pulling fumes away from your face, an open window, or a local smoke extractor can make long sessions more comfortable. The difference becomes obvious after an hour of shading. Without ventilation, your eyes complain, your nose complains, and the room smells like a campfire trying to become furniture.
The sixth lesson is to build in habits, not just hardware. Turn the unit off when changing tips. Return the pen to its stand every time. Start at a low setting. Unplug after use. Keep a clear zone around the work area. These tiny routines make the difference between a pleasant creative session and a bench full of “how did that happen?” moments.
The final lesson is patience. A DIY pyrography power supply is not just a box that makes a wire hot. It is part of a system: supply, controller, cable, pen, tip, wood, airflow, and artist. Improve one part at a time. Take notes. Test on scraps. When the setup finally feels predictable, pyrography becomes less like wrestling a tiny dragon and more like drawing with warm light.
Conclusion
A DIY pyrography power supply can be a rewarding project when it is approached with respect for electricity, heat, and safe workshop practice. The best design is not the wildest or cheapest one; it is the one that delivers stable, adjustable low-voltage power, protects against faults, keeps the handpiece comfortable, and lets the artist focus on the burn instead of babysitting the equipment.
For most makers, the smartest path is to keep mains power inside certified equipment and build only the low-voltage control side. Use proper ratings, protected wiring, good connectors, ventilation, and a sturdy enclosure. Test slowly, label clearly, and never treat smoke, heat, or electrical smells as normal background ambiance. Pyrography is supposed to leave marks on wood, not on your workbench, your cords, or your confidence.
Done well, a DIY pyrography power supply gives you more than a tool. It gives you repeatability, control, and a better understanding of how heat becomes line, shade, and texture. And when your next wood-burned sign comes out crisp, even, and beautifully detailed, you can give the power supply a respectful little nod. It earned it.