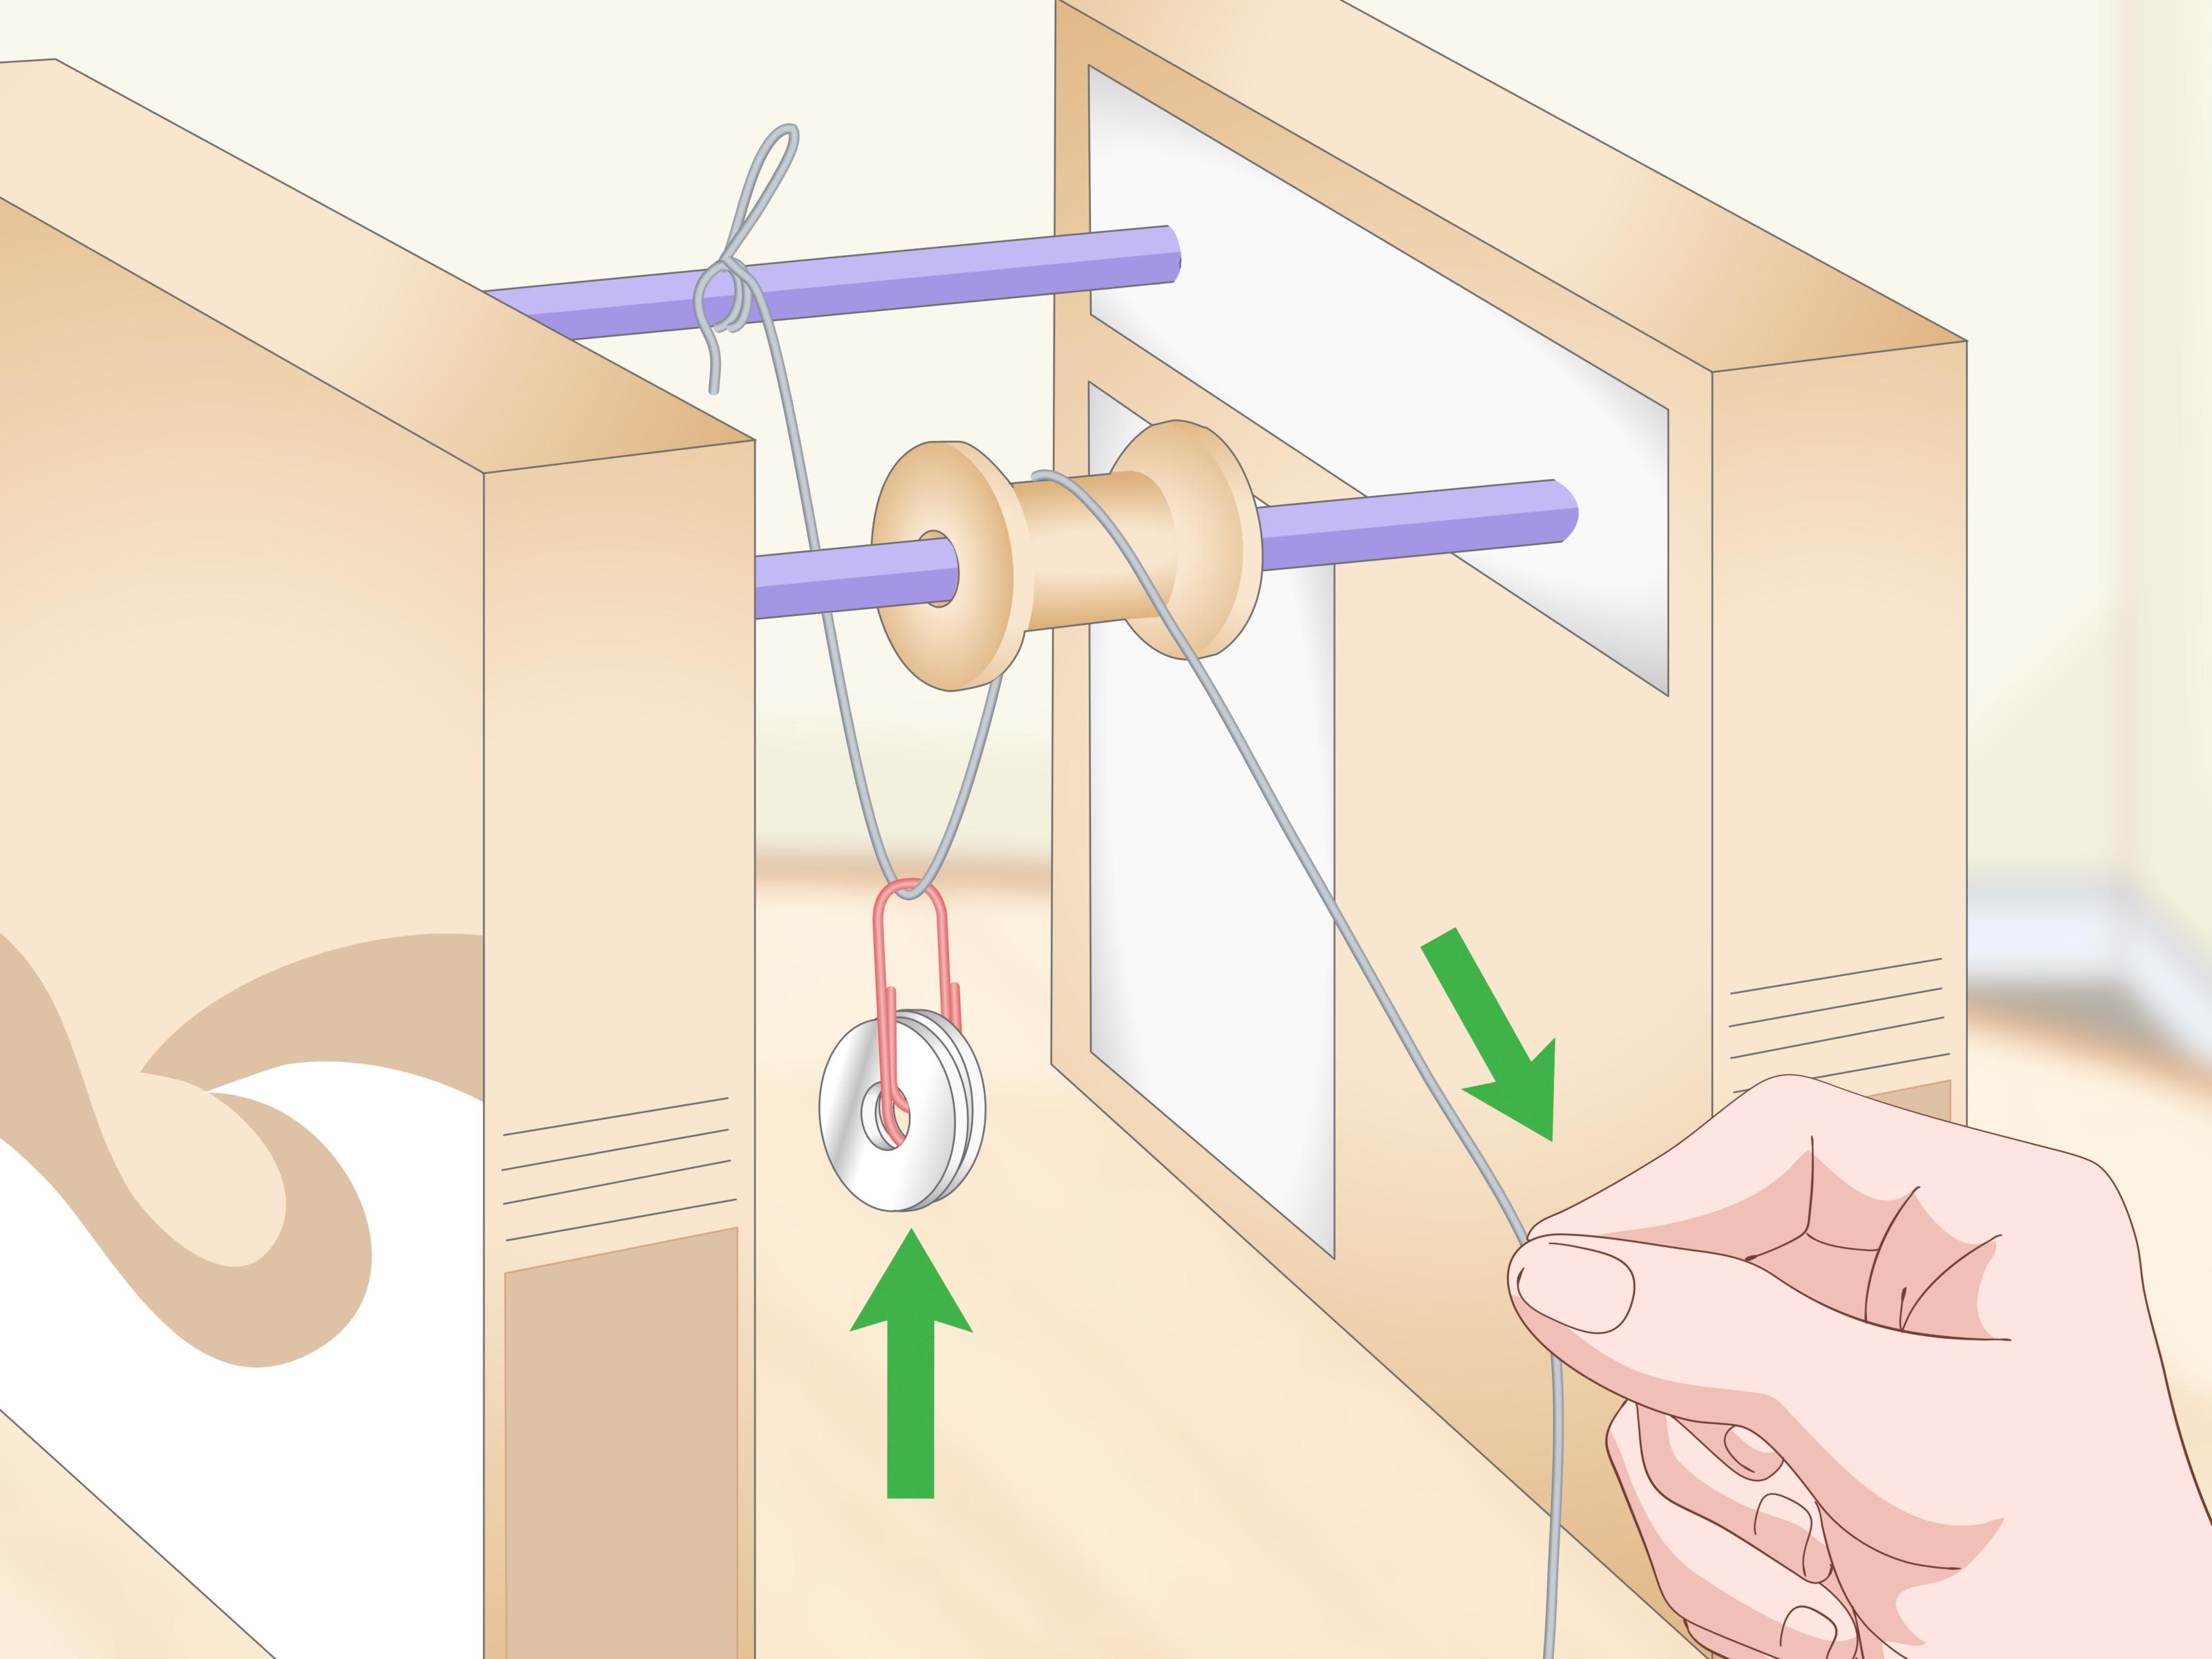

Learning how to build a pulley is one of those wonderfully practical projects that makes you feel like an inventor, a sailor, a garage engineer, and possibly a medieval castle operator all at once. A pulley is a simple machine that uses a wheel, an axle, and a rope or cable to change the direction of force. Add more pulleys, and you can reduce the effort needed to lift an object. That is the magic: not free energy, sadly, but smarter energy.
This guide explains how to build a basic pulley for learning, light-duty lifting, garage organization, or a school science project. You will learn the parts of a pulley, how pulley systems work, what materials to use, and how to build both a simple fixed pulley and a basic compound pulley. Before we start, one important safety note: a homemade pulley should never be used to lift people, pets, vehicles, heavy construction materials, or anything that could injure someone if it falls. For serious lifting, use professionally rated hardware and follow proper rigging standards. Gravity has no sense of humor.
What Is a Pulley and Why Build One?
A pulley is a grooved wheel that allows a rope, cord, belt, or cable to move around it. The wheel spins on an axle, reducing friction and helping redirect force. The simplest example is a flagpole pulley: you pull down on the rope, and the flag goes up. The pulley does not make the flag lighter, but it makes the job easier by changing the direction of your pull.
Pulleys are used in elevators, cranes, sailboats, window blinds, garage storage systems, exercise machines, wells, theater curtains, and countless workshop setups. The reason is simple: pulleys help people move loads more efficiently. A fixed pulley changes direction. A movable pulley reduces the force needed. A compound pulley, sometimes called a block and tackle, combines both ideas and can dramatically reduce effort.
How a Pulley Works: The Simple Physics Without the Headache
The main keyword here is mechanical advantage. Mechanical advantage means a machine helps multiply force. In an ideal world with no friction, a pulley system with two supporting rope segments can cut the effort roughly in half. A system with four supporting rope segments can reduce the effort to about one-fourth of the load. Real pulleys are not ideal because friction always sneaks in like a raccoon in a campsite, so the actual effort is a bit higher.
Fixed Pulley
A fixed pulley is attached to a stable overhead point, such as a beam, frame, or bracket. It changes the direction of force. Pull down on the rope, and the load rises. A fixed pulley is simple, useful, and satisfying, but it does not reduce the amount of force needed to lift the load.
Movable Pulley
A movable pulley is attached to the load itself. As the load moves, the pulley moves with it. This setup divides the load between rope segments, reducing the pulling force needed. The trade-off is that you must pull more rope. If the force is cut roughly in half, you usually pull about twice as much rope to lift the object the same distance.
Compound Pulley
A compound pulley combines fixed and movable pulleys. This is the classic block-and-tackle arrangement. It is the best choice when you want a noticeable lifting advantage for light-duty projects. It is also the setup most likely to make you say, “Wait, why did I not learn this before moving that heavy box?”
Materials Needed to Build a Basic Pulley
The exact materials depend on whether you are building a classroom pulley, a light-duty garage pulley, or a more polished workshop version. For a simple working pulley, gather the following:
- One small pulley wheel or sheave with a groove
- Strong rope, cord, or paracord that fits the pulley groove
- A sturdy mounting point, such as a wooden frame, ceiling joist, or metal bracket
- An eye screw, eye bolt, or pulley bracket
- A carabiner, hook, or shackle rated for the intended light load
- A small bucket, basket, or test weight
- Drill and drill bits
- Screws, washers, and nuts as needed
- Measuring tape
- Safety glasses and work gloves
For a school project, you can use cardboard, pencils, paper clips, thread, and washers. For a useful home or shop pulley, use real hardware. The rope should match the pulley’s recommended rope diameter. A rope that is too thick will bind. A rope that is too thin can slip, twist, or jump the groove. The pulley wheel should spin freely, and all hardware should have a working load limit higher than the load you plan to lift.
Safety First: Build Smart Before You Lift Anything
Before drilling holes or hanging hardware, decide what the pulley will lift. Then choose components rated above that weight. Do not guess. A shiny hook from the miscellaneous drawer is not automatically a lifting device. Hardware used for decoration, crafts, or plant baskets may fail under load.
Inspect the rope for cuts, fraying, melted spots, stiffness, or broken fibers. Inspect hooks, brackets, screws, and carabiners for bending, cracks, rust, or loose parts. Make sure the mounting surface is strong enough. A pulley mounted to thin plywood, drywall, or a weak shelf may pull loose. The pulley is only as strong as its weakest part, and that weakest part is usually the one you trusted because it “looked fine.”
For any load that could hurt someone, use professionally manufactured pulleys, rated rope or cable, proper anchors, and expert guidance. Stand clear of the load path. Never put your face, hands, feet, or favorite coffee mug under a suspended object.
How to Build a Simple Fixed Pulley
Step 1: Choose the Mounting Location
Pick a strong overhead support. A ceiling joist, exposed beam, sturdy wooden frame, or properly installed metal bracket can work for light loads. Avoid drywall alone. Drywall is excellent at being flat and terrible at holding suspended weight.
Step 2: Install the Anchor
Mark the mounting spot. Drill a pilot hole if you are using an eye screw in wood. Twist the eye screw in until the threads are fully seated. If you are using an eye bolt through a board or beam, secure it with washers and a nut. The anchor should not wobble, twist, or pull out when you tug downward.
Step 3: Attach the Pulley
Clip or fasten the pulley to the eye screw, eye bolt, or bracket. Make sure the pulley hangs straight and the wheel spins freely. If the wheel rubs against the side plate, adjust it before adding a load.
Step 4: Thread the Rope
Run the rope over the pulley wheel so both ends hang down. One end will attach to the load, and the other end will be the pulling side. Check that the rope sits inside the groove and does not scrape against the frame.
Step 5: Attach the Load
Tie the rope securely to a light test object, such as an empty bucket with a few small weights inside. Use a proper knot, such as a bowline or figure-eight follow-through, if you know how to tie one. If not, use a rated hook or carabiner and test slowly.
Step 6: Test the Pulley
Pull down gently on the free end of the rope. The load should rise smoothly. If the rope jumps, twists, squeaks loudly, or jams, lower the load and inspect the setup. A little friction is normal. A pulley making noises like a haunted shopping cart needs attention.
How to Build a Basic Compound Pulley
A compound pulley gives you more mechanical advantage than a single fixed pulley. For a beginner-friendly version, use one fixed pulley at the top and one movable pulley attached to the load.
Step 1: Install the Top Fixed Pulley
Mount the first pulley to a strong overhead anchor, just as you did for the simple fixed pulley. This pulley changes the direction of your pull and keeps the rope organized.
Step 2: Attach the Movable Pulley to the Load
Fasten the second pulley to the load using a hook, strap, or carabiner. The pulley must be able to move upward with the load. Keep the load centered so it does not tilt dramatically when lifted.
Step 3: Anchor One End of the Rope
Secure one end of the rope to the top support near the fixed pulley. This anchor point must be strong. The rope will travel from this anchor down around the movable pulley, then back up through the fixed pulley.
Step 4: Thread the Rope Through the System
Start at the fixed anchor point. Run the rope down and around the movable pulley attached to the load. Then guide the rope back up and over the fixed pulley. The free end becomes your pull line.
Step 5: Pull and Observe
Pull down on the free end. The load should rise with less effort than it would with a single fixed pulley. You will notice that you need to pull more rope to raise the load. That is the trade-off: less force, more distance. Physics is generous, but it always asks for a receipt.
Choosing the Right Rope, Wheel, and Hardware
A good pulley system depends on compatibility. The rope should fit the sheave groove, bend easily around the wheel, and have enough strength for the task. Nylon rope is strong and slightly stretchy. Polyester rope has less stretch and handles outdoor conditions well. Paracord works for small demonstrations, but it is not the right choice for heavy lifting. Wire rope requires pulleys designed specifically for wire rope.
The pulley wheel should be wide enough for the rope and smooth enough to reduce friction. A larger wheel usually helps the rope bend more gently, which can reduce wear. The axle should spin easily without grinding. If you are building a homemade wooden pulley wheel, sand the groove smooth and seal the wood to reduce splinters and swelling.
For light-duty home projects, store-bought pulleys are usually better than homemade wheels. They are inexpensive, consistent, and available in different sizes. If you build the wheel yourself for educational reasons, treat it as a model, not a certified lifting tool.
Common Pulley Building Mistakes
Using Weak Anchors
The anchor carries the load. If it fails, everything fails. Mount into solid wood, structural framing, or properly rated hardware. Never rely on drywall anchors for lifting.
Ignoring Working Load Limits
Every hook, rope, pulley, and fastener should be strong enough for the job. Use the lowest-rated component as the limit of the entire system. If one part is rated for 50 pounds and everything else is rated for 200 pounds, you have a 50-pound system, not a 200-pound system.
Letting the Rope Rub
Rope rubbing against sharp metal, rough wood, or the side of the pulley will wear quickly. Align the pulleys so the rope runs straight. Friction wastes effort and damages materials.
Lifting Too Much Too Soon
Start with a small test load. Increase weight gradually only if the system works smoothly. The first test should be boring. Excitement during a pulley test usually means something went wrong.
Simple Pulley Project Ideas
Once you understand the basic build, you can adapt pulleys for many useful projects. A garage ceiling pulley can help lift lightweight storage bins. A garden pulley can raise a hanging planter. A classroom pulley can demonstrate mechanical advantage with washers and string. A backyard play setup can move a small toy bucket from one platform to another. A workshop pulley can help route cords, open a small hatch, or raise lightweight tools out of the way.
For decorative or convenience projects, the pulley does not need massive lifting strength. For anything overhead, however, safety still matters. A falling planter can ruin a day, a floor, and someone’s trust in your engineering skills.
Maintenance: Keep Your Pulley Working Smoothly
Check your pulley system regularly. Look for rope wear, loose screws, bent hooks, rust, cracked plastic, swollen wood, or a wheel that no longer spins smoothly. Replace worn parts immediately. Do not “just do one more lift” with damaged hardware. That phrase has probably appeared in more accident reports than anyone wants to admit.
If the pulley squeaks, inspect the axle and wheel. Some pulleys can be lubricated lightly, but avoid getting oil on rope unless the rope material and manufacturer allow it. Oil can attract dirt or weaken certain fibers. Keep outdoor systems dry when possible, and store removable ropes indoors to extend their life.
Real-World Experience: What Building a Pulley Teaches You
The first time you build a pulley, the biggest surprise is usually how dramatic a small wheel can feel. You mount a simple pulley overhead, thread the rope, tie on a bucket, and suddenly you are not just lifting somethingyou are controlling it. The action feels smoother, more deliberate, and oddly satisfying. Pull down, bucket goes up. It is basic physics, but it feels like a tiny engineering superpower.
One practical lesson comes from alignment. On paper, a pulley system looks perfectly straight. In real life, the rope has opinions. If the top pulley is slightly off-center, the rope drifts toward one side of the wheel. If the movable pulley is attached unevenly, the load tilts. If the anchor point is too close to a wall, your rope scrapes and complains. You quickly learn that a pulley is not just a wheel and rope; it is a small system where every part needs to cooperate.
Another lesson is that friction matters more than beginners expect. A classroom pulley made from a pencil and string works, but it may feel scratchy and stubborn. Switch to a smooth wheel with a proper axle, and the difference is immediate. The load moves more easily, the rope lasts longer, and your arm stops accusing you of betrayal. This is why real pulley design cares about sheave shape, bearing quality, rope diameter, and clean routing.
Testing also teaches patience. The smartest builders do not start with the heaviest object they can find. They start with an empty bucket, then add a little weight, then a little more. This slow approach reveals problems before they become dangerous. A loose screw wiggles. A knot slips slightly. A rope rubs in one spot. These little warnings are gifts. Ignore them, and the pulley may deliver a much louder message later.
Building a compound pulley is even more eye-opening. When you add a movable pulley, the load feels lighter, but the rope travel increases. At first, that can seem strange. Why are you pulling so much rope just to raise the object a short distance? Then the principle clicks: you are trading distance for force. The pulley is not cheating physics; it is negotiating with it. That realization makes pulleys easier to understand and easier to respect.
The best experience, though, is how useful pulleys become once you start noticing them. Suddenly, the garage, garden, workshop, and backyard all look different. A hanging bike, a raised storage bin, a small dumbwaiter-style basket, a flag line, a curtain systemeach one becomes a possible pulley project. You begin to see simple machines everywhere. You may also begin explaining them at dinner, which your family will tolerate for approximately three minutes.
In the end, building a pulley teaches more than how to lift a load. It teaches planning, safety, friction, force, alignment, and humility. Humility matters because every DIY builder eventually learns that gravity is the strictest inspector in the room. Build carefully, test gently, and let the pulley do what it does best: make hard work feel a little smarter.
Conclusion
Knowing how to build a pulley gives you a hands-on understanding of one of the most useful simple machines ever invented. A fixed pulley helps change the direction of force. A movable pulley reduces effort. A compound pulley combines both ideas for greater mechanical advantage. With the right rope, a smooth sheave, a strong anchor, and sensible safety habits, you can create a pulley system for learning, organizing, experimenting, or handling light-duty tasks around the home.
The key is to respect the limits of your materials. Use rated hardware, inspect every part, test with small loads, and never lift anything that could cause injury if the system fails. A pulley may be simple, but simple does not mean careless. Build it well, and this humble wheel-and-rope setup will make you appreciate physics in the most practical way possible: by saving your back.
SEO Tags