
Note: This publish-ready HTML article is written from real Microsoft Word behavior and current practical guidance from official Microsoft Support documentation, Microsoft community guidance, and reputable Word productivity tutorials. No external source links are embedded so the article remains clean for web publishing.
Few things in Microsoft Word are more mysterious than a picture that refuses to stay where you put it. You drag a logo into the corner, add one harmless sentence above it, and suddenly the image behaves like it has been accepted into a witness protection program. The fix is not magic. It is anchoring.
Learning how to anchor an image in Word helps you control where a picture appears, how it moves with text, and whether it stays on the same page as a specific paragraph. This is especially useful for resumes, reports, instruction manuals, school papers, business proposals, newsletters, legal documents, and any file where “close enough” is not close enough.
In Word, an anchor connects a floating object, such as a picture, shape, chart, icon, or text box, to a paragraph. When the paragraph moves, the object can move with it. When you adjust the layout settings correctly, you can keep the image tied to the right section of your document instead of letting it wander around like a caffeinated squirrel.
This guide explains how to anchor an image in Word in 9 steps, what the anchor symbol means, which text wrapping option to choose, how to lock the anchor, and what to do when images still move after you think you have fixed them.
What Does Anchoring an Image in Word Mean?
Anchoring an image in Word means attaching a floating picture to a specific paragraph. The image is not simply sitting on the page by itself. Word connects it to nearby text so the picture has a reference point inside the document.
This matters because Word is a word processor, not a page-layout app like Adobe InDesign. Its first loyalty is to text flow. When you add, delete, or reformat paragraphs, Word recalculates the document. If an image is tied to text, it may move when that text moves. If it is fixed to a page position, the text may flow around it while the image stays in place.
There are two big ideas to remember:
- In Line with Text makes the image behave like a large text character. It moves naturally with the sentence or paragraph.
- Text Wrapping makes the image a floating object. Once it floats, Word can show an object anchor and give you advanced layout controls.
If you want full anchoring controls, the picture usually needs a wrapping style such as Square, Tight, Top and Bottom, Behind Text, or In Front of Text. If the picture remains In Line with Text, many positioning options will be unavailable because Word is treating it like text.
How to Anchor an Image in Word: 9 Steps
Step 1: Open Your Word Document
Open the Word document where you want to place the image. If you are working on an important file, save a copy first. Picture positioning can be adjusted safely, but when a long report has tables, captions, headers, and footnotes, one small layout change can create a domino effect. A backup copy is cheap insurance.
For best results, turn on paragraph marks while editing. Go to the Home tab and click the Show/Hide ¶ button. This helps you see paragraph breaks, spacing, and hidden formatting marks. The anchor itself may also become easier to understand when you can see the structure of the document.
Step 2: Insert the Image
Place your cursor near the paragraph where the image belongs. Then go to Insert > Pictures and choose the source of your image. Depending on your version of Word, you may see options such as This Device, Stock Images, or Online Pictures.
After inserting the picture, Word may place it In Line with Text by default. That is normal. The image may appear between lines like a giant character. This setting is stable for simple documents, but it does not give you the flexible anchoring controls most users want when they say they need to “anchor” an image.
Example: If you are writing a product manual and want a screenshot to appear beside the paragraph explaining a button, insert the screenshot near that paragraph first. Word’s anchor will be much easier to manage if the picture begins close to the text it belongs with.
Step 3: Select the Image
Click the image once. You should see resize handles around its edges and corners. You may also see a small Layout Options icon near the upper-right side of the image. This icon is your shortcut to the most important picture placement settings.
If clicking the image only places your cursor beside it, the image may be inline. That is fine. Select it carefully by clicking directly on the picture. If the document is crowded, zoom in so you can grab the image without accidentally selecting text.
Step 4: Choose a Text Wrapping Style
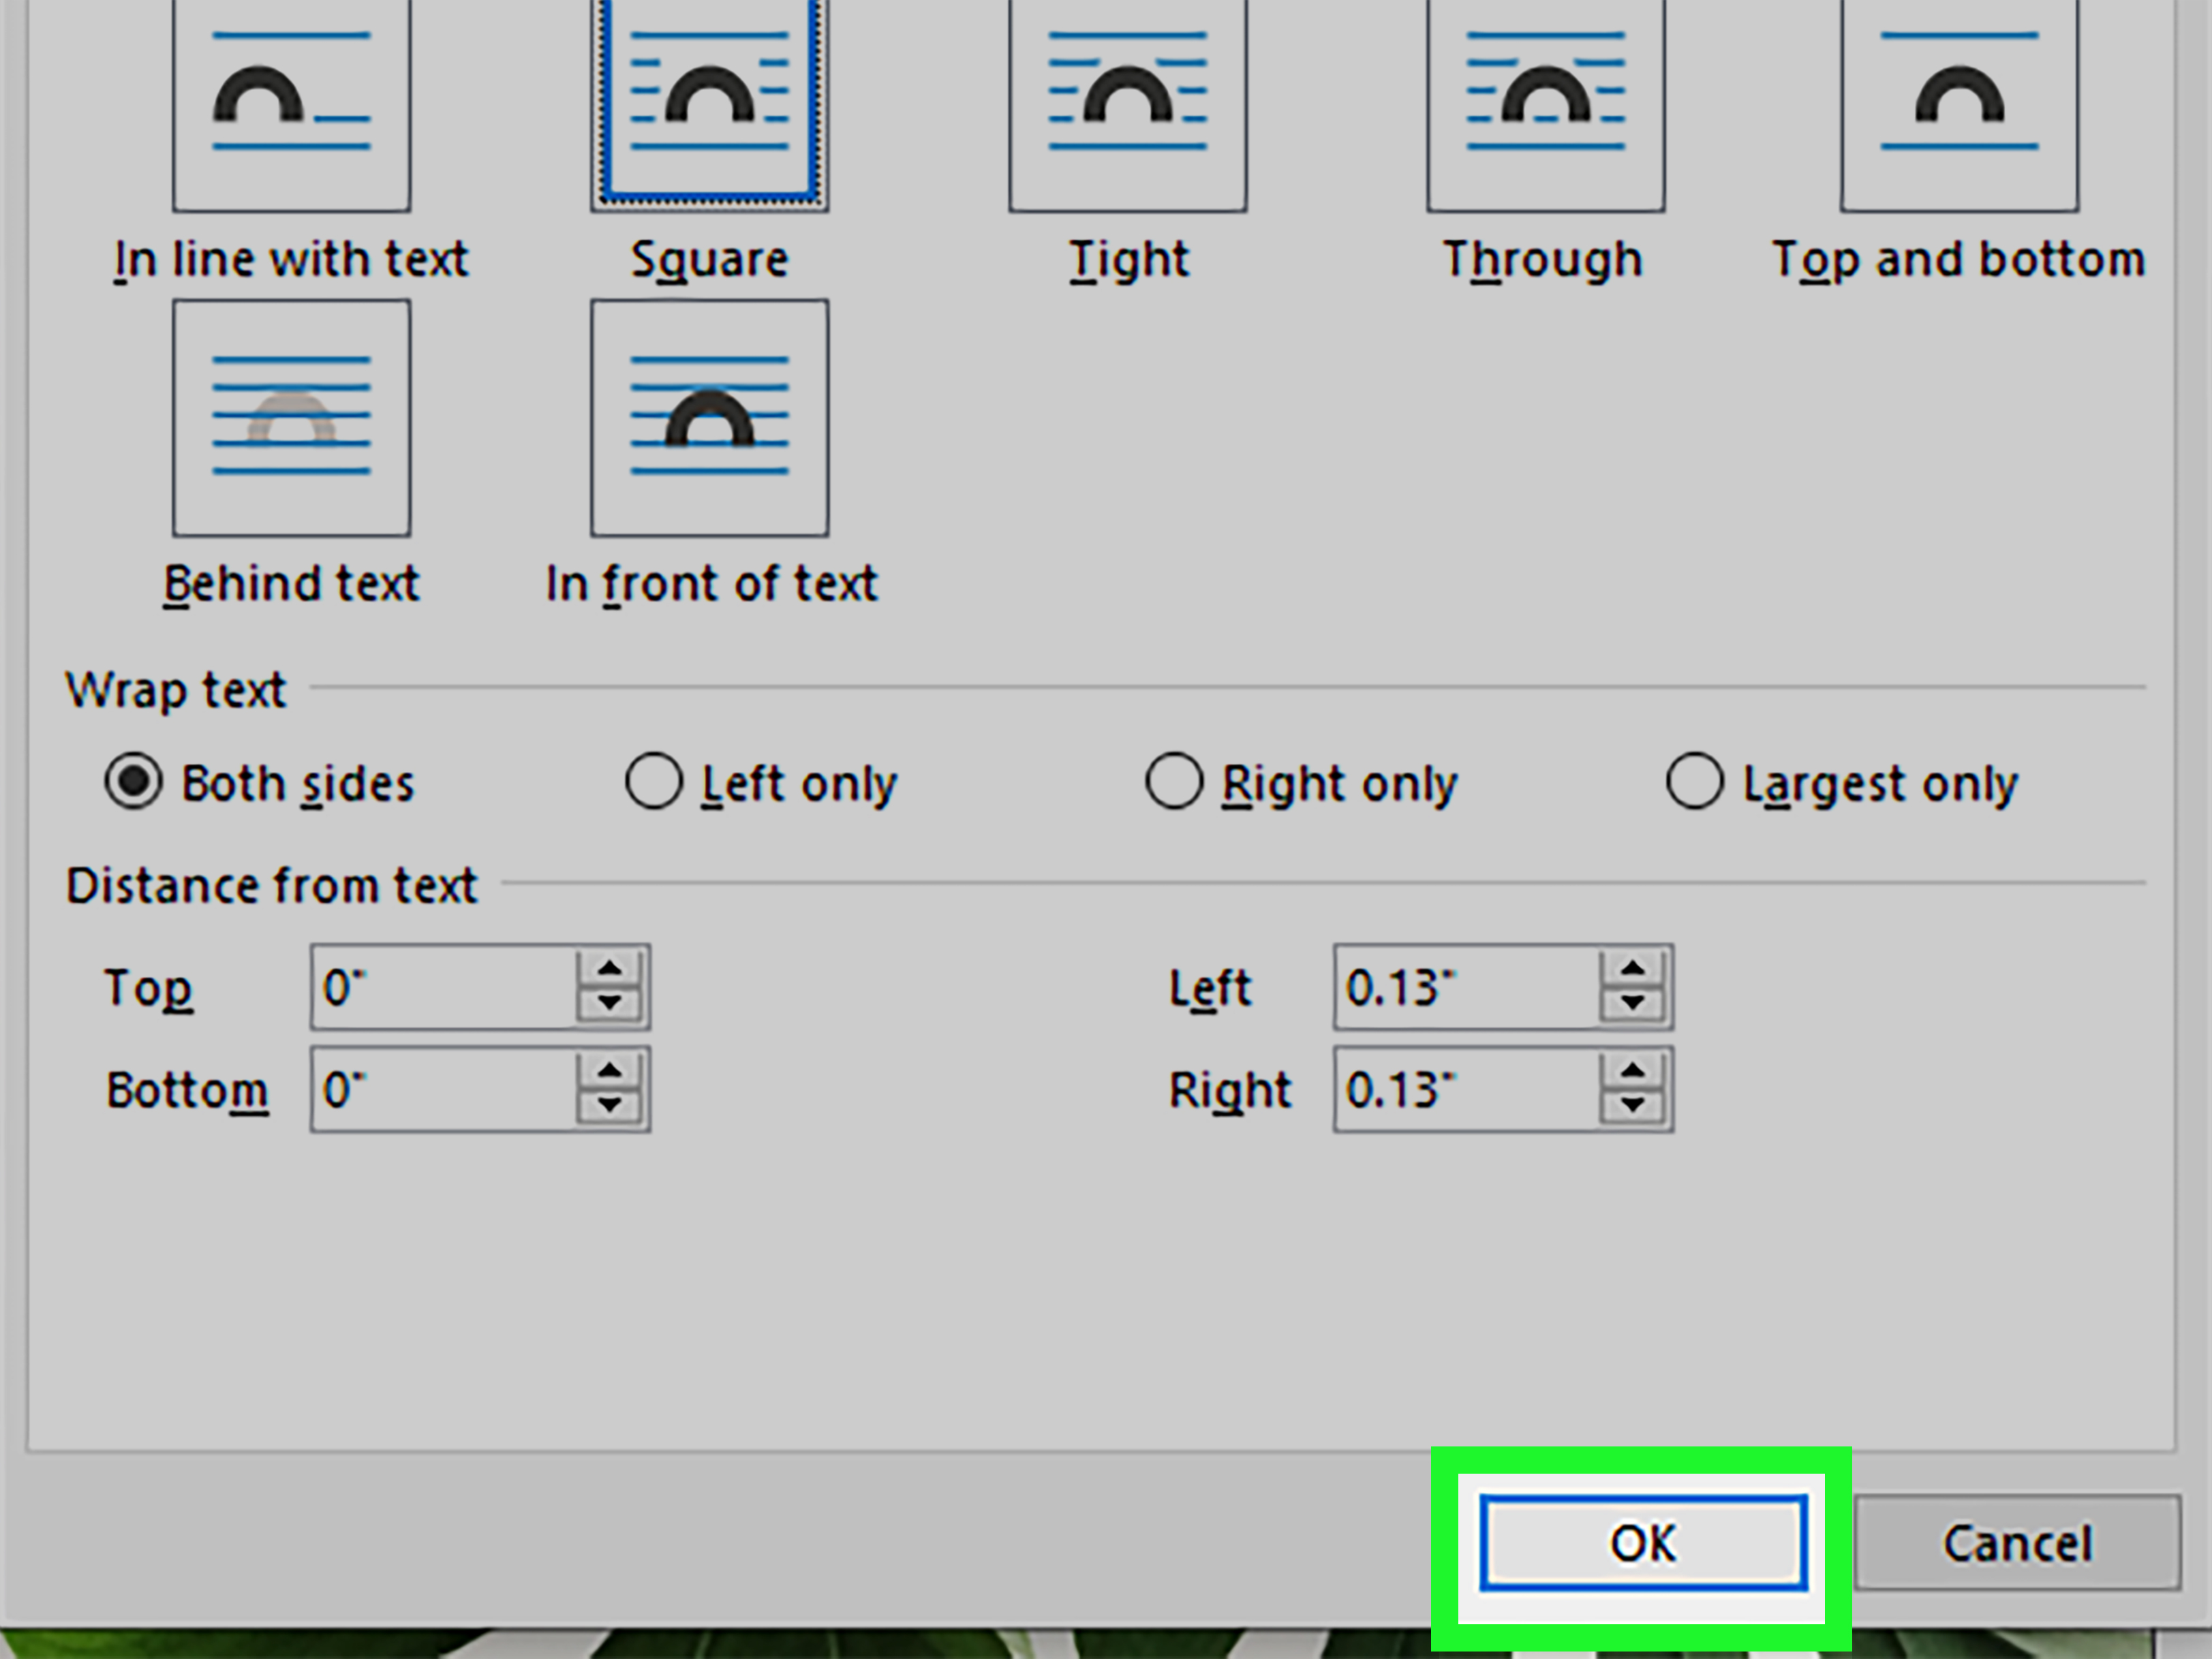
With the image selected, click the Layout Options icon or go to Picture Format > Wrap Text. Choose a wrapping style other than In Line with Text. The most common choices are:
- Square: Text wraps around the image in a neat rectangular shape. This is great for reports, guides, and blog-style layouts.
- Tight: Text follows the visible edge of the image more closely. This works well for cut-out images or irregular shapes.
- Top and Bottom: Text stays above and below the image, not beside it. This is excellent for figures in academic or business documents.
- Behind Text: The image sits behind the words, often used for backgrounds or watermark-style effects.
- In Front of Text: The image floats over the text. Use this carefully, unless your goal is to cover something on purpose.
For most users, Square is the safest starting point. It gives you freedom to move the image while keeping the surrounding text readable. It is the sensible sedan of Word image layout: not flashy, but unlikely to embarrass you in public.
Step 5: Move the Image Where You Want It
Drag the image to the desired location. You can place it next to a paragraph, near the top of a page, centered between sections, or aligned with the margin. Word may display alignment guides as you move the picture, depending on your settings and version.
If you need more precision, select the image and go to Picture Format > Position. Word offers preset positions such as top-left, top-right, middle-center, and bottom-right with text wrapping. These presets are useful when you want an image to sit consistently in a standard page location.
For tiny adjustments, use the arrow keys after selecting the image. If the picture jumps too far, zoom in or use the advanced position settings described in the next step.
Step 6: Open More Layout Options
To control the anchor more precisely, select the image, click the Layout Options icon, and choose See more. You can also right-click the image and choose Size and Position or open More Layout Options, depending on your Word version.
The Layout dialog box usually includes tabs such as Position, Text Wrapping, and Size. The Position tab is where you can define horizontal and vertical placement. For example, you can position the image relative to the page, margin, column, paragraph, or line.
This is where Word stops guessing and starts listening. Instead of dragging the image by hand and hoping it behaves, you can tell Word exactly where the image belongs.
Step 7: Set the Image to Move with Text or Stay Fixed
Now decide what you actually want the image to do. This is the part many people skip, and it is why their images keep moving.
Choose Move with text if the picture should follow a specific paragraph. For example, if a chart explains the paragraph beside it, you probably want the chart to move when that paragraph moves. This keeps the image connected to its explanation.
Choose Fix position on page if the picture should stay in a specific place on the page while text flows around it. This is useful for logos, decorative images, letterhead elements, cover pages, and designs where the image must remain visually locked to the page area.
Important detail: fixing an image on the page does not mean the image has no anchor. In Word, floating objects still have an anchor point. The anchor tells Word which paragraph the object belongs to for pagination and organization. This is why an image may still follow its anchor paragraph to another page in some situations.
Step 8: Lock the Anchor
In the Layout dialog box, look for the Lock anchor option. Check it if you want the image to remain attached to the current paragraph instead of accidentally attaching itself to a different paragraph when you drag the image around.
This option is helpful when your document has several images close together. Without a locked anchor, you might drag a picture slightly and unknowingly change the paragraph it is tied to. Later, when you edit the text, the picture moves in a way that makes no sense. Word is not being dramatic; it is obeying an anchor you did not realize had changed.
However, Lock anchor does not mean “make this picture impossible to move.” It means “keep this object anchored to this paragraph.” If you want to prevent other people from editing the image position, you may need document protection, restricted editing, or a PDF export.
Step 9: Test the Layout Before You Finish
After anchoring the image, test it. Add a few lines above the paragraph. Delete a sentence. Insert a page break. Watch what happens to the image.
If the image should follow the paragraph, confirm that it moves with the related text. If it should stay in a specific page position, confirm that the text changes without pushing the image somewhere strange. This quick test can save you from sending a proposal where the company logo ends up floating beside a pricing table like it got lost on the way to a meeting.
When the layout behaves correctly, save the document. If the file will be shared with others who may open it in different Word versions, consider exporting a PDF for final delivery. Word documents can reflow when fonts, printers, margins, or compatibility settings change.
How to Show or Hide the Anchor Symbol in Word
If you do not see the anchor symbol, it may be hidden. To show object anchors, go to File > Options > Display, then check Object anchors. You may also need to select the floating image before the anchor appears.
The anchor symbol usually appears in the margin near the paragraph to which the object is attached. You can drag the anchor to another paragraph if you want the image associated with a different section. If Lock anchor is turned on, you must unlock it before moving the anchor.
To hide anchors again, return to the same Display settings and uncheck Object anchors. Hiding the symbol does not remove the anchor. It only removes the visual reminder. The anchor is still doing its quiet little job in the background.
Best Text Wrapping Options for Anchored Images
Use Square for Most Business Documents
Square wrapping is the best all-purpose option. It keeps text organized around the image and works well for photos, screenshots, diagrams, and logos. If you are unsure which wrapping option to choose, start here.
Use Top and Bottom for Academic Figures
Top and Bottom is ideal when the image should sit between paragraphs. It prevents narrow columns of text from squeezing beside the image. This is often better for essays, research papers, manuals, and reports where readability matters more than magazine-style design.
Use Behind Text for Background Images
Behind Text works for watermarks, letterheads, faded background images, and decorative page designs. Make sure the image is light enough that the text remains readable. A beautiful background that makes your words impossible to read is not design; it is sabotage with pixels.
Use In Front of Text Carefully
In Front of Text gives you the most visual freedom, but it can cover words and create accessibility problems. Use it for special design elements, labels, or layered layouts, not for ordinary document images.
Common Problems When Anchoring Images in Word
The Image Still Moves
If the image still moves, check whether it is set to Move with text. If you want it to stay in a page location, switch to Fix position on page. Also confirm that the picture is not In Line with Text, because inline images naturally move with the text.
The Anchor Keeps Jumping
If the anchor attaches to the wrong paragraph, drag it to the correct paragraph and enable Lock anchor. Place the image near the paragraph it belongs with before fine-tuning the layout. This reduces confusion in long documents.
Text Wrap Options Are Grayed Out
If wrapping options are unavailable, the image may be inside a text box, header, footer, table, or another container with limited layout controls. Try moving the image into the main document body, then apply the wrapping option again.
The Image and Caption Separate
Captions can drift away from images if they are not managed carefully. For formal documents, use References > Insert Caption. For layout-heavy documents, consider placing the image and caption inside a borderless table or grouping objects when available. Keep in mind that Word only allows grouping when objects use compatible wrapping settings.
When Should You Anchor an Image?
You should anchor an image when the picture belongs to a specific paragraph or must stay in a controlled page position. Examples include:
- A screenshot beside the instructions that explain it
- A product photo next to a feature description
- A logo placed on a cover page
- A chart connected to a paragraph of analysis
- A decorative image fixed behind text
- A signature image placed near a closing block
- A diagram that must remain with a numbered step
Anchoring is less necessary for simple writing projects where images should appear between paragraphs. In those cases, In Line with Text is often more predictable. Many professional editors prefer inline images for long reports because they reduce surprise layout shifts.
Practical Example: Anchoring a Screenshot in a Training Manual
Imagine you are creating a training manual that explains how to use a software dashboard. You insert a screenshot beside Step 4, where the user must click a settings button. If the screenshot floats freely, it may slide to the next page when you add more text above it. If it is inline, it may interrupt the paragraph and create awkward spacing.
The best approach is to insert the screenshot near Step 4, choose Square or Top and Bottom wrapping, place it beside or below the instruction, open More Layout Options, and decide whether it should move with the Step 4 paragraph. Then lock the anchor so the screenshot stays attached to that instruction.
Now, if you add a new Step 3, the Step 4 text and its screenshot move together. The reader sees the right image with the right explanation. That is the whole point of anchoring: not just making an image stay still, but making it stay meaningful.
Advanced Tips for Better Image Control in Word
Change the Default Picture Wrapping Setting
If you constantly change images from In Line with Text to Square, adjust Word’s default paste behavior. Go to File > Options > Advanced. In the Cut, copy, and paste section, find Insert/paste pictures as and choose your preferred wrapping style.
Use Align Tools for Cleaner Layouts
Select the image and use Picture Format > Align to align it with the page, margin, or other objects. Alignment tools are more reliable than eyeballing placement, especially when preparing polished business documents.
Use Grid Settings for Precision
Word includes grid and guide settings that can help snap pictures and objects into cleaner positions. This is useful for forms, flyers, worksheets, and documents with repeated visual elements.
Export to PDF for Final Sharing
If the document is finished and the layout must not change, export it as a PDF. A Word file is editable and may reflow on another computer. A PDF is better for final delivery because it preserves the visual layout more consistently.
Experience Notes: What Real Users Learn After Fighting Word Images
After working with Word images for a while, most people discover that the problem is rarely the picture itself. The problem is the relationship between the picture and the text. Word is constantly asking, “What paragraph does this object belong to?” If you do not answer that question clearly, Word answers it for you. Word is confident. Not always correct, but very confident.
One practical lesson is to place images only after the main text is mostly drafted. If you insert and perfect every picture too early, then rewrite half the document, you may have to fix the layout again. It is usually faster to write the text first, apply headings and page breaks, then insert images and anchor them to the final paragraphs.
Another useful habit is to choose a consistent wrapping style for the whole document. For example, in a how-to guide, use Top and Bottom for full-width screenshots and Square for small icons or interface details. Consistency makes the document easier to edit and easier to read. It also prevents that chaotic “garage sale flyer” look where every image seems to follow a different constitution.
For reports with captions, inline placement often works better than fancy floating layouts. Many people try to anchor every figure precisely, only to watch captions split from images after edits. If the image must be numbered, referenced, and reviewed, simple inline placement with a proper caption can be more stable. Anchoring is powerful, but power is not always the same as convenience.
For resumes, proposals, and branded templates, fixed positioning is more useful. A logo in the header, a decorative side image, or a signature graphic should not move just because you added another bullet point. In those cases, set a wrapping style, choose Fix position on page, and test the layout after editing.
One of the biggest misunderstandings is the phrase Lock anchor. Many users assume it means the image itself is locked forever. It does not. It locks the connection between the object and its paragraph. Someone can still select and drag the image unless editing restrictions are applied. If you need a document that clients, classmates, or coworkers cannot accidentally rearrange, send a PDF or use Word’s protection features.
Finally, never trust a complex Word layout until you test it. Add a paragraph above the image. Delete a line. Change a heading. Move the related paragraph to the next page. If the image behaves correctly, you are safe. If it jumps, overlaps, or abandons its caption, fix the anchor settings before sharing the document. Word images are manageable, but they reward people who test before they celebrate.
Conclusion
Anchoring an image in Word is the key to controlling how pictures behave when your document changes. The basic process is simple: insert the image, choose a text wrapping style, position it, open the layout options, decide whether it should move with text or stay fixed, and lock the anchor if needed.
The most important lesson is that an anchor connects an image to a paragraph. If you want the image to follow an explanation, use Move with text. If you want the image to stay in one page location, use Fix position on page. If you want to prevent the anchor from attaching to another paragraph, use Lock anchor.
Once you understand those three controls, Word becomes much less frustrating. Your images stop roaming the document like tiny digital tourists, and your layout starts looking intentional, professional, and ready to publish.