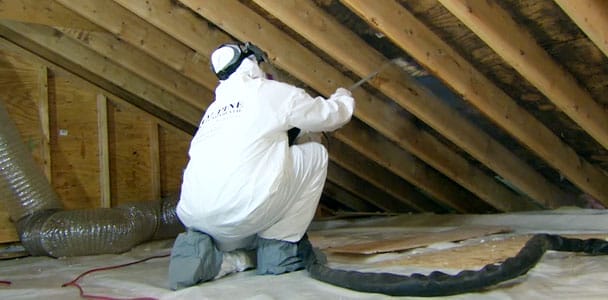

Attic mold is more than an ugly collection of black, green, white, or brown spots lurking above your ceiling. It is a moisture alarm wearing a fuzzy disguise. Cleaning the visible growth may make the attic look better, but unless you fix the water, humidity, condensation, or air-leakage problem that caused it, the mold will probably return like a houseguest who never understood the phrase “time to go.”
Learning how to get rid of attic mold therefore involves two connected jobs: removing contaminated material safely and correcting the conditions that allowed mold to grow. This guide explains how to identify common attic moisture sources, decide whether the project is suitable for DIY cleanup, clean affected surfaces, and prevent another moldy reunion.
Why Is Mold Growing in Your Attic?
Mold spores are naturally present in indoor and outdoor air. They generally become a building problem when they land on a damp material that provides food, such as roof sheathing, wood framing, cardboard, paper-faced drywall, or dusty insulation.
An attic can provide the perfect combination of moisture, wood, limited sunlight, and poor air circulation. The mold itself is not the original cause. It is evidence that the attic has remained damp long enough for fungal growth to become established.
Common causes of attic mold
- Roof leaks: Damaged shingles, deteriorated flashing, loose fasteners, failing roof penetrations, and ice dams can allow rain or melting snow to wet the roof deck.
- Bathroom exhaust discharged into the attic: A shower fan that ends beside the insulation rather than outdoors delivers warm, humid air directly to cold roof sheathing.
- Dryer or kitchen exhaust problems: These ducts should not terminate in an attic. Leaks or disconnected joints can release large amounts of moisture.
- Air leakage from the living space: Warm indoor air can escape around attic hatches, plumbing penetrations, wiring holes, duct chases, partition walls, and unsealed light fixtures.
- Blocked or poorly designed ventilation: Insulation covering soffit vents can interrupt airflow in a conventionally vented attic.
- Condensation on HVAC equipment: Poorly insulated ducts or air-conditioning components may sweat in warm, humid weather.
- Plumbing leaks: Water may enter around vent pipes or from supply lines, drain lines, humidifiers, and mechanical equipment.
- Construction moisture: Wet lumber or materials enclosed before they have dried can support early mold growth.
The pattern often offers clues. Mold concentrated around a roof penetration may indicate a leak. Widespread growth on the cold underside of the roof deck during winter more often points to indoor moisture and air leakage. Mold around a disconnected bathroom duct is not exactly a mystery worthy of a detective novel.
How to Recognize an Attic Mold Problem
Attic mold does not always look like the dramatic black coating seen in renovation television shows. It may appear as scattered dots, pale patches, streaks, fuzzy growth, or dark staining on the sheathing and rafters. A persistent musty odor can also indicate damp materials or hidden growth.
Do not assume that color identifies the mold species or determines how serious the situation is. “Black mold” is a popular phrase, not a reliable visual diagnosis. Any visible mold should be treated as a sign that moisture control and cleanup are needed.
Also distinguish mold from ordinary wood discoloration, soot, dirt, old water stains, and natural variations in lumber. When the material is visibly fuzzy, actively spreading, damp, or accompanied by a musty odor, the case for remediation is stronger. A qualified inspector can evaluate uncertain conditions without relying on color alone.
Can You Remove Attic Mold Yourself?
Federal guidance commonly uses an affected area of approximately 10 square feet as a general dividing point for basic household cleanup. A small, isolated patch on sound material may be manageable for a capable homeowner who can reach it safely and correct the moisture source.
Square footage is not the only consideration, however. Attics contain fall hazards, exposed nails, electrical wiring, extreme temperatures, fragile ceilings, insulation, and cramped spaces. A cleanup that looks small from the access hatch may extend behind insulation or across the hidden side of the roof deck.
Hire a mold remediation or building professional when:
- The visible growth covers more than about 10 square feet.
- Mold is widespread, dense, recurring, or present in several sections of the attic.
- Roof sheathing or structural framing is soft, delaminated, sagging, or visibly decayed.
- Contamination involves an air handler, HVAC ducts, or other mechanical equipment.
- The attic was affected by major flooding, sewage, or contaminated water.
- You cannot identify or safely repair the moisture source.
- The attic contains suspected asbestos, vermiculite insulation, lead hazards, or extensive animal waste.
- Access requires balancing on joists, working near unsafe wiring, or entering an unstable structure.
- A resident has asthma, severe allergies, a weakened immune system, or another condition that may increase sensitivity to mold exposure.
Remediation rules and contractor licensing requirements vary by state. Check local regulations before hiring anyone, and look for a contractor with documented mold-remediation experience, appropriate insurance, references, and a written plan that addresses both cleanup and moisture correction.
Safety Equipment for Small Attic Mold Cleanup
Do not enter a moldy attic in everyday clothes with a paper dust mask and a heroic attitude. Disturbing contaminated material can release spores, wood dust, insulation fibers, and debris into the air.
For a limited cleanup, protective equipment should generally include:
- A properly fitted, NIOSH-approved N95 respirator at minimum
- Non-vented safety goggles
- Nitrile, rubber, or other protective gloves
- Long sleeves and long pants or disposable protective coveralls
- Sturdy, slip-resistant footwear
- A reliable work light
- Boards or approved attic walkways where necessary to prevent stepping through the ceiling
People with respiratory conditions or significant mold sensitivity should not perform the cleanup. Avoid working alone, and stop if you experience breathing difficulty, dizziness, eye irritation, or unusual symptoms. Attic heat can also become dangerous quickly, so schedule work during cooler conditions and maintain a safe exit route.
How To Get Rid of Attic Mold Step by Step
1. Inspect the attic before disturbing anything
Begin with a careful visual inspection. Look at the roof deck, rafters, trusses, insulation, plumbing vents, exhaust ducts, attic hatch, recessed fixtures, and HVAC components. Photograph affected areas and record where they appear.
Check for active dripping, wet insulation, rusted fasteners, frost, condensation, water trails, disconnected ducts, and daylight entering around roof penetrations. A moisture meter can help compare suspicious wood with nearby dry material, although measurements must be interpreted according to the meter and wood species.
Do not begin aggressive cleaning until you understand why the surface became damp. Otherwise, you may remove the evidence while leaving the problem fully employed.
2. Stop the source of moisture
Repair roof and plumbing leaks first. Exhaust fans must discharge outdoors through properly installed, sealed, and insulated ductsnot into soffits where moisture can be pulled back into the attic and definitely not into a pile of insulation.
In a conventional vented attic, seal air leaks at the attic floor around penetrations and weather-strip the access hatch. Keep soffit vents open with correctly installed baffles, and verify that intake and exhaust ventilation work as a coordinated system.
Do not automatically install a powerful attic fan as a universal cure. When the ceiling is leaky or intake vents are inadequate, a fan can pull conditioned, moisture-laden air out of the house and into the attic. Attic design also varies by climate: a properly constructed unvented attic should not be casually converted into a vented one. A roofer, energy auditor, HVAC contractor, or building-science professional can recommend a solution appropriate for the roof assembly and local climate.
3. Isolate and prepare the work area
Keep occupants away from the cleanup zone. Close the attic hatch when practical and protect the area below it with plastic sheeting or another disposable covering. Turn off equipment that could distribute contaminated dust to occupied rooms if doing so is safe and appropriate.
Move clean stored items away from the work area. Moldy cardboard boxes and other disposable porous belongings should be sealed before being carried through the home. Avoid dropping debris through occupied spaces or shaking contaminated materials like a rug in a cartoon.
4. Remove materials that cannot be cleaned
Porous materials can hold mold growth below the visible surface. Wet or visibly contaminated insulation, cardboard, ceiling tiles, and badly damaged drywall often need to be removed and replaced. Place discarded material directly into durable bags or wrapped plastic to limit the spread of debris.
Sound structural wood can frequently be cleaned, but rotten, crumbling, or delaminated material may require replacement. Structural repairs should be evaluated by a qualified contractor rather than guessed at with a screwdriver and optimism.
5. Clean sound wood and other hard surfaces
For a small area of surface growth, use a cloth, sponge, or soft brush with water and a mild detergent suitable for the material. Clean without soaking the roof deck. Excess water defeats the purpose of a mold cleanup and can push moisture deeper into wood.
Routine household mold removal does not automatically require chlorine bleach. Detergent cleaning, physical removal, and complete drying are generally the central steps for cleanable surfaces. Bleach and other chemicals can produce irritating fumes, damage materials, and create serious hazards if mixed with incompatible products. Never combine cleaning chemicals, and always follow product labels.
Abrasive blasting, heavy sanding, wire brushing, and aggressive grinding can release large amounts of contaminated dust. Those methods are better left to trained remediation professionals using containment and appropriate respiratory protection.
6. Dry the area thoroughly
After cleaning, the attic must dry completely. Correct weather conditions, dehumidification in connected conditioned areas, repaired ventilation, and controlled air movement may assist drying. Do not aim an ordinary fan at active mold, because uncontrolled airflow can scatter spores and fragments.
Insulation should not be replaced until the roof deck and framing are dry and the leak or condensation problem has been corrected. Covering damp wood is an efficient way to create a sequel nobody requested.
7. Perform final cleanup and inspection
Once surfaces are dry, collect remaining dust with damp wiping and a true HEPA-filtered vacuum designed for fine particles. An ordinary shop vacuum may exhaust fine material back into the air unless it is specifically equipped and sealed for HEPA filtration.
A successful project should leave no visible active growth, loose debris, persistent moldy odor, or continuing moisture. Some staining may remain even after the growth has been removed, so perfectly restored wood color is not the only measure of success.
Reinspect the attic after rainfall, during cold weather, and again several weeks or months later. A dry attic with no renewed growth is a far better result than a freshly painted surface hiding an unresolved leak.
Attic Mold Removal Mistakes to Avoid
Painting directly over mold
Mold-resistant coatings may have a role after proper remediation, but paint is not a substitute for cleaning and drying. Coating active growth can trap moisture, hide deterioration, and make future inspection more difficult.
Adding ventilation without sealing air leaks
More roof vents do not automatically solve an attic moisture problem. In cold climates, humid air leaking from the home may continue condensing on cold sheathing. Air sealing is often a critical part of the repair.
Blocking soffit vents with insulation
Insulation pushed tightly against the roof edge can prevent intake airflow. Rafter baffles should preserve a clear path between soffit vents and the upper attic in assemblies designed for ventilation.
Testing every visible patch
When mold is plainly visible, routine species testing is often unnecessary. There are no general federal pass-or-fail limits for indoor mold spores. Money is usually better spent identifying moisture, correcting defects, and removing the contamination. Professional sampling may still be useful for disputed, unclear, or medically significant cases.
Cleaning without repairing the cause
This is the classic failure. The attic looks cleaner for a few months, winter arrives, warm indoor air leaks upward, and the roof deck grows a new spotted wardrobe. Moisture correction is not an optional bonus step; it is the foundation of the entire project.
How to Prevent Attic Mold From Returning
- Inspect the roof, flashing, skylights, chimneys, and plumbing penetrations regularly.
- Vent bathroom, kitchen, and dryer exhaust directly outdoors.
- Seal attic-floor penetrations before adding more insulation.
- Weather-strip and insulate the attic hatch or pull-down stairs.
- Keep soffit vents clear in conventionally vented roof assemblies.
- Use correctly installed baffles to prevent insulation from blocking airflow.
- Repair leaking or poorly insulated HVAC ducts.
- Control excessive indoor humidity, especially during cold weather.
- Dry roof leaks and wet materials promptly, ideally within 24 to 48 hours.
- Check the attic after severe storms, reroofing work, and major insulation upgrades.
Be especially alert after energy-efficiency improvements. Adding insulation reduces heat loss, which is good, but it can make roof sheathing colder in winter. If ceiling air leaks are not sealed first, moisture may condense more readily on that colder surface. Insulation slows heat transfer; it does not automatically stop airflow.
Practical Experiences and Lessons From Attic Mold Projects
The following composite examples reflect common experiences reported in residential attic investigations. They are not substitutes for an inspection, but they show why the location and pattern of mold matter as much as the cleaning product.
Experience 1: The “roof leak” that was actually a bathroom fan
A homeowner noticed dark growth on the roof deck above a second-floor bathroom. Because the staining appeared near the roof, the first assumption was a shingle leak. The shingles and flashing looked sound, however, and the sheathing was usually dry after rain.
The real problem was hiding beneath the insulation: the bathroom exhaust duct had separated from its roof cap. Every shower released warm, damp air into the attic, where it condensed on cold plywood. The affected wood was cleaned after the duct was reconnected, sealed, insulated, and verified to discharge outdoors. Had the homeowner cleaned first and ignored the duct, the mold would have returned with the next round of steamy showers.
Experience 2: New insulation, old air leaks
Another attic developed widespread spotting during the first winter after a major insulation upgrade. The insulation contractor had added a thick layer of blown material, but penetrations around plumbing pipes, wiring, and partition walls had not been sealed.
Before the upgrade, escaping household heat kept portions of the roof deck warmer. Afterward, the attic became colder and more energy efficient, but humid indoor air continued leaking upward. When it reached the cold sheathing, moisture condensed and supported mold growth.
The long-term repair involved moving insulation aside at key locations, safely air-sealing the attic floor, correcting ventilation pathways, and then restoring the insulation. The lesson was simple: air sealing and insulation are teammates. Sending only one onto the field can produce disappointing results.
Experience 3: A cleanup spray that solved nothing
In a smaller attic, a homeowner repeatedly sprayed dark spots with a strong cleaner. The stains temporarily faded, but the musty odor returned. Closer inspection found a slow leak around a plumbing vent boot. Water followed the pipe and wet the same section of sheathing during each storm.
Replacing the failed roof boot stopped the water. Damaged insulation was discarded, sound wood was cleaned, and the area was allowed to dry before new insulation was installed. This project demonstrated why the most important attic mold tool may be a flashlight and a careful moisture investigationnot the strongest bottle in the cleaning aisle.
Experience 4: More ventilation made the problem worse
A homeowner installed a powered attic fan to combat summer heat and moisture. Unfortunately, the soffit vents were partly blocked and the attic floor contained numerous air leaks. When the fan ran, it pulled conditioned air from the house through the ceiling. The cooling system worked harder, and humid air entered through unintended pathways.
An energy assessment identified the pressure imbalance. The eventual solution focused on sealing the ceiling plane, opening the intended intake vents, and reevaluating whether the powered fan was appropriate. The experience showed that attic ventilation must be designed as part of the whole building. Air does not read product packaging; it follows pressure and the easiest available path.
The shared lesson
These situations had different visible symptoms, but the successful solutions followed the same order: diagnose the moisture source, repair it, remove unsalvageable material, clean what can be saved, dry the assembly, and verify that the problem does not return.
Homeowners often focus on choosing between vinegar, bleach, detergent, or a commercial mold product. That decision is usually less important than locating the disconnected duct, roof defect, air leak, blocked vent, or sweating HVAC component. Mold cleanup is partly a cleaning project, but lasting attic mold removal is fundamentally a moisture-management and building-performance project.
Final Thoughts
To get rid of attic mold permanently, resist the temptation to treat it as a stain. Small patches on sound, accessible materials may be cleaned safely after the moisture source has been repaired. Larger areas, structural damage, contaminated HVAC systems, uncertain insulation, recurring growth, and unsafe access require professional assistance.
The best final test is not whether the wood looks brand-new. It is whether the attic remains dry, free of active growth and musty odors, and structurally sound through changing weather. Fix the moisture, clean the contamination, and monitor the repair. Do those three things in the right order, and the mold has far less reason to schedule a comeback tour.