
Somewhere out there, a perfectly normal ceiling projector mount is wearing a tuxedo and charging $129.99 because it has the words
“premium,” “aircraft-grade,” and “cinema” in the listing. Meanwhile, a basic universal projector mount under $10 is sitting quietly in the corner
doing the same job: holding a box of lenses in the air so you can watch movies like a civilized raccoon.
This article is for anyone who wants a clean ceiling setup without paying a “home theater tax.” Yes, the headline is spicy on purpose.
No, I’m not asking you to trust your expensive projector to a coat hanger and good vibes. What I am saying is that for a huge slice of
real-life projector setupsespecially today’s lightweight projectorsa simple mount can work beautifully if you shop smart and install it correctly.
Spend money where it actually matters: correct hardware, safe anchoring, and the right placement. Not a chrome-plated bracket with feelings.
Why projector mounts get weirdly expensive
Projector mounts are one of those accessories where pricing often reflects features (quick-release mechanisms, micro-adjustments,
security screws, long extension columns, drop-ceiling adapters) more than the basic function of “hold projector, don’t fall.”
Those features can be genuinely useful in classrooms, boardrooms, rentals, or commercial installs. But most home setups don’t need them.
In a typical living room, you’re mounting a projector once, leveling it once, and then ignoring the mount foreverlike a smoke detector that
only gets attention when it beeps at 3:00 a.m. A mount that costs less than a pizza can be enough, as long as it:
(1) fits your projector’s mounting points, (2) is rated for the weight with a healthy safety margin, and (3) attaches to real structure
(joist, beam, concrete, etc.), not “optimism drywall.”
The $10 mount manifesto: what matters (and what doesn’t)
1) Weight rating: treat it like a speed limit, not a suggestion
Most mounts advertise a maximum load (for example, 22 lb, 30 lb, 55 lb). Don’t shop by “bare minimum.” Shop by margin.
A simple rule that keeps you out of trouble: pick a mount rated for at least 3–5× the projector’s weight.
If your projector is 7 lb, shop for 25–35 lb capacity. If it’s 12 lb, look for 40–60 lb capacity.
The mount itself is only half the story. Your ceiling attachment (lag bolts into joists, proper concrete anchors, etc.)
is what prevents the “projector meteor” event. If a brand’s documentation emphasizes strong structural support and big safety factors,
that’s not scare tacticsthat’s gravity being honest.
2) Compatibility: “universal” usually means adjustable arms (but check your projector first)
Most universal projector ceiling mounts use a central plate with adjustable arms (sometimes called “spider arms”) that reach out to your projector’s
mounting holes. The goal is to match your projector’s hole pattern (which can vary widely).
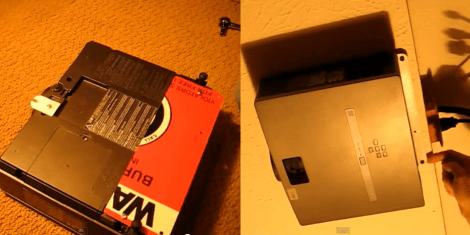
Before buying anything, flip your projector over and check:
- How many mounting points? Often 3 or 4.
- How far apart? Measure the distance between holes (center-to-center).
- What screws does it use? Many projectors use metric screws (commonly M4, M5, or M6), and screw length matters.
- Where’s the center of gravity? If the holes are far from center, you may need a mount with longer arms.
If the listing gives a maximum “mounting hole width” or supported pattern range, compare it to your measurements.
If it doesn’t list any dimensions at all, consider that a warning sign, not a fun mystery.
3) Adjustability: you need enough to level the image, not choreograph a ballet
The adjustment features that matter most in a home are:
- Tilt (pitch): to angle the projector up/down.
- Swivel (yaw): to point it left/right.
- Roll: the unsung herolets you make the image level (no “my movie is sliding downhill” effect).
Many low-cost mounts still include basic tilt and swivel. Roll adjustment is sometimes more limited on bargain mounts,
so plan to mount carefully and use small tweaksnot dramatic rescue missions.
4) Drop distance: flush mounts are cheap; long extension costs money (and that’s okay)
If you have a normal 8–9 ft ceiling and a standard throw projector, a low-profile mount can work and often costs the least.
But if you need the projector to hang lower (vaulted ceiling, high ceiling, ceiling fan clearance, or a specific throw distance),
you’re entering “extension column” territory. That’s one of the legitimate reasons mounts get pricier.
When a $10 projector mount is the right move
The headline holds best in these situations:
- Lightweight projectors (roughly under 10–12 lb): Many modern home and portable projectors fall here.
- Flat ceilings with accessible joists: You can anchor directly to structure.
- Simple alignment needs: Centered screen, modest throw, minimal fuss.
- “Set it and forget it” installs: You’re not swapping projectors weekly or adjusting for multiple rooms.
In these cases, the mount’s job is basically: hold steady, allow small leveling, and stay quiet about it.
When you should ignore this headline (yes, there are exceptions)
Here’s where paying more can be smartand sometimes necessary:
Heavier projectors or long-throw “big boys”
If your projector is heavy (think 20+ lb) or oddly shaped, you want a sturdier mount with higher rated capacity and more robust hardware.
Commercial-grade mounts often support significantly higher weights and may include better adjustment mechanisms and security features.
Ultra short throw (UST) setups
UST projectors typically live on a low cabinet inches from the wall and require precise geometry. Many are not ideal for typical ceiling mounts.
If you’re doing a UST ceiling install (rare, but possible), you’re often in specialty territorybudget mounts may not cut it.
Drop ceilings, vaulted ceilings, and “architectural chaos”
If you’re mounting to a drop ceiling grid, angled ceiling, or you need an extension column, that’s not the moment for the cheapest possible bracket.
You’re dealing with leverage, vibration, and geometry. Spend for the correct systemor choose a shelf/cabinet solution instead.
Public spaces, rentals, and anywhere people can touch it
In classrooms, offices, or rentals, mounts may need locking/security screws, quick-release serviceability, and robust anti-tamper design.
That’s when premium features earn their keep.
How to buy a projector mount under $10 without buying regret
Step 1: Make a 60-second “fit profile”
- Projector weight (from the spec sheet)
- Mounting hole pattern (measure it)
- Ceiling type (joists? concrete? drop ceiling?)
- Desired drop distance (flush vs lowered)
Step 2: Look for these signs of a decent budget mount
- Clear specs: max weight, compatible hole span, tilt/swivel range.
- Metal construction: Steel or aluminum components where it counts (plate/arms), not all plastic joints.
- Locking points: set screws or locking knobs to prevent slow “drift.”
- Multiple screw options: or at least a listing that tells you what screw sizes it supports.
Step 3: Assume the included hardware is “starter hardware,” not the final answer
This is the big secret of “cheap mount vs expensive mount”: sometimes you’re not really paying for stronger metalyou’re paying for
better hardware, better documentation, and fewer missing pieces.
If you’re mounting into wood joists, use appropriately sized lag bolts (and pilot holes).
If you’re mounting into concrete, use anchors rated for overhead loads.
If you’re mounting into drywall only, rethink the plan. At minimum, use heavy-duty toggle bolts rated well above your total load,
but understand that overhead drywall-only installs are generally the riskiest option.
Smart alternatives that sometimes beat any mount
Want a hot take? The cheapest “projector mount” is often not a mount.
- A sturdy shelf near the back wall: Great for renters; easy access for ports and controls.
- A tripod (for portable projectors): Fast setup, flexible placement, and no holes in your ceiling.
- A ceiling shelf/plate: Useful for ultra-small projectors with a single mounting point.
These options can reduce complexity and let you spend money on the screen, audio, or blackout curtainsthings that actually change the experience.
Quick install guide: safe, square, and not crooked
This is the “do it like a grown-up” version. No drama, no “oops,” no projector funerals.
1) Pick placement based on throw distance and alignment
Your projector’s manual (or a throw calculator) tells you how far back it needs to be for your screen size.
Mark the spot on the ceiling where the mount base will land. Use painter’s tape so you can adjust without scarring the ceiling.
2) Find structure
Use a stud finder to locate ceiling joists (or confirm concrete). Whenever possible, mount into structurenot just drywall.
If you can’t hit a joist where you need, consider shifting the projector, using a mounting plate that spans two joists, or switching to a shelf.
3) Pre-drill and mount the base securely
Drill pilot holes for lag bolts into wood. Keep the base level. Tighten firmly, but don’t crush drywall.
After installing, do a cautious “wiggle test.” If the base shifts, fix it nowbefore the projector is attached.
4) Attach the arms to the projector
Use the correct screw size and length. Too short won’t hold. Too long can damage internal components.
If your projector supports a safety tether or safety wire option, use it.
5) Hang the projector and level with roll adjustment
Power the projector on and throw an image. Use roll to get the picture level, then tilt/swivel to center it.
Tighten all locking points. Recheck after 24–48 hours to ensure nothing has settled or drifted.
Troubleshooting: common “my picture looks wrong” problems
The image is a trapezoid
That’s keystone distortion, usually caused by the projector being tilted too far up or down.
Fix it physically first (adjust mount height/angle), then use digital keystone only for small corrections.
Physical alignment preserves resolution and looks sharper.
The image is level on top but the bottom is off-center
Your projector may be rotated slightly (roll) or not centered to the screen. Check roll adjustment and the projector’s position relative to the screen.
The mount slowly “droops” over time
Tighten locking points and confirm the projector’s weight is within the mount’s rating with margin.
If the joints are slipping even when tight, that’s a sign the mount’s friction surfaces aren’t up to the taskupgrade or reduce leverage
(shorter drop distance).
FAQ
Can a cheap projector mount be safe?
Yesif it’s correctly rated, fits your projector, and is installed into proper structure with appropriate hardware.
Price does not magically defeat physics; installation does.
Do I need a safety cable?
If your projector or mount supports one, it’s an inexpensive layer of protection, especially in high-traffic rooms or vibration-prone buildings.
What if my projector has only one mounting point?
Many small projectors can use a single-point mount or a shelf/tripod setup. Just ensure the mount is designed for single-point support
and won’t loosen under vibration.
Real-world experiences: $10 mounts in the wild (the good, the bad, the “why is it sideways?”)
Let’s talk about what people commonly run into when they go budgetbecause the mount price is rarely the part that causes the drama.
The drama comes from ceilings, hardware, and expectations.
Experience #1: “It was perfect… until the next morning.”
A very common story: the projector looks aligned on install night, but by the next day the image has drifted a hair.
Usually the culprit isn’t “cheap metal,” it’s one of three things: a locking knob that wasn’t fully tightened, a joint that needs a set screw snugged,
or the mount settling slightly after the weight has been hanging for a while. The fix is simple: re-level, then tighten all lock points in the
correct order (base first, then tilt/swivel, then roll). Bonus tip: after tightening, gently push up on the projector to remove any slack,
then tighten again. Gravity is relentless; don’t negotiate with it.
Experience #2: “My projector mount came with screws… and none of them fit.”
Budget listings often include a handful of screws that may or may not match your projector’s threads.
That’s not always a scam; it’s just the reality of how many projector models exist. The best move is to identify the correct screw size
from your projector manual (or carefully test-fit), then buy the right screws in the right length.
The right length matters because “too long” can damage the projector, and “too short” can strip or pull out.
People who have the smoothest under-$10 mounting experiences tend to treat the included hardware as “samples,” not a final kit.
Experience #3: “I mounted it in drywall. It held… for a while.”
This is the one that makes everyone in the room talk a little quieter. Drywall-only installs are risky overhead, even with good anchors.
Sometimes it works for a lightweight projector in a low-vibration room; sometimes it fails at the worst possible moment.
The safe pattern people end up with is either (a) moving the mount to hit a joist, (b) spanning between joists with a proper mounting board/plate,
or (c) switching to a shelf solution that keeps weight off the ceiling entirely. If you take only one lesson from budget mounting,
let it be this: don’t save $20 on the bracket and then gamble with a ceiling attachment that isn’t built for overhead load.
Experience #4: “I upgraded from a fancy mount to a basic mount and nothing changed.”
This happens more than you’d think. Many home users buy an expensive mount expecting a magical improvement in picture quality.
But picture quality comes from the projector, screen, room lighting, and alignmentnot the price of the metal holding the projector.
If both mounts allow you to align the projector correctly and hold it steady, the image looks the same.
The expensive mount may feel nicer to adjust, offer cleaner cable routing, or include quick-release service features.
Those are nice. They’re not always necessary.
Experience #5: “The $10 mount was great… until I needed a long drop.”
Budget mounts shine when they’re low-profile and close to the ceiling. Add a long drop distance and you add leverage.
Leverage amplifies tiny movements into big alignment problems. People who need a long extension often end up spending morenot because they were “wrong,”
but because physics charges extra for tall ceilings.
The overall takeaway from real-world budget mounting isn’t “cheap is perfect.” It’s this:
keep the mount simple, keep the drop short, mount into real structure, and spend your effort on alignment and hardware.
Do that, and a low-cost mount can deliver a clean, stable setup that looks like you hired a pro (or at least a competent adult).
Conclusion: spend less on the bracket, more on the outcome
“Never pay more than $10 for a projector mount” is a headline with attitudebut the practical message is simple:
most home users don’t need premium features. They need a mount that fits, a capacity rating with margin, and a safe, structural install.
If your setup is lightweight and straightforward, a basic universal ceiling projector mount under $10 can absolutely do the job.
If your setup is heavy, high, complex, or public-facing, that’s when you upgradeand you’ll know why you’re paying more.
Either way, the goal is the same: a stable projector, a square image, and a movie night that doesn’t include “falling object” sound effects.