
There are few tech frustrations more annoying than this one: you sit down at a perfectly good computer, try to play a movie, TV show, or older purchased media from Apple, and suddenly get smacked with a message telling you the computer is not authorized. Meanwhile, the machine that is authorized is an ancient laptop in a closet, a dead desktop that gave up in 2019, or a mystery PC you vaguely remember owning during your “I can totally fix Windows myself” phase.
If that sounds familiar, take a breath. This problem is common, fixable, and much less dramatic than it feels in the moment. The trick is understanding how Apple’s authorization system works, what counts as a computer, and what to do when the old machine is gone, broken, sold, recycled, or basically now a paperweight with emotional baggage.
In this guide, you’ll learn how to deauthorize iTunes on old or dead computers, how to free up authorization slots, what to do if you still have access to the machine, and how to avoid getting stuck again later. We’ll also cover the difference between classic iTunes and Apple’s newer apps, because of course the menu names had to change just enough to keep things interesting.
Why this problem happens in the first place
Apple lets you authorize up to five computers at a time for certain purchased content tied to your Apple Account (formerly Apple ID). That limit applies to Macs and Windows PCs. iPhones, iPads, and Apple TV devices do not count as computers in this specific authorization system, which is why your phone can be happily minding its business while your laptop is having a full identity crisis.
The trouble usually starts when you do one of these very normal life things:
- Replace an old computer with a new one
- Reinstall Windows or erase a Mac without deauthorizing first
- Sell, donate, or recycle a machine
- Lose access to a computer with a dead hard drive or broken motherboard
- Forget which Apple account was used years ago
Once that old computer is still counted as authorized, it can keep occupying one of your five slots. And because Apple mainly shows you the number of authorized computers rather than a nice, tidy list with names like “That Dell from college,” troubleshooting becomes part detective story, part spring cleaning.
Authorized computers vs. associated devices
This is where many people get tripped up. An authorized computer is a Mac or PC approved to play certain purchases. An associated device is part of a different Apple purchases system and can include mobile devices. Removing something from your Apple Account’s device list is useful for account hygiene, but it is not always the same thing as deauthorizing a computer for iTunes or Apple media purchases.
In plain English: deleting an old device from your account settings is good housekeeping, but it may not free the computer authorization slot you actually need. Different lock, different key.
When you still have access to the computer
If the old computer still turns on and you can open iTunes, Apple Music, or Apple TV, congratulations: you get the easy route. Individual deauthorization is the cleanest option because it removes only that machine instead of wiping all your computer authorizations at once.
How to deauthorize in iTunes
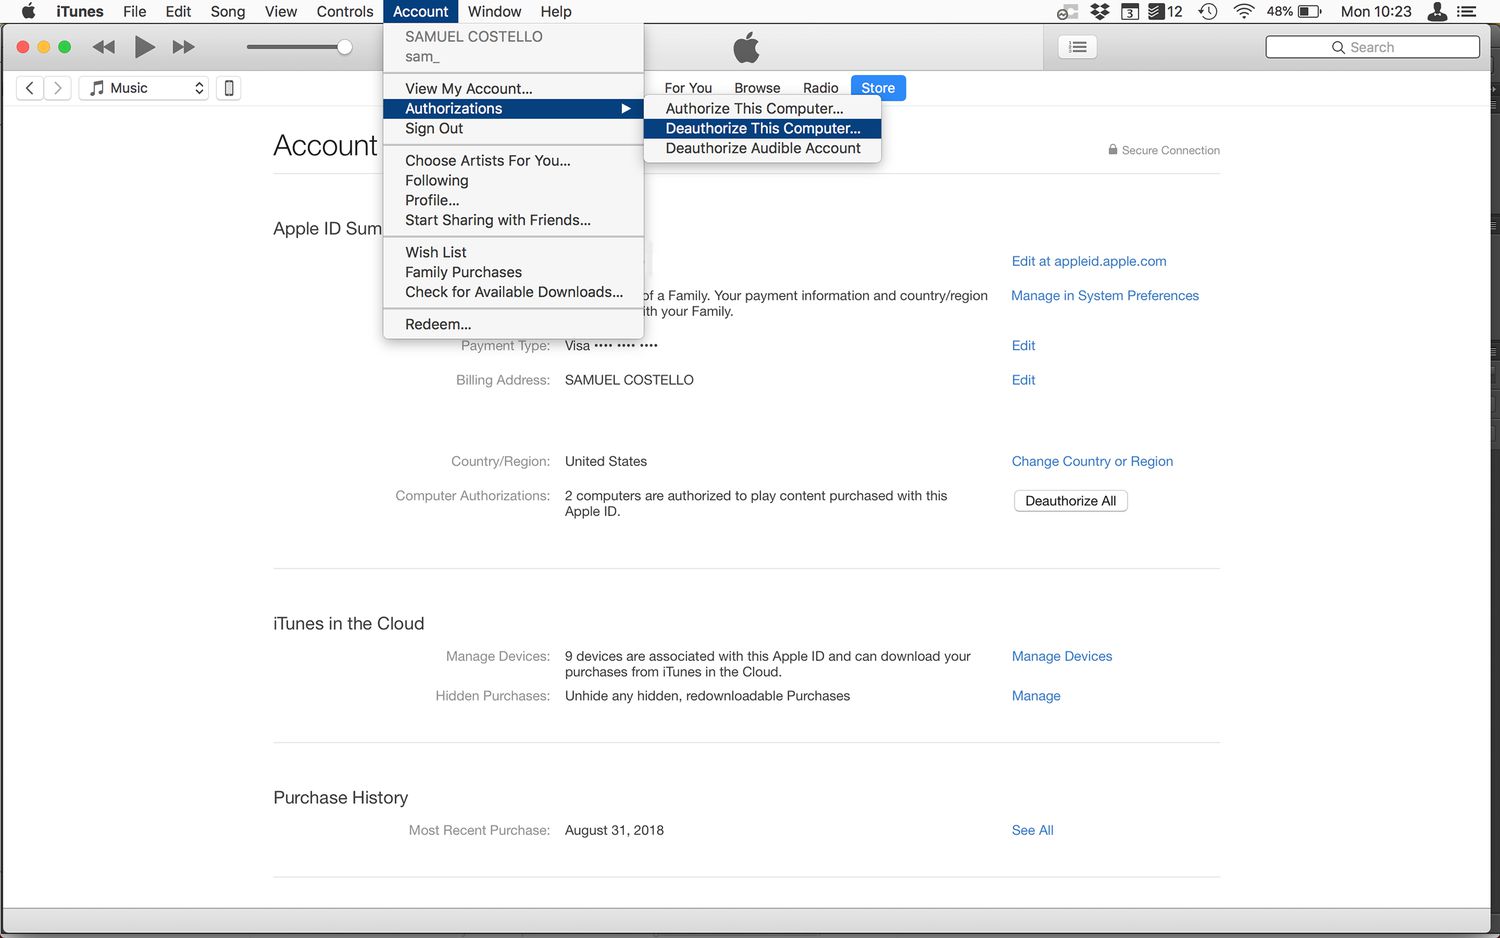
If the computer uses classic iTunes, follow these steps:
- Open iTunes.
- Go to Account > Authorizations.
- Choose Deauthorize This Computer.
- Sign in with your Apple Account if prompted.
- Confirm the deauthorization.
That’s it. One computer removed, one authorization slot back in your pocket.
How to deauthorize in Apple Music or Apple TV
On newer Macs, iTunes has been split into separate apps. On newer Windows setups, Apple also offers Apple Music and Apple TV apps alongside Apple Devices. If you’re using those newer apps instead of old-school iTunes, the wording may look a little different.
- Open Apple Music or Apple TV.
- Make sure you are signed in to the correct Apple Account.
- Go to the Account menu on Mac, or click your name in the sidebar on Windows.
- Select Deauthorize This Computer or Deauthorize Machine.
- Confirm your choice.
If you’re planning to sell, donate, recycle, or wipe the computer, do this before you reset the system. Future You will be grateful. Future You is tired of cleaning up Present You’s mess.
How to deauthorize iTunes on an old or dead computer
Now for the situation most people actually came here for: the computer is gone. Maybe it died. Maybe you sold it. Maybe it is currently living in a garage under a pile of mystery cables and an exercise bike that became a coat rack. Whatever happened, you can’t open the old machine and remove the authorization directly.
Here’s the important truth: Apple does not give you a neat “remove only that dead computer” button from another device. Instead, the official workaround is to deauthorize all computers on your account and then reauthorize only the ones you still use.
How to use Deauthorize All
You can do this from a computer you currently have access to.
- Open iTunes, Apple Music, or Apple TV.
- Sign in to the Apple Account that was used on the old computer.
- Open your account details:
- In iTunes: Account > View My Account
- In Apple Music or Apple TV: Account Settings or View My Account
- Find the section labeled Computer Authorizations.
- Click Deauthorize All.
- Confirm the action.
That removes authorization from every computer tied to that account, including the ones you still use. So yes, it works. And yes, it is slightly dramatic. Apple’s solution is basically, “Burn down the whole guest list and invite back only the people you like.”
A very important catch
You can only use Deauthorize All once per year. That means this is the emergency lever, not the everyday button you mash whenever something looks mildly suspicious.
Also, the exact appearance of the Deauthorize All option can vary depending on whether you’re using legacy iTunes or the newer Apple apps. If the button is missing, check the number of authorized computers and make sure you’re signed in to the right account. Apple’s newer and older software do not always present the same wording or conditions in exactly the same way, which is a fancy way of saying, “Yes, the menus are weird, and no, it’s not just you.”
How to reauthorize the computers you still use
After you deauthorize all computers, your current Mac or PC may stop playing certain purchased content until you authorize it again. This part is easy:
- Open iTunes, Apple Music, or Apple TV on the computer you want to keep using.
- Go to Account > Authorizations or the equivalent account menu.
- Choose Authorize This Computer or Authorize Machine.
- Sign in with your Apple Account.
- Repeat on the computers you actually use.
Be selective here. If you currently use one laptop and one desktop, authorize those two and stop. Do not get sentimental and authorize every old family PC “just in case.” That’s how this whole saga began.
How to check how many computers are authorized
If you are not sure whether you’ve reached the limit, look up the count before you start deauthorizing everything.
- In iTunes, open Account > View My Account.
- In Apple Music or Apple TV, go to Account Settings or View My Account.
- Look for Computer Authorizations.
This tells you how many computers are currently authorized. It is a quick way to confirm whether the problem is really an authorization limit or something else entirely, like the wrong account, outdated software, or a library file that has decided today is its villain era.
What to do if deauthorization still doesn’t solve the problem
Sometimes the authorization system is not the only issue. If you’ve deauthorized and reauthorized properly but still get errors, try these fixes.
1. Confirm you’re signed in to the correct Apple Account
This sounds obvious right up until it isn’t. Many households have multiple Apple accounts, and old purchases may belong to a different one than the one you use now. If a movie or song was bought under Account A, authorizing Account B won’t help.
2. Update iTunes or the Apple apps
Outdated software can cause authorization problems, playback glitches, or account-sync hiccups. Install the latest available version for your setup, especially on Windows.
3. Sign out, quit the app, and sign back in
Classic, boring, effective. Not every computer problem is solved by restarting, but enough of them are that we keep coming back like it’s a tech support religion.
4. Restart the computer
Yes, seriously. Authorization data can get stuck in a half-updated state. A restart clears more nonsense than most people want to admit.
5. Reinstall only if you’ve exhausted the easy stuff
If the app is corrupted or behaving strangely, reinstalling may help. Just make sure your library is backed up first if you still manage local files through iTunes.
6. Check whether the issue is with purchased media or local files
Authorization mainly matters for Apple purchases and protected content. If your problem is with imported MP3 files or local music that you ripped yourself, the issue may not be authorization at all.
Common mistakes people make
- Confusing sign-in devices with authorized computers: They overlap sometimes, but they are not the same thing.
- Forgetting to deauthorize before wiping a computer: This is the all-time classic.
- Using the wrong Apple Account: The account tied to the purchase is the one that matters.
- Using Deauthorize All too casually: Remember, it is limited to once per year.
- Assuming the dead computer can be removed individually from the web: That would be nice, but that is not how Apple handles media authorization.
What to do before selling, donating, or replacing a computer
If your current computer still works and you know you’re about to retire it, use this quick checklist before you do anything drastic:
- Open iTunes, Apple Music, or Apple TV.
- Deauthorize the computer.
- Back up your library if you keep local media files.
- Sign out of your Apple Account.
- Erase or reset the computer only after the above steps are done.
This takes a minute or two and can save you an hour of muttering later. It is one of those tiny chores that feels unnecessary right up until it becomes wildly necessary.
Real-world experiences and lessons from the deauthorization trenches
One of the most common stories goes like this: someone upgrades from an old Windows laptop to a shiny new machine, installs iTunes or Apple Music, signs in, and assumes everything will just transfer over because “it’s all in the cloud now, right?” Then they try to play a purchased movie and get blocked because the old laptop was never deauthorized. The laptop, naturally, no longer boots. At this point the user spends 20 minutes blaming the new computer before realizing the ghost of the old one is still taking up a seat.
Another very familiar scenario involves a hard-drive replacement or a clean Windows reinstall. The owner is being responsible, trying to fix a slow PC or start fresh. They wipe the system first, then remember iTunes authorization second. That order is exactly backwards. Once the original installation is gone, you lose the easy one-computer deauthorization path and often end up using the once-a-year nuclear option instead.
Families run into their own version of the problem too. A parent may have authorized a desktop years ago for children’s purchases, then later added a laptop, then a replacement laptop, then another shared computer in a home office. Everything works for years until a fifth authorization gets used up and no one remembers which machines were actually connected. Suddenly, a Saturday afternoon turns into a household archaeology project.
People who have bounced between Mac and Windows know this pain especially well. A MacBook dies, a temporary Windows PC takes over, then a new Mac arrives, and each step quietly consumes another authorization if no one cleans up after the transition. The user feels like Apple is counting invisible computers in another dimension. In a way, it is. The account remembers more than you do, which is both impressive and mildly rude.
Then there are the “I only use streaming, why am I even dealing with this?” cases. These usually happen when someone still has older purchased TV shows, movies, or protected items mixed into a modern library. They assume Apple Music streaming rules apply to everything, but purchased content can still trigger authorization requirements. So the account appears fine until one stubborn item refuses to play and sends the user into a confusing detour through account settings.
The biggest lesson from all these experiences is simple: deauthorization is not hard, but forgetting about it creates weird, delayed problems. The best habit is to treat deauthorizing a computer the same way you treat backing up your files before a reset. Do it while the machine still works. Do it before you sell it. Do it before you swap drives, reinstall Windows, or hand the laptop to your cousin who “just needs it for a month.” Because in tech, “for a month” has the same energy as “I’ll only have one potato chip.”
The second lesson is to stay calm when the dead machine is truly gone. A lot of people assume they are permanently locked out. They are not. Annoyed? Yes. Doomed? No. As long as you can access the correct Apple Account, you can usually recover by deauthorizing all and then rebuilding your active list the right way.
Final thoughts
If you need to deauthorize iTunes on an old or dead computer, the fix depends on one thing: whether you still have access to the machine. If you do, remove it individually through iTunes, Apple Music, or Apple TV. If you do not, use Deauthorize All, then reauthorize only the computers you actually use. It is not the most elegant system in the world, but it works.
The smartest long-term move is prevention. Before you replace, reset, sell, donate, or recycle a computer, deauthorize it first. That one tiny step keeps your Apple media library from turning into a scavenger hunt later. And if you forgot this time, welcome to the club. Membership is free, but unfortunately it comes with troubleshooting.
SEO Tags