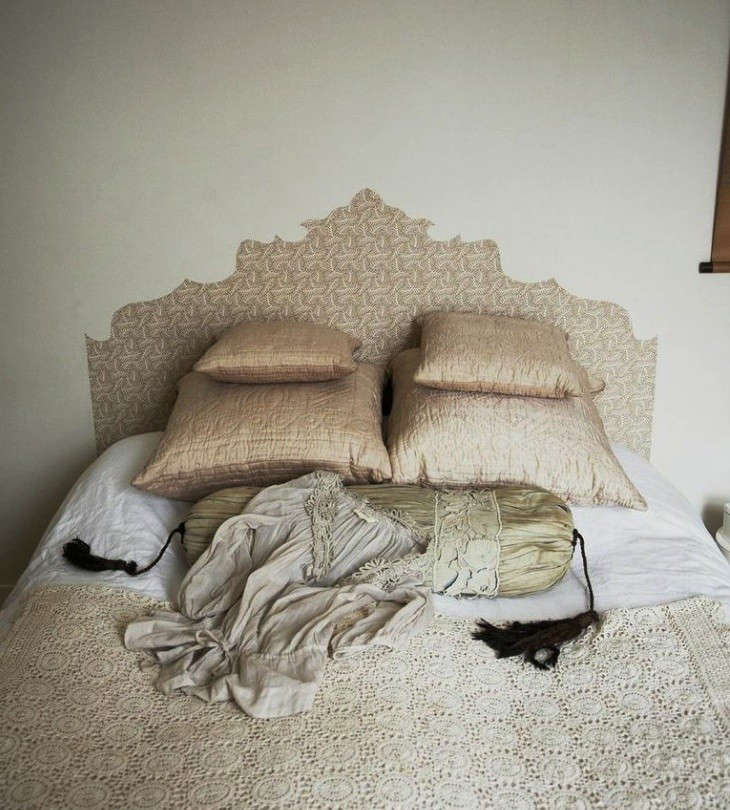

A bedroom without a headboard can feel a little like coffee without the mug: technically functional, but emotionally confused. That is why the idea behind DIY: Wallpaper Headboard by Emma Cassi remains so charming. Instead of buying a bulky upholstered headboard, drilling into walls, or spending a weekend wrestling lumber in the garage, Emma Cassi’s wallpaper headboard concept turns a simple sheet of wallpaper into a romantic, custom-looking focal point.
The project is clever because it borrows the silhouette of a traditional headboard while keeping the process light, affordable, and highly personal. Cassi, a London-based French jewelry designer and stylist, became known for seeing beauty in unexpected places, and this DIY reflects that eye. A piece of patterned wallpaper, carefully measured and cut into a graceful shape, can visually anchor the bed, add color, and make a plain wall feel designed rather than forgotten.
This guide explains how to create your own wallpaper headboard inspired by Emma Cassi’s approach, with practical steps, design ideas, renter-friendly alternatives, and real-world lessons from anyone who has ever tried to make a straight line on a wall while pretending not to panic.
What Is a Wallpaper Headboard?
A wallpaper headboard is a faux headboard created by applying wallpaper directly to the wall, a panel, or a removable backing behind the bed. Instead of using wood, metal, cane, or upholstery, the “headboard” is created with pattern, shape, and placement.
Emma Cassi’s version is especially memorable because it does not simply cover a rectangle on the wall. The design uses a curved, decorative outline that mimics the elegance of an antique headboard. The result feels handmade, soft, and artistic, almost like a painted mural but with the texture and charm of wallpaper.
This makes the project ideal for small bedrooms, rental apartments, guest rooms, dorm rooms, and anyone who wants a dramatic update without committing to heavy furniture. It is also a smart solution when your bed sits against a flat wall and needs visual height. The wallpaper adds architecture where there is none.
Why Emma Cassi’s Wallpaper Headboard Idea Works So Well
The beauty of this DIY project is that it uses design illusion in the best possible way. A real headboard adds structure, but it can also be expensive, heavy, and hard to move. A wallpaper headboard gives the eye a similar stopping point without taking up floor space.
It works especially well because the bed already creates the lower boundary. Once the wallpaper shape begins just above the mattress or behind the pillows, the brain happily accepts it as a headboard. Interior design is full of little magic tricks like this. Some involve mirrors. Some involve lighting. This one involves sticky paper and confidence.
The project also lets you choose a pattern that expresses your room’s personality. Florals create a vintage cottage look. Stripes feel crisp and tailored. Botanical prints add softness. Geometric wallpaper can make the bed feel modern and architectural. A scenic mural can turn the room into a tiny boutique hotel, minus the mysterious minibar charges.
Materials You Will Need
Before starting your DIY wallpaper headboard, gather your supplies. Having everything nearby prevents that classic DIY moment where you are balancing wallpaper with one elbow while searching for scissors under a pillow.
- Wallpaper, removable wallpaper, or traditional wallpaper with adhesive
- Measuring tape
- Pencil
- Eraser
- Large paper or kraft paper for making a template
- Scissors or a sharp utility knife
- Metal ruler or straight edge
- Level
- Smoothing tool or plastic scraper
- Painter’s tape
- Wallpaper paste if using traditional wallpaper
- Clean cloth and mild cleaner for wall prep
If you are renting, consider peel-and-stick wallpaper or apply the wallpaper to a thin removable panel, foam board, or lightweight plywood instead of directly to the wall. This gives you the look without triggering your landlord’s dramatic villain origin story.
Step-by-Step Guide: How to Make a DIY Wallpaper Headboard
Step 1: Measure Your Bed and Wall
Start by measuring the width of your bed. A wallpaper headboard usually looks best when it is slightly wider than the mattress. For example, if you have a queen bed that is about 60 inches wide, consider making the headboard 64 to 68 inches wide. This small overhang creates a more intentional, balanced look.
Next, decide how tall you want the headboard to be. A lower shape feels subtle and cozy, while a tall shape adds drama. For most bedrooms, a height of 42 to 56 inches from the floor works well, depending on the mattress height, pillows, and ceiling height.
Step 2: Choose the Shape
Emma Cassi’s wallpaper headboard has a curved, decorative silhouette. You can create a similar look with a rounded top, scalloped corners, or a soft arch. If you prefer a modern style, try a simple rectangle, half-circle, or oversized arch.
Draw your shape on paper first. Fold the paper in half vertically before drawing one side of the headboard shape. When you cut it out and unfold it, both sides will match. This is the easiest way to avoid creating a headboard that looks like it had an argument with geometry.
Step 3: Make a Full-Size Template
A full-size template is worth the extra time. Tape kraft paper or several sheets of paper together, draw the final headboard shape, and place it behind your bed. Step back and look at the proportions. Does it feel too short? Too wide? Too fancy? Not fancy enough?
This is the moment to adjust the design. Once wallpaper is cut, especially patterned wallpaper, changes become more annoying. A template lets you test the size before making the commitment.
Step 4: Prep the Wall
Wallpaper performs best on a smooth, clean, dry surface. Wipe the wall with a mild cleaner and let it dry completely. Remove dust, lint, and any small bumps. If the wall has nail holes or rough patches, fill and sand them before applying wallpaper.
Fresh paint should cure before wallpaper is applied. Many wallpaper manufacturers recommend waiting several weeks after painting, especially for peel-and-stick products. This helps the adhesive bond properly and reduces the risk of paint lifting during removal.
Step 5: Plan the Pattern Placement
Pattern placement is where this project can go from “cute DIY” to “designer moment.” Lay your wallpaper on the floor and study the repeat. If the wallpaper has flowers, birds, medallions, or stripes, decide what should appear in the center of the headboard.
For a symmetrical look, center the main motif above the bed. For a relaxed cottage style, the pattern can feel more casual. If using multiple wallpaper pieces, make sure the seams line up. Pattern matching is not glamorous, but neither is staring at a chopped-off flower every night for three years.
Step 6: Trace and Cut the Wallpaper
Place your template over the wallpaper and trace the shape lightly on the back. If you are using traditional wallpaper, account for seams and pattern repeats. If you are using peel-and-stick wallpaper, avoid removing the backing until you are ready to install.
Cut slowly with sharp scissors or a utility knife and metal ruler. For curves, scissors may be easier. For straight sections, a utility knife creates a crisp edge. Work on a protected surface so you do not accidentally carve your dining table into an abstract sculpture.
Step 7: Mark the Wall
Use a level and pencil to mark the center point above your bed. Then mark the outer edges and top height of the headboard. Painter’s tape can help you visualize the placement before applying wallpaper.
Do not assume your ceiling, floor, or bed frame is perfectly straight. Homes have personalities. Some of those personalities include crooked corners. A level helps the wallpaper headboard look intentional even when the room itself is doing interpretive dance.
Step 8: Apply the Wallpaper
If using peel-and-stick wallpaper, peel back only a small section of the backing at first. Align the top or center edge with your pencil guide, then smooth outward with a scraper or smoothing tool. Continue peeling the backing slowly while pressing the paper onto the wall.
If using traditional wallpaper, apply adhesive according to the product instructions. Smooth from the center outward to remove bubbles. Wipe away excess paste carefully. Work patiently, especially around curves and seams.
Step 9: Smooth Bubbles and Finish the Edges
Small air bubbles can usually be pushed toward the edge with a smoothing tool. For stubborn bubbles, gently lift and reapply the paper if the product allows it. Avoid stretching peel-and-stick wallpaper, because stretched material can shrink back later and reveal gaps.
Once the wallpaper is fully applied, inspect the edges. If a corner lifts, press firmly with a clean cloth. Some DIYers add thin trim, molding, or painted edging around the wallpaper shape for a framed effect. This can make the project look more polished, especially if your cutting skills are more “enthusiastic” than “surgical.”
Design Ideas for a Wallpaper Headboard
Romantic Floral Headboard
A floral wallpaper headboard is closest in spirit to Emma Cassi’s soft, decorative style. Choose vintage roses, trailing vines, or small-scale botanical prints for a charming bedroom. Pair it with white bedding, linen pillows, and warm lighting for a calm, layered look.
Modern Arch Headboard
An arch-shaped wallpaper headboard feels fresh and simple. It works beautifully with solid-colored peel-and-stick wallpaper, terrazzo prints, abstract patterns, or muted geometric designs. The arch shape adds softness while keeping the room modern.
Panel-Style Wallpaper Headboard
If you want a more structured design, create a rectangular wallpaper panel behind the bed and frame it with narrow molding. This gives the effect of a custom wall panel. It is especially effective with grasscloth-style wallpaper, linen textures, or subtle stripes.
Scalloped Cottage Headboard
A scalloped top edge adds playful charm. This shape works well in children’s rooms, guest rooms, and cheerful cottage-style bedrooms. Use a plate or bowl to trace even scallops on your template before cutting.
Common Mistakes to Avoid
The first mistake is choosing wallpaper before measuring. Always measure first so you know how many rolls or panels you need. Buy a little extra for pattern matching, mistakes, and future touch-ups.
The second mistake is applying wallpaper to a dirty or textured wall. Dust, bumps, and uneven paint can cause peeling or visible imperfections. A wallpaper headboard is simple, but simple does not mean “slap it up during a commercial break.”
The third mistake is ignoring scale. A tiny pattern may disappear from across the room, while an oversized print may look awkward if the headboard shape is small. Tape a sample to the wall and view it from the doorway before committing.
The fourth mistake is rushing the cut. Curved edges define the final look, so cut slowly. If possible, practice on scrap paper first. Your future self, lying in bed and admiring the result, will thank you.
Renter-Friendly Options
For renters, removable wallpaper is the safest starting point. Look for peel-and-stick products designed for clean removal, and always test a small area first. Avoid applying wallpaper over fragile paint, rough plaster, or damp surfaces.
Another smart option is to apply wallpaper to foam board or lightweight plywood and mount the panel with removable strips. This creates a portable headboard that can move with you. It also allows you to work flat on the floor rather than directly on the wall, which is helpful if your arms get tired or your patience has a short battery life.
You can also create a temporary headboard using wallpaper decals, wall arches, or removable mural panels. These products offer the same visual impact with less cutting and measuring.
How to Style the Bed Around Your Wallpaper Headboard
Once the wallpaper headboard is installed, keep the bedding balanced. If the wallpaper is bold, choose simple sheets and solid pillows. If the wallpaper is subtle, add texture with quilts, linen, velvet, or woven throws.
Lighting matters, too. Wall sconces, table lamps, or pendant lights can frame the headboard and make it feel more permanent. Small bedside tables help anchor the composition. Artwork above the wallpaper can work, but keep it light and intentional so the wall does not feel crowded.
Color repetition is the secret to a finished look. Pull one or two colors from the wallpaper and repeat them in pillows, throws, lampshades, or curtains. This makes the headboard feel connected to the room rather than randomly invited to the party.
Extra Experience Notes: What This DIY Teaches You
The first experience most people have with a DIY wallpaper headboard is surprise. It is surprising how quickly a plain bedroom can change. Before the project, the bed may look like it is simply parked against a wall. Afterward, the same bed suddenly looks styled, deliberate, and more expensive than it really is.
The second lesson is that preparation is not boring; it is protective. Making a template may feel unnecessary when you are excited to see the final result, but it prevents awkward proportions. In real rooms, the height of pillows, the thickness of the mattress, and the width of nightstands all affect how the headboard looks. A paper mockup gives you a preview before the wallpaper becomes permanent, semi-permanent, or emotionally permanent because you are too tired to redo it.
Another useful experience is learning how much pattern affects mood. A bedroom is not just a place to sleep; it is the first and last room you see every day. A busy print may energize the space, while a softer floral or muted botanical can make it feel restful. If you are unsure, order samples and tape them behind the bed for a few days. Notice how they look in morning light, evening light, and that strange midnight lighting when you are looking for your phone charger.
The project also teaches patience with seams. Matching wallpaper patterns can be oddly satisfying, like solving a puzzle that sticks to your fingers. Start from the center when possible and work outward. This keeps the most visible area behind the pillows looking balanced. If the pattern does not line up perfectly near the lower edges, pillows and bedding will often hide small imperfections. DIY is not about achieving museum-level perfection; it is about creating a room that feels loved, useful, and personal.
One practical tip from experience is to avoid installing wallpaper when you are tired. Wallpaper senses weakness. Start when the room is clean, the wall is dry, and you have enough time to move slowly. Play music, keep a sharp blade nearby, and step back often. The best results come from checking your progress rather than charging ahead like a decorating superhero with no cape and questionable lighting.
Finally, this DIY is a reminder that style does not always require buying more furniture. Sometimes, the smartest design move is flat, flexible, and made from paper. Emma Cassi’s wallpaper headboard idea works because it celebrates imagination over expense. It gives a bedroom a focal point, a story, and a bit of handmade charm. And if your first attempt has a tiny bubble or two? Congratulations. That is not failure. That is proof a human made it.
Conclusion
A DIY wallpaper headboard inspired by Emma Cassi is one of the most creative ways to refresh a bedroom without a major renovation. With careful measuring, a thoughtful template, clean wall prep, and the right wallpaper pattern, you can create a custom focal point that looks artistic, stylish, and personal.
This project is budget-friendly, space-saving, and flexible enough for renters or homeowners. Whether you choose a romantic floral, a modern arch, a framed panel, or a playful scalloped design, the goal is the same: make the bed feel finished and make the room feel like yours. Best of all, you do not need advanced carpentry skills, power tools, or a heroic tolerance for sawdust. You just need wallpaper, patience, and a willingness to trust the process.
Note: Always follow the wallpaper manufacturer’s installation and removal instructions, especially for peel-and-stick products, freshly painted walls, textured surfaces, and rental spaces.
SEO Tags