
Tying a rope on a pole sounds like one of those skills people assume they will magically know when the moment arrives. Then the moment arrives, the rope slips, the pole laughs silently, and suddenly your “secure setup” looks like modern art. The good news is that learning how to tie a rope on a pole is not complicated. You just need a few reliable rope techniques, a little practice, and the wisdom to stop trusting random knots that look confident but behave like quitters.
Whether you are securing a tarp, tying a line to a post, making a temporary shelter, setting up camp, or fastening gear in the backyard, the best method depends on what you want the rope to do. Do you need a quick temporary hold? A strong knot that handles strain well? A loop that will not shrink? An adjustable line? This guide breaks it down into eight simple steps so you can choose the right knot, tie it cleanly, and avoid the classic “I thought that would hold” speech.
Why Knowing How to Tie a Rope on a Pole Actually Matters
A rope tied to a pole is one of the most common setups in camping, boating, scouting, yard work, emergency prep, and DIY projects. You might tie a line to a porch post, fence post, dock piling, tent pole, tree-sized support, or metal stake. In each case, the goal is the same: keep the rope from slipping, avoid damaging the line, and make the knot easy enough to untie later without summoning a power tool.
That last part matters more than people think. A knot that is impossible to untie after being loaded is not “extra secure.” It is just rude.
Step 1: Know What Job the Rope Needs to Do
Before you tie anything, decide what success looks like. This is the step most people skip, usually because they are in a hurry and the pole is just standing there looking available. But the best knot for one job can be a poor choice for another.
Common goals when tying rope on a pole
- Temporary hold: Great for quick setups, light loads, and situations where you want to untie the rope fast.
- Secure under load: Better for mooring, shelter lines, tied-down gear, or anything that may be pulled hard.
- Fixed loop around the pole: Useful when you want a loop that stays the same size.
- Adjustable tension: Helpful for tarps, guylines, and lines that may need tightening later.
If you only remember one idea from this article, make it this: the “right” knot is the one that matches the job. Rope work is less about knot trivia and more about function.
Step 2: Pick the Right Rope and Check the Pole
Not all rope behaves the same way. Slick synthetic rope can slide more than rougher natural-fiber rope. Stiff rope can be harder to dress neatly. Very thin cord can bite into your hands, while oversized rope can feel like wrestling a sleepy python.
What to check before tying
- Look for frayed or damaged rope.
- Make sure the pole is stable and not rotten, loose, or sharp-edged.
- Check whether the pole is smooth, wet, painted, or icy, because that affects grip.
- Leave enough working end, or tail, to finish the knot properly.
A very common beginner mistake is leaving a tail so short that the knot looks finished but is basically held together by optimism. Give yourself room to work. Rope loves options.
Step 3: Start with a Simple Wrap Around the Pole
Before you tie the final knot, pass the rope around the pole in the direction that makes sense for the pull. This sounds obvious, but the direction matters. If the standing part of the rope will pull down and away, the knot should be positioned so the tension helps snug it rather than twist it into nonsense.
In many real-life setups, one wrap around the pole is enough to begin. For heavier strain, adding a full round turn gives you more friction before the finishing hitches are tied. That friction helps control the load and keeps the rope from slipping while you work.
Think of the first wrap as your handshake with the pole. A good handshake is firm, clear, and not weird.
Step 4: Use a Clove Hitch for a Fast, Handy Attachment
If you need a quick way to tie a rope to a pole, the clove hitch is one of the easiest and most useful options. It is popular in scouting, lashings, and general utility work because it is fast to tie and easy to adjust before tightening.
When a clove hitch works best
- Starting or finishing lashings
- Fast temporary attachment to a post or pole
- Situations where speed matters more than maximum long-term holding power
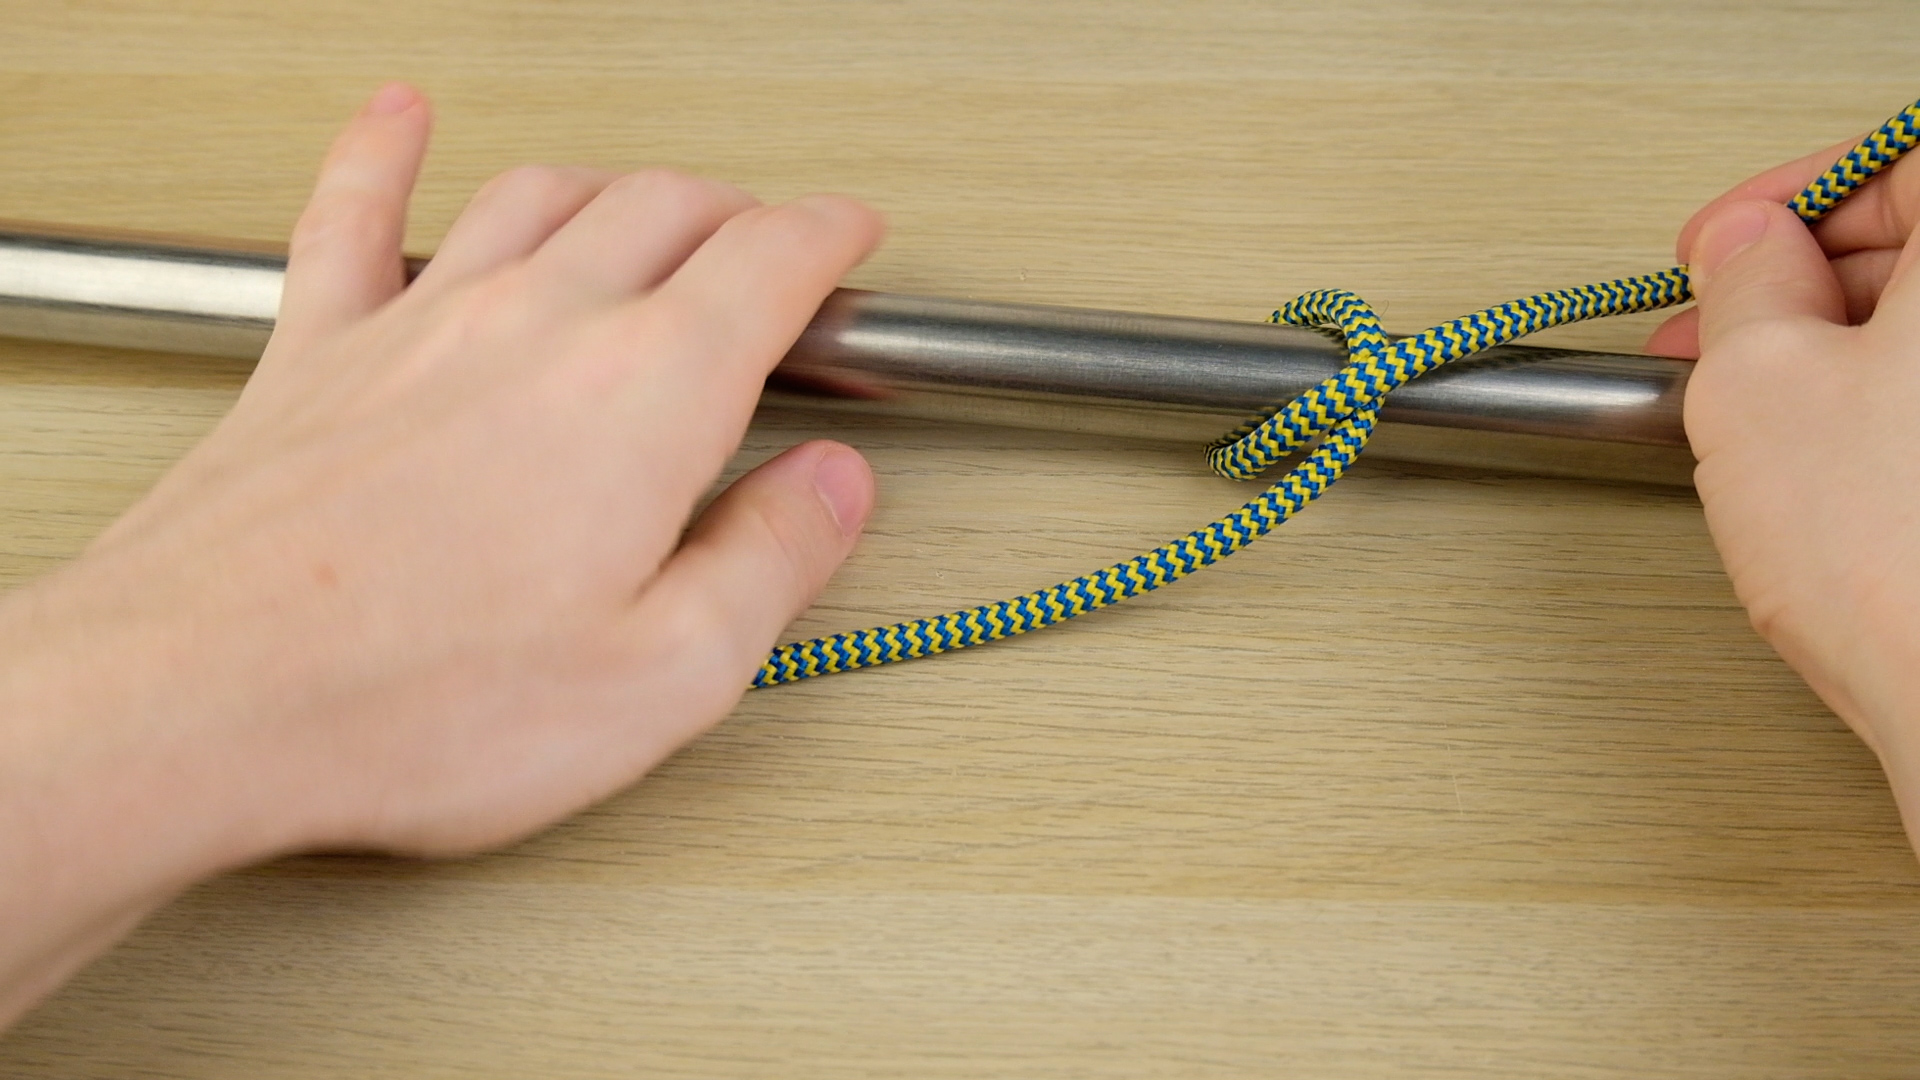
How to tie a clove hitch on a pole
- Wrap the rope around the pole once.
- Cross over the standing part and wrap around the pole again.
- Tuck the working end under the second wrap.
- Pull both ends to snug the knot neatly against the pole.
A clove hitch is wonderfully efficient, but it is not always the hero of the story. On smooth poles, with shifting loads, or when left under tension for a long time, it may need backup. That is why many people add an extra half hitch for insurance. Because sometimes the knot is fine and sometimes the pole is suspiciously polished like it is planning something.
Step 5: Choose Round Turn and Two Half Hitches for Better Holding Power
If you want one of the easiest and most dependable ways to tie a rope to a pole, round turn and two half hitches is a top choice. It is especially useful when the rope will carry a load or remain in place for a while. The round turn creates friction, and the two half hitches lock the line onto the standing part.
Why this knot is so practical
- It handles strain well.
- It is easier to untie than many tighter jam-prone knots.
- It works for posts, rings, rails, and mooring points.
- It is beginner-friendly but still genuinely useful.
How to tie it
- Pass the rope around the pole twice, making a full round turn.
- Bring the working end across the standing part.
- Make one half hitch around the standing part and snug it down.
- Make a second half hitch in the same direction.
- Dress the knot so the wraps lie neatly and the hitches sit cleanly together.
This is often the best answer when someone asks how to tie a rope securely to a post. It gives you more control than a basic clove hitch and more stability when the load pulls steadily. If the line will be under serious tension, this knot is usually a smarter move than improvising a mystery knot that looks like a pretzel with self-esteem issues.
Step 6: Use a Bowline When You Need a Fixed Loop Around the Pole
Sometimes you do not want the rope tied directly with hitches. You want a loop that stays the same size, slips over or around the pole, and holds without cinching tighter. That is when the bowline earns its reputation.
Best uses for a bowline on a pole
- Creating a fixed loop around a post or ring
- Fastening a line where easy untying matters
- Situations where a non-slipping loop is more useful than a gripping hitch
Simple bowline method
- Make a small loop in the standing part of the rope.
- Pass the working end through the loop from underneath.
- Wrap it around the standing part.
- Bring it back down through the loop.
- Pull tight to form a fixed loop.
- Place that loop around the pole and snug it into position.
The bowline is famous because it creates a dependable loop that does not tighten under load like a noose. That makes it excellent for many utility tasks. Still, it is not the best solution for every constantly shifting or heavily loaded scenario. A lot of rope work is about knowing what not to force a favorite knot to do.
Step 7: Add Tension or Adjustability When the Setup Needs It
Sometimes tying a rope on a pole is only part of the job. You also need the line to stay taut. This is common when setting up tarps, clotheslines, shade canopies, and ridge lines. In that case, the pole connection may be one knot, while the tensioning system uses another.
Good options for adjustable setups
- Taut-line hitch: Great for guy lines because it slides when adjusted and grips when loaded.
- Trucker’s hitch: Excellent for creating mechanical advantage and pulling a line tight.
A smart setup might use a bowline or round turn and two half hitches at the pole, then a taut-line hitch farther down the line for adjustment. That combination is especially handy for camping because weather changes, fabric stretches, and the universe enjoys loosening tarps right before bedtime.
Example
Let’s say you are tying a shelter line to a porch post. You could secure one end with round turn and two half hitches, run the rope out to your tarp, and use an adjustable hitch on the other side. That gives you a solid anchor and an easy way to retighten the line after wind or rain.
Step 8: Dress, Tighten, Test, and Leave a Safe Finish
This is the final step, and it separates a reliable knot from a decorative accident. “Dressing” a knot means arranging the wraps and turns neatly before fully tightening it. A messy knot may still hold, but a well-dressed knot is easier to inspect, stronger in practice, and usually easier to untie later.
Your final knot check
- Make sure the wraps sit flat instead of crossing randomly.
- Check that both half hitches were tied in the same direction when required.
- Leave an adequate tail on the working end.
- Pull on the standing part firmly to test the knot before trusting it.
- Remove excess slack and make sure no loose line creates a tripping or snagging hazard.
If the knot slips during the test, do not negotiate with it. Retie it. Rope gives very honest feedback. If something looks wrong, it probably is wrong.
Best Knot Choices for Common Pole-Tying Situations
For a quick temporary tie
Use a clove hitch. It is fast, convenient, and perfect for light-duty or short-term jobs.
For a stronger all-around attachment
Use round turn and two half hitches. This is often the best blend of security, control, and simplicity.
For a fixed loop around the pole
Use a bowline. It is ideal when you need a stable loop that does not cinch tighter.
For lines that need retightening
Pair the pole knot with a taut-line hitch or trucker’s hitch elsewhere in the system.
Mistakes to Avoid When Tying Rope on a Pole
- Using the wrong knot for the job: Fast does not always mean secure.
- Too little tail: A knot with no tail is basically a cliffhanger.
- Messy dressing: Twisted wraps reduce reliability and make inspection harder.
- Ignoring load direction: The rope should pull in a way that helps the knot hold.
- Trusting one test-free knot: Always tug before you trust.
- Leaving dangerous loose rope: Extra line should be managed, not left waiting to trip somebody.
Real-World Experience: What Actually Happens When You Tie Rope on a Pole
Experience teaches things that diagrams do not. On paper, most knots look clean and noble, like they graduated at the top of rope college. In real life, you are often tying with cold fingers, damp rope, fading daylight, and one friend saying, “I think that’s fine,” while contributing absolutely nothing useful.
One of the first lessons people learn is that a quick knot and a good knot are not always the same thing. A clove hitch feels amazing when you need speed. It is fast, tidy, and satisfying. But if the pole is slick or the load keeps shifting, you quickly discover why experienced campers, scouts, and boaters love round turn and two half hitches. That extra friction from the round turn makes a huge difference. It buys you control while tying, and control is everything when the rope is under strain.
Another real-world lesson is that rope behaves differently outdoors than it does in your living room. Dry practice cord is cooperative. Wet rope can be stubborn. Stiff rope may resist neat turns. Thin utility cord can cut into your fingers when you cinch hard. Poles vary too. A rough wooden post grips better than a smooth metal pipe, and a painted railing can be slick enough to humble an overconfident beginner in about four seconds.
People also learn that knot failure is often not dramatic. It is sneaky. The line does not explode loose like in the movies. It slowly creeps. The tarp sags. The bundle leans. The tied-down item shifts an inch, then another. That is why testing matters so much. A strong pull right after tying tells you whether the knot is truly set or just pretending to be an adult.
There is also the matter of untying. Beginners often assume the tightest knot is the best knot. Then they come back later and spend ten minutes picking at a jammed lump with their fingernails. A useful knot is not only secure; it is practical. Good rope work balances holding power with the ability to release the line without starting a personal grudge against rope forever.
Perhaps the most valuable experience-based truth is this: repetition makes everything easier. The first few times you tie a clove hitch or bowline, it may feel like your hands are translating from another language. After a few rounds, the motions start making sense. After more practice, you stop memorizing steps and start recognizing structure. That is when knot tying becomes genuinely useful instead of weirdly theatrical.
So yes, learning to tie a rope on a pole is a practical skill. But it is also a confidence skill. Once you know which knot fits which job, simple outdoor tasks become smoother, safer, and less chaotic. And that, frankly, is a beautiful thing.
Conclusion
If you want an easy way to tie a rope on a pole, the simplest path is to match the knot to the task. Use a clove hitch for speed, round turn and two half hitches for dependable security, and a bowline when you need a fixed loop. Add an adjustable hitch when tension matters, dress the knot neatly, and test before trusting it. With those basics, you will handle most everyday rope-to-pole situations without panic, guesswork, or the ancient tradition of tying random loops and hoping for the best.