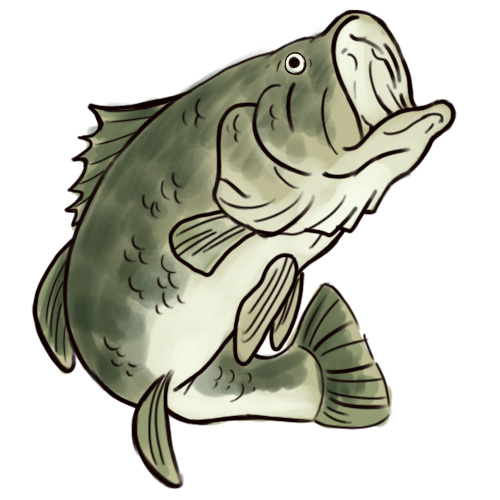

Learning how to draw a bass is a wonderfully sneaky art lesson. At first, it looks like you are simply sketching a fish with an impressive attitude problem. But the moment you study the body, fins, mouth, scales, and shadows, you are actually practicing shape construction, animal anatomy, proportion, line control, texture, and shading. Not bad for one fish, right?
In this guide, we are drawing a largemouth bass, one of the most recognizable freshwater fish in North America. It has a sturdy oval body, a bold horizontal side stripe, a large jaw that extends past the eye, a pale belly, and a dorsal fin that looks almost split into two sections. These features make it fun to draw because the silhouette is clear, the details are interesting, and the final sketch can look realistic without requiring you to become the Leonardo da Vinci of lake creatures overnight.
Grab a pencil, eraser, paper, and maybe a reference photo. A reference is not cheating; it is what artists use when their brain says, “I remember fish,” but their hand draws a potato with fins. Let’s build your bass drawing in six practical steps.
What You Need Before You Start
You do not need fancy supplies to create a good bass fish drawing. A regular graphite pencil works well, especially if you keep your early lines light. A kneaded eraser is helpful for soft corrections, but a standard eraser is perfectly fine. If you want to add stronger contrast, use a darker pencil such as a 2B or 4B for final shading.
For beginners, the most important tool is not the pencil. It is the habit of looking carefully. Bass have a long, slightly compressed body, a broad head, and a mouth that gives them that “I just swallowed a frog and have no regrets” expression. Notice the placement of the eye, the gill cover, the fins, and the lateral stripe before you begin.
How to Draw a Bass in 6 Steps
Step 1: Sketch the Main Body Shape
Start with a long oval or rounded football shape. This will become the main body of the bass. Keep the oval slightly thicker toward the front because largemouth bass have a broad head and muscular upper body. The tail end should narrow gradually, not suddenly, so the fish looks natural instead of like it was pinched by a cartoon crab.
Draw a light center guideline from the head area to the tail. This line helps you place the mouth, eye, lateral stripe, and tail in a smooth direction. A bass is not usually shaped like a perfect straight ruler. Give the body a gentle curve to make it feel alive, especially if you want your fish to look like it is swimming.
At this stage, avoid pressing too hard. Construction lines are temporary. Think of them as the scaffolding around a building. Useful now, awkward if you leave them forever.
Step 2: Add the Head, Jaw, and Mouth
Now shape the front of the fish. The largemouth bass is famous for its big mouth, so this area deserves attention. From the front of the oval, draw a sloping upper head line that leads down toward the mouth. Then sketch the lower jaw slightly forward and upward, creating a wide opening or closed mouth depending on your style.
If you are drawing the mouth closed, make the jawline extend behind the eye. This is one of the classic identification features of a largemouth bass. The mouth should look large but not ridiculous. Unless your goal is “bass that just saw its report card,” keep the expression natural.
Add a small round eye above the mouth line. Place it closer to the front of the head than the middle of the body. Then draw a curved gill cover behind the eye. The gill cover is important because it separates the head from the body and gives the drawing a believable fish structure.
Step 3: Draw the Tail and Fins
Next, add the tail fin, also called the caudal fin. A bass tail is usually slightly forked, so draw it like a soft “V” shape attached to the narrow back end of the body. Avoid making the tail too tiny. A fish uses its tail for movement, so it should look strong enough to push water.
Now add the dorsal fin along the top of the bass. Largemouth bass have a dorsal fin that appears almost divided into two sections: a spiny front portion and a softer rear portion. Sketch the front dorsal fin with short, firmer points, then continue into a smoother rear section. This detail instantly makes the fish look more like a bass and less like a generic goldfish wearing a serious face.
Add the pectoral fin on the side of the body just behind the gill cover. It should be small and rounded, angled slightly backward. Draw the pelvic fins along the lower front area and the anal fin closer to the tail on the underside. Keep these fins simple at first. You can refine their edges later.
Step 4: Refine the Outline and Proportions
Once the basic parts are in place, begin cleaning up the outline. Shape the back so it rises gently from the head and slopes toward the tail. Shape the belly so it is fuller near the front and tapers toward the rear. A largemouth bass often looks sturdy and athletic, like the gym teacher of freshwater fish.
Check the proportions before adding details. Is the head too small? Is the mouth large enough? Does the tail connect naturally? Are the fins placed in believable spots? This is the moment to fix problems while your drawing is still flexible.
Use your eraser to remove unnecessary construction lines. Keep the best outline and strengthen it gradually. Do not outline everything with the same heavy pressure. Realistic drawings look better when some lines are darker and some are softer. The shadow side, mouth, gill cover, and fin bases can be darker, while the belly and lighter areas can stay delicate.
Step 5: Add Bass Details, Scales, and the Side Stripe
Now comes the fun part: details. Draw the lateral stripe along the side of the bass. On a largemouth bass, this stripe is often made of dark blotches that connect into a rough horizontal band. Do not draw it as a perfectly straight marker line. Make it irregular, broken, and organic. Nature rarely uses a ruler, which is honestly very brave of nature.
Add subtle scale texture by using small curved marks or light overlapping strokes. You do not need to draw every scale unless you have several free hours and a dramatic playlist. Instead, suggest scales in key areas: along the side, near the stripe, and around the upper body. Keep the belly smoother and lighter.
Draw fin rays inside the fins using thin lines that follow the direction of each fin. The tail fin rays should spread outward from the base. The dorsal fin rays should rise upward. The pectoral and pelvic fins should have softer, shorter lines. These details make the fins feel flexible and translucent.
Add a few small marks around the mouth, lower jaw, and gill cover. Bass have strong facial structure, so these lines help create character. Just be careful not to overdo it. Too many random lines can make your bass look like it has been worrying about taxes.
Step 6: Shade and Finish the Drawing
Shading gives your bass drawing depth. Start by deciding where the light is coming from. A simple choice is light from above, which means the top of the fish will be darker and the belly will be lighter. This matches how many fish naturally appear: darker on top, pale underneath.
Shade the back with medium pencil pressure. Blend lightly if you want a smooth look, or use layered strokes if you prefer a sketchy natural style. Darken the lateral stripe and add shadow around the gill cover, under the jaw, at the base of the fins, and where the tail connects to the body.
Keep the belly light. This contrast between dark upper body and pale underside helps the bass look three-dimensional. Add a tiny highlight in the eye by leaving a small white spot. That one detail can make the fish look alive instead of like it is silently judging your sketchbook.
Finally, step back and review the whole drawing. Strengthen the most important lines, soften anything too harsh, and erase smudges. If you want a cleaner illustration, outline the final drawing with a fine pen after the pencil sketch is complete. If you prefer realism, keep the pencil texture and build more gradual values.
Common Mistakes When Drawing a Bass
Making the Body Too Round
A bass is not a beach ball with fins. It has a long, slightly deep body that narrows toward the tail. If your first sketch looks too circular, stretch the form horizontally and make the tail section more streamlined.
Forgetting the Big Mouth
The mouth is one of the most important bass features. If the jaw ends too early, the fish may look more like a smallmouth bass, bluegill, or general mystery fish. For a largemouth bass, let the upper jaw reach behind the eye.
Drawing Fins Like Flat Triangles
Fins have rhythm, curves, and rays. Instead of drawing stiff triangles, give each fin a natural edge and internal lines. The dorsal fin should feel connected to the body, and the tail should fan outward smoothly.
Using Too Many Scale Marks
Scale texture is useful, but too many identical marks can clutter the drawing. Suggest texture instead of describing every scale like you are filing a fish census report.
Easy Variations for Your Bass Drawing
Once you understand the basic method, you can create several versions of your bass. Draw a simple cartoon bass by exaggerating the mouth, eye, and tail. Make a realistic bass by using careful shading, accurate fin placement, and subtle scale texture. Create an action pose by curving the body and opening the mouth as if the fish is lunging toward a lure.
You can also add a background. A few weeds, bubbles, rocks, or water lines can turn a plain drawing into a small underwater scene. Keep the background lighter than the fish so the bass remains the star. Nobody came here to watch a dramatic rock steal the spotlight.
Tips to Make Your Bass Drawing Look More Realistic
Use reference photos whenever possible. Look at real bass from the side, because side-view references are easiest for beginners. Study where the fins attach, how the mouth angles, and how the dark stripe breaks into blotches. The more you observe, the less you have to guess.
Vary your line weight. Darker lines around the mouth, gill cover, and shadow areas create structure. Lighter lines along the belly and fin edges keep the drawing from looking flat. Also, shade in layers. It is much easier to darken a light area than to rescue a page after your pencil has gone full thunderstorm.
Finally, do not chase perfection. A good bass drawing does not need to look like a scientific illustration. It needs clear proportions, recognizable features, and confident marks. If the viewer can say, “That is definitely a bass,” you are doing well.
Experience Section: What Drawing a Bass Teaches You
Drawing a bass is one of those art exercises that seems simple until you actually begin. The first time many beginners try it, they sketch a basic fish outline, add a tail, draw a circle for the eye, and then pause. Something feels missing. The fish exists, technically, but it does not have the strong personality of a bass. That is where observation changes everything.
The biggest lesson is that a bass is built from contrasts. The back is darker and heavier. The belly is lighter and softer. The mouth is large, but the eye is relatively small. The body is smooth, but the fins have sharp rays and edges. Once you notice those contrasts, your drawing improves quickly.
One helpful experience is to sketch the bass several times in small thumbnails before making a final version. These quick drawings take the pressure off. In the first thumbnail, focus only on the body shape. In the second, focus on the mouth and head. In the third, exaggerate the fins. By the fourth attempt, your hand usually understands the fish better than it did at the start. This is not magic. It is repetition wearing a tiny artist hat.
Another useful habit is comparing your drawing to the reference upside down or from a distance. When you stare at the same drawing too long, your brain starts politely lying to you. It says, “Looks great,” even when the tail is too small or the mouth is floating in a strange direction. Turning the page or stepping back helps you see shapes instead of symbols.
Shading is often where a bass drawing becomes satisfying. The dark back, pale underside, and side stripe give you a natural value plan. You do not need to invent dramatic lighting. The fish already brings its own design. Start lightly, then darken slowly. The best bass drawings often have controlled contrast: strong shadows near the gill cover and mouth, medium tones across the upper body, and soft highlights along the belly.
Texture also teaches restraint. Beginners often want to draw every scale because scales are visible and therefore must be included, right? Not always. In drawing, suggesting detail can be stronger than explaining every detail. A few scale marks near the side stripe and upper body can tell the viewer everything they need to know. The viewer’s brain fills in the rest, which is convenient because the viewer’s brain works for free.
Drawing a bass also builds confidence in animal illustration. Fish are excellent practice subjects because they have clear silhouettes and recognizable parts. Once you can draw a bass, you can apply the same method to trout, perch, salmon, or even fantasy fish. Start with the main shape, place the head and eye, add fins, refine the outline, build texture, and shade with purpose.
The final experience worth remembering is this: your first bass drawing does not need to be your best one. Art improves through noticing. Maybe your first sketch has a strange tail. Good. Now you know to check the tail. Maybe the jaw looks too short. Great. Now you understand an important bass feature. Every mistake is a little signpost pointing toward the next improvement.
So draw the bass once. Then draw it again. Try one realistic, one cartoon, and one action pose. Before long, your sketchbook will have a small school of bass swimming across the pages, and at least one of them will look like it knows exactly where the best fishing spot is.
Conclusion
Learning how to draw a bass in 6 steps is really about learning how to see. Begin with simple shapes, build the head and jaw, place the fins correctly, refine the outline, add the famous side stripe, and finish with shading. The more carefully you observe the bass’s real features, the more convincing your drawing becomes.
Whether you are creating a school art project, a fishing-themed illustration, a nature journal page, or a just-for-fun sketch, this method gives you a clear path from blank paper to finished fish. Keep your pencil light at first, let the details arrive gradually, and remember: even a bass with a crooked fin is still better than a blank page.
Note: This article was created by synthesizing real fish anatomy references, bass identification details, and practical beginner drawing methods, then rewritten into original, web-ready instructional content.
SEO Tags