
A glass tile backsplash is one of those home upgrades that looks expensive, sparkly, and slightly intimidatinglike it belongs in a kitchen where someone casually owns copper cookware and fresh basil. The good news? You do not need a contractor’s truck, a reality TV camera crew, or a mysterious uncle named “Tony the Tile Guy” to pull it off. With patience, the right materials, and a plan that does not begin with “let’s just wing it,” you can install a glass tile backsplash that protects your walls and makes your kitchen or bathroom look instantly brighter.
Glass tile is popular because it reflects light, resists stains, and brings a clean modern finish to walls behind sinks, ranges, and countertops. But it also has a personality. Because many glass tiles are translucent, the adhesive behind them can show through. Because the surface is smooth, scratches are more obvious. Because the edges can chip, cutting requires care. In other words, glass tile is beautifulbut it appreciates respect.
This guide walks you through the full process: planning, tools, wall preparation, layout, cutting, setting, grouting, caulking, and cleaning. Whether you are installing glass subway tile, mosaic sheets, or a mixed-material backsplash, these steps will help you avoid the classic DIY backsplash disasters: crooked rows, visible trowel lines, tiny awkward tile slivers, and grout haze that appears to have signed a long-term lease.
Why Choose a Glass Tile Backsplash?
A backsplash is not just decorative. It protects drywall from water splashes, cooking grease, food stains, soap residue, and the occasional spaghetti sauce event that nobody wants to discuss. Glass tile works especially well in kitchens and bathrooms because it is nonporous, easy to wipe clean, and available in countless colors, shapes, and finishes.
Glass also brightens a room. A pale blue glass mosaic can make a small kitchen feel breezy. White glass subway tile can create a clean, timeless look. Iridescent tile adds movement and shine without requiring you to install a disco ball over the sinkalthough honestly, your kitchen, your rules.
The main tradeoff is installation sensitivity. Glass tile often requires white, high-performance, polymer-modified thin-set mortar instead of basic adhesive. Clear or translucent tile may reveal ridges, shadows, or uneven coverage behind the tile. That is why careful troweling, clean walls, and a smooth setting bed matter so much.
Tools and Materials You Will Need
Basic Tools
Before you begin, gather everything you need. Tile work becomes much less relaxing when you are standing in wet mortar searching for a missing spacer.
- Measuring tape
- Level or laser level
- Pencil or painter’s tape for layout marks
- Notched trowel recommended for your tile size
- Margin trowel
- Grout float
- Rubber float or beating block
- Tile spacers
- Utility knife for cutting mesh backing
- Wet saw with a glass tile blade or scoring cutter rated for glass
- Tile nippers for small adjustments
- Buckets, sponges, microfiber cloths, and clean water
- Caulk gun
- Safety glasses and cut-resistant gloves
Materials
- Glass tile or glass mosaic sheets
- White polymer-modified thin-set mortar approved for glass tile
- Grout approved for glass tile, often unsanded for narrow joints
- Color-matched caulk for corners and countertop joints
- Painter’s tape and drop cloths
- Outlet extenders if tile thickness changes outlet depth
- Grout sealer if recommended for your grout type
Always read the tile manufacturer’s installation instructions before buying mortar or grout. Glass tile is not a universal product. Some tiles have mesh backing, some are paper-faced, some have painted backs, and some require specific setting materials. The instructions are not decorative paperwork; they are your tile’s personal diary.
Step 1: Plan the Layout Before Touching Mortar
Good tile installation starts with planning, not with opening a bucket and hoping inspiration strikes. Measure the backsplash area from countertop to upper cabinets and from one side of the wall to the other. Multiply height by width to calculate square footage, then add about 10 percent extra for cuts, mistakes, and the tile piece that will somehow vanish into another dimension.
Dry-lay your tile on the countertop or floor. This means arranging sheets or individual tiles without adhesive so you can see how the pattern will land. Look closely at ends, corners, outlets, and the area behind the range. Try to avoid tiny slivers of tile at visible edges. If a row ends with a skinny piece, adjust the layout so both ends have larger, more balanced cuts.
For a professional look, establish a level starting line. Countertops are not always perfectly level, even when they look innocent. If the counter dips, starting directly from it can make the entire backsplash lean. Use a level to mark a straight reference line and plan for a small expansion gap between the tile and countertop. That gap will later be filled with caulk, not grout.
Step 2: Prepare the Wall Surface
Glass tile needs a clean, flat, stable surface. Grease, dust, old adhesive, peeling paint, or glossy residue can interfere with the bond. Wash the wall with a mild degreaser, rinse with clean water, and let it dry completely. If the wall is glossy, lightly scuff it with sandpaper so the mortar can grip. Patch holes or dents, then sand smooth.
If you are tiling over painted drywall in a dry backsplash area, the wall must be firmly attached and free of loose paint. If the area is very wet, damaged, or uneven, cement backer board may be a better substrate. Glass tile can crack if the surface behind it flexes, so do not install over loose panels or questionable drywall and simply hope the tile will “hold everything together.” Tile is not a therapist; it cannot fix underlying instability.
Remove outlet covers and switch plates. Turn off power to the work area before handling outlets. If outlets need to sit flush with the finished tile surface, install approved outlet extenders according to local electrical rules. When in doubt, ask a licensed electrician. A beautiful backsplash is great; surprise sparks are not part of the design plan.
Step 3: Protect Countertops and Cabinets
Cover countertops with cardboard, rosin paper, or a drop cloth. Tape the edges carefully so thin-set, grout, and tile chips do not sneak underneath. Protect cabinet edges and appliances with painter’s tape. Glass tile installation is not outrageously messy, but mortar has a gift for appearing exactly where you did not want it.
If your backsplash meets a range, sink, or window trim, take extra time taping around these transitions. Clean edges make the final caulk line look intentional instead of “I finished this at midnight and gave up.”
Step 4: Mix and Apply the Thin-Set Mortar
Use white thin-set mortar approved for glass tile. White mortar keeps translucent glass bright and consistent, while gray mortar can darken or muddy the color. Mix only as much as you can use within the product’s working time. Follow the manufacturer’s water ratio and mixing instructions. Too much water weakens the mortar; too little makes it hard to spread.
Apply mortar with the flat side of the trowel first to create a bond coat on the wall. Then use the notched side to comb the mortar in straight, even lines. For many glass tiles, especially translucent ones, the ridges should be flattened with the flat side of the trowel before setting the tile. This helps prevent visible trowel lines from showing through the glass.
Work in small sections. Mortar can skin over if left exposed too long, which reduces bond strength. If you touch the mortar and it does not transfer to your finger, scrape it off and apply fresh mortar. This is annoying, yes, but less annoying than tiles falling off later like tiny glass confetti.
Step 5: Set the Glass Tile
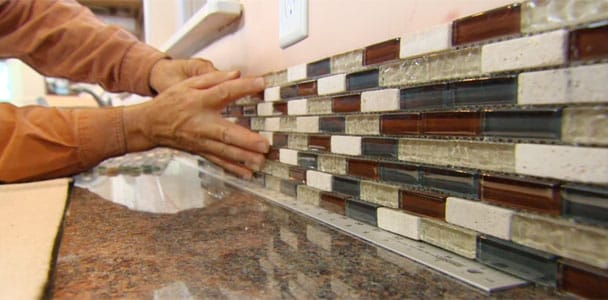
Press the first tile sheet or tile piece into the mortar using your layout line as a guide. Use spacers to maintain even joints. For mosaic sheets, check both the sheet spacing and the spacing between individual tiles. Sometimes sheets are mounted slightly unevenly, and if you do not catch it early, the wall may develop a “wavy handmade charm” you did not order.
Use a rubber float or beating block to gently press the tile into the mortar. Do not hammer directly on glass tile. The goal is full contact without cracking or shifting the tile. Periodically lift a tile or corner of a sheet to check mortar coverage. You want a consistent bond behind the tile, especially with glass because voids can show through.
Clean mortar from the tile face and grout joints as you work. Once thin-set hardens in the joints, removing it becomes a tiny archaeology project. A damp sponge, margin trowel, or utility knife can help keep joints clear, but be gentle around glass edges.
Step 6: Cut Glass Tile Carefully
Cuts are often the most intimidating part of installing a glass tile backsplash. For straight cuts, use a wet saw with a blade designed for glass tile. Go slowly and support the tile fully. Pushing too fast can chip the surface. For small notches around outlets, tile nippers or a scoring tool may help, depending on the tile style.
If you are working with mesh-mounted mosaic sheets, cut the mesh backing first with a utility knife. Then cut individual tiles only where needed. This is easier than trying to run an entire floppy sheet through a saw while it behaves like a wet lasagna noodle.
Place cut edges where they will be least visible, such as under cabinets, in inside corners, or behind outlet covers. Use trim pieces, metal edging, or finished end tiles where the backsplash stops in an open area. A clean edge makes the whole installation look deliberate.
Step 7: Let the Mortar Cure
After the tile is installed, allow the mortar to cure according to the product instructions. Many installations require at least 24 hours before grouting, but timing can vary based on mortar, tile, humidity, and temperature. Do not rush this step. Grouting too soon can disturb tile placement or trap moisture behind the glass.
Before grouting, inspect the wall. Check for crooked sheets, excess mortar, uneven joints, or loose tiles. Small corrections are easier before grout enters the chat.
Step 8: Grout the Backsplash
Choose grout approved for glass tile. Unsanded grout is often recommended for narrow joints and delicate glass surfaces because sanded grout can scratch some glass tiles. However, grout choice depends on joint width and manufacturer guidance, so confirm before you buy.
Mix grout to the recommended consistency, or use a premixed grout if approved for your tile. Apply grout with a rubber float held at an angle, working diagonally across the joints. Push grout fully into the spaces so there are no gaps or pinholes. Then hold the float more upright and scrape excess grout from the tile face.
Wait the recommended amount of time, then wipe the tile with a damp sponge. Use light pressure and rinse the sponge often. Too much water can weaken or wash out grout, so avoid turning the backsplash into a water park. After the haze dries, buff the tile with a clean microfiber cloth.
Step 9: Caulk the Edges and Transitions
Use caulk, not grout, where the backsplash meets the countertop, inside corners, cabinets, window trim, or other surfaces that may move slightly. Grout is rigid and can crack at these joints. Caulk remains flexible and creates a cleaner, more durable transition.
Apply a thin bead of color-matched caulk, smooth it with a damp finger or caulk tool, and remove painter’s tape before the caulk skins over. This small step has a huge visual payoff. A neat caulk line is like a good haircut for your backsplash: people may not know why it looks polished, but they will notice that it does.
Step 10: Clean and Maintain Your Glass Tile Backsplash
Glass tile is wonderfully easy to maintain. For everyday cleaning, use a soft cloth, warm water, and mild dish soap. For grease, use a non-abrasive cleaner suitable for glass and grout. Avoid harsh scrub pads, steel wool, and abrasive powders because they can scratch the tile or dull the finish.
Wipe cooking splatters promptly, especially near the range. Clean grout lines with a soft brush and mild cleaner. If your grout requires sealing, apply sealer after the grout has cured fully. Sealed grout resists stains better, which is helpful in a kitchen where coffee, tomato sauce, and mystery splashes regularly test your optimism.
Common Mistakes to Avoid
Using the Wrong Mortar
Do not assume any leftover adhesive in the garage is good enough. Glass tile often needs bright white, high-performance thin-set. The wrong adhesive can show through, fail to bond properly, or discolor the tile.
Skipping the Dry Layout
Dry layout prevents awkward cuts and crooked patterns. Ten minutes of planning can save hours of regret.
Leaving Trowel Ridges Behind Translucent Tile
With clear or translucent glass, visible ridges can ruin the look. Flatten the mortar ridges when recommended and aim for even coverage.
Overwashing Grout
A wet sponge is helpful. A dripping sponge is trouble. Too much water weakens grout and can leave blotchy color.
Grouting Movement Joints
Use caulk where surfaces change planes or meet countertops. Grout in these areas often cracks.
Real DIY Experience: What Installing a Glass Tile Backsplash Teaches You
The first thing you learn when installing a glass tile backsplash is that walls have secrets. A wall that looked perfectly straight yesterday may suddenly reveal waves, dips, and corners with the geometry of a funhouse. This is why layout matters so much. The best DIY approach is to treat the first hour as a planning session, not a race. Measure twice, dry-fit twice, and only then open the mortar. Your future self will be grateful, and your current self will feel suspiciously professional.
Another real-world lesson is that lighting changes everything. Glass tile can look different in morning light, under cabinet lighting, and at night when the kitchen bulbs are on. Before installation, hold a tile sample against the wall at different times of day. A tile that looks soft gray in the store may turn icy blue at home. That is not necessarily bad, but it is better to discover it before the wall is covered.
Outlets are also where many DIY dreams go to sweat. The tile around outlets must be planned carefully so the cover plate hides cuts without leaving gaps. Before setting tile, hold the outlet cover in place and mark where cuts can safely land. If a tile sliver near an outlet looks too fragile, shift the layout. A slightly adjusted pattern is better than a cracked piece staring at you every time you make toast.
Mortar management is another experience-builder. Beginners often spread too much mortar at once because it feels efficient. Then the phone rings, the dog barks, someone asks where the cereal is, and suddenly the mortar has skinned over. Work in small areas. Keep the bucket closed when possible. Clean as you go. Tile installation rewards calm, steady progress more than speed.
Cutting glass tile also teaches patience. A slow cut with the right blade usually looks cleaner than a rushed cut with brute force. Keep extra tile nearby, because even careful installers break pieces. This is not failure; it is tuition. Every DIY project charges a small fee in wasted material and humbled confidence.
Grouting is the moment the backsplash finally looks finished, but it is also the moment to slow down. Apply grout thoroughly, clean gently, and do not panic when the tile looks hazy at first. Haze is normal. Buffing after the grout firms up usually brings back the shine. The key is not to flood the surface while cleaning. Think “damp sponge,” not “kitchen monsoon.”
The final experience is pride. A glass tile backsplash changes the room in a way that feels bigger than the square footage involved. It reflects light, frames the countertop, and makes everyday cleaning easier. More importantly, every time you notice a straight grout line or a clean corner, you get the quiet satisfaction of knowing you did that. And if one tiny tile is slightly imperfect? Congratulations. That is not a flaw; that is your signature.
Conclusion
Installing a glass tile backsplash for your home is a manageable DIY project when you respect the details. Start with a solid layout, prepare the wall properly, choose the right white thin-set mortar, flatten ridges behind translucent tile, cut carefully, grout gently, and caulk movement joints for a clean finish. The process takes patience, but the reward is a bright, durable, easy-to-clean surface that upgrades your kitchen or bathroom without a full remodel.
Glass tile may be a little more demanding than basic ceramic tile, but it pays you back with shine, depth, and style. Take your time, follow product instructions, protect your surfaces, and remember: the backsplash does not need to be installed in one dramatic burst of weekend heroism. Slow, clean, careful work wins. Your wall will thank you, your kitchen will glow, and your friends may start asking when you became “the tile person.”