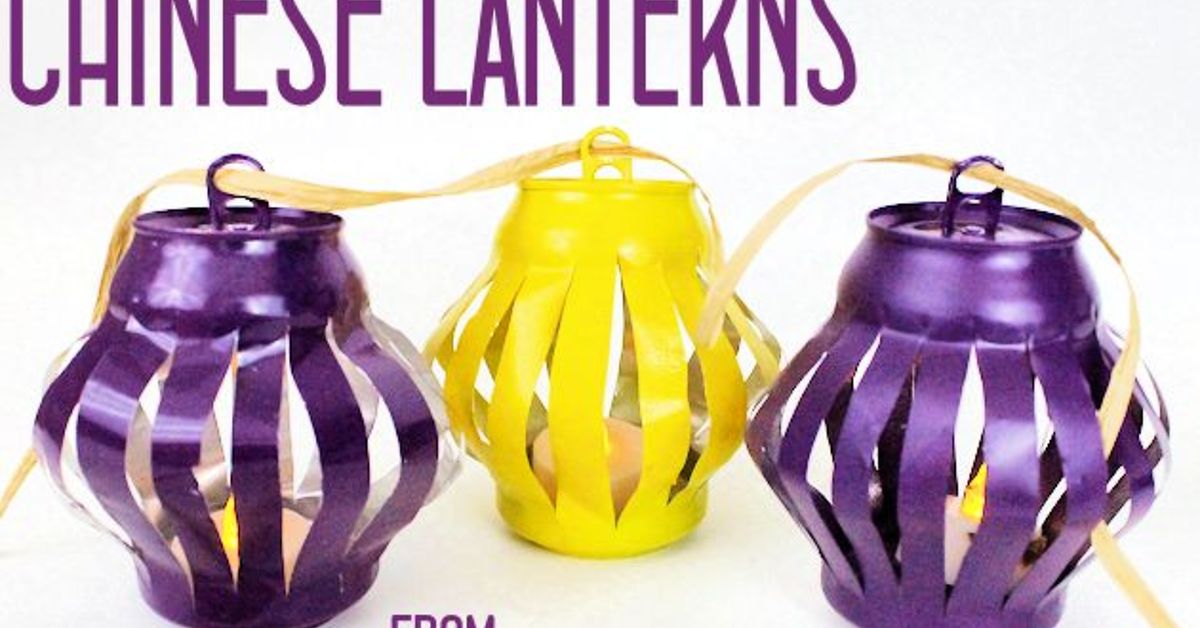

There are two kinds of people in this world: people who toss an empty soda can into the recycling bin without a second thought, and people who stare at it and think, “Hmm, that could become a tiny glowing masterpiece.” If you belong to the second groupor you are at least curious enough to visit their craft tablethis guide is for you.
Making Chinese-inspired lanterns from soda cans is a clever way to combine upcycling, home decor, cultural appreciation, and a little “I made this with my own hands” pride. Instead of buying another plastic decoration that disappears into a storage box for eleven months, you can turn a used aluminum can into a shimmering lantern that reflects light beautifully. The curved metal, the ridges, and even the original can shape help create a charming glow when paired with a battery-operated LED tea light.
Before we begin, let’s set one rule: this project should be handled with care. Aluminum cans can have sharp edges once opened or shaped, so adults should handle any cutting, piercing, or edge-smoothing. For homes with kids, pets, or forgetful adults who once left toast in the toaster for “just one more minute,” LED lights are the safest choice. The goal is a lovely lantern, not a dramatic visit from the fire department.
Why Soda Cans Make Surprisingly Beautiful Lanterns
Soda cans may look ordinary, but aluminum is a fantastic craft material. It is lightweight, reflective, flexible, and easy to shape with the right precautions. When a small LED light sits inside the can, the metal catches and bounces the glow, creating patterns that feel more sophisticated than the humble origin story suggests. Think of it as the Cinderella transformation of the recycling bin.
Traditional Chinese lanterns are often associated with celebration, good wishes, reunion, and the closing of Lunar New Year festivities during the Lantern Festival. While classic lanterns are usually made from paper, silk, bamboo, or wire frames, this soda can version is a modern recycled craft inspired by the lantern’s shape, warm light, and festive spirit. It is not meant to replace traditional craftsmanship; it is a creative, eco-friendly tribute that works beautifully for parties, patios, dorm rooms, craft fairs, and seasonal decorations.
Materials You Will Need
Gather your supplies before starting so the project feels fun instead of turning into a scavenger hunt through junk drawers, kitchen cabinets, and that one mysterious box labeled “miscellaneous.”
Basic Supplies
- Empty aluminum soda cans, rinsed and completely dry
- Battery-operated LED tea lights or mini LED string lights
- Permanent marker or washable marker
- Measuring tape or ruler
- Painter’s tape or masking tape
- Fine-grit sandpaper or a sanding sponge
- Protective gloves
- Scrap cardboard or a cutting mat
- Metal-safe craft scissors or tin snips, handled by an adult
- Hole punch, awl, or small metal punch, handled by an adult
- Thin craft wire, ribbon, or string for hanging
Decorative Supplies
- Acrylic paint or spray paint suitable for metal
- Paint pens in gold, red, black, or white
- Small adhesive gems or foil stickers
- Red ribbon, tassels, or cord
- Clear sealant for outdoor display
For a Chinese-inspired look, red and gold are classic color choices. Red often appears in Lunar New Year decorations because it is associated with joy, good fortune, and celebration. Gold adds warmth and a festive shine. That said, your lantern does not need to follow a strict palette. A silver can with tiny star-shaped holes can look dreamy. A matte black lantern with gold dots can look elegant. A bright turquoise lantern can say, “I am festive, but I also have opinions.”
Safety First: Read This Before You Craft
This project involves metal, and metal edges can be sharp. If you are making these lanterns with children or teens, let an adult prepare the can body and handle any cutting or piercing. Younger crafters can safely help with washing cans, choosing colors, drawing patterns, painting, adding ribbon, and placing LED lights inside after the lantern has been fully smoothed and checked.
Use battery-operated LED tea lights instead of real candles. Open flames can be risky around lightweight decor, paint, paper tassels, ribbons, curtains, tablecloths, and pets who believe every object exists for scientific investigation. LEDs give you the glow without the worry. Choose LED lights with secure battery compartments, especially if small children may be nearby.
Step-by-Step Guide: How to Make Chinese Lanterns From Soda Cans
Step 1: Clean and Dry the Can
Rinse the soda can thoroughly with warm water and a drop of dish soap. Sticky soda residue is not part of the design plan, and it can attract insects if the lantern is displayed outdoors. Let the can dry completely upside down. If moisture remains inside, it can interfere with painting and make your craft table smell like a forgotten vending machine.
Step 2: Plan the Lantern Design
Decide whether you want your lantern to stand on a table or hang from a hook. A standing lantern can keep the can’s bottom intact and use the top opening for placing the LED light. A hanging lantern may need two small holes near the rim for wire or ribbon. Keep the structure simple for your first attempt.
Sketch your pattern on paper before marking the can. Common lantern patterns include vertical slits, small punched dots, crescent shapes, floral motifs, stars, simple geometric lines, or a repeating wave pattern. For a Chinese-inspired design, consider cloud shapes, plum blossoms, simple lattice patterns, or a band of red and gold around the top and bottom.
Step 3: Mark Your Guidelines
Wrap a strip of painter’s tape around the can near the top and another near the bottom. These strips act like borders and help keep your design neat. Use a ruler to mark evenly spaced vertical lines between the two tape borders. If you prefer a punched-light design, mark small dots instead of long lines.
Spacing matters. If the lines are too close together, the can may become flimsy. If they are too far apart, the lantern may look less delicate. A balanced design usually leaves enough metal between openings for the can to hold its shape.
Step 4: Have an Adult Cut or Punch the Openings
This is the part where caution deserves the spotlight. An adult should use appropriate metal-safe tools to create the marked openings while wearing protective gloves and working on a stable surface. For a slit lantern, the adult can carefully open the marked lines. For a dotted lantern, the adult can use a small metal punch to create light holes.
Avoid making large jagged openings. Small, controlled openings create a cleaner look and reduce the risk of weak spots. After the openings are made, gently press the can to encourage the lantern shape. Some designs bow outward slightly, giving the piece a rounded, traditional lantern silhouette.
Step 5: Smooth Every Edge
Do not skip this step. Smooth all cut or punched areas with fine-grit sandpaper or a sanding sponge. Check the lantern carefully with gloved hands. If any edge feels sharp, rough, or snaggy, sand it again. The finished lantern should be decorative and safe to handle, not a tiny metal dragon waiting to bite.
Step 6: Paint the Lantern
Once the can is clean, dry, shaped, and smooth, it is time for the makeover. Apply a thin coat of metal-friendly primer if you want strong paint coverage. Then add acrylic paint or spray paint in light coats, letting each coat dry before adding the next. Red is a timeless choice for festive lanterns, while gold details can highlight the punched or cut pattern.
For a more refined look, paint the whole can red, then use a gold paint pen to outline the top and bottom borders. Add tiny dots, blossoms, or curved lines. You can also leave parts of the aluminum exposed for a reflective silver accent. The best designs usually balance color and shine rather than burying the metal completely.
Step 7: Add a Handle or Hanging Loop
If your lantern will hang, thread thin craft wire, ribbon, or strong string through two small holes near the top rim. Make sure the holes are smooth before adding the hanger. A red cord with a small tassel can give the lantern a festive finish. For a tabletop lantern, you can skip the handle and place the piece directly on a flat surface.
Step 8: Place the LED Light Inside
Set a battery-operated LED tea light inside the can. Turn off the room lights and admire your work. This is the moment when the soda can stops being a soda can and starts acting like it has always belonged in a cozy evening display.
If the glow is too dim, try a brighter LED or enlarge the design slightly on your next lantern. If the light is too harsh, use a warm white LED instead of cool white. Warm light usually feels softer and more lantern-like.
Design Ideas for Soda Can Chinese Lanterns
Classic Red and Gold Lantern
Paint the can red and add gold trim around the top and bottom. Use small punched dots or vertical openings to let the light shine through. Add a red tassel underneath for a traditional-inspired finish.
Plum Blossom Lantern
Paint the can deep red or soft pink. Use a paint pen to draw simple branches and five-petal blossoms. Punched holes in the center of each flower can create a lovely glowing effect.
Modern Minimalist Lantern
Keep the aluminum surface silver and add only a black or gold geometric pattern. This version looks great on a modern patio table or bookshelf.
Festival Cluster Lanterns
Make several lanterns in different heights and colors. Group them on a tray with LED lights inside. Use red, gold, orange, and metallic silver for a layered festive display.
Where to Display Your Finished Lanterns
Soda can lanterns work best in places where they can glow safely without being bumped, rained on, or treated like toys. Place them on a mantel, dining table, balcony shelf, covered porch, or party buffet. If you hang them outdoors, keep them under cover and bring them inside after use, especially if they are painted or decorated with ribbon.
For Lunar New Year, these lanterns can be part of a larger display with paper cuttings, oranges, red envelopes, flowers, or a festive table runner. For everyday decor, a single lantern can become a charming nightstand accent or meditation corner light. For parties, a row of matching lanterns can make a snack table look intentionally styled, even if the snacks are just chips in a bowl. Presentation is powerful.
Common Mistakes to Avoid
Using Real Candles
Real candles may seem traditional, but they are not the best choice for soda can crafts. Aluminum conducts heat, decorations can catch fire, and lightweight lanterns can tip. Use LEDs instead.
Skipping Edge Smoothing
Sharp edges are the fastest way to turn a relaxing craft into a regrettable afternoon. Smooth every edge thoroughly and inspect the lantern before use.
Painting Too Thickly
Heavy paint can drip, peel, or clog tiny light holes. Thin coats look cleaner and dry more evenly.
Overcomplicating the First Design
Your first lantern does not need dragons, clouds, a full moon, and a tiny opera scene. Start with clean vertical lines or dots. Once you understand how the material behaves, try more detailed designs.
Eco-Friendly Benefits of Upcycled Soda Can Lanterns
Upcycling is not just a cute word that craft bloggers sprinkle around like glitter. It is a practical way to extend the life of materials before they are recycled or discarded. Aluminum cans are already highly recyclable, but turning one into decor gives it another chapter before it returns to the recycling stream. It also helps people think differently about everyday packaging.
This craft is especially useful for classrooms, community workshops, sustainability events, and family craft nights. It teaches design, reuse, patience, and safety awareness. It also proves that attractive decor does not always require expensive supplies. Sometimes it starts with rinsing out a can of sparkling water and saying, “You, my fizzy friend, have potential.”
Experience Notes: What I Learned Making Soda Can Lanterns
The first thing you learn when making Chinese-inspired lanterns from soda cans is that the can has a personality. It looks simple, but the moment you start planning a design, you realize the curve matters, the ridges matter, and the original branding can either be hidden or cleverly included. My first attempt was too ambitious. I wanted perfect vertical slits, a graceful rounded lantern shape, painted trim, and a tassel worthy of a boutique window display. What I got was a slightly lopsided object that looked like it had survived a small argument. Still, when I placed an LED tea light inside, it glowed beautifully. That is the magic of lantern crafts: light is forgiving.
One helpful lesson is to work slowly. The best lanterns come from simple, repeated patterns rather than rushed complicated ones. Evenly spaced dots can look more elegant than a messy dragon design. A clean red paint job with gold trim can look more polished than five competing colors. When in doubt, simplify. The can is small, so every design choice becomes noticeable.
Another lesson is that preparation affects the final result more than decoration. A can that is washed, dried, marked carefully, shaped gently, and smoothed properly will almost always look better than one rushed straight into painting. Paint also behaves better when the surface is clean and dry. If you apply thick paint because you are impatient, the lantern will remember. It may drip. It may bubble. It may look at you with quiet disappointment.
LED choice matters too. Cool white lights can make the lantern look modern, but warm white lights usually create a softer, more traditional glow. Tiny LED string lights can work well if the lantern has many small holes, while a single tea light is better for a bold cutout pattern. If the lantern is part of a dinner table display, warm light is usually more flattering. Your guests and your dumplings will both appreciate it.
For group crafting, prepare a few sample lanterns ahead of time. People understand the project faster when they can see the finished glow. Offer design templates with simple lines, dots, blossoms, and borders. Keep the risky preparation tasks separate from the decorating area, especially when children are involved. Let younger participants paint, choose ribbons, and add stickers after an adult has finished shaping and smoothing the metal.
The most satisfying part is seeing several lanterns together. One soda can lantern is cute. Five or seven arranged in a cluster become a centerpiece. Mix heights by trimming designs differently or placing some lanterns on small wooden blocks. Use similar colors so the group looks intentional. Red, gold, and silver are a reliable combination, but deep blue with gold accents can look stunning for a night-sky theme.
Finally, do not expect perfection. Handmade decor should show a little character. A tiny wobble or uneven dot is not failure; it is proof that a real person made it. The goal is not to create a factory-perfect object. The goal is to turn something ordinary into something glowing, meaningful, and memorable. And honestly, any craft that makes people say, “Wait, that used to be a soda can?” has already won.
Conclusion
Learning how to make Chinese lanterns from soda cans is a creative way to celebrate light, culture, sustainability, and hands-on design. With careful preparation, adult-handled cutting, smooth edges, safe LED lighting, and a thoughtful color scheme, an empty can becomes a charming lantern for Lunar New Year displays, parties, patios, classrooms, or cozy home corners.
The beauty of this project is its flexibility. You can make it traditional-inspired with red, gold, tassels, and symbolic patterns, or you can go modern with metallic finishes and minimalist shapes. Either way, the finished lantern carries a simple message: useful beauty can come from unexpected places. Even the recycling bin has a flair for drama.