
Trusted devices are like the VIP guest list for your Apple Account. They help you sign in, receive verification codes, access iCloud, and keep your digital life moving smoothly. But just like a house key, you do not want old, lost, sold, borrowed, or suspicious devices hanging around forever. If an iPad you gave away years ago is still listed under your account, or an old MacBook keeps appearing like a ghost from your college era, it is time for a cleanup.
This guide explains how to remove trusted devices from your iPhone, what happens after you remove one, how to reset trusted computers, and what to check if your goal is better Apple Account security. The process is not difficult, but there is one very important twist: Apple uses the phrase “trusted device” for Apple Account two-factor authentication, while “trusted computer” refers to a Mac or PC you previously allowed to access your iPhone through a cable. Different problem, different fix. Fun, right? Apple loves keeping us emotionally alert.
What Is a Trusted Device on iPhone?
A trusted device is an Apple device already signed in to your Apple Account with two-factor authentication. It can receive verification codes when you try to sign in on a new device or browser. Common trusted devices include an iPhone, iPad, Mac, Apple Watch, or iPod touch signed in with your Apple Account.
Here is a simple example. Suppose you buy a new iPad and sign in with your Apple Account. Apple may send a six-digit verification code to your iPhone. Because your iPhone is trusted, it can help confirm that you are really you and not someone in a hoodie trying to invade your iCloud from a basement with dramatic lighting.
Trusted devices are useful because they make account security stronger. Even if someone knows your password, they usually still need a verification code to sign in. But the list should stay clean. If a device is no longer yours, no longer used, or appears unfamiliar, removing it is a smart security move.
Trusted Device vs. Trusted Computer: Do Not Mix These Up
Before you start tapping buttons, make sure you know what you want to remove. The term “trusted device” usually means an Apple device connected to your Apple Account and used for two-factor authentication. The term “trusted computer” means a Mac or Windows PC that you allowed to access your iPhone after seeing the “Trust This Computer?” alert.
Remove a trusted device when:
- You sold, gave away, lost, or retired an Apple device.
- You see an unfamiliar iPhone, iPad, Mac, or Apple Watch in your Apple Account device list.
- You no longer want a device to receive Apple Account verification codes.
- You are cleaning up old devices attached to iCloud, Find My, or Apple services.
Reset trusted computers when:
- You once tapped “Trust” on a shared, school, work, repair shop, or public computer.
- You want your iPhone to stop remembering previously trusted USB-connected computers.
- You want the “Trust This Computer?” prompt to appear again the next time you connect.
If your concern is Apple Account security, remove the device from your account list. If your concern is a computer you plugged into, reset Location & Privacy. If your concern is both, do both. Your iPhone will not complain. It has seen worse.
How To Remove Trusted Devices From Your iPhone
The easiest way to remove a trusted device is directly from the Settings app on your iPhone. This works well when you still have access to your current iPhone and want to remove another device from your Apple Account.
Step-by-step instructions
- Open the Settings app on your iPhone.
- Tap your name at the top of the screen.
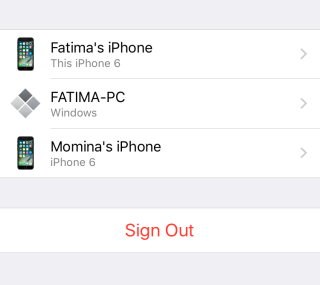
- Scroll down until you see the list of devices connected to your Apple Account.
- Tap the device you want to remove.
- Review the device details carefully.
- Tap Remove from Account.
- Confirm your choice when prompted.
After removal, that device should no longer be able to receive Apple Account verification codes. Access to iCloud and other Apple services on that device may also be blocked until someone signs in again with two-factor authentication.
Here is the key detail many people miss: if the device is still signed in to your Apple Account, it may come back online and reappear. To permanently remove a device you still own, sign out of iCloud, Media & Purchases, iMessage, FaceTime, and Game Center on that device. If you are selling or giving it away, erase it properly before handing it off.
How To Remove a Device If You No Longer Have It
If you do not have the old device anymore, do not panic. You can still remove it from your Apple Account using your current iPhone or through your Apple Account page in a browser.
Use your current iPhone
Open Settings, tap your name, scroll to your device list, select the old device, and tap Remove from Account. This is usually the fastest method.
Use the web
You can also sign in to your Apple Account from a browser, review your devices, and remove the one you no longer recognize or own. This is helpful if your current iPhone is not available, but you still have access to your account and verification method.
If the missing device was stolen, treat the situation more seriously. Use Find My to mark the device as lost or erase it remotely if needed, then remove it from your trusted devices. Also review your Apple Account details, trusted phone numbers, payment methods, and recent sign-in activity. A stolen iPhone is not just a missing rectangle; it is a tiny portal to your photos, messages, subscriptions, and possibly your entire digital routine.
How To Reset Trusted Computers on iPhone
If you are trying to remove a computer that your iPhone previously trusted, the steps are different. Apple does not show a neat little list of trusted computers where you can remove one by one. Instead, you reset all trusted computers at once by resetting Location & Privacy settings.
Steps to reset trusted computers
- Open Settings on your iPhone.
- Tap General.
- Tap Transfer or Reset iPhone.
- Tap Reset.
- Tap Reset Location & Privacy.
- Enter your iPhone passcode if asked.
- Confirm the reset.
After this, your iPhone forgets the computers you previously trusted. The next time you connect your iPhone to a Mac or PC, the “Trust This Computer?” alert should appear again. Only tap Trust if the computer is yours or belongs to someone you truly trust. If it is a random computer at a print shop, airport lounge, school lab, or cousin’s house where nine people share one desktop and nobody knows who installed the toolbar from 2013, choose Don’t Trust.
What Happens When You Remove a Trusted Device?
Removing a trusted device can affect several Apple services. The removed device will no longer act as a trusted device for two-factor authentication. That means it should not display verification codes for new sign-ins. It may also lose access to iCloud, Find My, and other Apple services until it is signed in again.
Removing a device from your Apple Account does not always erase the device itself. It does not magically wipe photos, apps, or local files from the hardware. Think of it as cutting the account connection, not physically cleaning the device. If you are selling, trading in, or giving away an iPhone, iPad, or Mac, you should still sign out, turn off Find My when appropriate, erase all content and settings, and confirm Activation Lock is removed before the next person uses it.
When Should You Remove Trusted Devices?
You do not need to remove devices every week like you are cleaning a refrigerator. But there are several moments when reviewing your trusted devices is a very good idea.
After selling or giving away a device
If you sell an iPad or give an old iPhone to a family member, remove it from your Apple Account after signing out and erasing it. This helps prevent account confusion and keeps your device list accurate.
After losing a device
If a device is lost and you cannot recover it, use Find My first. Mark it as lost or erase it if necessary. Then remove it from your trusted devices so it cannot be used as part of your account verification setup.
After seeing an unfamiliar device
If you see a device name you do not recognize, investigate immediately. Sometimes the name is harmless, like “John’s iPhone” after you forgot you renamed your own phone during a late-night setup. But if it truly does not belong to you, remove it and change your Apple Account password.
Before handing your iPhone to repair
Before repair, back up your iPhone and review your account security. Depending on the repair situation, you may need to adjust Find My or use Apple’s repair-related options. Avoid giving your passcode to anyone unless it is absolutely necessary and you understand why.
Security Checklist After Removing a Trusted Device
Removing the device is a good start, but it should not be the only step if you are worried about account safety. Use this quick checklist to tighten things up.
- Change your Apple Account password if the device was lost, stolen, or unfamiliar.
- Review trusted phone numbers under Sign-In & Security.
- Check Find My to make sure only your current devices are listed.
- Review payment methods connected to your Apple Account.
- Check Family Sharing if you share purchases or subscriptions.
- Update iOS so your iPhone has the latest security improvements.
- Turn on Stolen Device Protection if available on your iPhone and useful for your situation.
Also make sure you have at least one trusted phone number you can access. If your only trusted device is lost and your only trusted phone number is tied to that same missing iPhone, signing back in can become much harder. A second trusted phone number, such as a family number or another number you control, can save you from a future headache.
Why You Might Not See “Remove from Account”
Sometimes the option to remove a device may not appear, or the device list may not load as expected. Here are common reasons and fixes.
The device is your current iPhone
You usually remove other devices from the device list. If you want to remove your current iPhone from your Apple Account, sign out of your Apple Account on that iPhone instead. If you are preparing to sell it, erase all content and settings after backing it up.
Your internet connection is weak
The Apple Account device list needs to load from Apple’s servers. If the list is blank or outdated, connect to reliable Wi-Fi or cellular data and try again.
The device is still signed in
If the device is still signed in and connected to the internet, it may reappear. Sign out on that device or erase it if you still have access.
Apple’s settings labels changed slightly
Depending on your iOS version, you may see “Apple ID,” “Apple Account,” “Password & Security,” or “Sign-In & Security.” The exact wording can change, but the path is generally inside Settings > your name.
Does Removing a Trusted Device Delete Photos or Messages?
Removing a device from your Apple Account does not directly delete photos, messages, apps, or files from the device. However, it can stop that device from accessing Apple services tied to your account. For example, iCloud Photos, iMessage, FaceTime, iCloud Drive, and Find My may stop working until the device signs in again.
If your goal is to protect personal data before selling or giving away a device, removing it from the trusted device list is not enough. You should back up the device, sign out of your Apple Account, erase all content and settings, and confirm it is no longer connected to Find My or Activation Lock. Removing the account connection is one piece of the puzzle, not the entire puzzle.
Does Removing a Trusted Device Turn Off Two-Factor Authentication?
No. Removing one trusted device does not turn off two-factor authentication for your Apple Account. It simply removes that device from the group of devices that can help verify your identity. Your account can still use other trusted devices or trusted phone numbers for verification.
In many cases, two-factor authentication cannot be turned off once it is active on an Apple Account. That is a good thing for most people because it adds a major layer of protection. Passwords alone are like screen doors in a storm; two-factor authentication gives your account a much stronger lock.
How Often Should You Review Trusted Devices?
A practical routine is to review your trusted devices every few months, after buying a new Apple device, before selling an old one, and anytime you notice suspicious account activity. It takes less than a minute and can prevent bigger problems later.
To review quickly, open Settings, tap your name, and scroll through the device list. If every device looks familiar, great. If you see an old iPhone you traded in, a Mac you no longer use, or a mystery device with a name that sounds like a spy novel, investigate and remove it if needed.
Personal Experience: What Removing Trusted Devices Feels Like in Real Life
The first time many people check their trusted devices list, they expect to see two or three items. Then reality arrives wearing tap shoes. There is the current iPhone, the old iPhone, the even older iPhone, a MacBook from a job three years ago, an iPad that was “temporarily” loaned to a sibling, and maybe an Apple Watch that has been living in a drawer since the charger disappeared. Suddenly, your Apple Account looks less like a secure device list and more like a family reunion where half the guests were not invited.
In real-world use, removing trusted devices is less about being paranoid and more about staying organized. For example, imagine you upgrade from an iPhone 13 to an iPhone 16. During setup, your new phone becomes trusted. But your old phone might remain listed until you sign out and erase it. If that old phone is sitting in your desk drawer, the risk may be low. If you sold it online and forgot to erase it properly, the risk becomes much more interestingand not in the fun way.
Another common experience happens when someone connects an iPhone to a work computer and taps “Trust” just to move photos quickly. Months later, they wonder whether that computer can still access the phone. The fix is not in the Apple Account device list. Instead, resetting Location & Privacy makes the iPhone forget previously trusted computers. It is a small step, but it gives peace of mind, especially if you connect your phone to shared machines.
People also discover that device names can be confusing. “iPhone” might be your current phone, your old phone, or your cousin’s phone if you once signed in to help them download an app. A good habit is to rename your devices clearly. Names like “Sarah iPhone 15 Pro” or “Home iPad Air” are much easier to recognize than a lineup of identical “iPhone” labels. Your future self will thank you, probably while drinking coffee and wondering why everything has a password now.
The best experience is making device review part of your upgrade routine. Before trading in or selling an Apple device, back it up, sign out, erase it, remove it from your Apple Account if needed, and check Find My. After setting up the new device, look at your trusted devices list again. This simple before-and-after check prevents confusion, protects your account, and keeps your Apple ecosystem from turning into a digital junk drawer.
Removing trusted devices is not dramatic. There are no lasers, no hacker movie countdown, and no dramatic “access denied” voice. But it is one of those small maintenance tasks that makes your iPhone safer and your account easier to manage. Think of it as changing the locks after moving, except the locks are invisible and the keys are shaped like old iPads.
Conclusion
Knowing how to remove trusted devices from your iPhone is an essential Apple Account security skill. The process is simple: go to Settings, tap your name, choose the device, and tap Remove from Account. But the smart part is understanding what you are removing and why. A trusted Apple device can receive verification codes and access Apple services. A trusted computer is different and must be reset through Reset Location & Privacy.
If a device is old, lost, sold, unfamiliar, or no longer yours, remove it. If a computer should no longer be trusted, reset trusted computer permissions. Then review your password, trusted phone numbers, Find My settings, and device list. A clean trusted devices list makes your Apple Account easier to manage and much harder for unwanted access to sneak through.