
Mid-century furniture has a peculiar superpower: even when it gh dust to qualify as an archaeological site, it can still look cool. Those tapered legs, compact proportions, warm wood tones, and unfussy lines are remarkably forgiving. A neglected dresser may not need a funeral. It may simply need a careful cleaning, a veneer repair, and someone willing to spend Saturday afternoon arguing with a stubborn drawer.
A successful mid century upcycle does more than make old furniture look new. It preserves the character of a vintage piece while adapting it for modern life. The best projects respect the original design, repair what is worth saving, and introduce new color, storage, hardware, or function only where those changes genuinely improve the piece.
What Is a Mid Century Upcycle?
A mid century upcycle is the creative improvement of furniture or decor inspired by mid-century modern design. The starting object may be an authentic vintage piece from the 1940s, 1950s, or 1960s, a later reproduction, or an ordinary secondhand item with the right proportions for a retro transformation.
The goal is not necessarily museum-perfect restoration. Restoration usually aims to return an object as closely as possible to its original condition. Upcycling allows more flexibility. A damaged credenza might become a media console. A sewing cabinet might turn into a cocktail bar. A plain dresser might receive tapered legs, sliding doors, and a warm walnut finish.
Mid-century modern design grew from modernist principles while embracing natural materials, organic shapes, functional construction, and furniture designed around the human body. Molded plywood, streamlined profiles, mixed materials, and efficient manufacturing all became important parts of the movement. Charles and Ray Eames, Florence Knoll, George Nelson, Eero Saarinen, and other designers helped make modern furniture both practical and visually distinctive. The Eames Lounge Chair, introduced in 1956, remains one of the era’s most recognizable examples. n>
Why Mid-Century Furniture Is Ideal for Upcycling
Simple Forms Leave Room for Creativity
Mid-century furniture typically avoids excessive carving and heavy ornament. That simplicity makes it easier to update without creating visual chaos. A clean-front cabinet can accept new doors, contrasting paint, cane inserts, or replacement hardware without looking like it fell into a craft store during an earthquake.
Vintage Pieces Often Have Useful Proportions
Many mid-century dressers, desks, and sideboards are relatively low and long. Those dimensions work beautifully in contemporary homes. A low dresser can serve as a television console, an entryway cabinet, or a bedroom storage unit. Narrow-legged tables also keep rooms feeling open because more of the floor remains visible.
Reuse Has Environmental Benefits
Keeping existing furniture in use reduces demand for new raw materials, conserves energy, prevents some manufacturing-related pollution, and keeps bulky objects out of landfills. It can also save money, especially when the alternative is purchasing a newly manufactured hardwood cabinet. Reuse sits above recycling in the preferred materials-management hierarchy because the original product remains useful without first being broken down into raw material. n>
Before You Touch the Sandpaper, Inspect the Piece
The most important stage of a vintage furniture makeover happens before the makeover begins. Examine the piece under good lighting and determine what you actually own. Sanding first and researching later is how a valuable veneer becomes a pile of expensive dust.
Look for Maker Marks
Check the back, underside, inside drawers, beneath cushions, and around hardware for labels, stamps, serial numbers, signatures, or branded metal plates. Search those identifiers before altering the finish. An authentic designer piece, rare manufacturer, or well-preserved vintage item may be worth considerably more in original condition.
Identify Solid Wood, Veneer, and Engineered Board
Solid wood usually shows continuing grain patterns around edges and corners. Veneer consists of a thin layer of attractive wood bonded to a less expensive substrate. Many excellent mid-century pieces use veneer; it is not automatically a sign of poor quality. However, aggressive sanding can cut through it quickly.
Particleboard and fiberboard require a different approach. They can often be painted successfully, but damaged edges may swell or crumble. These materials benefit from careful filling, sealing, priming, and minimal exposure to water.
Check the Structure
Gently test joints, legs, drawer runners, doors, shelves, and back panels. Look for wobbling, missing screws, split rails, loose glue blocks, and sagging shelves. Structural repairs should happen before cosmetic work. A flawless finish on a collapsing chair is merely a beautifully decorated liability.
Evaluate the Existing Finish
Not every piece needs to be stripped. A finish that looks cloudy or dull may simply be dirty. Start with the least aggressive treatment: vacuum dust from corners, clean the surface carefully, and reassess it after drying. Small scratches, water rings, and worn areas can sometimes be corrected without removing the entire finish.
Essential Tools and Materials
A basic mid century upcycle does not require a professional workshop, although a garage, covered patio, or well-ventilated work area is extremely helpful. Assemble supplies according to the actual project rather than buying every refinishing product in the hardware store.
- Screwdrivers, pliers, and an adjustable wrench
- Vacuum with a soft brush attachment
- Mild soap, clean cloths, and microfiber towels
- Wood glue and clamps
- Wood filler or tinted epoxy putty
- Fine-grit sanding paper and sanding blocks
- Paint scraper or plastic putty knife
- Primer suited to wood, veneer, laminate, or particleboard
- Furniture paint, stain, toner, or clear finish
- Quality brushes, foam rollers, or a paint sprayer
- Gloves, eye protection, and appropriate respiratory protection
When working with old painted furniture, consider the possibility of lead-containing coatings. Do not dry-sand an unidentified old finish and send dust floating through the house. Test questionable surfaces and use lead-safe procedures when necessary. Refinishing products also create dust or fumes, so ventilation and protective equipment matter even when lead is not present. n>
How to Complete a Mid Century Upcycle
Step 1: Photograph and Disassemble
Take pictures before removing anything. Photograph hinge positions, drawer locations, wiring routes, and hardware arrangements. Label drawers and doors with removable tape. Vintage furniture occasionally contains parts that look interchangeable but are not. Discovering that Drawer A fits only Slot A after painting everything is an exciting experience in exactly the wrong way.
Remove knobs, pulls, legs, shelves, doors, and detachable trim. Store screws and small components in labeled bags.
Step 2: Clean Thoroughly
Vacuum first so loose grit does not scratch the finish. Clean with a mild solution appropriate for the material, using as little moisture as necessary. Grease and furniture polish residue can interfere with glue, primer, stain, and paint.
Allow the piece to dry completely. This is also when hidden damage often becomes visible, including loose veneer, chipped corners, and previous repairs performed with mysterious substances that may once have been glue.
Step 3: Repair the Structure
Reglue loose joints, tighten fasteners, replace missing support blocks, and repair damaged drawer runners. Clamp glued joints according to the adhesive instructions. Avoid driving large modern screws through visible surfaces merely because the joint is stubborn.
Step 4: Repair Veneer Carefully
Loose veneer can often be reattached by introducing adhesive beneath it and clamping it flat with a protective block. Blisters may be softened or opened carefully so adhesive can reach the substrate. Missing areas can be patched with matching veneer, ideally aligned with the existing grain.
For small chips, tinted epoxy putty or filler may be practical. Large, prominent losses require patience and grain matching. Veneer repairs are not difficult because the wood is emotionally complicated; they are difficult because the decorative layer may be extremely thin. tep 5: Preserve, Refinish, or Paint
Choose the least destructive option that produces a durable result.
Preserve the original finish when it is stable, attractive, and historically appropriate. Minor wear can provide desirable character.
Refinish the wood when the coating is severely damaged, peeling, sticky, or uneven. Remove the old finish carefully, repair the surface, sand lightly, and apply a compatible stain or clear coat.
Paint the piece when it has little collector value, extensive mismatched repairs, low-grade engineered surfaces, or a previous paint job that cannot reasonably be preserved. Clean, scuff, prime, and use furniture-appropriate paint. Painting valuable or unusually well-preserved mid-century furniture can reduce its character and resale value, so investigate before opening the can. tep 6: Update the Details
Hardware can shift the entire personality of a cabinet. Slim brass pulls, wooden knobs, black metal handles, or simple recessed pulls complement mid-century lines. Keep original hardware whenever it is distinctive and usable. It can be cleaned, polished, repainted, or stored safely in case a future owner wants to reinstall it.
Replacement legs are another effective upgrade. Tapered wood legs can make a heavy box cabinet look lighter, but the attachment points must be reinforced. Do not screw decorative legs directly into thin particleboard and hope optimism will function as structural engineering.
Step 7: Protect and Reassemble
Allow each coating to dry and cure according to its instructions. Dry-to-the-touch does not always mean ready for books, lamps, coffee mugs, or enthusiastic house cats. Reinstall doors and drawers carefully, adjust hinges, wax sticky runners when appropriate, and add felt pads beneath legs.
Mid Century Upcycle Project Ideas
Turn a Dresser Into a Media Console
Remove one or two upper drawers and convert the openings into shelves for electronics. Add discreet cable openings in the back, reinforce shelves, and preserve closed storage below. A low, wide silhouette naturally suits televisions and audio equipment.
Convert a Cabinet Into a Home Bar
Add a durable interior surface, glass racks, bottle storage, and warm LED lighting. A cabinet with sliding doors works especially well because it can hide the entire operation when relatives visit and begin asking why you own four kinds of bitters.
Modernize a Nightstand
Repair the drawer, clean the wood, paint only the cabinet shell, and leave the drawer front natural. The contrast highlights the grain without overwhelming a small piece. A new pull and taller tapered legs can complete the transformation.
Give a Chair New Upholstery
A structurally sound chair can be transformed with new foam, webbing, and fabric. Textured neutrals, olive green, burnt orange, mustard, navy, and subtle geometric patterns all work with mid-century forms. Retain reusable internal materials when they remain clean and functional, but replace degraded foam or brittle support components.
Create a Statement Storage Piece
Use paint strategically rather than coating every visible surface. A deep blue exterior paired with walnut drawer fronts, a warm white cabinet with natural doors, or an olive interior inside a teak-toned bookcase can feel fresh without erasing the original design.
How to Keep the Result Stylish Instead of Theme-Park Retro
Mid-century design works best when it is mixed with the present. A room filled with matching starburst clocks, atomic patterns, orange vinyl, and plastic flamingos may be entertaining, but it can begin to resemble a television set waiting for actors who never arrive.
Choose one or two strong vintage-inspired pieces and surround them with simpler contemporary elements. Repeat wood tones without making every item identical. Combine warm walnut, oak, leather, linen, ceramics, glass, and metal. Add softness with curtains, rugs, plants, and modern artwork.
Current interpretations of mid-century interiors continue to emphasize tapered profiles, natural wood, sculptural lighting, geometric accents, and earthy colors. Designers also increasingly mix periods rather than reproducing one era with strict historical accuracy. That collected approach helps an upcycled piece feel personal instead of staged. n>
Common Mid Century Upcycling Mistakes
- Sanding through veneer: Begin gently, especially on edges and corners.
- Painting before researching: Check maker marks and potential value first.
- Skipping cleaning: Paint does not bond reliably to wax, oil, or old polish.
- Ignoring structural damage: Cosmetic improvements cannot stabilize a loose joint.
- Using incompatible products: Confirm that primer, paint, stain, and topcoat can work together.
- Installing weak legs: Reinforce attachment points before elevating a heavy cabinet.
- Overdecorating: Let the shape, proportions, and grain provide much of the visual interest.
- Rushing the cure time: A beautiful finish can develop permanent marks when used too soon.
A Composite Mid Century Upcycle Experience
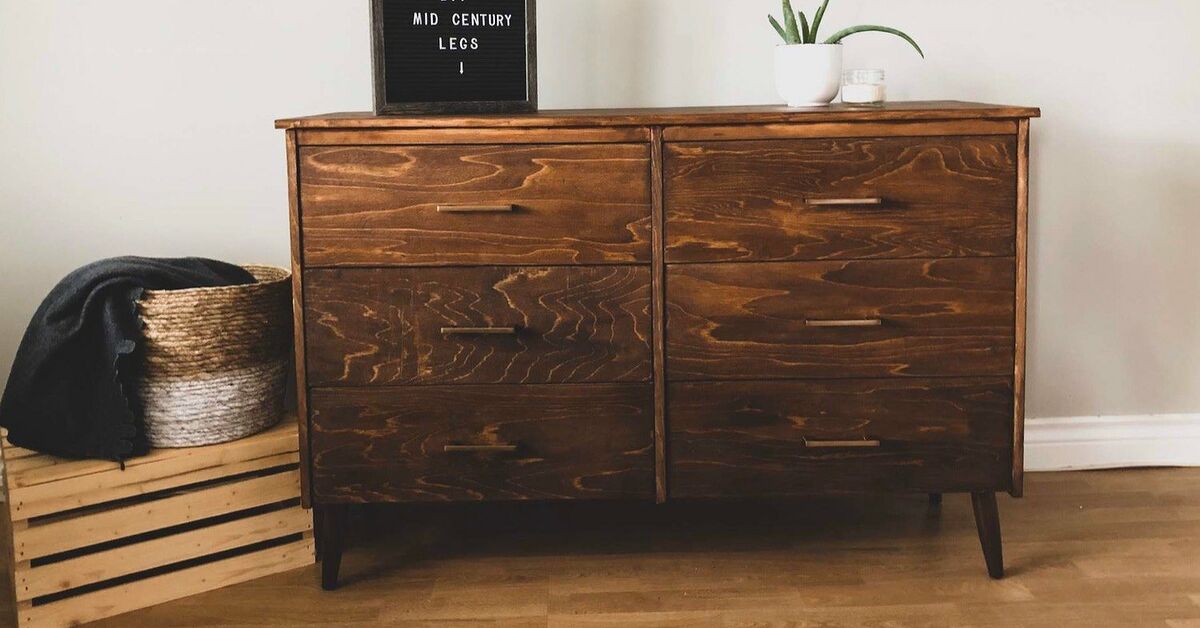
The following experience combines common lessons from practical furniture makeover projects. The subject is a low six-drawer dresser discovered at a neighborhood garage sale. It has tapered legs, recessed pulls, faded veneer, and one drawer that refuses to close without a motivational speech.
The first impulse is to paint everything dark green. Fortunately, inspection comes first. A paper label on the back identifies a regional manufacturer rather than a major collectible brand. The case is veneered, the drawer fronts are solid wood, and the legs are structurally sound. The top has water damage, but most of the original finish remains intact.
Cleaning produces the first surprise. Much of the “damaged finish” is actually decades of grime and furniture polish. After the surface dries, the wood looks warmer and more even. The project immediately becomes smaller, cheaper, and less destructive.
The stubborn drawer is removed and compared with the others. Its wooden runner is loose, while an old nail protrudes slightly from the frame. The nail is removed, the runner is reglued and clamped, and the drawer begins operating normally. This five-minute diagnosis prevents the unnecessary purchase of replacement slides and confirms an important upcycling principle: repair the cause, not the symptom.
The top still needs attention. A loose veneer corner is lifted only enough to introduce glue, then clamped beneath a flat scrap board protected with waxed paper. A missing chip near the back is filled with tinted epoxy. The repair is not invisible, but it becomes difficult to notice from normal viewing distancewhich is a perfectly respectable outcome for furniture intended to hold socks rather than enter a museum competition.
Instead of stripping the entire dresser, the old finish is cleaned and lightly refreshed. The badly worn top receives more extensive preparation and a compatible new finish. The drawer fronts are preserved, while the outer frame is painted a muted warm white to conceal several previous repairs. Original recessed pulls are cleaned and reinstalled.
The greatest delay comes from impatience. The painted frame appears dry the following morning, but the product instructions recommend a longer cure. Waiting feels unnecessary until a test board develops a mark beneath a heavy book. The dresser receives several more days before reassembly. This small experiment saves the finished surface from six drawer-shaped scars.
Once complete, the dresser retains its long horizontal profile, visible wood grain, original hardware, and tapered legs. The selective paint makes the piece suitable for a brighter bedroom without disguising its age. The total expense remains modest because the project uses repair materials already on hand and avoids replacing functional parts.
The biggest lesson is that dramatic transformations do not always require dramatic intervention. Cleaning can outperform stripping. One repaired joint can matter more than expensive hardware. A partial paint treatment can be more convincing than covering every inch. Most importantly, a good mid century upcycle should still look like a piece of furniture with a historynot a brand-new object wearing a retro costume.
Approach the work slowly, preserve anything distinctive, and make every alteration solve a real problem. That combination produces furniture that is useful, sustainable, stylish, and unlikely to cause regret the next time someone recognizes the maker’s mark.