
A simple foam tube, a few minutes, and suddenly your car stops eating your phone like it has a personal vendetta.
What Is the Pipe Insulation Car Hack?
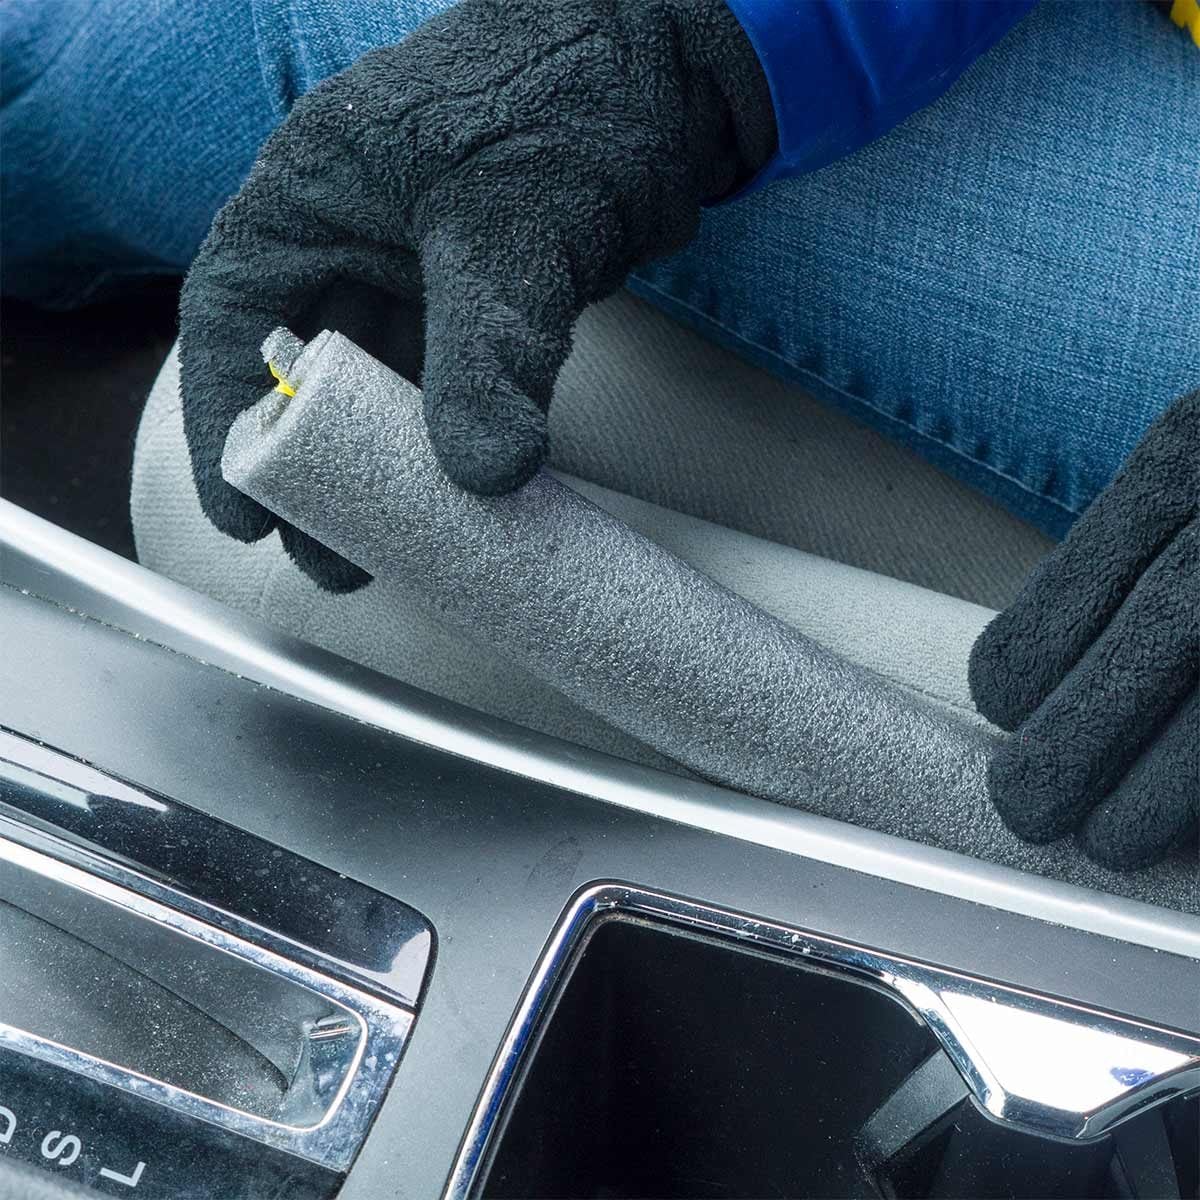
The pipe insulation car hack is one of those brilliantly simple ideas that makes you wonder why cars were not designed this way in the first place. The basic concept is easy: take a length of foam pipe insulation, cut it to fit the gap between your car seat and the center console, then wedge it into place so keys, coins, French fries, lip balm, charging cables, and your dignity stop disappearing into the mysterious black canyon beside the seat.
Popularized by practical DIY sources such as The Family Handyman, this hack uses inexpensive foam pipe insulationthe same pre-slit tubing normally used to protect plumbing pipes from freezing, sweating, or heat loss. Because it is soft, flexible, lightweight, and easy to cut, it happens to work surprisingly well as a DIY car seat gap filler.
The result is not fancy. It does not connect to Bluetooth. It does not require an app. It simply blocks the gap where small items love to dive at the exact moment you need them most. And honestly, that is the kind of low-tech genius every car deserves.
Why This Car Hack Works So Well
Every driver knows the seat-console gap. It is narrow enough to trap your hand, deep enough to hide a house key, and dark enough to make a flashlight feel underqualified. When something falls into that space, retrieving it can turn into a full-body yoga pose performed in a parking lot.
Foam pipe insulation works because it fills that gap without adding a hard or bulky object to the cabin. Most pipe insulation tubes are pre-slit, which makes them naturally compressible. They can be pressed into place, trimmed to size, and removed for cleaning. The foam also blends into many interiors, especially if you choose black or dark gray insulation.
Another benefit is cost. A single six-foot length of foam pipe insulation is usually enough for both front seats, and often leaves extra material for other small garage or car organization projects. Compared with commercial seat gap fillers, this DIY version is budget-friendly and easy to customize.
Materials You Need
You do not need a full workshop for this project. In fact, if this hack required more than a few tools, it would lose half its charm.
Basic Supplies
- One length of foam pipe insulation, preferably black or dark gray
- A measuring tape
- A utility knife or sturdy scissors
- A marker
- A clean cloth or vacuum for the seat area
Optional Upgrades
- Fabric wrap for a more finished appearance
- Hook-and-loop strips if your gap is unusually wide
- Double-sided fabric tape for wrapping or securing fabric
- A small brush or handheld vacuum for cleaning the hidden gap first
For most vehicles, standard foam pipe insulation with a diameter around one inch works well. Larger gaps may need thicker foam, while very tight gaps may require a smaller diameter or a slight trim along one side.
How to Make a DIY Pipe Insulation Car Seat Gap Filler
Step 1: Clean the Seat Gap First
Before adding anything, clean the area between the seat and center console. Slide the seat forward and back, vacuum crumbs, and rescue any long-lost objects. You may find coins, pens, receipts, or a snack fossil from a road trip you promised yourself you would forget.
This step matters because the foam will sit in that gap. If the space is full of debris, the insulation may not fit smoothly, and you could trap dirt where it is harder to clean later.
Step 2: Measure the Length of the Gap
Use a measuring tape to measure the space from the front of the seat cushion area to the back near the seat belt buckle. You do not need laboratory precision. The goal is to cut a foam piece long enough to block the drop zone without interfering with the seat belt, seat controls, or seat movement.
Most front seat gaps need a piece somewhere around 16 to 22 inches long, depending on the vehicle. Compact cars may need less. Trucks and SUVs may need more.
Step 3: Cut the Pipe Insulation
Mark the measurement on the foam pipe insulation and cut it with a utility knife or scissors. Cut slowly so the edge stays clean. A slightly angled cut at the front can help the foam sit more neatly near the lower dashboard or console curve.
If your pipe insulation has adhesive edges, you usually do not need to expose them. For this hack, the foam should remain removable. Permanent adhesive can leave residue or make cleaning harder later.
Step 4: Test the Fit
Wedge the foam into the gap between the seat and console. It should sit snugly but not force the seat out of position. Move the seat forward and backward to make sure the foam does not bind, bunch, or slide into an unsafe area.
Also check the seat belt buckle. The foam should not cover it, press on it, or make buckling awkward. If it does, trim the foam shorter or cut a notch to clear the buckle area.
Step 5: Repeat on the Other Side
Once the driver’s side fits properly, repeat the process for the passenger side. If you regularly carry passengers, check that the filler does not make the seat uncomfortable or interfere with seat adjustments.
Step 6: Do a Safety Check
This is the most important step. The foam should never be placed near the pedals, under the floor mat, or anywhere it could slide into the driver’s footwell. Keep it strictly in the seat-console gap. After installation, sit in the driver’s seat, buckle up, adjust the seat, and confirm everything works normally.
Important Safety Tips Before You Try It
A good car hack should make driving easier, not riskier. The pipe insulation car hack is simple, but it still needs common sense.
Never Put Foam Near the Pedals
Do not place loose foam, towels, mats, bags, or any other object where it could slide under the accelerator, brake, or clutch pedal. Even a small object in the driver’s footwell can become a serious problem if it blocks pedal movement.
Do Not Block Seat Belts or Seat Controls
The foam should not interfere with seat belt buckles, seat adjustment rails, power seat buttons, side seat controls, or airbag areas. If your car has seat-mounted side airbags, avoid attaching or wrapping anything around the seat itself.
Keep It Removable
One of the best things about this hack is that it can be removed for cleaning. Avoid permanent glue. A snug friction fit is usually enough.
Check It Occasionally
Foam compresses over time. Every few weeks, especially after adjusting the seat, check that the filler is still in place and has not shifted. If it becomes torn, flattened, sticky, or crumbly, replace it.
Best Type of Pipe Insulation for a Car Interior
Not all pipe insulation is identical. Some tubes are foam, some are rubber, some are self-sealing, and some are designed for specific pipe sizes. For a car seat gap filler, soft foam or rubber pipe insulation is usually the easiest to work with.
Foam Pipe Insulation
Foam pipe insulation is lightweight, affordable, and easy to cut. It compresses well into narrow spaces and is usually available in dark colors. This makes it a good choice for most vehicles.
Rubber Pipe Insulation
Rubber insulation often feels denser and may last longer, especially in hot climates. It can look cleaner, but it may cost more and feel heavier than basic foam.
Self-Sealing Pipe Insulation
Self-sealing insulation has adhesive strips along the slit. That is useful for plumbing, but not always necessary for this car hack. If you buy self-sealing foam, leave the protective backing on unless you are wrapping the foam in fabric away from the car.
Color Choice
Choose black, charcoal, or dark gray if possible. Bright white foam may work, but it tends to look more like a plumbing supply accidentally moved into your sedan. Dark foam disappears visually, especially in shadowed console gaps.
Creative Variations of the Pipe Insulation Car Hack
1. The Clean-Look Fabric Wrap
If you want the hack to look more polished, wrap the foam in black felt, vinyl-like fabric, or automotive upholstery fabric. Cut the fabric slightly longer than the foam, wrap it around the tube, and secure the seam with fabric tape or glue before placing it in the car.
This version is ideal if you care about interior appearance or drive a newer vehicle where raw foam feels a little too “weekend science project.”
2. The Console Cable Tamer
If your charging cable constantly falls into the gap, cut a tiny channel in the foam so the cable can rest along the top. This keeps the cable accessible without letting it wander into the abyss.
Just make sure the cable still moves freely and does not become pinched by the seat track.
3. The Garage Door Ding Protector
Pipe insulation is also useful in the garage. If your car door opens against a wall, a strip of foam pipe insulation can act as a soft bumper. Cut it to length and mount it where the door edge makes contact. Some DIYers attach foam to wood strips or directly to the wall with screws, tape, or suitable adhesive.
This is especially useful in tight garages where every inch matters and one careless door swing can leave a ding that costs far more than the foam.
4. The Trunk Organizer Cushion
Short pieces of foam pipe insulation can be placed around hard edges of storage bins, toolboxes, or cargo dividers in the trunk. This helps reduce rattles and prevents plastic bins from knocking against interior panels.
5. The Roof Rack Padding Idea
For short, low-speed loading situations, foam pipe insulation can help cushion items against a roof rack crossbar. However, it should never replace proper cargo straps, rack pads, or manufacturer-approved tie-down methods. Foam is padding, not cargo security.
Pros and Cons of the Pipe Insulation Car Hack
Pros
- Very inexpensive compared with many commercial gap fillers
- Easy to cut and customize
- Soft enough for most car interiors
- Removable for cleaning
- Helps prevent small items from falling beside the seat
- Can be reused for garage, storage, and anti-rattle projects
Cons
- May not look as polished as a store-bought seat gap filler
- Can compress over time
- May not fit very narrow or unusually shaped gaps
- Needs occasional checking to ensure it has not shifted
- Should not be used anywhere near pedals or safety equipment
For most drivers, the pros easily outweigh the cons. This is not a luxury upgrade; it is a practical fix for a daily annoyance. Think of it as giving your car a tiny foam security guard whose only job is to stop your phone from making a break for it.
How This Hack Compares With Commercial Seat Gap Fillers
Commercial seat gap fillers are designed specifically for this job. Many are made from neoprene, faux leather, foam, or fabric-covered padding. Some include openings for seat belt buckles, and some are shaped to slide with the seat.
The pipe insulation version is cheaper and easier to customize, but it may not look as refined. A commercial product may be better if you want a cleaner finish, a snug buckle cutout, or a more durable long-term solution. But if your goal is simply to stop objects from falling beside the seat, foam pipe insulation does the job surprisingly well.
The best choice depends on your car and your expectations. If you enjoy DIY fixes, start with pipe insulation. If you want a finished accessory that looks factory-made, buy a dedicated gap filler. Either way, the mission is the same: protect your belongings from the seat-gap black hole.
Common Mistakes to Avoid
Using Foam That Is Too Thick
If the foam is too thick, it may push against the seat or console too firmly. That can make seat adjustment harder and may look awkward. Choose foam that compresses gently into place.
Cutting It Too Long
A piece that is too long can bunch up near the seat belt buckle or slide forward. Start slightly longer than needed, test the fit, then trim little by little.
Using Permanent Adhesive in the Car
Adhesive can leave residue on plastic trim, leather, vinyl, or carpet. Unless you are attaching foam to a garage wall, skip glue inside the car.
Forgetting to Move the Seat During Testing
Always slide the seat through its normal range of motion after installing the foam. A filler that looks fine while parked may shift when the seat moves.
Ignoring Heat
Car interiors can get extremely hot in summer. Cheap foam may soften, deform, or smell unpleasant if left in direct heat. Choose decent-quality insulation and replace it if it starts breaking down.
Who Should Try This Hack?
This hack is perfect for drivers who regularly lose small items between the seat and console. It is especially useful for commuters, parents, rideshare drivers, delivery drivers, road-trippers, and anyone whose car has become a rolling junk drawer with cup holders.
It also works well for older vehicles with wider gaps. Some newer cars have tighter interior layouts, but many still have enough space for cards, coins, and phones to fall through. If you have ever had to park, get out, move the seat, kneel on the pavement, and retrieve a debit card with the emotional intensity of a rescue mission, this hack is for you.
Real-World Experience: What It Is Like to Use the Pipe Insulation Car Hack
The first thing you notice after installing foam pipe insulation beside the console is not dramatic. There is no grand transformation. The steering wheel does not glow. The dashboard does not applaud. But after a few days, the little benefits start adding up.
You drop a charging cable, and it stays on top instead of sliding into darkness. You toss your keys toward the cup holder and miss, but they land against the foam instead of vanishing under the seat rail. You reach for lip balm at a stoplight, fumble it, and for once it does not become part of the car’s permanent archaeological record.
One of the best experiences with this hack is how invisible it becomes when done correctly. A dark piece of foam tucked neatly into a dark gap does not scream “DIY project.” It simply sits there, quietly preventing problems. Passengers may not even notice it. And if they do, they usually say something like, “Wait, that’s smart.” This is the highest compliment a cheap garage hack can receive.
The hack is especially helpful during long drives. Road trips create clutter quickly: snack wrappers, toll receipts, sunglasses, napkins, cables, earbuds, and random coins from states you forgot you drove through. The seat gap is usually where that clutter goes to retire. With foam in place, small items stay reachable, and the front cabin feels less chaotic.
Parents may appreciate it even more. Kids have a special talent for dropping things in places that require adult flexibility, advanced lighting, and possibly a search warrant. A foam gap filler can stop crayons, toy parts, snack pieces, and tiny treasures from slipping into the worst possible location. It will not make the back seat spotless, but it can reduce the number of “Can you get that?” emergencies.
Another practical benefit appears during cleaning. Without the foam, vacuuming the seat-console gap can be awkward. With the foam installed, fewer crumbs and objects enter the space in the first place. When it is time to clean, you can pull the foam out, shake it off, wipe it down, vacuum the area, and put it back. That is much easier than trying to fish a coin out with a butter knife while questioning every decision that led to that moment.
There are a few lessons learned from real use. First, fit matters. If the foam is too loose, it may shift when the seat moves. If it is too tight, it can look bulky or interfere with normal seat adjustment. The sweet spot is snug but not forced. Second, color matters more than expected. Black foam looks intentional. Light gray or white foam can look like you are transporting plumbing supplies in your center console.
Third, not every car needs the same shape. Some consoles are straight; others curve. Some seat belt buckles sit high; others are buried low beside the cushion. A quick notch around the buckle area can make the difference between “pretty good” and “fits like it belongs there.” Do not be afraid to trim and test more than once.
The garage wall variation is also worth mentioning from experience. If your garage is narrow, a foam strip placed at the exact door-contact point can prevent chips and dings. The trick is to park normally, open the door carefully, mark the contact zone, and mount the foam there. Randomly sticking foam on the wall is less effective than placing it where the door actually touches.
In the end, the pipe insulation car hack succeeds because it solves a real annoyance with a cheap, flexible material. It is not glamorous, but neither is crawling under a seat to retrieve a phone. The hack is quick, forgiving, and easy to reverse. That makes it one of those small upgrades that earns its placenot because it is impressive, but because it quietly makes everyday driving a little less irritating.
Final Thoughts
The pipe insulation car hack proves that smart DIY does not have to be complicated. Sometimes the best solution is sitting in the plumbing aisle, waiting to be promoted to automotive hero. With a few cuts and a quick test fit, a simple foam tube can stop small items from falling between your seat and console, reduce clutter, and make your car easier to live with.
Just remember the safety rules: keep the foam away from pedals, do not block seat belts or controls, and check the fit after moving the seat. Done properly, this hack is inexpensive, practical, and oddly satisfying. Your phone stays reachable. Your keys stay visible. Your seat gap finally stops acting like a tiny storage unit with no return policy.