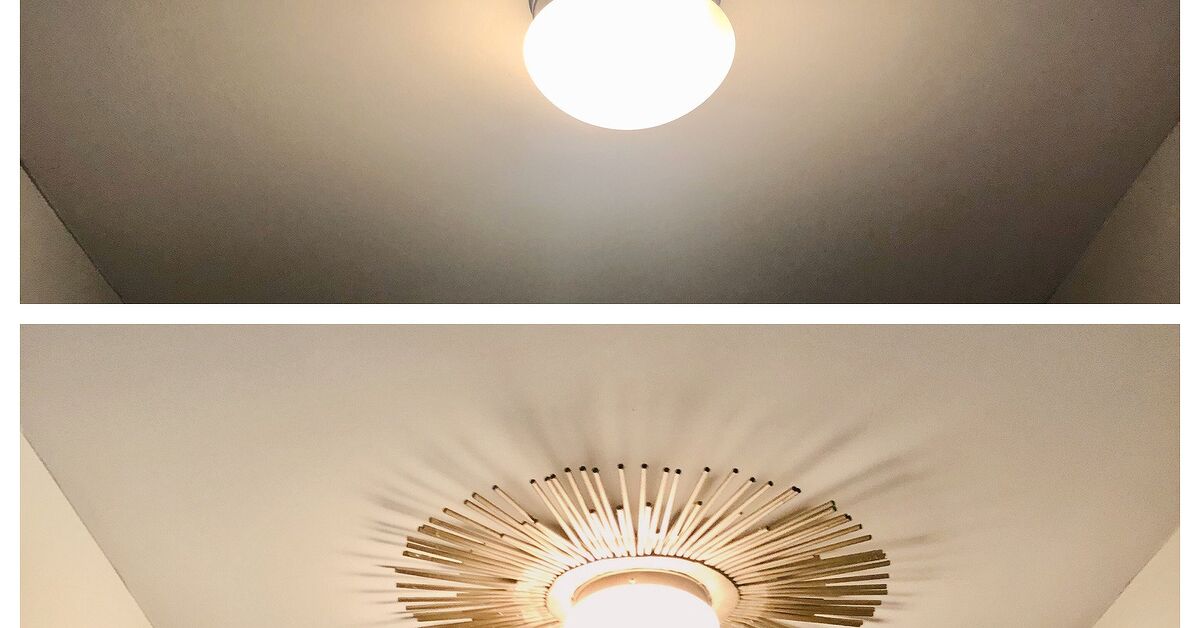

Plastic straws have had a dramatic few years. One minute they were living their best life in iced coffee, and the next they became the tiny plastic villains of modern environmental conversations. But before you banish every leftover straw to the junk drawer of shame, here is a surprisingly stylish idea: turn them into a plastic straw light fixture DIY project.
Yes, plastic straws. The same bendy little tubes that once came with lemonade can become a modern, geometric, budget-friendly lampshade or decorative light cover. With smart design, careful materials, and a strict “LED bulb only” rule, a straw light fixture can look less like a cafeteria accident and more like something you found in a boutique home store with a suspiciously confident price tag.
This project is part upcycled home decor, part sculptural craft, and part “wait, you made that?” conversation starter. It works well for renters, students, craft lovers, small-space decorators, and anyone who enjoys turning overlooked materials into something with personality. The goal is not to rewire your ceiling or pretend plastic is heatproof. The goal is to create a lightweight decorative shade around a safe existing fixture or pendant kit while keeping the electrical components untouched.
Why Make a Light Fixture From Plastic Straws?
A plastic straw light fixture is appealing because it checks three boxes DIY decorators love: it is affordable, customizable, and weirdly satisfying. Straws are light, easy to cut, simple to glue, and available in many colors. They can be arranged into spikes, diamonds, sunbursts, fringe, rows, honeycomb patterns, or a mid-century-inspired starburst shape. In other words, they are tiny architectural tubes waiting for their big break.
The idea also fits into the wider upcycling movement. Instead of buying a new decorative shade, you can reuse leftover straws, rescue a plain lampshade frame, or upgrade a boring flush-mount cover. Reuse is not a magical cure for plastic waste, but it is better than tossing usable material into the trash when it can be turned into something practical and fun. Think of this project as giving plastic straws a second career in interior design. Will they become famous? Probably not. Will guests ask about them? Absolutely.
Important Safety Note Before You Start
Let’s be very clear: plastic straws should never touch a hot bulb, socket, wiring, or any exposed electrical part. This DIY is a decorative shade project, not an electrical installation. Do not modify wiring unless you are qualified to do so. If you are using an existing ceiling fixture, keep the original fixture intact and attach the straw design only to a removable shade frame, wire ring, basket frame, or non-electrical support.
Use an LED bulb, preferably a low-wattage bulb recommended for your fixture. LEDs are more energy-efficient and produce much less heat than incandescent bulbs, but they still need ventilation and clearance. Check the fixture’s maximum wattage label and follow it. When in doubt, choose the cooler-running option and keep the straw shade several inches away from the bulb in every direction. Plastic plus heat is not the home decor love story we are writing today.
Best Places to Use a Plastic Straw Light Fixture
This DIY works best in areas where you want style, texture, and a little playfulness without heavy-duty lighting demands. A closet, hallway, craft room, dorm room, powder room, reading nook, covered patio with battery-powered LED lights, or kids’ art space can all be good candidates. For a dining room or living room, go bigger and more polished with spray paint and a symmetrical design.
Avoid placing plastic straw shades in kitchens directly above stoves, near fireplaces, in bathrooms with heavy moisture, or anywhere a shade could be bumped into the bulb. If you want outdoor lighting, use only outdoor-rated LED string lights or solar lights and keep the straw structure protected from heat, rain, and wind.
Materials You Will Need
Basic Supplies
- Plastic straws, preferably straight straws without bendy necks
- A lampshade frame, wire wreath form, embroidery hoop, hardware cloth cylinder, or lightweight basket frame
- Low-temperature hot glue gun or strong craft adhesive
- Scissors or a craft knife
- Ruler or measuring tape
- Painter’s tape or clips
- Craft wire, zip ties, or floral wire
- Drop cloth or cardboard for painting
- Spray paint suitable for plastic, optional
- LED bulb or LED pendant light kit
Optional Design Extras
- Metallic spray paint for a brass, gold, black, or chrome look
- Clear straws for a glassy, icy effect
- White straws for a clean modern pendant
- Colorful straws for a playful retro fixture
- Beads, small wooden rings, or paper accents for texture
Design Idea 1: The Straw Sunburst Shade
The sunburst design is the easiest way to make plastic straws look intentional. It creates a spiky sculptural silhouette that feels modern, energetic, and slightly glamorous. Start with a wire wreath ring or lampshade hoop. Cut your straws into different lengths, such as 3 inches, 5 inches, and 7 inches. The varied lengths create depth and prevent the fixture from looking like a plastic porcupine having a bad hair day.
Glue or wire the straws around the frame so they point outward like rays. Work in sections and rotate the frame as you go. Keep the pattern balanced by repeating short, medium, and long pieces. Once the entire ring is covered, spray paint the finished shade in a metallic color for a high-end look. Gold or matte black can make humble straws look shockingly expensive.
Design Idea 2: The Geometric Straw Pendant
If you love clean lines and modern shapes, try a geometric pendant. Cut straws into equal pieces and connect them into triangles, diamonds, or cube-like forms using thin craft wire. You can build small triangular modules and attach them together around a lightweight frame. This style works especially well over a desk, nightstand, or reading corner.
The secret is consistency. Measure carefully, cut cleanly, and repeat the same shape until the structure grows into something architectural. Clear straws give this design an airy feel, while black or white straws look crisp and graphic. Metallic paint can turn the finished piece into a faux brass chandelier without the financial commitment or emotional damage of actual brass chandelier shopping.
Design Idea 3: The Drum Shade With Straw Texture
For a softer, more traditional light fixture, use an old drum lampshade frame or create a cylinder from hardware cloth. Attach straws vertically around the outside, placing them close together like reeds or fluting. This creates texture similar to ribbed glass, bamboo, or pleated fabric, depending on the color and finish you choose.
White straws make the shade look bright and minimal. Natural tan paper straws create a warmer, coastal look. Black straws feel bold and contemporary. If your straws have stripes, line them up in the same direction for a neat pattern or rotate them randomly for a more playful look. Spray paint can unify mismatched straws and hide logos, colors, or branding.
Step-by-Step Tutorial: DIY Plastic Straw Light Fixture
Step 1: Choose Your Base
Pick a base that does not require electrical modification. A lampshade frame, wire basket, embroidery hoop, or wreath ring is ideal. If you are covering an existing ceiling light, design the straw shade as a removable cover that hangs around the fixture without touching the bulb. For a pendant, use a certified pendant light kit and attach the straw shade to the shade ring or separate support frame.
Step 2: Plan the Shape
Sketch the fixture before cutting anything. Decide whether you want a sunburst, drum, dome, fringe, or geometric pendant. Measure the diameter of the fixture and note how far the straws will extend. Planning prevents the classic DIY tragedy where the project grows larger than expected and suddenly your hallway light resembles a satellite dish.
Step 3: Cut the Straws
Use sharp scissors for clean cuts. For a sunburst, cut straws into three or four different lengths. For a drum shade, cut all straws to the same height. For a geometric pendant, use identical lengths so the shape stays even. Keep the pieces sorted in small cups or bowls to avoid crafting chaos.
Step 4: Attach the First Layer
Begin with one section of the frame. Apply a small amount of glue to each straw or tie it with craft wire. If using hot glue, choose a low-temperature glue gun and work carefully. Hold each straw in place until secure. Do not overload the frame with glue; too much glue adds weight and creates messy lumps.
Step 5: Build the Pattern
Continue around the frame, repeating your pattern. Step back every few minutes to check symmetry. For a sunburst, rotate lengths evenly. For a drum shade, keep the vertical straws straight. For a geometric shape, check corners and angles often. This is the point where patience pays off. The difference between “designer DIY” and “craft drawer explosion” is usually spacing.
Step 6: Paint the Fixture
If you want a polished look, spray paint the finished shade outdoors or in a well-ventilated area. Use paint designed for plastic and apply several light coats instead of one heavy coat. Rotate the shade to reach all sides and let it dry fully before installation. Metallic finishes can make the final piece look surprisingly luxe, while matte paint creates a cleaner modern style.
Step 7: Install Without Touching Wiring
Attach the finished shade to the frame, hook, or pendant kit according to the base you selected. The straw structure should be stable, lightweight, and safely away from the bulb. Check that air can circulate. Turn on the light for a short test, then turn it off and inspect the shade. If any part feels warm, smells odd, or sits too close to the bulb, remove it and adjust the design.
Choosing the Right Bulb
The best bulb for a plastic straw light fixture is a low-wattage LED. Choose brightness by lumens, not just watts. For soft accent lighting, 450 to 800 lumens is often enough. For a workspace, you may need more brightness, but do not increase wattage beyond the fixture’s rating. A frosted LED bulb can diffuse light more gently than a clear bulb, helping the straw shade glow instead of creating harsh shadows.
Warm white bulbs, around 2700K to 3000K, create a cozy look. Cool white bulbs feel brighter and more modern but can make plastic look sharper. If your shade is colorful, test the bulb before committing. Some colors look beautiful when lit, while others create a mysterious glow best described as “alien smoothie.”
Style Variations That Look Expensive
Modern Brass Look
Use straight white or clear straws, build a sunburst design, and spray paint everything satin brass or antique gold. Pair it with a globe LED bulb for a boutique-inspired fixture.
Minimal White Pendant
Attach white straws vertically around a drum frame. Keep the cuts even and the finish matte. This look works well in Scandinavian, coastal, or small apartment decor.
Playful Kids’ Room Fixture
Use colorful straws and a battery-powered LED puck light or low-heat LED string lights. Keep it lightweight, cheerful, and easy to remove for cleaning.
Black Geometric Chandelier
Create triangular straw modules, attach them to a central ring, and spray paint everything matte black. The result can look surprisingly architectural, especially in a room with white walls.
Common Mistakes to Avoid
The biggest mistake is placing plastic too close to the bulb. Even with LEDs, clearance matters. Another mistake is using too much glue, which makes the piece heavy and messy. Uneven cutting is also a common problem, especially with geometric designs. Measure twice, cut once, and do not craft while distracted by a dramatic TV finale unless you enjoy lopsided triangles.
Do not use incandescent, halogen, or high-heat bulbs with this project. Do not cover ventilation openings. Do not hang the shade from the electrical cord unless the pendant kit is designed for that purpose. Do not use damaged cords, mystery light kits, or anything that looks like it came from the haunted corner of a garage sale.
How to Clean and Maintain the Fixture
Plastic straw fixtures collect dust, especially sunburst and fringe designs. Turn off the light and let everything cool before cleaning. Use a microfiber duster, canned air, or a soft paintbrush to remove dust from tight spaces. Avoid soaking the fixture in water, especially if it has glue, paint, or wire attachments.
Inspect the shade occasionally. Look for loose straws, sagging glue, discoloration, or any sign that the material has been affected by heat. If something looks wrong, remove the shade and repair or retire it. A DIY light fixture should bring charm to a room, not suspense.
Budget Breakdown
One of the best parts of this project is the cost. If you already have leftover straws and an old lampshade frame, you may spend only a few dollars on glue or paint. A new pack of straws, a wire ring, and spray paint can still keep the project comfortably under the price of many store-bought shades. If you buy a certified pendant light kit, the cost will rise, but the finished fixture can still be far cheaper than a designer pendant.
For the most polished result, spend money on the safest lighting component, not the decorative material. A reliable LED bulb, proper pendant kit, and sturdy frame matter more than fancy straws. The straws are the visual drama; the lighting hardware is the responsible adult in the room.
Is This Project Eco-Friendly?
A plastic straw light fixture is not a perfect environmental solution, but it can be a thoughtful reuse project. The most sustainable approach is to use straws you already have rather than buying new plastic straws just for the craft. If you want the same look without new plastic, consider paper straws, plant-based straws, thrifted craft supplies, or salvaged materials.
The project works best as a reminder that creativity can extend the life of ordinary objects. Reusing materials helps reduce waste, but reducing unnecessary single-use plastic in the first place is still the better long-term habit. In other words: make the fixture, admire the fixture, and maybe keep a reusable straw in your bag like the environmentally aware design genius you are becoming.
Real-Life Experience: What It Feels Like to Make a Plastic Straw Light Fixture
The first thing you learn when making a plastic straw light fixture is that the project looks ridiculous before it looks beautiful. At the beginning, you are just sitting at a table with a pile of straws, scissors, glue, and the quiet fear that you may have misunderstood your own creative vision. This is normal. Many good DIY projects pass through an awkward middle stage where they resemble a school science fair volcano with better lighting ambitions.
Cutting the straws is oddly relaxing. Once you decide on lengths, the rhythm becomes satisfying: measure, snip, sort, repeat. The tiny pieces gather in bowls like colorful building blocks. If you are making a sunburst shade, the project starts to become exciting when the first few rays are attached. Suddenly the frame has movement. It begins to look intentional. You may even tilt your head and whisper, “Oh, this might actually work.” That is the official anthem of budget DIY.
The most important practical lesson is to test your layout before gluing everything permanently. Dry-fit a section with tape or clips. Look at it from across the room. Lighting is visual, and what looks dramatic on a table can look too dense once it hangs overhead. A little spacing allows light to escape and makes the shade feel airy instead of heavy. With straws, negative space is your friend. Without it, the fixture can look more like a plastic helmet than a stylish pendant.
Painting is the moment the project transforms. Before paint, the fixture may still read as “straw craft.” After paint, especially with matte black, soft white, or brushed gold, the material becomes less obvious. The shape takes over. This is why many DIYers love monochrome finishes. They hide the humble origin of the materials and let the design speak. A gold straw sunburst can look playful and glam; a white drum shade can feel clean and modern; a black geometric pendant can look like something from a design studio that serves espresso in tiny cups.
Installation is where patience matters again. The fixture should hang evenly, clear the bulb, and remain easy to remove. After turning the light on, watch it for a few minutes. Notice the shadows. Straw shades can cast beautiful linear patterns on walls and ceilings, especially when the straws are arranged in rows or rays. That shadow play is one of the nicest surprises of the project. It adds texture without adding clutter.
The finished fixture also becomes a story. Visitors may compliment it before realizing what it is made from. When you tell them, expect a pause, a closer look, and possibly the phrase, “Wait, those are straws?” That little moment is the charm of upcycled decor. It proves that style does not always come from expensive materials. Sometimes it comes from imagination, careful spacing, and the confidence to glue beverage accessories to a lampshade frame.
Would this project suit every home? No. A formal dining room with crystal sconces may not be begging for a straw chandelier. But in a creative apartment, studio, dorm, craft room, casual hallway, or playful bedroom, it can be a fantastic statement piece. It is budget-friendly, lightweight, customizable, and genuinely fun to make. Best of all, it turns a disposable object into something that feels personal.
Final Thoughts
A plastic straw light fixture DIY project is proof that home decor does not need to be expensive to be interesting. With a safe LED setup, a lightweight frame, and a clear design plan, plastic straws can become a surprisingly stylish shade, pendant, or chandelier-inspired accent. The key is to treat the straws as decoration only, keep them away from heat, and let the structure shine.
This is the kind of project that rewards experimentation. Try a small version first. Play with color. Test different lengths. Use paint to elevate the finish. Most importantly, enjoy the process. DIY should not feel like a punishment with glue sticks. It should feel like discovery, preferably with fewer burns and more snacks.
So yes, plastic straws can become a light fixture. Not just a “good enough for the laundry room” fixture, either. With care, style, and common sense, they can become a clever, conversation-starting piece of decor. Who knew the humble straw had main-character energy?