
There are household debates that divide families: shoes on or off, thermostat wars, and whether pineapple belongs on pizza. Somewhere in that surprisingly passionate category sits this humble bathroom question: Should you caulk around the toilet?
The short answer is yes, in most cases, you should caulk around the toilet base. A clean bead of bathroom-grade caulk helps block mop water, shower splashes, dust, odors, grime, and suspicious bathroom liquids from sneaking under the toilet. It also gives the toilet a neat, finished look and may help reduce slight shifting when the toilet is already properly installed.
Butand bathrooms love a dramatic “but”caulk should never be used to hide a loose toilet, a bad wax ring, a damaged flange, wet flooring, or an active leak. Caulk is a sealant, not a plumbing confession booth. If the toilet rocks, smells like sewer gas, leaks at the base, or sits on a damaged floor, fix the real problem first.
The Quick Verdict: Yes, Caulk Around the Toilet Base
For most bathrooms, caulking around the toilet is the smarter choice. It creates a tidy barrier where the porcelain base meets the floor. That seam may look small, but it can collect an impressive amount of grime, moisture, and odor over time. If your bathroom floor is tile, vinyl, laminate, or wood, that little gap can become a tiny underground nightclub for mildew and bacteria. Nobody invited them, but they show up anyway.
Many plumbing codes and local inspection practices also favor sealing the joint where plumbing fixtures meet floors or walls. The goal is simple: prevent water and debris from getting into places that cannot be cleaned easily. A toilet base is exactly that kind of place. Once liquid gets underneath, it does not evaporate quickly. It sits, stews, and occasionally becomes the reason your bathroom smells “mysterious.”
So if your toilet is stable, properly bolted, leak-free, and sitting on a sound floor, caulk it. Use a flexible, waterproof bathroom caulk, apply it neatly, and let it cure according to the label. This is one of those small DIY jobs that makes a bathroom look more finished and behave better.
Why Is Caulking Around a Toilet So Controversial?
The debate comes from a reasonable concern: if the toilet leaks from the wax ring or seal underneath, caulk might trap the water and hide the leak. That sounds scary because hidden water damage is the villain in many homeowner horror stories. It creeps into subfloors, stains ceilings below, and quietly sends your repair budget into witness protection.
That concern is not silly. A leaking toilet base should be addressed quickly, and anything that delays discovery can make damage worse. However, the counterargument is strong: water from outside the toilet is far more common than many people realize. Mop water, shower spray, sink splashes, bath overflows, toddler experiments, pet water-bowl chaos, and “bad aim” can all run toward the toilet base. Without caulk, that moisture can slide under the toilet and stay there.
In other words, not caulking may help reveal one type of leak, but it also invites several other moisture problems. The practical middle ground many pros recommend is to caulk the front and sides while leaving a small gap at the back. Others prefer sealing the full perimeter because water does not always politely travel to the one little gap you left open. Local code, manufacturer instructions, and the condition of your bathroom should guide the final decision.
Why You Should Caulk Around the Toilet
1. Caulk Keeps Water from Sneaking Under the Toilet
Bathrooms are wet rooms, even when nobody is actively taking a shower. Water splashes out of sinks, tubs, showers, and mop buckets. If the base of the toilet is unsealed, moisture can slip underneath the toilet where towels, fans, and normal cleaning cannot reach it.
That trapped moisture can lead to stains, mildew, soft flooring, damaged grout, swollen wood, or unpleasant odors. On wood subfloors, prolonged dampness is especially risky. Caulk creates a simple barrier that helps keep everyday bathroom water on the visible surface, where you can wipe it up like a responsible adultor at least like someone pretending to be one.
2. Caulk Makes Cleaning Easier
An uncaulked toilet base often leaves a dark, uneven shadow line around the porcelain. That line collects dust, hair, urine residue, floor cleaner, and whatever mystery particles bathrooms manufacture at 3 a.m. Once gunk gets under the toilet edge, cleaning becomes nearly impossible without removing the toilet.
A smooth bead of caulk turns that crack into a wipeable seam. Instead of scrubbing a tiny canyon with an old toothbrush and regret, you can clean the area with a cloth or bathroom-safe cleaner. For busy households, rental properties, and guest bathrooms, that is a very real advantage.
3. Caulk Helps Control Odors
Caulk does not fix sewer gas. If you smell sewer gas, the wax ring, flange, venting, or toilet installation may need attention. However, caulk can help prevent everyday odor sources from collecting under the toilet base. A dirty, damp gap around the toilet can trap organic residue and cleaning water, creating a stale smell that no candle called “Ocean Linen Breeze” can fully defeat.
When the base is sealed, the floor stays cleaner and odors are less likely to settle into hidden spaces. Your bathroom should smell like soap, not like a secret basement.
4. Caulk Can Reduce Pest-Friendly Gaps
Small gaps around fixtures can attract small pests, especially in older homes. Bugs like dark, damp, protected areas. The unsealed space under a toilet base checks those boxes nicely. Caulk helps close off that little hideaway and gives pests one less reason to tour your bathroom.
5. Caulk Gives the Toilet a Finished Look
Even if everything functions perfectly, an uncaulked toilet can look unfinished. A neat caulk line hides the uneven edge where porcelain meets flooring. It also makes the installation look intentional, not like the toilet was dropped into place during a mild emergency.
When You Should Not Caulk Around a Toilet Yet
Caulk is helpful only after the toilet is correctly installed. If there is an underlying issue, caulking too soon is like putting a tuxedo on a raccoon: impressive from a distance, still chaos underneath.
Do Not Caulk a Rocking Toilet
If the toilet rocks when you sit down, stand up, or gently push the bowl, stop. A toilet should be stable before caulk is applied. Rocking can break the wax ring or damage the flange. The fix may involve tightening closet bolts carefully, adding proper toilet shims, correcting an uneven floor, or repairing the flange.
Do not crank the bolts aggressively. Toilets are porcelain, and porcelain responds to overtightening by cracking in a way that makes everyone sad. Tighten only until snug, then address leveling and support properly.
Do Not Caulk Over an Active Leak
If water appears around the toilet base after flushing, caulk is not the answer. The wax ring or rubber seal may have failed, the flange may be too low or broken, the toilet may not be seated correctly, or the tank may be leaking and running down the outside of the bowl. Find the source before sealing anything.
Do Not Caulk Over Wet, Moldy, or Damaged Flooring
If the floor around the toilet feels soft, smells musty, shows dark staining, or has loose tiles, inspect the damage first. Sealing the edge may trap moisture inside the floor system. Let the area dry, repair damaged materials, and reinstall the toilet correctly before applying new caulk.
Should You Leave a Gap at the Back?
This is the famous toilet-caulk compromise. Many plumbers and DIYers caulk the front and sides of the toilet, then leave a small gap at the back. The idea is that if the wax ring leaks, water has a visible escape path instead of being fully trapped under the toilet.
This approach makes sense in many homes, especially where local code allows it and the gap is hidden from normal view. A rear opening can act as a leak clue. If water appears behind the toilet after flushing, you know something is wrong.
However, the gap method is not perfect. Water does not always travel where you want it to. Floors slope. Caulk lines vary. Leaks may move downward through the flange opening instead of outward toward the back. In some jurisdictions or inspections, the expectation may be a fully sealed joint. That is why the best answer is practical: follow local code and manufacturer instructions, and if you choose to leave a gap, keep it small, clean, and intentional.
What Kind of Caulk Should You Use Around a Toilet?
The best caulk for a toilet base is usually a high-quality, waterproof kitchen-and-bath caulk. Look for a product labeled for bathrooms, plumbing fixtures, high-moisture areas, or mildew resistance. Silicone caulk is popular because it stays flexible and handles water well. Siliconized acrylic latex can also work in some situations, especially if you want easier cleanup and a paintable surface, but pure silicone generally performs better in wet areas.
For color, white is the classic choice for white toilets and light floors. Clear caulk can work on patterned tile or stone, though it may show dirt differently over time. Color-matched caulk can look excellent with tile floors, especially gray, beige, or tan grout lines.
Avoid basic painter’s caulk, construction adhesive, and plumber’s putty for this job. Painter’s caulk is not designed for constant bathroom moisture. Construction adhesive is far too aggressive and can make future toilet removal miserable. Plumber’s putty is useful for certain drains and fittings, but it is not the right material for sealing the exterior base of a toilet to the floor.
How to Caulk Around a Toilet Step by Step
Step 1: Check the Toilet First
Before opening the caulk tube, test the toilet. Sit on it carefully and shift your weight. Gently push the bowl from the side. Flush several times and inspect the base, tank bolts, supply line, shutoff valve, and floor. If anything moves or leaks, fix that before caulking.
Step 2: Remove Old Caulk
If old caulk is cracked, moldy, peeling, or lumpy, remove it. Use a plastic caulk removal tool, utility knife, scraper, or caulk softener as needed. Work carefully so you do not scratch tile, vinyl, or the toilet base. Old silicone residue can prevent new caulk from bonding, so take your time.
Step 3: Clean and Dry the Area
Clean the seam with bathroom cleaner, then wipe away residue. For stubborn silicone film, rubbing alcohol or mineral spirits may help, depending on your flooring material. Let the area dry completely. Caulk and trapped moisture are not friends; they are coworkers who send passive-aggressive emails.
Step 4: Tape for a Cleaner Line
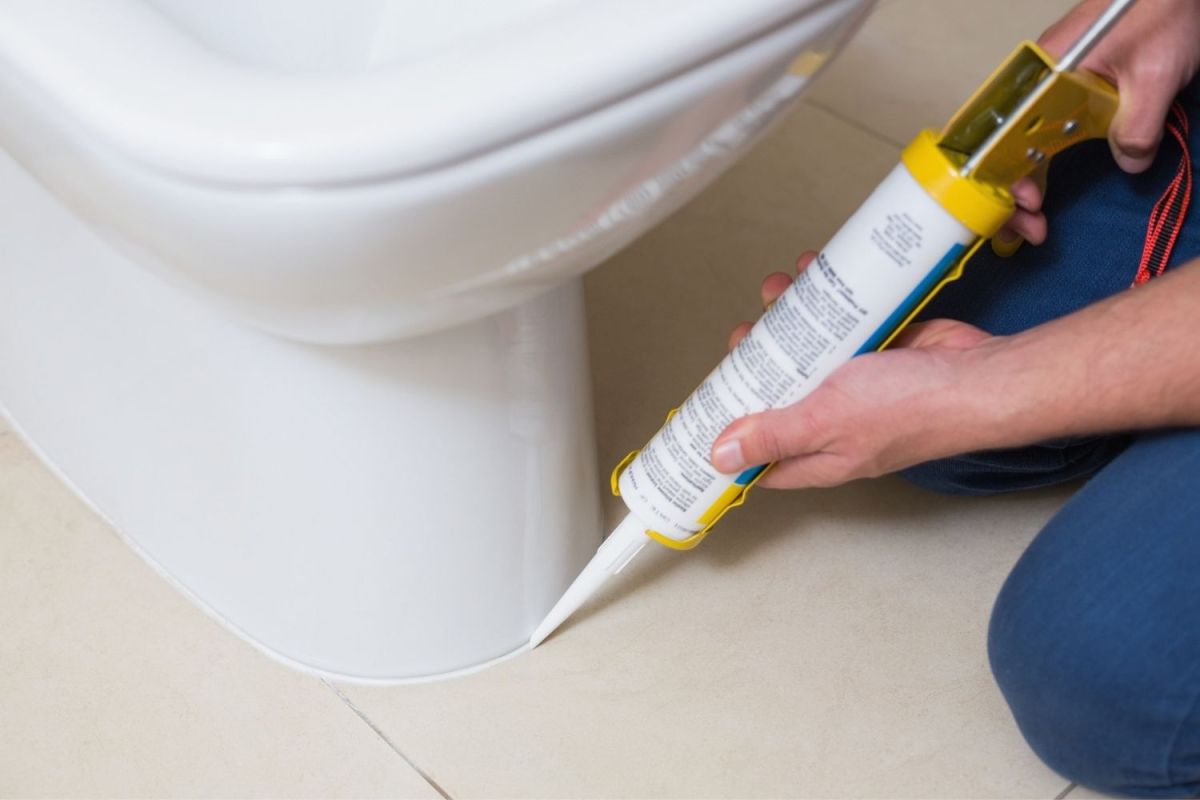
Painter’s tape is optional but helpful. Apply one strip on the floor and one on the toilet base, leaving a narrow channel for the caulk. This keeps the bead straight and prevents the “frosted cupcake” look that happens when enthusiasm exceeds control.
Step 5: Apply a Small, Even Bead
Cut the nozzle at a 45-degree angle. Use steady pressure and move slowly around the base. The goal is a small, continuous bead, not a decorative mountain range. If you are leaving a gap at the back, stop before the hidden rear section and restart on the other side.
Step 6: Smooth the Caulk
Use a caulk finishing tool, a damp gloved finger, or a lightly moistened cloth to smooth the bead. Remove the tape before the caulk skins over. Wipe away excess immediately.
Step 7: Let It Cure
Follow the product label. Some caulks are water-ready in a short time, while others need 24 hours or more to cure fully. Avoid mopping, scrubbing, or soaking the area until the seal has set properly.
Common Mistakes to Avoid
The biggest mistake is using caulk to solve a plumbing problem. Caulk can seal a seam, but it cannot repair a broken flange, replace a wax ring, level a toilet, or stop a leak from the tank. If water appears only after flushing, the toilet probably needs to be pulled and reset.
Another mistake is applying too much caulk. A thick bead looks sloppy and attracts dirt. A narrow, smooth bead is stronger, cleaner, and easier to maintain. Also avoid caulking over dirt, old silicone, wet flooring, or loose material. Surface preparation matters more than brand loyalty.
Finally, do not forget future maintenance. Caulk does not last forever. Inspect the toilet base during routine cleaning. If the bead cracks, lifts, darkens, or separates, remove it and recaulk. Adding fresh caulk over failing caulk usually creates a layered mess that peels faster.
Real-World Experience: What Happens When You Doand Don’tCaulk
In real bathrooms, the toilet base lives a harder life than people admit. It gets hit with mop water, wet feet, shower overspray, pet accidents, potty-training mishaps, and cleaning products that promise “fresh citrus” but mostly smell like chemical determination. Over time, an unsealed toilet base can develop a dark outline that refuses to disappear no matter how aggressively you scrub. That line is not just ugly; it is often a mixture of dust, moisture, residue, and old floor cleaner that has settled into the gap.
One common homeowner experience goes like this: the toilet looks fine for years, then someone decides to deep-clean the bathroom before guests arrive. They notice a grayish ring around the toilet base. They spray cleaner, scrub with a brush, wipe with paper towels, and somehow the line still looks like it belongs in a crime documentary. The problem is that the grime is not only on the surface. It has worked into the tiny space under the toilet edge. A neat caulk bead would have made that seam wipeable from the beginning.
Another experience happens after installing a new tile floor. The toilet is reset, the bolts are snug, and everything works. But the porcelain base does not sit perfectly flush because tile has texture, grout lines, or tiny height variations. A thin bead of caulk visually bridges the gap and makes the installation look professional. Without it, even a properly installed toilet can look slightly unfinished, as if the bathroom project stopped one cup of coffee too early.
On the other hand, caulk can create trouble when it is used too soon. Imagine a toilet that rocks slightly. Someone notices the movement and decides to “stabilize” it with caulk. For a week, it seems better. Then the rocking returns, the wax seal weakens, and water begins to damage the floor under the toilet. The caulk did not fix the issue; it simply delayed the awkward conversation. The correct fix would have been to shim the toilet properly, inspect the flange, and reset the wax ring if needed.
There is also the rental-property lesson. In busy bathrooms, uncaulked toilet bases tend to become cleaning headaches fast. Tenants may mop often, but water can still get under the toilet. Over time, that hidden moisture may create odor complaints. A properly caulked base reduces that risk and makes turnovers easier. Property managers often appreciate small details that prevent big smells because nobody wants a maintenance ticket titled “bathroom has vibes.”
The best experience-based advice is simple: caulk a healthy toilet, but do not caulk a suspicious one. If the toilet is stable, dry, level, and leak-free, seal the base neatly. If the toilet rocks, leaks, smells like sewer gas, or sits on questionable flooring, investigate first. Caulk should be the final finishing touch, not the first attempt at denial.
Final Answer: Should You Caulk Around the Toilet?
Yes, you should usually caulk around the toilet. It protects the floor from everyday moisture, blocks grime from collecting under the base, improves hygiene, reduces odors, discourages pests, and gives the bathroom a clean, finished look. In many areas, sealing fixture-to-floor joints is also expected by plumbing code or inspection practice.
The important rule is to caulk only after the toilet is properly installed. A toilet should not rock, leak, wobble, or sit on damaged flooring. If it does, repair the installation before sealing the base. Choose a waterproof kitchen-and-bath caulk, apply a small bead, smooth it cleanly, and let it cure. If you prefer early leak visibility and local requirements allow it, leave a small gap at the back. Otherwise, follow the manufacturer’s directions and local code.
Caulking around a toilet is not glamorous. Nobody throws a party because the toilet base has a perfect bead of silicone. But it is one of those small bathroom details that quietly prevents bigger problems. And in home maintenance, quiet prevention is usually cheaper than dramatic repair.
SEO Tags