
A convincing cabin kitchen should feel discovered, not delivered. It should look as though the pine walls have watched a hundred pancake breakfasts, even if the cabinets arrived last month in flat boxes and the “antique” table was rescued from a neighbor’s garage. That relaxed authenticity is what makes a budget-conscious Catskills kitchen so appealing.
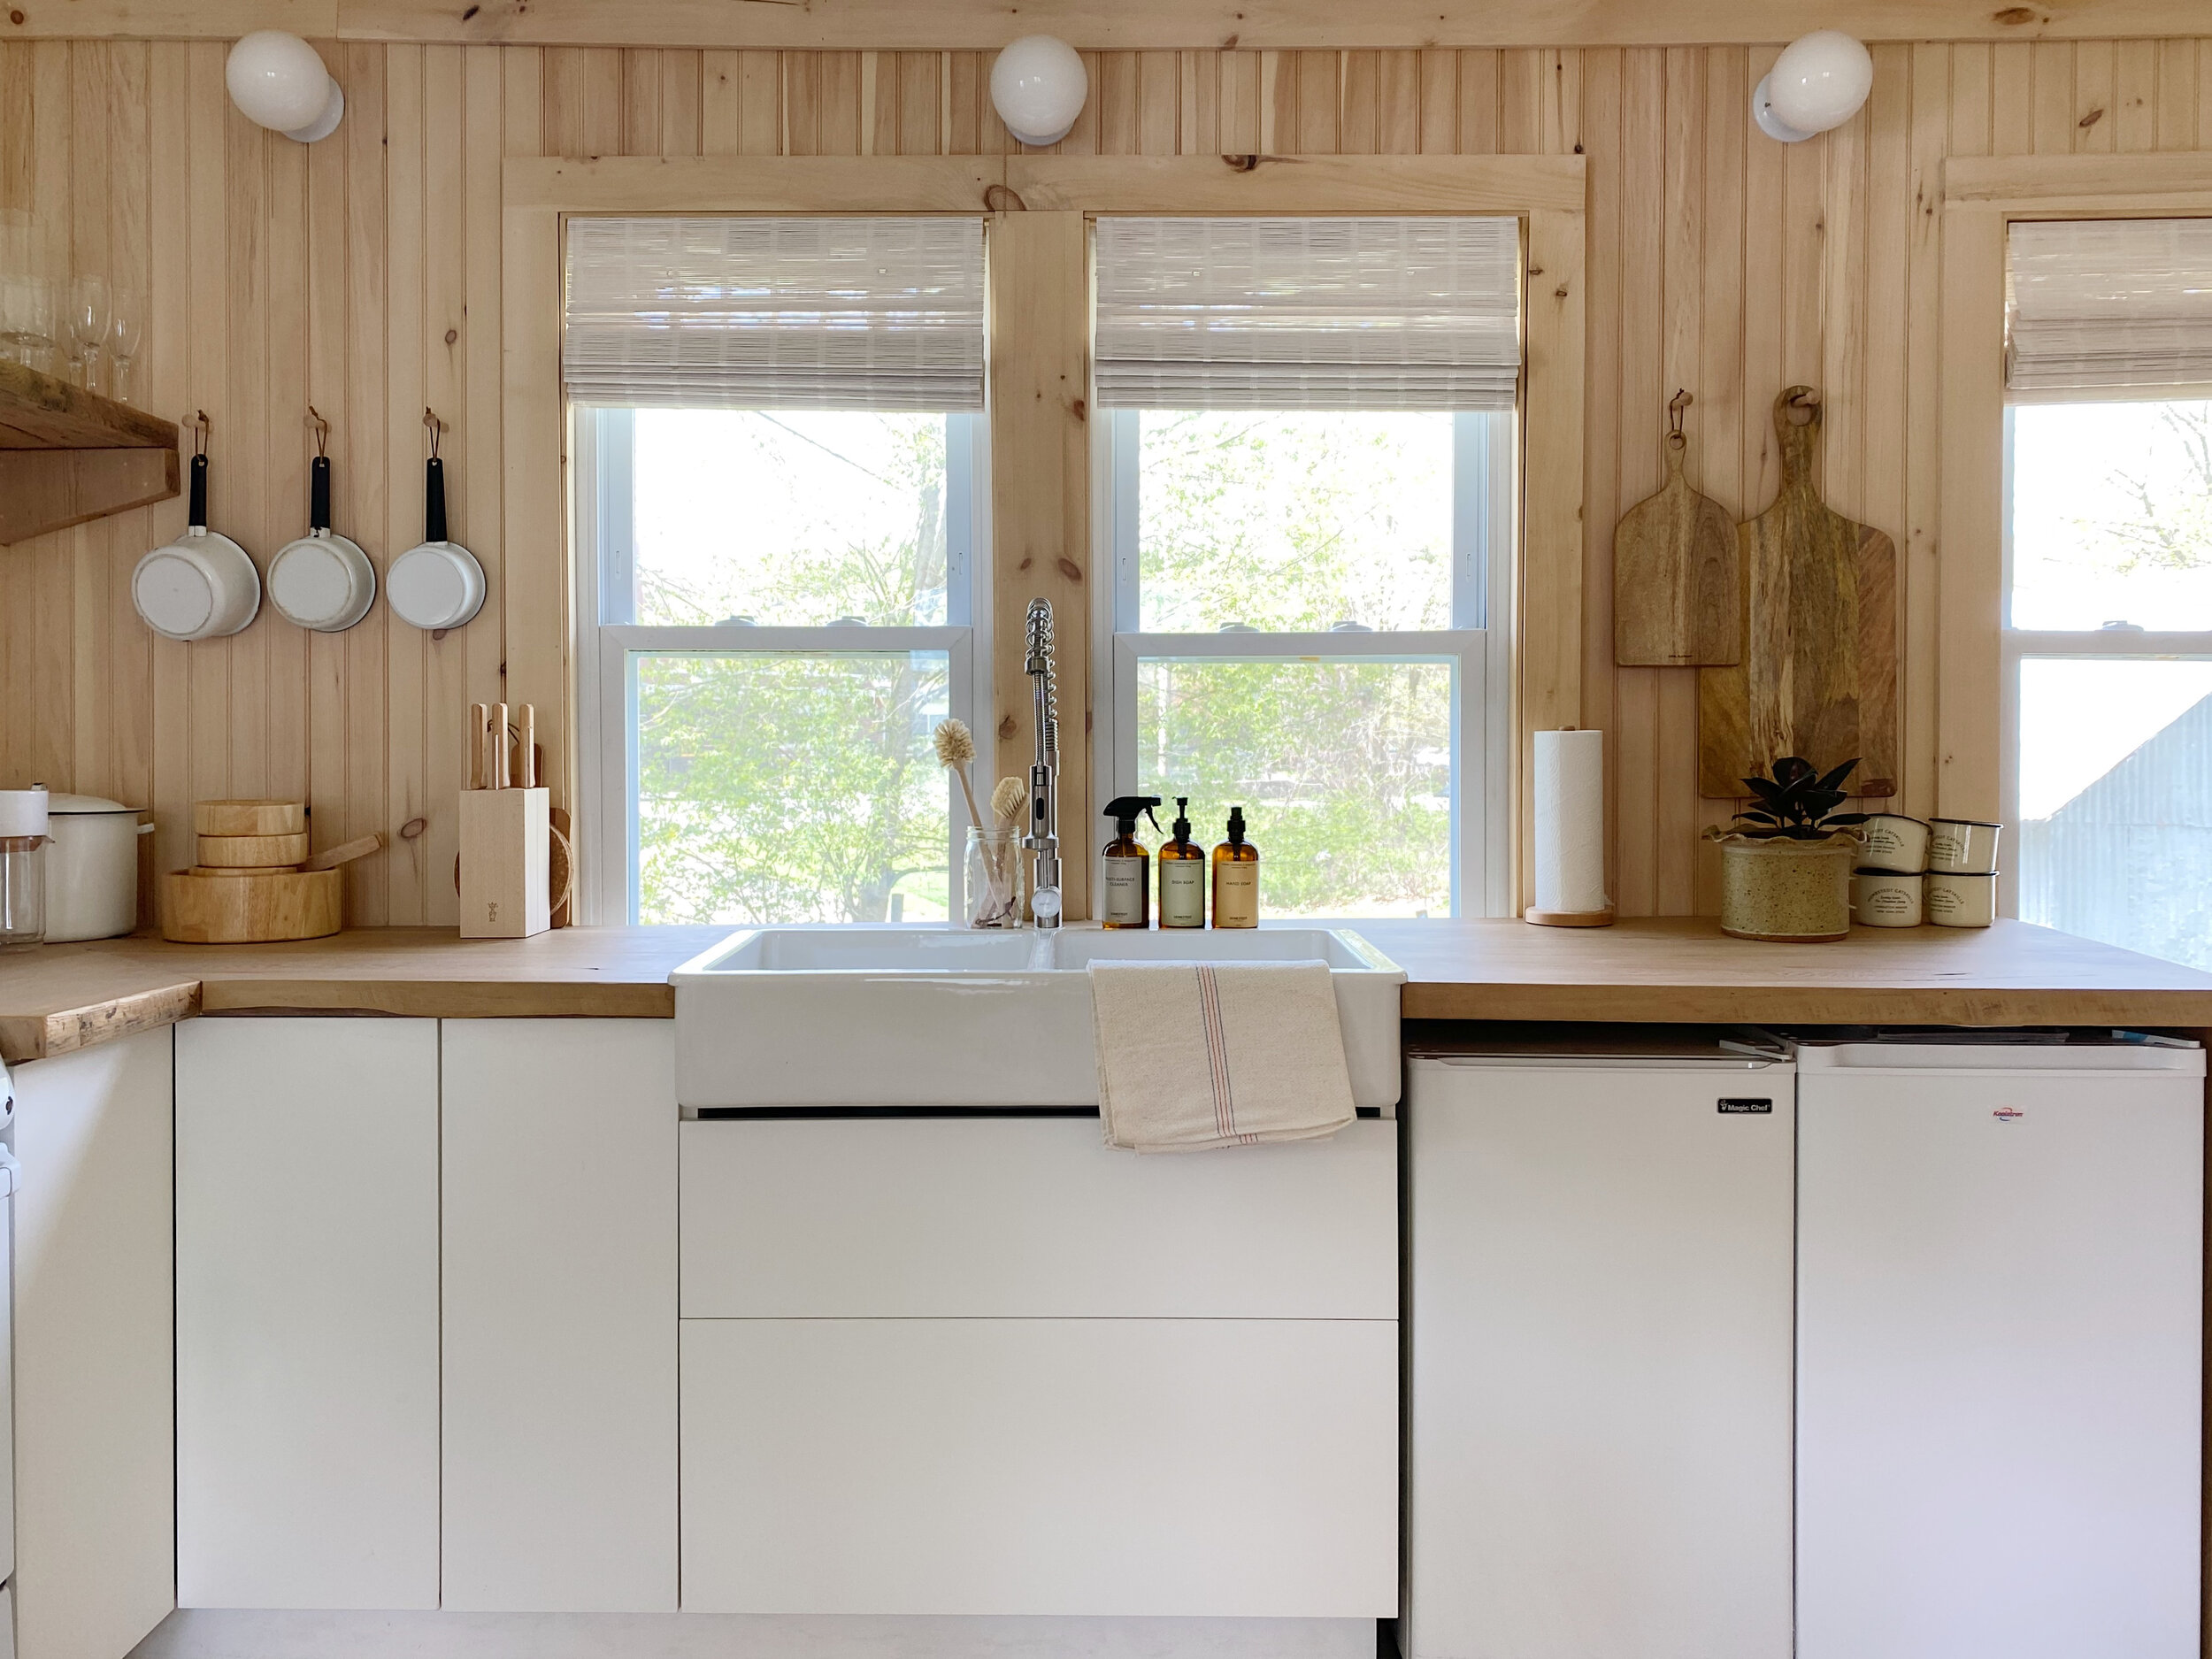
The reference look is refreshingly direct: plain white lower cabinets, reclaimed-wood countertops, tongue-and-groove pine walls, refinished wood floors, modest appliances, pale ash furniture, woven shades, and simple lighting. None of the pieces is especially loud. Together, they create a warm, practical room with enough character to make stainless-steel show kitchens look slightly overdressed.
Why the Catskills Cabin Kitchen Look Works
The design depends on contrast. Painted cabinetry brightens a compact room, while wood adds depth and warmth. Dark metal or black accents give the pale palette definition. Because the materials are limited, affordable choices appear intentional rather than merely inexpensive.
It also lets the cabin do some of the decorating. Original floors, visible grain, simple trim, and slightly imperfect surfaces carry more personality than a cart full of “rustic” accessories. The best version is not a woodland theme park. There are no mandatory antlers, novelty bears, or signs informing guests that coffee happens in the kitchen.
Finally, it combines new basics with old character. Stock cabinets and straightforward appliances handle daily work. Vintage stools, enamelware, stoneware, an old table, and reclaimed boards make the room feel collected over time. The goal is not to make every item old; it is to make every item belong.
Protect the Budget by Keeping the Layout
The cheapest plumbing line is usually the one already inside the wall. Before selecting colors, decide whether the sink, range, refrigerator, outlets, and major lighting points can stay close to their current locations. One documented budget renovation kept the major systems largely in place and completed the fixed improvements for under $6,000 at the time of publication. That strategy reduced outside labor and prevented a refresh from becoming a demolition documentary.
Measure circulation before adding an island. The National Kitchen & Bath Association recommends at least 42 inches for a one-cook work aisle and 48 inches for multiple cooks. In a tight cabin, a narrow farm table or rolling cart may be more useful than a permanent island that forces everyone to walk sideways like courteous crabs.
How to Recreate the Look Without Overspending
Start with Simple Painted Base Cabinets
Plain-front or Shaker-style lower cabinets are the visual foundation. White is closest to the inspiration kitchen, but soft cream, putty, pale mushroom, or muted gray-green can work just as well. If the cabinet boxes are sturdy and the layout functions, repainting doors and changing hardware generally makes more sense than replacing everything.
Preparation is the difference between a durable finish and a drawer that sticks to your sweater. Degrease thoroughly, sand as required, prime compatible surfaces, use a cabinet-grade coating, and respect the stated cure time. Label hinges and doors before removal; “I will remember where these go” is one of renovation’s oldest practical jokes. Lowe’s and other remodeling guides likewise emphasize surface preparation, quality paint, and proper curing for DIY cabinet work.
Use Open Shelves Selectively
Two or three wood shelves reveal more of the pine wall, visually enlarge the room, and cost less than a full bank of upper cabinets. In one real-world makeover, four shelves cost under $100 at the time, while upper cabinets were estimated to add at least $1,000. The trade-off is maintenance: open shelves collect dust and cooking residue, so place them away from the range when possible and use them for everyday dishes that cycle through the dishwasher.
Keep closed base storage for cookware, food packages, cleaning supplies, and the mysterious drawer containing seven lids for three containers. Open shelving looks best when it displays useful items in a restrained palette rather than every mug acquired since college.
Add Warm Wood Countertops
Butcher block or reclaimed wood creates the cabin mood immediately. It is tactile, repairable, and often more affordable than premium stone. It is not maintenance-free. Wood must be sealed promptly, kept dry around sinks, and maintained according to the finish. Oiled surfaces need periodic reapplication; damaged areas can often be sanded and refinished.
For an easier-care compromise, use wood on a short counter, freestanding cart, or dining table and choose laminate or another durable material around the sink. Repeating the wood tone on the shelves helps the mixed surfaces feel planned.
Bring in Pine Without Building a Wooden Cave
Tongue-and-groove pine adds rhythm and warmth, but restraint matters. Use it on the primary wall, ceiling, or cooking zone rather than covering every visible surface. Pair pale pine with painted cabinets and quiet hardware. A clear low-sheen finish preserves the fresh look; a light wash can soften orange undertones.
Wood tones do not need to match perfectly, but they should relate. Let one tone dominate, then add limited contrast. If the floor, walls, counters, shelves, table, and chairs all compete, paint one element and give the eye somewhere to rest.
Refinish the Floor Before Replacing It
Scratches, uneven color, and old nail marks can look appropriate in a cabin. Sanding and refinishing original boards may preserve more character than installing a new floor. When saving the wood is not practical, consider simple porcelain tile, durable sheet vinyl, or painted floorboards in a quiet color. The floor should support the room, not audition for the lead role.
Furnish Instead of Overbuilding
A freestanding table can provide dining and prep space. A vintage workbench can become an island. A narrow cupboard can hold pantry goods, and a rolling cart can move beside the range during cooking. This unfitted approach is flexible, often less expensive, and well suited to old cabins whose walls regard ninety-degree angles as optional. Design publications increasingly highlight freestanding tables, cupboards, butcher blocks, and carts as functional alternatives to fully built-in kitchens.
Choose Appliances, Ventilation, and Lighting for Real Life
A compact refrigerator may suit a two-person weekend retreat, but it can become a cold-food traffic jam when six guests arrive with beverages and an emotionally significant amount of cheese. Inventory what the cabin holds during a full weekend before downsizing. White appliances often blend naturally with pale cabinetry. When replacing a refrigerator, compare operating cost as well as purchase price; ENERGY STAR says certified models are about 9 percent more efficient than models meeting the federal minimum standard.
Do not sacrifice ventilation for a cleaner photograph. The U.S. Environmental Protection Agency recommends using a range hood whenever cooking, leaving it on for 10 to 20 minutes afterward, and venting outdoors when possible. That matters in a compact cabin where the kitchen may open directly into the living and sleeping areas.
Layer modest lighting instead of relying on one heroic ceiling bulb. Combine general light with task lighting at the counter and a pendant or compact fixture above the table. Simple enamel shades, flush mounts, plug-in sconces, and under-shelf lights can look tailored without luxury pricing. Use consistent warm bulbs and add dimmers where practical.
A Budget Plan That Keeps Priorities Straight
Fund safety and function first: structural repairs, electrical work, plumbing, ventilation, and moisture control. Next pay for surfaces that receive daily wear, including cabinets, counters, sink, faucet, and floor. Lighting and movable furniture follow. Accessories come last, because the kitchen does not become more operational when it acquires a decorative wooden spoon the size of a canoe paddle.
| Area | Budget-Conscious Move | Worth Paying For |
|---|---|---|
| Cabinets | Keep sound boxes; paint doors; use stock bases | Durable finish and quality hinges |
| Counters | Butcher block, reclaimed wood, or laminate | Accurate sink cuts and proper sealing |
| Storage | Open shelves, peg rails, freestanding cupboard | Strong brackets and safe anchoring |
| Lighting | Simple flush mounts and task lights | Professional electrical work when required |
| Furniture | Secondhand table, chairs, or cart | Sound construction and comfortable seating |
Consumer Reports, HGTV, Better Homes & Gardens, and Architectural Digest all emphasize variations of the same cost-control logic: preserve workable elements, avoid unnecessary layout changes, repaint sound cabinetry, use budget-friendly surfaces, and make a few visible upgrades rather than replacing everything.
Mistakes That Can Spoil the Cabin Effect
Too much themed decor: A believable cabin kitchen develops slowly. Useful vintage objects feel natural; five matching “rustic” signs feel like a gift shop with plumbing.
No closed storage: Keep cabinets for food packages, appliances, and visual chaos. Open shelves are a feature, not a moral obligation.
Ignoring maintenance: Wood counters, open shelves, and woven shades require care. Use them selectively when your enthusiasm for oiling and dusting is mostly theoretical.
Buying before measuring: A bargain is not a bargain when the refrigerator blocks a doorway or the table creates a human slalom course.
Conclusion: Spend on Usefulness, Collect the Character
The budget-conscious Catskills kitchen succeeds because it is edited, flexible, and honest about materials. Preserve the layout, brighten the cabinets, add wood where it creates warmth, use furniture instead of unnecessary built-ins, and let vintage pieces arrive gradually. The finished room should not look expensive. It should look inevitableas though it has always been waiting for coffee, muddy boots, and one more guest.
Experience Notes: A Weekend in a Budget-Conscious Catskills Kitchen
Imagine arriving at the cabin on Friday evening after a long drive north. The kitchen is the first room that makes the place feel different from home. There is no glossy wall of cabinetry and no appliance screen asking to connect to Wi-Fi. The pine catches the last amber light, the white cabinets keep the room from feeling heavy, and the wood counter already looks better with a paper bag of bread sitting on it.
Unpacking reveals the first practical lesson: a small kitchen rewards organization immediately. Breakfast food goes into one cabinet, dinner supplies into another, and everyday plates remain on the open shelf where nobody needs directions. The compact refrigerator demands strategy. Bulky packaging is removed, drinks are grouped together, and one guest is gently informed that bringing a watermelon the size of a bowling ball was optimistic.
Saturday morning is when the layout proves itself. Two people can make coffee and eggs without colliding because the table provides a landing zone away from the range. A peg rail keeps pans within reach, and open shelves make bowls easy to grab. Sunlight moves across the refinished floor, highlighting scratches that might look like damage in a formal kitchen but read as history here.
Cooking also exposes the less photogenic realities. The range hood matters when bacon hits the skillet. Wood around the sink must be wiped dry. Shelves near the stove need regular cleaning. Decorative objects that sit too close to the cooking zone quickly acquire a glamorous finish known as airborne grease.
By afternoon, the kitchen becomes social space. Someone chops vegetables at the counter, another person sits at the table, and a third leans against the freestanding cupboard offering advice of questionable value. The room does not need an enormous island because movable furniture creates flexible gathering points. Chairs can go outside, the cart can roll beside the table, and the center remains open for traffic.
Dinner feels relaxed because the materials are forgiving. A new mark on the wood top is not a crisis. Mismatched plates look appropriate. Enamel cookware moves from stove to table without ceremony. The kitchen encourages participation rather than performance; guests help because everything is visible and understandable.
On Sunday, cleanup is quick but honest. Shelves receive a wipe, the counter is dried, and the floor gets swept with a wooden-handled broom. Nothing feels precious, yet the room never feels careless. That balance is the real luxury of the budget cabin kitchen: it supports the weekend instead of becoming the weekend’s main maintenance project.
The lasting impression is not that every object was cheap. It is that every object earned its place. The room feels warm because of wood, bright because of paint, personal because of vintage finds, and functional because the layout was protected. When it is time to leave, the kitchen looks almost as it did on arrivalonly now there are crumbs on the table, a towel drying beside the sink, and plans to return with a smaller watermelon.
Research Note
This guide synthesizes information from 13 reputable U.S. sources: Remodelista, Apartment Therapy, Better Homes & Gardens, Architectural Digest, House Beautiful, HGTV, Consumer Reports, The Spruce, The Home Depot, Lowe’s, ENERGY STAR, the U.S. Environmental Protection Agency, and the National Kitchen & Bath Association.
Note: Product prices and availability change. Verify local building, electrical, plumbing, ventilation, and fire-safety requirements before beginning work.