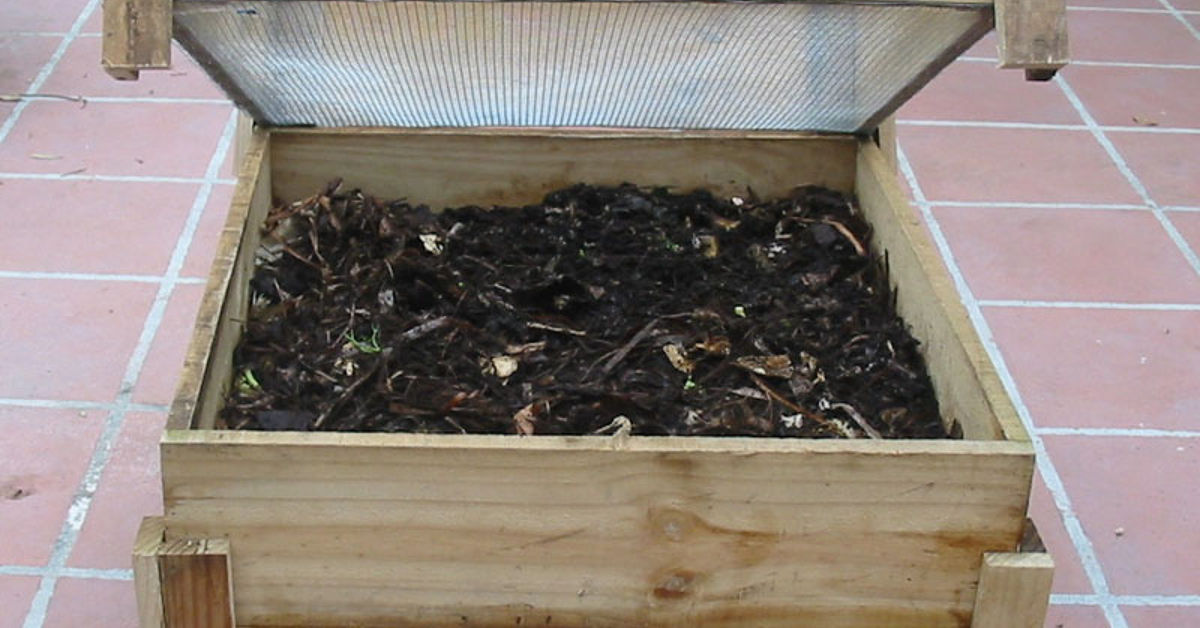

Worm composting sounds like something invented by a garden gnome with a recycling obsession, but it is one of the easiest, cleanest, and most space-friendly ways to turn kitchen scraps into rich compost. Also called vermicomposting, worm composting uses red wigglers and helpful microbes to transform fruit peels, coffee grounds, shredded paper, and veggie scraps into dark, crumbly worm castings that plants absolutely love.
The best part? You do not need a farm, a tractor, or a mysterious pile steaming in the backyard. A good worm composting bin can live under a sink, in a basement, on a shaded porch, in a garage, or even tucked beside raised garden beds. Whether you live in an apartment, a suburban home, or a tiny house where every square inch has to earn rent, there is a worm bin design that can work for you.
This guide covers 10 practical worm composting bin ideas and tutorials, from beginner-friendly plastic totes to stacked tray systems, wooden bins, bucket towers, and classroom-friendly mini bins. You will also learn what to feed your worms, how to avoid smells, how to harvest worm castings, and how to keep your worm herd happy enough that they do not stage a dramatic escape across your laundry room floor.
What Makes a Good Worm Composting Bin?
A successful worm composting bin is not complicated, but it does need to meet a few non-negotiable worm demands. Red wigglers like darkness, moisture, airflow, moderate temperatures, and a steady supply of soft organic food. They do not want bright light, standing water, freezing conditions, meat scraps, or surprise garlic bombs.
Most home vermicomposting bins are made from dark plastic, untreated wood, buckets, trays, or repurposed containers. The key features are drainage, ventilation, a lid, bedding, and enough surface area for worms to feed near the top. Red wigglers are surface dwellers, so a shallow bin usually works better than a deep barrel. Think “wide apartment” rather than “worm skyscraper.”
Basic Supplies for Most Worm Bin Tutorials
- A dark plastic tote, wooden box, bucket, tray system, or other container
- A tight-fitting lid or breathable cover
- Air holes near the top and drainage holes near the bottom
- A tray or second bin to catch excess liquid
- Moist bedding such as shredded newspaper, cardboard, paper bags, dry leaves, or coconut coir
- Red wiggler worms, usually Eisenia fetida
- Small amounts of fruit and vegetable scraps, coffee grounds, crushed eggshells, and other worm-safe foods
1. The Classic Plastic Tote Worm Bin
The plastic tote worm bin is the “first apartment” of vermicomposting: affordable, simple, and surprisingly functional when set up correctly. A 10-gallon dark storage tote is a great starter size for beginners, especially if you want an indoor worm composting bin for a kitchen, laundry room, closet, basement, or garage.
How to Make It
Choose a dark, opaque tote because worms dislike light. Drill several small ventilation holes around the upper sides and lid. Add drainage holes to the bottom, then place the tote inside a second undrilled tote or on a tray to catch excess moisture. Cover larger air holes with window screen if you are worried about worms wandering or fruit flies sneaking in like tiny uninvited dinner guests.
Fill the bin about halfway with moist, fluffed bedding. The bedding should feel like a wrung-out sponge: damp, not dripping. Add a handful of finished compost or garden soil to introduce grit and microorganisms. Place the worms on top, let them settle, then begin feeding lightly after they have moved down into the bedding.
This bin is best for beginners, apartment dwellers, and anyone who wants to test vermicomposting without spending much money. It is easy to move, easy to clean, and forgiving if you manage moisture carefully.
2. The Two-Bin Drainage System
The two-bin drainage system is a smarter version of the classic tote. It uses one drilled bin nested inside a second solid bin. The upper bin holds bedding, worms, and food scraps. The lower bin catches any liquid that drains out. This design helps prevent soggy bedding, which is one of the main causes of odor in worm composting.
How to Build It
Start with two matching dark plastic totes. Drill air holes around the top sides and lid of one tote. Drill small drainage holes in the bottom of that same tote. Leave the second tote untouched. Place a few blocks, upside-down plastic cups, or short spacers inside the bottom tote so the drilled tote sits slightly raised. This creates room for airflow and drainage.
Add bedding, worms, and food scraps to the top bin only. Check the bottom bin occasionally. If liquid collects, it may mean the worm bin is too wet or overfed. Add dry shredded cardboard and slow down feeding until conditions balance out. A healthy worm bin should smell earthy, not swampy.
This tutorial is ideal for people who worry about mess. It is also a strong choice for indoor setups because it gives extra protection against leaks.
3. The Stackable Tray Worm Composting Bin
A stackable worm bin is the tidy organizer’s dream. Instead of one large container, it uses multiple trays stacked vertically. Worms begin in the bottom tray with bedding and food. When that tray starts filling with castings, you add a fresh tray above it with new bedding and scraps. The worms naturally migrate upward toward the food, leaving finished vermicompost below.
Why It Works
Stackable systems make harvesting easier because the worms do much of the sorting for you. They are excellent for people who want a cleaner, less hands-on method. Commercial systems are available, but DIY versions can be made with shallow plastic bins, nursery trays, or food-safe containers with holes drilled between layers.
The trick is to make sure each tray has enough contact with the tray below it so worms can move upward. Keep bedding moist, avoid packing it down, and feed gradually. Stackable bins are not completely “set it and forget it,” but they reduce the big messy dump-and-sort harvest that makes some beginners reconsider their life choices.
4. The Wooden Worm Composting Box
A wooden worm bin is sturdy, breathable, and attractive enough for a porch, potting shed, or covered garden area. Wood naturally absorbs some moisture and allows better airflow than plastic, which can help prevent the bin from becoming too wet. The classic wooden worm box is shallow and wide, often around 1 foot deep, 2 feet wide, and 3 feet long.
How to Build It
Use untreated lumber or exterior-grade plywood. Avoid pressure-treated wood because chemicals can harm worms. Also be cautious with naturally aromatic woods such as cedar, redwood, and cypress, which may contain compounds that worms dislike. Build a shallow box with drainage holes in the bottom, small air gaps or drilled ventilation holes on the sides, and a hinged lid for easy feeding.
If the bin will sit outdoors, place it in shade and protect it from heavy rain. You can paint the outside to reflect heat or match your garden style, but leave the inside unfinished. Add wheels if the bin is large; worm compost is wonderful, but moving a full wooden bin without wheels can turn into an accidental CrossFit session.
This idea is best for gardeners who want a long-lasting outdoor or garage setup with more capacity than a small tote.
5. The Under-Sink Apartment Worm Bin
Yes, you can keep worms under the sink. No, your kitchen does not have to smell like a swamp monster’s lunchbox. A small indoor worm composting bin works beautifully when it is well ventilated, lightly fed, and covered with bedding after every feeding.
How to Set It Up
Use a compact dark tote, cat-litter container, or rectangular storage box that fits your cabinet. Drill air holes near the top and a few tiny drainage holes in the bottom if the bin will sit inside a tray. Add moist shredded paper or cardboard bedding. Start with a modest number of worms and feed only small amounts until you know how quickly they process scraps.
The best foods for an under-sink worm bin are chopped vegetable scraps, banana peels, apple cores, coffee grounds in moderation, crushed eggshells, and tea leaves. Avoid onions, garlic, meat, dairy, grease, bones, pet waste, and large amounts of citrus. Always bury food under at least a couple inches of bedding. This one habit prevents most odor and fruit fly problems.
This setup is perfect for renters, condo owners, and anyone who wants compost without walking outside in pajamas during winter.
6. The 5-Gallon Bucket Worm Tower
A worm tower is an in-ground vermicomposting system that feeds the garden directly. Instead of harvesting castings from a bin, you bury a drilled bucket or PVC pipe partly into a garden bed. Worms and microbes break down scraps inside the tower, and nutrients gradually move into the surrounding soil.
How to Make a Bucket Worm Tower
Take a food-safe 5-gallon bucket with a lid. Drill many holes in the lower half of the bucket so worms can move in and out. Leave the upper section mostly solid to discourage pests. Dig a hole in a raised bed or garden area and bury the bucket so the drilled portion is underground while the lid remains above the soil surface.
Add damp shredded cardboard, a small scoop of compost, and a handful of red wigglers if your soil does not already have active composting worms. Feed small amounts of soft kitchen scraps and cover each feeding with bedding. Keep the lid secure. A worm tower is especially useful near heavy-feeding plants such as tomatoes, squash, peppers, and cucumbers.
This idea is excellent for gardeners who want low-maintenance composting directly in the bed. Just remember that in-ground systems are seasonal in cold climates and may slow down dramatically during winter.
7. The PVC Pipe Worm Tower
The PVC worm tower is the slim cousin of the bucket tower. It takes up very little garden space and can be installed between plants. It is a great choice for small raised beds where a full bucket would feel like parking a refrigerator in the lettuce patch.
Simple Tutorial
Use a wide PVC pipe, usually 4 to 6 inches in diameter. Drill holes along the lower portion that will be buried in the soil. Cap the top with a removable lid, plant saucer, or fitted cap to keep rain, flies, and curious critters out. Bury the pipe 12 to 18 inches deep, leaving several inches above the soil line.
Add moist bedding and small food scraps. Because the pipe is narrow, do not overload it. Chop scraps finely and add dry shredded paper if it becomes wet. PVC towers work best as supplemental composting stations rather than your household’s only food-scrap solution. Think of them as snack bars for worms, not all-you-can-eat buffets.
8. The Classroom or Kids’ Observation Worm Bin
Few things make decomposition more exciting than children watching worms turn lunch leftovers into garden gold. A classroom worm bin is educational, compact, and surprisingly low drama if teachers establish clear feeding rules. It teaches biology, recycling, soil health, food waste reduction, and responsibility in one wiggly package.
How to Build a Kid-Friendly Bin
Use a small dark tote or a clear observation container wrapped in black paper so worms stay in the dark most of the time. Add moist bedding, a small amount of soil or finished compost, and red wigglers. Feed measured scraps once or twice a week. Keep a simple chart showing what was added and how long it took to disappear.
For observation days, remove the dark cover briefly so students can see tunnels, bedding layers, castings, and food breakdown. Then cover the bin again. Worms are not classroom pets that want applause; they prefer privacy, moisture, and banana peels.
This worm bin idea works for schools, homeschool families, scout groups, garden clubs, and science projects.
9. The Repurposed Drawer or Cabinet Worm Bin
If you enjoy DIY projects with character, an old dresser drawer can become a charming worm composting bin. Cornell’s classic worm-bin guidance notes that reused drawers, fish tanks, wooden boxes, and plastic bins can all work when cleaned and prepared properly. A drawer-style bin is shallow, wide, and easy to slide under a bench or potting table.
How to Convert a Drawer
Choose an untreated wooden drawer that is not coated with flaking paint or questionable mystery chemicals. Line the bottom and sides with a sturdy plastic sheet, old shower curtain, or trash bag to slow moisture damage. Add small drainage holes and set the drawer on a tray. Create a breathable lid from plywood, hardware cloth, or a loose-fitting cover that blocks light but allows airflow.
Add moist bedding and worms as usual. This bin has a rustic look and is great for covered porches or sheds. Because wood eventually breaks down, inspect it occasionally for soft spots. If the drawer has sentimental value, do not use it. Worms are wonderful, but they are not known for respecting antique furniture.
10. The Outdoor Insulated Worm Bin
An outdoor insulated worm bin is designed for gardeners who want more capacity but live where temperatures swing. Red wigglers are happiest in moderate conditions, and they slow down when cold. In freezing weather, they can die if the bin is not protected. In hot weather, they can overheat. The goal is to give them a stable, shaded, breathable home.
How to Set It Up
Use a large plastic tote, wooden box, or lidded bin in a shaded location. Add generous bedding so worms can move away from uncomfortable areas. In cold months, insulate around the bin with straw bales, burlap, blankets, or rigid foam while leaving gaps for airflow. Keep the bin off frozen concrete or bare ground if temperatures drop sharply. In summer, keep it shaded, moist, and never sealed tightly.
Outdoor bins need less food during cold weather because worms process scraps more slowly. Overfeeding in winter is a classic beginner mistake. The scraps sit, sour, and attract pests while the worms are basically saying, “We are not running a restaurant in January.” Feed lightly and check conditions before adding more.
Best Foods for Worm Composting Bins
Worms are not picky in the way toddlers are picky, but they do have limits. Feed fruit and vegetable scraps, coffee grounds, paper coffee filters, crushed eggshells, plain grains in small amounts, tea leaves, soft garden trimmings, and shredded non-glossy paper. Chop scraps into small pieces to speed decomposition.
Avoid meat, fish, bones, dairy, oils, greasy foods, salty foods, pet waste, glossy paper, large amounts of citrus, and strong foods like onions and garlic. These materials can create odors, attract pests, or make the bin too acidic. When in doubt, leave it out or test a tiny amount in one corner.
How to Prevent Odor, Fruit Flies, and Escaping Worms
A healthy worm composting bin should smell earthy, like a forest floor after rain. If it smells sour, rotten, or ammonia-like, the bin is probably too wet, under-ventilated, or overfed. Add dry bedding, fluff the material gently, and pause feeding for several days.
Fruit flies usually show up when food is exposed. Always bury scraps under bedding. Freezing fruit scraps before feeding can also help kill fruit fly eggs. Keep a two-inch layer of fresh bedding on top of the feeding zone, and avoid dumping in a week’s worth of melon rinds at once unless you enjoy hosting an insect convention.
If worms crawl up the sides or try to leave, check moisture, temperature, acidity, and airflow. New bins sometimes have a short adjustment period, but mass escapes usually mean the environment is uncomfortable. Keep the lid on, shine a light near the bin temporarily if needed, and correct the underlying problem.
How to Harvest Worm Castings
Most worm bins are ready to harvest in three to six months, depending on bin size, worm population, temperature, bedding, and feeding habits. Finished vermicompost is dark, crumbly, and mostly free of recognizable food scraps.
For a single-bin system, push finished compost to one side and add fresh bedding and food to the other side. Over two or three weeks, many worms will migrate toward the new food. Then scoop out the finished castings. Another method is the dump-and-sort technique: empty the bin onto a tarp under light, make small mounds, and let worms move downward. Scrape finished compost from the top until mostly worms remain, then return them to fresh bedding.
Use worm castings as a soil amendment, sprinkle them around houseplants, mix a small amount into potting soil, or top-dress garden beds. A little goes a long way. Worm castings are rich, so you do not need to bury plants in them like you are tucking them into a luxury compost blanket.
Hands-On Experience: What Worm Composting Teaches You After the First Few Months
The first lesson of worm composting is humility. You may start with a perfect plan, a neat bin, and the confidence of someone who watched three tutorials in a row. Then, one week later, you realize the worms do not care about your enthusiasm. They care about moisture, airflow, food size, and whether you buried the banana peel properly. Worm composting rewards observation more than perfection.
One of the most useful habits is checking the bin before feeding it. Beginners often treat a worm bin like a trash can with employees. It is not. It is a living system. If last week’s scraps are still visible, wait. If the bedding feels soggy, add shredded cardboard. If the top layer looks dry, mist it lightly. If everything smells earthy and the food is disappearing, you are on the right track.
Another real-world lesson is that cardboard is your best friend. Shredded cardboard balances wet food scraps, improves airflow, and gives worms a comfortable place to move. Keep a bag of torn egg cartons, toilet paper tubes, brown paper bags, and plain corrugated cardboard near the bin. Whenever the bin seems too wet, cardboard saves the day. It is basically the emergency towel of vermicomposting.
Temperature also matters more than many beginners expect. An indoor bin is usually easier to manage because household temperatures are comfortable for red wigglers. Outdoor bins are more seasonal. In summer, shade is essential. In winter, insulation and reduced feeding help keep the colony alive. If you live somewhere with freezing winters, bringing the bin into a garage, basement, or utility room can prevent heartbreak and frozen worm lasagna.
Food preparation makes a huge difference. Whole carrot tops, thick broccoli stems, and big citrus peels break down slowly. Chopped scraps disappear faster. Freezing and thawing scraps softens them, making them easier for microbes and worms to process. Some experienced vermicomposters keep a freezer container for scraps, then thaw small portions before feeding. It sounds fancy, but it is really just meal prep for worms.
The most satisfying moment comes during the first harvest. You open the bin expecting chaos and find dark, crumbly castings that look and smell like healthy soil. That is when worm composting stops feeling like an experiment and starts feeling like a quiet household superpower. Yesterday’s coffee grounds become tomorrow’s tomato food. Apple peels become houseplant booster. Junk mail bedding becomes garden amendment. The system is small, but the lesson is big: waste is often just a resource wearing the wrong outfit.
For best results, start small. A compact plastic tote or two-bin system is enough to learn the rhythm. Once you understand moisture, feeding, and harvesting, you can upgrade to stacked trays, a wooden outdoor bin, or garden worm towers. The best worm composting bin is not the fanciest one. It is the one you will actually maintain.
Conclusion
Worm composting is one of the most practical ways to recycle kitchen scraps, improve soil, and reduce household waste without needing a large backyard. From plastic totes and stackable trays to wooden boxes, bucket towers, PVC pipes, and classroom bins, there is a worm composting bin idea for nearly every home and garden style.
The secret is to build a bin that fits your space, then manage it like a living habitat. Keep bedding moist but not soaked. Use red wigglers. Feed small amounts of worm-safe scraps. Cover food with bedding. Protect the bin from temperature extremes. Harvest castings when the material becomes dark and crumbly. Do that, and your worms will quietly turn leftovers into one of the best soil amendments your plants will ever meet.
Note: This article is written as original, publication-ready content based on practical vermicomposting principles from U.S. composting educators, university Extension programs, and gardener-tested worm bin methods. No raw source links or placeholder citation tags have been inserted into the article body.