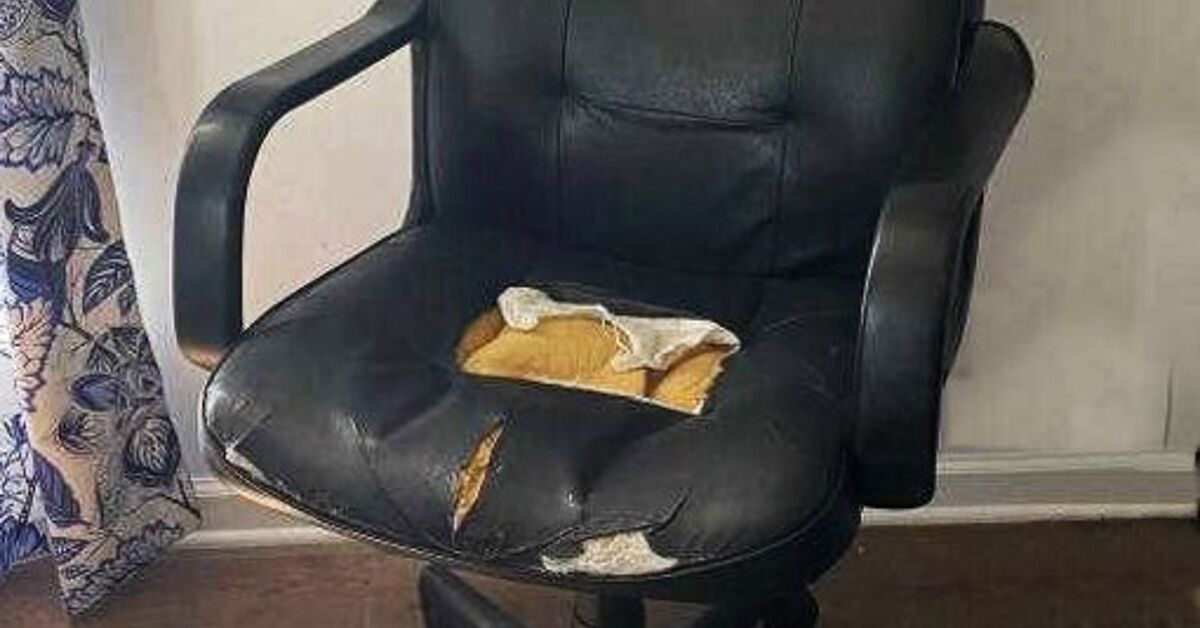

Your old office chair has been through a lot. It has survived coffee spills, deadline panic, late-night scrolling, mysterious crumbs, and at least one dramatic spin after a successful email reply. But when the cushion feels flatter than yesterday’s soda and the fabric looks like it has entered its “vintage but not in a cool way” era, it may be time for a refresh.
The good news? You do not always need to buy a brand-new chair to improve your workspace. With smart cleaning, simple repairs, new upholstery, better support, upgraded casters, and a few ergonomic adjustments, you can update an old office chair and make it look sharper, feel better, and work harder for your daily routine.
This guide walks you through practical, budget-friendly ways to revive an office chair without turning your living room into a full furniture factory. Whether you have a worn fabric task chair, a peeling faux leather seat, or a squeaky old rolling chair that sounds like a haunted shopping cart, there is probably a fix worth trying.
Why Updating an Old Office Chair Is Worth It
An office chair is more than a place to sit. It affects posture, comfort, focus, and the overall look of your workspace. A tired chair can make a clean desk feel messy. A poorly adjusted chair can make your back complain before lunch. And a chair with stubborn wheels can turn every movement into a tiny upper-body workout nobody requested.
Updating an old office chair can save money, reduce waste, and give you control over the final look. Instead of settling for whatever neutral gray chair is currently on sale, you can choose fabric, color, cushioning, and accessories that match your room and your body. That is the sweet spot: style meets function, and your chair stops looking like it was rescued from a forgotten conference room.
Step 1: Inspect the Chair Before You Start
Before buying fabric, foam, paint, or replacement wheels, give the chair a full inspection. Place it on a clean surface and check the seat, backrest, arms, base, casters, height adjustment, and tilt mechanism. Sit in it carefully and notice what feels wrong. Is the seat sagging? Does the backrest wobble? Are the wheels stuck? Is the upholstery stained, torn, or peeling?
Some problems are cosmetic and easy to fix. A stained fabric seat, dusty mesh back, squeaky caster, or scratched armrest can usually be improved. Other issues are more serious. If the gas cylinder sinks while you sit, the base is cracked, the frame is bent, or the chair feels unstable, replacement may be safer than repair. A chair should support you, not behave like a suspense movie prop.
Quick Chair Checkup List
- Seat cushion: flat, lumpy, stained, or still supportive?
- Backrest: secure, adjustable, and comfortable?
- Armrests: loose, cracked, sticky, or too high?
- Wheels: rolling smoothly or dragging like stubborn luggage?
- Base: sturdy, level, and free of cracks?
- Height adjustment: smooth and reliable?
- Upholstery: cleanable, repairable, or ready for replacement?
Step 2: Deep Clean the Chair
The fastest way to update an old office chair is also the least glamorous: clean it properly. Dust, body oils, snack residue, pet hair, and old stains can make even a decent chair look exhausted. Start by vacuuming the seat, backrest, seams, and underside using a brush attachment. Pay special attention to the gap where the seat meets the back. That area often holds crumbs with more history than a museum exhibit.
For fabric chairs, mix a small amount of mild dish soap or gentle detergent with cool water. Dampen a microfiber cloth, blot the surface, and avoid soaking the cushion. Too much water can push dirt deeper into the foam or create odors. For stubborn spots, blot slowly instead of scrubbing aggressively. Scrubbing can rough up fibers and leave a strange fuzzy patch that screams, “I panicked.”
For faux leather or vinyl chairs, wipe the surface with mild soap and warm water, then follow with a clean damp cloth to remove residue. Dry with a soft towel. Avoid harsh cleaners, bleach, and abrasive pads because they can damage the finish. If the surface is peeling badly, cleaning will help hygiene, but it will not magically turn cracked faux leather back into a showroom chair. That is where recovering or using a slipcover becomes useful.
For mesh chairs, vacuum first, then wipe with a damp cloth and mild soap solution. Use a soft brush only when necessary, and be gentle around the mesh so it does not stretch or snag. Let every part dry fully before reassembling or sitting. A clean chair is delightful. A damp chair is just regret with wheels.
Step 3: Tighten Screws and Fix Wobbles
Many old chairs feel worse than they are because screws and bolts loosen over time. Flip the chair over and inspect the fasteners connecting the seat plate, arms, backrest, and base. Use the correct screwdriver or Allen wrench to tighten them. Do not over-tighten; you want secure, not stripped.
If a screw keeps loosening, add a small amount of removable thread-locking compound or replace the screw with a matching one. If the hole is damaged in a wooden seat base, a furniture repair approach may help, but be cautious with structural parts. A loose armrest is annoying. A failing seat mount is a safety issue.
Step 4: Replace the Casters for a Smoother Ride
Old office chair wheels collect hair, dust, and mystery fibers with impressive dedication. Sometimes cleaning the wheels is enough. Pull out trapped hair with tweezers or small scissors, wipe the wheel surface, and test the roll. If the casters are cracked, noisy, or constantly stuck, replace them.
Most office chair casters pop out with a firm pull, although some need a flat tool for gentle leverage. Measure the stem size before ordering replacements. Many chairs use a standard grip-ring stem, but not all do. Choose casters based on your floor type. Soft rubber-style wheels are popular for hard floors because they roll quietly and may reduce scratching. Traditional hard plastic casters often work better on carpet or chair mats.
This is one of the easiest upgrades with the biggest daily impact. A chair that glides smoothly makes a workspace feel more polished immediately. Suddenly, reaching the printer does not feel like dragging furniture across a medieval castle floor.
Step 5: Improve the Seat Cushion
If your office chair seat feels flat, the foam may be worn out. Replacing or adding foam can make a major difference. Remove the seat from the chair frame if possible. Many office chair seats are attached with screws underneath. Take photos before disassembly so you know how everything goes back together.
Once the seat is removed, inspect the upholstery. If you plan to reupholster, remove staples with a staple remover, flat screwdriver, or pliers. Lift the old fabric carefully if you want to use it as a pattern. If the foam is crumbling, compressed, or uneven, replace it with upholstery foam of similar size and thickness. A layer of batting over the foam can soften edges and create a smoother, more professional look.
For a quick no-tools option, add a separate seat cushion. Look for one that does not raise you so high that your feet dangle. Comfort is not just about softness; it is about alignment. A cloud-like cushion that ruins your posture is basically a marshmallow with consequences.
Step 6: Reupholster the Seat for a Fresh Look
Reupholstering an office chair seat is a satisfying weekend project. Choose a durable upholstery fabric that can handle daily use. Heavy cotton, performance fabric, microsuede, canvas, and woven upholstery materials are common choices. Avoid thin craft fabric for a chair you use every day, unless you enjoy redoing projects while muttering at your staple gun.
Lay the new fabric face down on a clean surface. Place batting and foam on top, then position the seat base over them. Cut the fabric with several inches of extra material on all sides so it can wrap underneath. Start stapling at the center of one side, then move to the opposite side and pull the fabric snug. Continue alternating sides to maintain even tension.
At the corners, fold neatly and trim excess bulk. Corners are where many DIY upholstery projects reveal their secrets, so take your time. The goal is smooth, not strangled. Pull the fabric tight enough to remove wrinkles but not so tight that the pattern warps or the foam compresses oddly.
Best Fabric Ideas for Office Chair Makeovers
- Neutral tweed for a professional home office
- Performance velvet for a soft but stylish upgrade
- Canvas for a durable, casual workspace
- Faux leather for easy wiping and a modern look
- Patterned upholstery fabric for a creative studio or craft room
- Dark woven fabric for hiding daily wear
Step 7: Refresh or Replace Armrests
Armrests take a beating. They catch elbows, coffee mugs, phone drops, and the occasional “I am thinking very hard” lean. If your armrests are sticky or dull, clean them with mild soap and water. For plastic arms, a gentle all-purpose cleaner may help, but test first in a hidden area.
If the pads are cracked, consider replacement arm pads. Many common office chairs have screw-on pads that can be swapped out. Measure the distance between screw holes before buying. If replacement parts are unavailable, you can use armrest covers. They add padding, hide damage, and make the chair feel more comfortable during long work sessions.
Ergonomically, armrests should let your shoulders relax. If they force your shoulders upward, they are too high. If they make you lean, they are not helping. Adjustable arms are ideal, but even fixed arms can be improved with padding or, in some cases, removed if they interfere with your desk setup.
Step 8: Add Lumbar Support
A good office chair should support the natural curve of your lower back. If your old chair does not offer enough lumbar support, add a removable lumbar pillow or a rolled towel as a temporary solution. Position it at the small of your back, not halfway up your spine like a confused backpack.
Lumbar support should feel helpful, not aggressive. If it pushes you forward or causes discomfort, adjust the height, thickness, or placement. For mesh chairs, clip-on lumbar supports can work well. For upholstered chairs, a cushion with straps may stay in place better.
This upgrade is especially useful if the chair looks fine but feels tiring after an hour. Sometimes the chair does not need a full makeover; it just needs to stop making your lower back do all the unpaid labor.
Step 9: Adjust the Chair for Better Ergonomics
After cleaning, repairing, and updating the chair, adjust it correctly. Start with seat height. Your feet should rest flat on the floor or on a footrest, with thighs roughly parallel to the floor. If your feet dangle, lower the chair or use a footrest. If your knees are too high, raise the chair and adjust your desk setup if needed.
Next, check seat depth. Ideally, you should have a small gap between the front edge of the seat and the backs of your knees. If the seat presses into your legs, it can feel uncomfortable over time. Add a lumbar cushion behind your lower back if you need to sit slightly forward while staying supported.
Set armrests so your elbows rest comfortably near your sides and your shoulders stay relaxed. Adjust the backrest so it supports you while allowing small posture changes. Sitting perfectly still all day is not the goal. Movement matters. Shift positions, stand up periodically, stretch, and let your chair support your work instead of trapping you in one rigid pose.
Step 10: Paint or Polish the Base
If the chair base looks scratched or dull, you can refresh it. For plastic bases, clean thoroughly and use a plastic-safe restorer or spray paint designed for plastic, following the product instructions. For metal bases, remove rust if present, clean the surface, and use an appropriate metal paint if needed.
Always paint in a well-ventilated area and protect surrounding surfaces. Remove the base from the chair if possible. Light coats usually look better than one heavy coat. Let the finish cure fully before reassembling the chair. A rushed paint job can feel dry on the surface but still scuff easily. Patience is cheaper than repainting.
Step 11: Hide Damage With Smart Accessories
Not every chair update requires tools. A fitted slipcover can hide worn upholstery and add color. A decorative lumbar pillow can improve comfort and style. Armrest covers can disguise cracks. A chair mat can protect flooring and help casters roll more smoothly. Even a small throw blanket over the back can soften the look of a bulky chair in a home office.
The trick is to make accessories look intentional. Choose colors that match your desk, rug, curtains, or wall art. A chair refresh should feel like part of the room, not like your office chair put on a costume five minutes before guests arrived.
Step 12: Know When to Replace Instead of Repair
Updating an old office chair is worthwhile when the frame is sturdy and the problems are mostly cosmetic or comfort-related. But some chairs are not good candidates. Replace the chair if the base is cracked, the gas lift fails repeatedly, the seat plate bends, or the chair rocks dangerously even after tightening hardware.
Also consider replacement if the chair cannot be adjusted to fit your body. A beautiful chair that causes discomfort is not a win. It is just furniture with good lighting. Your chair should support your workday, fit under your desk, roll safely, and let you sit with relaxed shoulders and supported feet.
Budget-Friendly Office Chair Update Plan
If you want a practical order of operations, start with the lowest-cost improvements. Clean the chair first. Tighten all screws. Remove hair from the wheels. Adjust the height, backrest, and armrests. Add a lumbar cushion if needed. These steps can improve comfort before you spend much money.
Next, decide what bothers you most. If the chair looks bad, reupholster the seat or use a slipcover. If it rolls badly, replace the casters. If the seat hurts, replace the foam or add a cushion. If the arms are uncomfortable, add covers or replacement pads. Updating an office chair works best when you solve the biggest problem first instead of buying random accessories and hoping comfort appears through vibes.
Common Mistakes to Avoid
One common mistake is choosing fabric only because it looks pretty. Office chairs need durable materials. A delicate fabric may photograph beautifully but wear out quickly. Another mistake is adding a thick cushion without adjusting chair height. This can lift you too high and throw off your desk posture.
People also forget to take photos before disassembly. Your future self will appreciate every picture when it is time to reattach the seat plate. Finally, do not ignore safety. If the structure is damaged, no amount of cute upholstery will make the chair reliable. A chair makeover should not include suspense.
Personal Experience: What Updating an Old Office Chair Really Feels Like
There is something oddly satisfying about rescuing an old office chair. At first, it looks like a small project. You tell yourself, “I will just clean it.” Then you notice the wheels are packed with hair, the fabric has a suspicious stain shaped like a tiny continent, and one armrest wiggles like it has stage fright. Suddenly, you are holding a screwdriver and negotiating with furniture.
From experience, the first big improvement usually comes from cleaning and tightening. A chair can feel ten years younger after a serious vacuuming, a wipe-down, and a few tightened bolts. It is not glamorous, but it works. The chair stops creaking as much, the seat feels less grimy, and you start to believe that maybe this makeover will not require a second mortgage or advanced engineering skills.
The next noticeable upgrade is often the wheels. Replacing old casters can completely change how the chair feels. A chair that once dragged across the floor suddenly glides smoothly, and the workspace feels more professional. It is a small change, but it affects every movement. You roll toward the file cabinet and think, “Look at me, operating a premium mobility system.” Is that dramatic? Yes. Is it true? Also yes.
Reupholstering the seat is where the personality shows up. Choosing fabric can be surprisingly fun because it lets you decide whether your office should feel calm, bold, cozy, modern, or slightly eccentric in a charming way. A dark textured fabric can make a chair look expensive. A patterned fabric can make it feel custom. A soft neutral can blend into a minimalist workspace. The chair becomes less of an object you tolerate and more of a piece you actually like seeing every morning.
The most important lesson is that comfort and appearance should be updated together. A chair can look fantastic and still feel like punishment after two hours. That is why foam, lumbar support, seat height, and armrest position matter. After refreshing a chair, always sit in it for a real work session. Write emails, type, read, and move around. Notice whether your shoulders rise, whether your feet rest flat, and whether your lower back feels supported. The best office chair update is not the one that looks best in a photo; it is the one you forget about because it quietly does its job.
Another practical lesson: do not rush the project. Let cleaned upholstery dry fully. Let paint cure. Pull fabric evenly. Keep screws organized in a cup or small tray. Take pictures before removing parts. These tiny habits prevent the classic DIY moment where you stare at four leftover screws and wonder whether your chair has become a puzzle.
Updating an old office chair also changes the mood of the workspace. When your chair looks clean, rolls smoothly, and supports you better, the whole desk area feels more inviting. You may even feel motivated to clear old papers, organize cables, or finally remove that coffee mug that has become a pen holder against its will. A chair refresh can become the first domino in a larger workspace reset.
In the end, reviving an old office chair is part repair, part design, and part personal victory. It reminds you that not everything worn-out needs to be thrown away. Sometimes it needs a good cleaning, new fabric, better wheels, and a little patience. And sometimes, after the final screw is tightened and the chair rolls back under the desk, you get the quiet satisfaction of knowing your workspace has been upgraded by your own hands. That is a pretty good return on a weekend project.
Conclusion
Learning how to update an old office chair is one of the most practical ways to revitalize your workspace without starting from scratch. A deep clean can restore freshness. New casters can improve movement. Better foam can revive comfort. Reupholstery can transform the chair’s entire personality. Lumbar support and ergonomic adjustments can make long work sessions easier on your body.
The key is to inspect the chair honestly, fix safety issues first, and choose upgrades that match how you actually work. You do not need a luxury chair to create a better workspace. You need a chair that is clean, stable, supportive, and pleasant to use. Give that old chair the right attention, and it may go from “office eyesore” to “workspace MVP” faster than you expect.