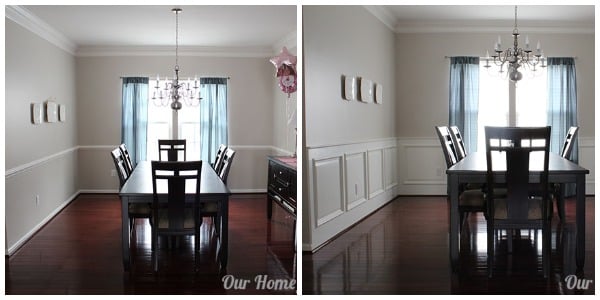

Wainscoting is one of those home upgrades that looks as if a finish carpenter arrived with a truck full of specialized tools, whispered something scholarly about millwork, and billed accordingly. The pleasant surprise is that many styles of DIY wainscoting can be built with basic trim, careful measurements, and a free weekend. The less pleasant surprise is that walls, floors, and corners are rarely as straight as they looked before you introduced a level.
This DIY wainscoting tutorial explains how to plan the layout, choose materials, handle outlets and uneven surfaces, install the trim, and create a smooth painted finish. The method focuses on applied molding or simple board-and-batten wainscoting because both deliver a custom look without requiring cabinetmaking skills. Beadboard notes are included where the process differs.
What Is Wainscoting?
Wainscoting is decorative paneling installed on the lower portion of an interior wall. Traditional versions were made from solid wood and helped protect plaster from furniture, shoes, and everyday abuse. Modern wainscoting may use hardwood, poplar, plywood, medium-density fiberboard, PVC, or molding applied directly over painted drywall.
The main styles include raised-panel wainscoting, recessed or Shaker-style panels, beadboard, board and batten, and picture-frame molding. Raised panels are beautiful but more demanding. Picture-frame molding is usually the easiest budget option because the existing wall becomes the “panel.” Board and batten uses flat vertical strips between horizontal rails. Beadboard uses grooved sheets or tongue-and-groove planks for a cottage, farmhouse, or coastal look.
Choose the Right Wainscoting Style
Applied Picture-Frame Molding
Thin panel molding is cut into rectangles and attached directly to the wall beneath a chair rail. It is affordable, lightweight, and forgiving. This is an excellent choice for dining rooms, hallways, bedrooms, and stair landings.
Board and Batten
Board-and-batten wainscoting creates a cleaner, more contemporary grid. Flat stock, often 1-by-2, 1-by-3, or similar trim, forms the top rail and vertical battens. It suits entryways, mudrooms, offices, and modern living spaces.
Beadboard
Beadboard consists of narrow vertical grooves and may come as large sheets or individual planks. It works especially well in breakfast nooks, powder rooms, kitchens, and cottage-style interiors. In moisture-prone rooms, use a product rated for that environment; ordinary MDF can swell when repeatedly exposed to water.
Raised or Recessed Panels
These systems look the most like traditional built-in millwork. They can be assembled from rails, stiles, panels, and decorative molding or purchased as kits. The result is elegant, but layout and joinery require more time, so beginners may want to practice on a small wall first.
How High Should Wainscoting Be?
A common starting point is approximately one-third of the wall height, including the top cap or chair rail. In a room with an 8-foot ceiling, a finished height around 32 to 36 inches often looks balanced. Many classic installations fall between roughly 30 and 42 inches, while taller treatments can reach halfway or even two-thirds up the wall for a dramatic library or dining-room effect.
Do not let a rule of thumb bully the room. Tape a horizontal line on the wall at two or three possible heights, then view it from the doorway and from a seated position. Consider windowsills, switches, countertops, radiator covers, and furniture. A chair rail that collides with every outlet in the room is not “architectural character”; it is a layout meeting you skipped.
Tools and Materials
Recommended Tools
- Tape measure, pencil, and combination square
- Four-foot level or laser level
- Stud finder
- Miter saw or miter box with a fine-tooth saw
- Jigsaw or oscillating multi-tool for outlet and trim cuts
- Brad nailer with appropriate brads, or a hammer and nail set
- Caulk gun, putty knife, sanding sponge, and shop vacuum
- Eye protection, hearing protection, and a suitable dust mask or respirator
Typical Materials
- Panel molding, MDF strips, poplar boards, beadboard, or a wainscoting kit
- Chair rail or top-cap molding
- Baseboard compatible with the thickness of the new wall treatment
- Construction adhesive made for the selected wall and trim materials
- Paintable acrylic-latex caulk
- Wood filler or patching compound
- Primer and durable interior trim paint
- Electrical box extenders where the finished wall becomes thicker
Plan the Layout Before Cutting Anything
Measure each wall separately. Record the total length, finished wainscoting height, door and window casing locations, inside and outside corners, outlets, switches, vents, and permanent fixtures. Older rooms may have four walls that appear rectangular but are participating in four different geometries.
For picture-frame molding, decide how many boxes will fit on each uninterrupted wall section. Keep the spaces above, below, and between frames visually consistent. A simple formula is:
Frame width = (usable wall width − total width of all planned gaps) ÷ number of frames
For board and batten, calculate the spacing by accounting for the actual width of every batten, not merely the size printed on the lumber rack. For example, a board sold as a 1-by-3 is normally narrower than three inches.
Lay sample strips on the floor or use painter’s tape on the wall. Centering a batten or an open space on the main focal point can prevent awkward slivers at both ends. Around doors and windows, prioritize balanced margins over mathematically identical panels throughout the entire room.
Step-by-Step DIY Wainscoting Installation
Step 1: Inspect the Room and Test Old Paint
Check the walls for moisture, loose drywall, peeling paint, bulges, and damaged baseboards. Fix leaks before covering anything. Wainscoting can hide cosmetic flaws, but it should not be used as a decorative lid for an active moisture problem.
If the home was built before 1978, disturbing painted surfaces may create hazardous lead dust. Determine whether lead-based paint could be present and follow lead-safe practices or hire a certified professional before sanding, cutting, scraping, or demolition.
Step 2: Acclimate Wood Products
Bring wood, MDF, or beadboard into the room before installation and follow the manufacturer’s acclimation instructions. Stack panels flat with room for air circulation rather than leaning them against a wall like oversized dominoes. Acclimation can reduce movement, open joints, and bowed material after installation.
Step 3: Remove or Adapt the Existing Baseboard
Applied picture-frame molding can often remain above the existing baseboard. Board-and-batten and beadboard may need a thicker, flat baseboard so the vertical pieces do not overhang a narrow decorative edge.
Score existing caulk and paint lines with a utility knife. Protect the wall with a wide putty knife or wood shim, and pry the baseboard away gradually. Label reusable pieces as they come off so reinstallation does not become a surprisingly difficult wooden jigsaw puzzle.
Step 4: Establish a Level Top Line
Find the desired finished height and mark a perfectly level reference line around the room with a laser or long level. Do not simply measure the same distance up from the floor at every point; floors frequently rise and fall.
The eye notices a crooked chair rail faster than it notices a small variation hidden near the baseboard. When the floor is uneven, preserve the level top line and plan to conceal minor differences at the bottom.
Step 5: Locate Studs and Utilities
Mark wall studs slightly above the wainscoting line so the marks remain visible during installation. Use a scanner capable of detecting live wiring when possible, and avoid blindly driving long fasteners near outlets, switches, plumbing, or HVAC components.
Fasten structural rails into studs whenever practical. Adhesive and shorter brads can secure lightweight decorative molding between studs, provided the installation method is suitable for the material.
Step 6: Dry-Fit the Design
Cut a few representative pieces and temporarily tape them in place. Check the relationship between the baseboard, vertical trim, top rail, chair rail, door casing, and outlet covers.
This small mock-up can reveal thickness conflicts before the room is covered in expensive, confidently incorrect cuts. It also gives you one last chance to adjust the proportions.
Step 7: Cut and Install the Main Horizontal Pieces
Install the baseboard, lower rail, or top rail according to your design. Cut outside corners with matching miters. At inside corners, a butt joint is often simplest for square stock, while profiled molding may look better with a coped joint.
Apply construction adhesive in a controlled bead, press the piece to the layout line, verify that it is level, and nail into studs where possible. Wipe away squeezed-out adhesive immediately instead of waiting for it to become a permanent decorative feature.
Step 8: Install Battens, Frames, or Beadboard
For board and batten, measure each vertical piece individually because the distance between the top and bottom rails may vary slightly. Use a spacer block to maintain the planned gaps and check every few battens for plumb.
For picture-frame molding, assemble frames on a flat surface or install one side at a time using spacer blocks. A stop block attached to the saw improves cutting consistency. Glue mitered corners when practical, then pin or brad the molding to the wall.
For beadboard sheets, cut the panels to height and dry-fit the first sheet at a corner. Confirm that its edge is plumb. Apply panel-compatible adhesive and add finish nails at panel edges and stud locations. Follow the manufacturer’s instructions for expansion gaps and joint spacing.
When installing tongue-and-groove beadboard planks, seat the joints carefully without crushing the tongue. Check frequently for plumb because a small error in the first few boards can become a large error at the other end of the wall.
Step 9: Work Safely Around Outlets and Switches
Turn off the correct circuit at the breaker and verify that the power is off before removing cover plates or working around electrical boxes. Carefully transfer each box location to the panel and cut the opening with a jigsaw or oscillating tool.
Start with a conservative opening. A hole can be enlarged; a missing corner cannot be negotiated back into the panel.
The finished electrical box must extend properly to the new wall surface. An approved box extender may be required when paneling or trim increases the wall thickness. Do not bury electrical junctions, pinch wiring, or improvise with loose spacers. Hire a licensed electrician when a box must be moved or the wiring is unclear.
Step 10: Add the Chair Rail or Cap
The top molding visually unifies the project and hides the upper edges of panels. Install long runs first, checking that the molding follows the level reference line.
Use scarf joints when a wall is longer than the available stock, and position joints where they can be securely fastened. Return exposed molding ends into the wall instead of leaving a raw angled cut visible.
Step 11: Fill, Caulk, and Sand
Set proud nail heads and fill nail holes with a material suitable for the trim. Use paintable caulk for small gaps where molding meets the wall and where fixed painted pieces meet.
Avoid using caulk as a substitute for badly measured joints or across panel connections that require seasonal movement. Smooth each bead with a caulk tool or damp finger, allow it to cure, and sand filled areas until they disappear under your fingertips.
Step 12: Prime and Paint
Vacuum the dust and wipe all surfaces clean. Prime bare wood, exposed MDF edges, patched areas, and glossy surfaces that require improved adhesion. MDF edges are especially absorbent, so they may need extra sealing, drying, and sanding.
After the primer dries, lightly sand the surface and remove the dust again. Apply two thin coats of durable interior trim paint while following the manufacturer’s drying and recoat times.
A quality angled brush works well in corners and molding profiles, while a small foam or microfiber roller speeds up broad panels. Satin and semi-gloss finishes are popular because they are easier to wipe clean. Durable eggshell or matte paint can provide a more contemporary appearance in lower-traffic rooms.
Common DIY Wainscoting Mistakes
- Following the floor instead of a level line: The top edge gradually tilts, and the entire room looks seasick.
- Ignoring trim thickness: Battens overhang the baseboard or collide awkwardly with door casing.
- Spacing by guesswork: The last panel becomes noticeably narrower than the others.
- Skipping a mock-up: Chair rails run into switches, windowsills, or thermostat plates.
- Over-nailing: Excessive fasteners create extra filling and increase the risk of hitting hidden utilities.
- Painting before caulk cures: Shrinkage, cracks, and rough lines appear in the finished paint.
- Using ordinary MDF in wet conditions: Swollen edges turn crisp millwork into something resembling damp cereal.
Practical Wainscoting Design Examples
Small Dining Room
Use picture-frame molding at approximately one-third of the wall height. Paint the molding and lower wall the same soft neutral color, then add wallpaper or a deeper paint color above it. Equal margins around the frames create a formal appearance without making the room feel crowded.
Busy Entryway
Choose board and batten with a durable, washable finish. A slightly wider top cap can visually support hooks or a narrow ledge, but functional hooks should be mounted into studs or proper blocking rather than relying on thin decorative trim.
Powder Room
Use moisture-resistant beadboard or PVC rated for the intended interior environment. Seal cut edges as directed, ventilate the room, and keep panel joints away from direct water exposure. A dark wainscoting color can make a tiny powder room feel intentionally dramatic rather than merely tiny.
Experience Notes: Lessons From a Realistic Weekend Wainscoting Project
A realistic first-time project often begins on Friday night with optimism, painter’s tape, and a layout that seems flawless from six feet away. The useful lesson is to stop before buying trim. Tape the entire design on the wall, including the top rail and the edges of the baseboard. Sit in the room, walk through the doorway, and photograph it. A panel arrangement that looks centered on an empty wall may feel off once a dining table, console, or bed is considered.
On Saturday morning, the first surprise is usually the floor. Measuring 36 inches up at both ends of a wall may produce marks that do not align. The better approach is to choose one finished height and project a level line around the room. Any small difference is absorbed at the bottom, where the baseboard hides it. This single decision often separates professional-looking DIY wainscoting from trim that appears to be slowly sliding downhill.
The second lesson arrives at the doorway. A 1-by-3 batten may be thicker than the existing door casing, creating an exposed step. Before installing anything, hold full-size samples of the baseboard, batten, rail, cap, and casing together. Sometimes the fix is a thinner batten; sometimes it is a small backband added to the casing. Discovering this with scrap material is satisfying. Discovering it after forty nails is an advanced course in colorful vocabulary.
During installation, spacer blocks become the quiet heroes. Two identical blocks can keep picture-frame molding evenly separated from the chair rail and baseboard. A longer story pole can mark repeated batten centers without measuring each location from scratch. These simple jigs reduce cumulative errors and make the work faster, especially when fatigue begins turning fractions into abstract art.
Outlet openings deserve extra patience. The most reliable approach is to shut off and verify the circuit, remove the cover, measure from fixed reference lines, and cut the opening slightly conservatively. A hole can be enlarged; a missing corner cannot be negotiated back into the panel. Where added material changes the wall thickness, the electrical box must be brought safely to the finished surface with an approved solution.
By Sunday, filling and caulking may seem like cosmetic cleanup, but this is where the design becomes believable. Nail holes that looked tiny in raw MDF can flash under glossy paint. Gaps that appeared harmless become dark outlines. Fill, sand, inspect with a work light, prime, and inspect again. The first coat of primer is not a victory lap; it is an extremely honest coworker who points at every flaw.
The final lesson is restraint. Caulk improves small transitions, but a thick bead cannot rescue a poorly fitted corner. Paint improves consistency, but heavy coats soften crisp profiles and create drips. Thin layers, clean sanding, and adequate drying time produce a better result than rushing to photograph the room before dinner. The completed project may not be factory-perfect, yet balanced spacing, a level top line, and a smooth finish will make it look intentionaland intentional is the secret ingredient in most good finish carpentry.
Conclusion
A successful DIY wainscoting project is less about owning exotic tools and more about planning the proportions, respecting the room’s imperfections, and finishing carefully. Choose a style that matches your skill level, mock up the height and spacing, establish a level reference line, and solve trim and outlet details before installation.
Once the rails, frames, battens, or beadboard are secure, patient filling, caulking, priming, and painting will turn ordinary materials into convincing architectural detail. Measure carefully, dry-fit whenever possible, and remember that the caulk gun is a finishing toolnot a magical eraser for half-inch mistakes.
Note: Building conditions, electrical systems, local codes, and product requirements vary. Follow manufacturer instructions, use appropriate protective equipment, and consult qualified professionals for lead paint, moisture damage, wiring changes, or structural concerns.