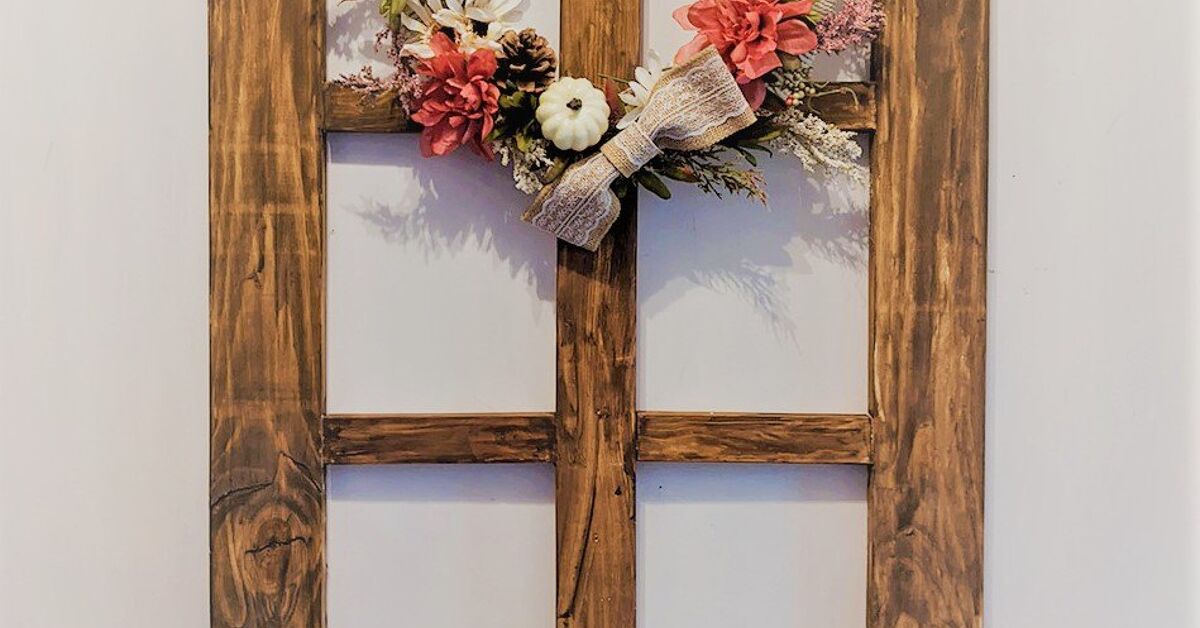

An old wooden window frame has already spent decades providing a view. With a little woodworking, it can begin a second career displaying plants, photographs, candles, pottery, and all those charming objects that currently wander around your home without a proper address.
A wooden window frame display shelf combines wall art with practical storage. It has more character than a standard floating shelf, costs less than many store-bought decorative pieces, and can be customized for farmhouse, cottage, rustic, coastal, industrial, or modern interiors. Better yet, the construction is approachable for beginners. You do not need a workshop full of machinery or the ability to carve a dining table from a tree trunk while blindfolded.
This guide explains how to select a suitable frame, prepare old wood safely, build a strong shelf, choose a finish, and mount the completed piece securely. It also includes practical lessons gathered from common woodworking and reclaimed-material projects.
What Is a Wooden Window Frame Display Shelf?
A wooden window frame display shelf is a decorative wall unit made by attaching a narrow shelf board to the bottom of a new, salvaged, or reproduction window frame. The frame creates architectural interest, while the shelf provides a ledge for lightweight decorations.
The panes can remain empty, hold glass, or be fitted with mirrors, photographs, wallpaper, decorative metal, cork, or clear acrylic. A small frame might become a key shelf near an entryway. A larger six-pane window can serve as a living-room focal point, complete with family photographs and seasonal decorations.
Although the project looks rustic and relaxed, its strength should never be casual. The frame, shelf, mounting hardware, and displayed objects all contribute to the total weight. A secure wall attachment is therefore more important than achieving the perfect shade of “weathered barn gray.”
Plan the Shelf Before Cutting Anything
Choose the Right Location
Begin by deciding where the display shelf will hang. Measure the available wall area and check for doors, vents, switches, furniture, and walking paths. A shelf that looks perfectly innocent on the workbench can become a forehead-seeking obstacle when installed too low in a narrow hallway.
Use painter’s tape to outline the proposed frame and shelf on the wall. This simple mockup helps you judge the scale before committing to holes. Step back and view it from several parts of the room. The shelf should feel connected to nearby furniture rather than floating randomly like a decorative emergency exit.
Select a Suitable Window Frame
Look for a frame that is reasonably square, dry, and structurally sound. Minor dents, worn paint, and small cracks add character, but deep rot, active insect damage, loose joints, or severely twisted wood can compromise the build.
A frame between 24 and 36 inches wide is manageable for most walls. Larger frames make dramatic displays but require stronger mounting hardware and may need two people for installation. If the original glass is cracked, loose, or unusually thin, remove it carefully. For family rooms, hallways, and children’s spaces, clear acrylic is often a lighter and more impact-resistant alternative.
Decide How Deep the Shelf Should Be
A nominal 1-by-6 board produces a shelf approximately 5 1/2 inches deep, which is suitable for picture frames, candles, small pottery, and compact plants. A 1-by-8 board provides about 7 1/4 inches of depth and accommodates larger decorations, but it also places more leverage on the frame and mounting system.
For most decorative window shelves, a depth of 5 to 7 inches offers a useful balance. Avoid making the shelf unnecessarily deep unless you plan to add substantial corbels or metal brackets.
Tools and Materials
Recommended Materials
- One solid wooden window frame
- One 1-by-6 or 1-by-8 shelf board
- One 1-by-2 board for a hidden backer or support cleat
- Two small wooden corbels or heavy-duty shelf brackets
- Wood glue
- Wood screws in lengths appropriate for the frame and shelf
- Wall-mounting screws and anchors rated for the completed load
- Wood filler or stainable filler
- Sandpaper in 80-, 120-, 180-, and 220-grit
- Primer and paint, or stain and clear protective finish
- Optional mirror, acrylic, photographs, hooks, or decorative backing
Recommended Tools
- Tape measure and pencil
- Carpenter’s square
- Level
- Stud finder
- Drill and driver bits
- Countersink bit
- Circular saw, miter saw, or handsaw
- Random-orbit sander or sanding block
- Clamps
- Safety glasses, hearing protection, and dust protection
How to Build a Wooden Window Frame Display Shelf
Step 1: Inspect the Frame for Safety
Before sanding or scraping a vintage painted window, consider its age. Windows and other painted architectural materials made before 1978 may contain lead-based paint. Disturbing that finish can release hazardous dust.
Do not aggressively dry-sand an unknown old coating. Have the paint tested or consult a lead-safe professional. When lead is present, follow current Environmental Protection Agency guidance for containment, personal protection, dust control, cleanup, and disposal. This is one part of the project where “I will probably be fine” is not an approved woodworking technique.
Check the frame joints by gently pressing and twisting the corners. Tighten loose joints with suitable screws, glue, or corner braces. Replace weak glazing points, remove sharp hardware, and confirm that any retained glass is secure.
Step 2: Clean the Frame
Vacuum loose dirt with a soft brush attachment. Wipe the wood using a slightly damp cloth and a mild cleaning solution appropriate for the existing finish. Avoid soaking the frame because old wood can swell, warp, or loosen at the joints.
Let the frame dry completely. Remove protruding nails and screws, or drive them below the surface when they are needed for structural stability. Fill unwanted holes only after deciding whether you want a smooth finish or a visibly aged appearance.
Step 3: Repair Weak Wood and Loose Joints
Small cosmetic cracks can be filled with wood filler. Loose but salvageable joints can often be strengthened with wood glue and clamps. Where the back will remain hidden, small metal corner braces may provide additional reinforcement without changing the front appearance.
Do not rely on filler to repair major rot. Wood filler improves appearance; it does not magically turn damaged fibers into structural lumber. Replace severely weakened sections or select another frame.
Step 4: Measure and Cut the Shelf Board
Measure the overall width of the frame at its bottom edge. The shelf can match that width exactly or extend 1 to 2 inches beyond each side for a more traditional mantel-like appearance.
Mark the cut using a carpenter’s square. Cut the board with a miter saw, circular saw guided by a straightedge, or handsaw. Check the fit against the frame before moving to assembly. If the window is slightly out of square, prioritize an even front over forcing the board tightly against every irregular surface.
Step 5: Shape and Sand the Shelf
Ease the sharp front corners with sandpaper, a block plane, or a router fitted with a small round-over bit. A softened edge looks more finished and is less likely to chip. Decorative molding can also be attached beneath the front edge for a traditional appearance.
For rough new lumber, begin with 80- or 120-grit sandpaper. Continue with 180-grit for a smooth painted surface. Before staining, many projects benefit from stopping around 180 or 220 grit, depending on the wood and the finish manufacturer’s directions.
Always sand with the grain during the final passes. Vacuum the board and wipe away all dust. Finishing over sawdust creates a surface texture best described as “freshly breaded furniture.”
Step 6: Add a Hidden Backer
A 1-by-2 backer strengthens the connection between the frame and shelf. Cut it slightly shorter than the inside width of the frame so it fits discreetly across the lower back.
Position the backer against solid portions of the two vertical frame stiles. Confirm that it is level and does not interfere with glass or decorative inserts. Drill countersunk pilot holes before driving screws. Pilot holes are especially important in dry reclaimed wood, which can split when a screw is driven too close to an edge.
Apply wood glue where clean, unfinished wood surfaces meet, then secure the backer with screws of a suitable length. Avoid driving screws through the front face or into glass channels.
Step 7: Attach the Shelf Board
Place the shelf on the lower edge of the frame and hidden backer. Center it from side to side and confirm that its front edge is parallel with the frame.
Apply a moderate bead of wood glue along the supporting wooden surfaces. Clamp the shelf in position. Drill pilot holes from underneath through the backer and into the shelf, taking care not to drill through the top. Drive the screws until snug without crushing the old wood.
For additional support, install two small corbels beneath the shelf near the sides. Corbels add visual interest while reducing the tendency of the shelf to rotate downward. Simple steel angle brackets are another option and can be painted to blend into the design.
Step 8: Fill, Sand, and Check the Assembly
Allow the glue to cure according to its label. Fill visible screw holes and unwanted gaps with wood filler. Once dry, sand the repairs flush.
Place the assembly on a flat surface and check for rocking or twisting. Inspect every fastener, frame joint, bracket, and glass-retaining point. This is also the ideal time to test the display arrangement using unbreakable objects. If the shelf flexes noticeably, strengthen it before finishing.
Choose a Finish That Fits Your Style
Preserved Rustic Patina
When the existing paint is confirmed safe and stable, its worn appearance may be the frame’s best feature. Clean it gently and apply a compatible clear protective coating if appropriate. Test any product in an inconspicuous area because clear finishes can darken old wood or alter the color of aged paint.
Painted Farmhouse Finish
For a clean farmhouse look, prime repaired wood and apply two thin coats of interior paint. Warm white, muted green, dusty blue, charcoal, and soft black work particularly well on architectural pieces.
Allow each coat to dry fully. Lightly sand between coats when recommended by the paint manufacturer. For controlled distressing, rub a small amount of wax on selected edges before the final coat, then gently reveal the lower color after drying.
Natural Stained Wood
If the frame and shelf have attractive bare wood, stain can unify their colors while preserving the grain. Pine and other softwoods may absorb stain unevenly, so a pre-stain wood conditioner can reduce blotching.
Test the complete finishing schedule on scrap wood. The same stain can appear dramatically different on pine, oak, poplar, and weathered reclaimed lumber. Apply stain with the grain, remove excess product as directed, and let it dry thoroughly before adding a protective topcoat.
Two-Tone Finish
A painted frame paired with a stained shelf creates attractive contrast. For example, combine a soft-black window frame with a walnut-toned ledge, or an aged-white frame with a natural oak shelf. The two-tone approach is also useful when the frame and shelf are made from different wood species that refuse to become visual friends.
How to Mount the Display Shelf Securely
Use a French Cleat When Possible
A wooden or metal French cleat is one of the strongest and most forgiving ways to mount a wide display shelf. One interlocking piece attaches to the back of the frame, while the matching piece attaches level to the wall. The system spreads the load and makes it easier to remove the shelf later.
Position the frame-side cleat high enough to prevent the display from tipping forward. Depending on the frame’s construction, a second spacer or lower attachment point may be needed to keep the piece flat against the wall.
Locate the Wall Studs
Use an electronic stud finder, then confirm the stud edges and centers. Whenever possible, attach the wall cleat to at least two studs using appropriately sized structural or cabinet screws.
When the desired position does not align with studs, use wall anchors rated for the wall material and the entire installed load. The load includes the frame, glass, shelf, hardware, and decorations. Follow the anchor manufacturer’s instructions rather than selecting a fastener because it happens to be nearby and looks optimistic.
Level Before Tightening
Mark a level reference line with a pencil or painter’s tape. Install the cleat loosely, check it again with the level, and then tighten the fasteners. Hang the window shelf and verify that it sits flat without rocking.
Keep the display lightweight during the first test. Gradually add decorations while watching for movement, flexing, or gaps at the wall. Never use a decorative window shelf as a bookshelf unless it was specifically designed and mounted for that load.
Creative Ways to Style the Finished Shelf
- Place black-and-white family photographs behind individual panes.
- Add mirror panels to brighten a small entryway.
- Install cork backing for notes, postcards, and children’s artwork.
- Display lightweight trailing plants in small containers with drip trays.
- Add cup hooks beneath the shelf for keys, mugs, or dried flowers.
- Use seasonal wreaths, miniature houses, or battery-operated candles.
- Install decorative wallpaper behind the openings for color and pattern.
Leave some empty space when styling. A display shelf usually looks better with three or five carefully chosen objects than with seventeen unrelated treasures competing for custody of the ledge. Vary the heights, overlap a few items, and repeat one or two colors from the surrounding room.
Common Mistakes to Avoid
Using a Damaged Frame
Decorative wear is attractive; structural decay is not. Test the frame before investing time in sanding and finishing.
Skipping Pilot Holes
Old, dry wood splits easily. Predrilling requires only a few extra minutes and can prevent a dramatic crack during final assembly.
Attaching the Shelf Only With Glue
Glue can strengthen well-fitted wooden joints, but a projecting shelf also needs mechanical fasteners and proper support. Use screws, a backer, and corbels or brackets as appropriate.
Mounting Into Drywall Alone
Standard wood screws driven into empty drywall provide little reliable support. Hit wall studs or use anchors designed and rated for the wall and load.
Ignoring the Weight of Glass
Old glass adds more weight than many builders expect. Include it when selecting the cleat, screws, anchors, and shelf location.
Experience-Based Lessons for a Better Window Frame Shelf
The first useful lesson from reclaimed-window projects is that old materials rarely behave like new lumber. A vintage frame may look rectangular from across the room but reveal bowed rails, uneven corners, and layers of repairs when placed on a bench. Measuring only once is risky. Measure the frame at the top, middle, and bottom, and use the actual installation area to determine the final shelf width.
Dry-fitting every part before opening the glue bottle prevents a surprising number of problems. Set the frame flat, position the backer, add the shelf, clamp the assembly lightly, and inspect it from the front and both sides. This rehearsal may reveal that a screw would enter a glass channel, a corbel is too large, or the shelf looks visually off-center even though the tape measure says otherwise.
Another recurring lesson is that reclaimed wood rewards restraint. New builders often try to sand every dent and weathered mark away. Unfortunately, those imperfections are usually the reason the old frame looked interesting in the first place. Sand enough to remove splinters, rough repairs, and unstable material, but preserve sound tool marks, worn corners, and natural color variation when they suit the design.
Finishing samples are equally important. Stain colors shown on a label are only approximations. A medium-brown stain may look warm and subtle on oak but turn orange on pine or nearly black on aged end grain. Test the stain, paint, glaze, and clear coat on the back of the frame or on scrap wood prepared with the same sanding sequence.
Mounting tends to be the stage where a beautiful project encounters reality. A heavy window frame is awkward to hold level while marking holes, particularly after glass and a shelf have been added. A removable French cleat simplifies the process because the wall component can be installed independently. Once that cleat is level and secured, the display can be lowered into place instead of being balanced with one hand while the other hand searches for a screw that has rolled under the sofa.
It is also wise to finish the frame and shelf before final wall installation. Painting after mounting increases the chance of drips, missed edges, and accidental wall decoration. However, keep glue surfaces unfinished during assembly whenever possible, since many adhesives bond more effectively to clean wood than to a sealed coating.
When arranging decorative items, start lighter and simpler than you think necessary. Small frames, dried botanicals, wooden beads, miniature pottery, and battery-operated candles create visual interest without excessive load. Live plants should sit in waterproof containers or on discreet trays because repeated moisture can damage the shelf and wall.
Finally, let the window frame remain the star. The most successful displays use objects that complement its shape rather than hide it completely. Repeat the geometry of the panes with small photographs, place one taller object off-center, and leave enough negative space for the original architecture to remain visible. The result will look collected and intentional instead of resembling a yard sale that learned how to use wall anchors.
Conclusion
Building a wooden window frame display shelf is an excellent way to turn an architectural salvage piece into functional wall decor. The project requires only basic cutting, sanding, assembly, finishing, and mounting skills, yet the finished shelf can become a genuine focal point.
The keys to success are choosing a sound frame, handling unknown old paint safely, reinforcing the lower section with a hidden backer, supporting the projecting shelf, and securing the complete unit to suitable wall framing or rated anchors. Take time with the dry fit and finish samples. Small adjustments made on the workbench are much easier than large apologies made after the shelf is on the wall.
Note: Vintage painted windows may contain lead-based paint, and old glass may be fragile. Test unknown coatings before sanding, use appropriate protective practices, and replace unsafe glass or severely damaged wood before beginning construction.