
Measuring gutters sounds like one of those weekend jobs that should take ten minutes and one heroic sip of coffee. Then you step outside, look up at the roofline, notice three corners, two downspouts, a suspiciously sagging section, and suddenly your tape measure feels like a tiny sword in a very domestic battle. The good news? Learning how to measure gutters is not complicated once you break the job into three practical methods: measuring linear feet, measuring gutter size, and measuring drainage capacity.
Whether you are replacing old rain gutters, planning a new gutter installation, buying materials, estimating gutter cost, or checking whether your current system can handle heavy rain, accurate measurements matter. Gutters are not just decorative trim for your roof. They collect rainwater, move it to downspouts, and help protect siding, landscaping, basements, crawl spaces, and foundations from water damage. A gutter that is too short, too narrow, poorly sloped, or missing enough downspouts can turn a normal storm into a front-yard splash festival.
This guide explains three reliable ways to measure gutters like a smart homeowner instead of a confused raccoon on a ladder. You will learn what to measure, where to measure, how to plan for downspouts, and when to call a professional before gravity files a complaint.
Why Accurate Gutter Measurements Matter
Before grabbing a ladder, it helps to understand why gutter measurement is more than simply stretching a tape along the edge of the roof. A complete gutter system includes gutter runs, inside and outside corners, end caps, outlets, hangers, downspouts, elbows, splash blocks, and extensions. Each piece depends on the measurements around it.
If the gutter run is too short, water spills off the roof edge. If the gutter is too small, heavy rain can overflow the front lip. If the downspouts are too far apart, water may pool inside the gutter and pull it away from the fascia. If the slope is wrong, rainwater may sit there like it rented the place.
Most residential gutters in the United States are 5-inch or 6-inch K-style gutters, while common downspouts are 2-by-3 inches or 3-by-4 inches. Smaller homes in moderate rainfall areas often use 5-inch gutters, while larger roofs, steep roof pitches, metal roofing, or regions with intense rain may need 6-inch gutters or larger downspouts. The right choice depends on roof size, roof pitch, rainfall intensity, and how efficiently water can exit through the downspouts.
Tools You Need Before Measuring Gutters
You do not need a contractor’s truck full of mysterious objects to measure gutters, but you do need a few basic tools. A 25- or 50-foot tape measure works for most homes. A notepad or phone helps record each roof edge separately. A pencil, chalk line, level, calculator, ladder, work gloves, and a helper are also useful. If you are measuring a two-story home, steep lot, damaged fascia, or a roofline that looks like it was designed during an argument, consider hiring a professional.
Safety deserves its own paragraph because ladders do not forgive overconfidence. Always place the ladder on stable ground, keep three points of contact, avoid reaching sideways, and never measure during rain or wind. Gutters can be replaced; ankles are harder to order online.
Way 1: Measure the Linear Feet of Your Gutter Runs
The first and most basic way to measure gutters is to calculate the linear feet of gutter needed along the roof edges. This is the measurement most homeowners need when estimating material quantity or comparing gutter installation quotes.
Step 1: Sketch Your Home’s Roofline
Start with a simple sketch of your house from above. It does not have to win an architecture award. Draw each roof edge where gutters will be installed. Most homes need gutters along the lower horizontal edges of the roof, not on the angled rake edges of a gable. Mark corners, garage sections, porch roofs, and any places where one roof drains onto another.
Label each gutter run as A, B, C, and so on. This keeps your measurements organized and prevents the classic “was that 32 feet for the back porch or the garage?” moment.
Step 2: Measure Each Roof Edge Separately
Use your tape measure to measure along the fascia board or existing gutter from end to end. Record each run in feet and inches. If you are replacing old gutters, measure the current gutter length only if it was installed correctly. If the old gutter is too short, damaged, or awkwardly patched, measure the fascia instead.
For example, your notes may look like this:
- Front roofline: 42 feet
- Back roofline: 38 feet
- Garage front: 20 feet
- Covered porch: 14 feet
Total gutter length: 114 linear feet.
For sectional gutters, round up because sections are commonly sold in standard lengths. For seamless gutters, the installer will fabricate continuous runs, but your linear-foot total still helps estimate cost.
Step 3: Count Corners, End Caps, and Outlets
Linear feet tell you how much gutter you need, but accessories make the system work. Count every inside corner and outside corner. Mark open ends that need end caps. Identify where each gutter run will connect to a downspout outlet.
A house with 114 linear feet of gutter might also need four outside corners, two inside corners, six end caps, four outlets, four downspouts, and several elbows. These small parts are easy to forget until you are standing in the aisle at the hardware store whispering, “Why are there so many elbows?”
Way 2: Measure Existing Gutter Width, Depth, and Profile
The second way to measure gutters is to determine the size and style of your existing system. This is especially important if you are replacing one damaged section, adding gutter guards, matching old gutters, or deciding whether your current gutters are large enough.
Measure the Width Across the Top Opening
Gutter size usually refers to the width across the top opening. To measure it, place your tape measure across the top from the back edge to the front lip. A 5-inch gutter measures about 5 inches across the opening. A 6-inch gutter measures about 6 inches.
Do not measure only the front face. The decorative front curve of a K-style gutter can trick the eye. Measure the actual opening where water enters.
Measure the Depth of the Gutter
Depth tells you how tall the gutter is from top to bottom. Place the tape measure inside the gutter and measure from the top edge down to the bottom. This helps when matching replacement sections or evaluating capacity. A deeper gutter can hold more water, but width, shape, slope, and downspout size all matter too.
Identify the Gutter Profile
Most modern residential homes use K-style gutters, which have a flat back and a decorative front that resembles crown molding. Half-round gutters look like a tube cut in half and are often found on older homes or homes with historic styling. Box gutters may appear on commercial buildings or certain custom homes.
Knowing the profile matters because accessories are not always interchangeable. A K-style end cap will not magically fit a half-round gutter just because you ask nicely.
Measure the Downspout Size
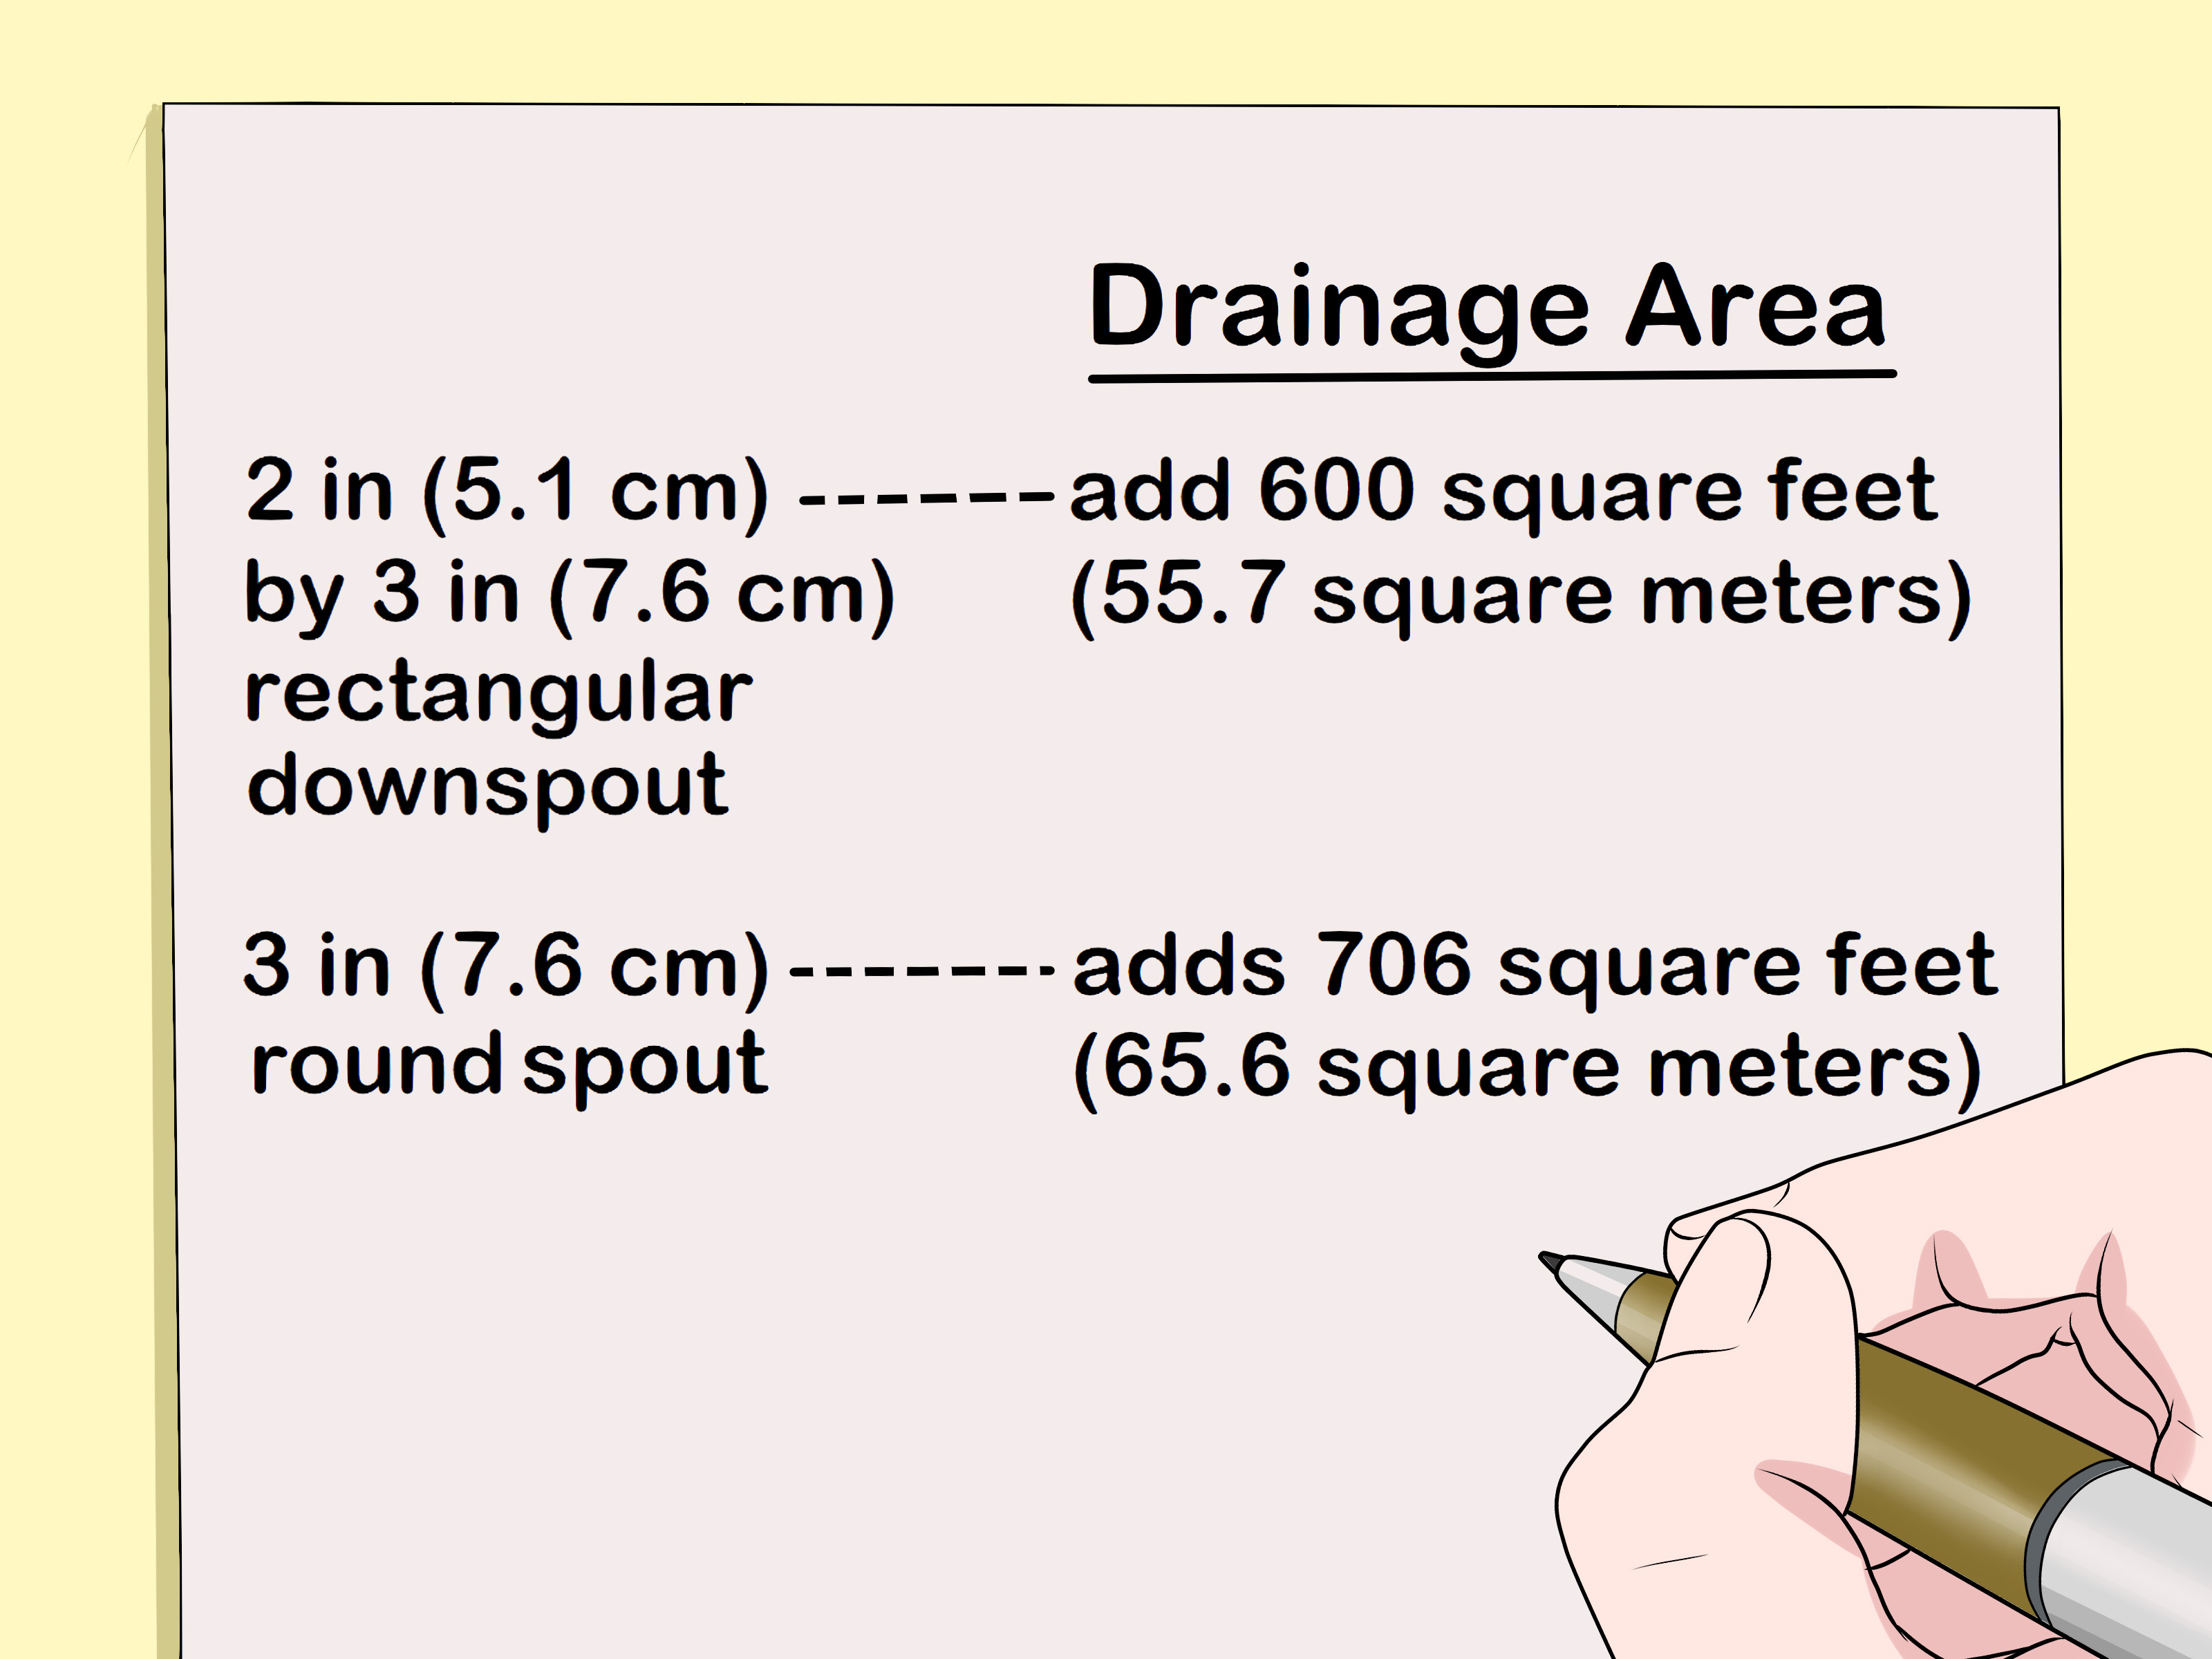
Next, measure the downspouts. Rectangular downspouts are commonly 2-by-3 inches or 3-by-4 inches. Larger 3-by-4-inch downspouts move more water and are often paired with 6-inch gutters. Round downspouts are measured by diameter.
If your gutters overflow during heavy rain but are not clogged, undersized downspouts may be part of the problem. Sometimes adding another downspout or upgrading to a larger size improves performance without replacing the entire gutter system.
Way 3: Measure Roof Area, Pitch, and Drainage Capacity
The third way to measure gutters is the most important when you are choosing between 5-inch and 6-inch gutters or designing a new system. This method considers how much water your roof actually sends into the gutters.
Measure the Roof Drainage Area
Each gutter run drains a specific section of roof. To estimate that drainage area, measure the horizontal length and width of the roof section feeding into that gutter. Multiply length by width to get square footage.
For example, if one roof plane is 40 feet long and 18 feet from ridge to eave, the roof area is 720 square feet. If that entire section drains into one gutter run, that gutter must handle the runoff from 720 square feet of roof.
For complex roofs, break the roof into rectangles or triangles and calculate each section separately. Valleys are important because they concentrate water from two roof planes into one area. If you have ever watched a roof valley during a thunderstorm, you know it can behave like a small, angry river.
Account for Roof Pitch
Roof pitch affects gutter sizing because steep roofs shed water faster. A low-slope roof sends water more slowly, while a steep roof can deliver water to the gutter with extra speed. Roof pitch is commonly described as rise over run, such as 4:12, 6:12, or 8:12. A 6:12 pitch means the roof rises 6 inches for every 12 inches of horizontal run.
As a practical rule, steeper roofs often benefit from larger gutters, larger downspouts, or additional downspouts. This is especially true in regions with intense storms. A 5-inch gutter may work perfectly on a modest roof in a moderate rainfall area, while a steep roof in a heavy-rain climate may need a 6-inch system.
Consider Local Rainfall Intensity
Gutters in dry climates do not face the same workload as gutters in areas with frequent thunderstorms, hurricanes, or heavy snowmelt. Local rainfall intensity helps determine how much water the system must move during a strong storm. If your area gets intense downpours, do not size gutters based only on calm drizzle. Gutters should be designed for the weather that actually causes problems.
For many homes, standard 5-inch K-style gutters are enough. However, 6-inch gutters can carry more water and are often recommended for larger roof areas, steep pitches, long runs, metal roofs, tile roofs, or regions with heavy rainfall. When in doubt, ask a local gutter contractor to calculate drainage capacity using roof area, pitch, and rainfall data.
How to Measure Gutter Slope
Gutter slope is the slight downward angle that moves water toward the downspout. Without slope, water sits in the gutter and collects leaves, dirt, mosquitoes, and homeowner regret.
A common guideline is to slope gutters about 1/4 inch to 1/2 inch for every 10 feet of gutter run toward the downspout. For a 30-foot run, that means the downspout end may be about 3/4 inch to 1 1/2 inches lower than the high end.
To measure slope, mark the high point near the far end of the gutter run. Then measure the total run length and calculate the drop needed. Use a chalk line to snap a straight guide on the fascia. The line should look almost level from the ground but still allow water to drain properly.
For runs longer than about 40 feet, many installers pitch from the center toward downspouts at both ends or pitch from both ends toward a center downspout. Long runs with one outlet can overload the system during heavy rain.
How to Measure for Downspouts
Downspouts are the exit doors for rainwater. If gutters collect water but downspouts cannot carry it away, the system fails at the finish line.
A useful rule is to plan one downspout for every 25 to 35 linear feet of gutter, and avoid running more than about 40 feet of gutter to a single downspout. Homes in heavy-rain areas may need more downspouts. Valleys, large roof planes, and long gutter runs may also need extra outlets.
To measure downspout length, measure from the gutter outlet down to the ground. Add length for elbows and extensions. Extensions should direct water away from the foundation, not simply dump it beside the house like a tiny waterfall with bad manners.
For example, if the gutter is 10 feet above the ground and you need a 4-foot extension, each downspout may require about 14 feet of material, plus elbows and straps. Multiply that by the number of downspouts.
Example: Measuring Gutters for a Simple One-Story Home
Imagine a one-story ranch home with a 50-foot front roofline, a 50-foot back roofline, and a 24-foot garage roofline. The total gutter length is 124 linear feet. The front run is long, so it may need two downspouts. The back run may also need two. The garage might need one.
The homeowner measures the existing gutters and finds they are 5-inch K-style with 2-by-3-inch downspouts. The roof has a moderate pitch, but the home sits in an area with frequent summer storms. During heavy rain, water overflows near a roof valley. In this case, the solution might be adding a downspout near the valley, upgrading to 3-by-4-inch downspouts, or switching to 6-inch gutters if the roof area and rainfall demand it.
This example shows why measuring gutters is not just about length. Length tells you how much material to buy. Width and profile tell you what type of gutter you have. Roof area, pitch, rainfall, and downspout placement tell you whether the system can do its job.
Common Gutter Measuring Mistakes
Forgetting to Measure Each Run Separately
Adding everything into one big number may seem efficient, but separate measurements help you plan cuts, seams, corners, outlets, and downspouts. A single total cannot tell you where the tricky parts are hiding.
Ignoring Roof Valleys
Roof valleys collect water from multiple surfaces. If a gutter overflows in one spot, the valley above it is often the reason. Add notes to your sketch wherever valleys empty into a gutter.
Assuming Bigger Is Always Better
Larger gutters can handle more water, but they also cost more and may look bulky on some homes. The best gutter size is the one that matches the roof, rainfall, architecture, and drainage needs.
Not Planning Water Discharge
Measuring downspouts is only half the job. Water must exit away from the foundation. Add extensions, splash blocks, underground drainage, or rain barrels where appropriate.
When to Hire a Professional
You can measure many single-story gutters yourself, but some situations call for a professional. Hire help if your home has multiple stories, steep rooflines, damaged fascia, complex roof valleys, copper gutters, custom profiles, or drainage problems that keep returning. A professional can calculate capacity, fabricate seamless gutters, set correct slope, and recommend proper downspout placement.
Professional installation is also smart if your measurements suggest a major upgrade from 5-inch to 6-inch gutters, or if water is already damaging fascia, siding, landscaping, or the foundation. Paying for accurate installation is usually cheaper than paying for water damage later.
Practical Experience: What Measuring Gutters Teaches You in the Real World
After measuring gutters on a few homes, you quickly learn that every roof has a personality. Some are straightforward and polite. Others seem to have been designed by someone who loved corners, hated symmetry, and owned stock in elbow fittings. The biggest lesson is this: do not trust your eyes alone. A gutter run that looks like 30 feet from the ground may be 37 feet when measured properly. A “small” porch roof may send more water into one corner than expected. A downspout that looks fine may be overwhelmed because it serves too much roof area.
One practical habit is to walk the home twice. On the first walk, simply observe. Look for stains on siding, mulch washed out below corners, soil erosion, mildew near the foundation, sagging gutters, loose hangers, and splash marks. These clues tell you where water has been misbehaving. On the second walk, measure. This prevents you from focusing only on numbers while missing the story the house is already telling.
Another useful experience is to measure after a rainstorm, once conditions are safe. You may notice where water drips behind the gutter, where a valley overshoots the front lip, or where a downspout empties too close to the foundation. Dry-weather measuring gives you dimensions. Wet-weather observation gives you truth. Together, they make a much better plan.
It also helps to take photos of every side of the house. Photograph each corner, downspout, roof valley, and damaged section. Then mark your measurements directly on the photos using your phone. This is far easier than decoding a notebook later that says “left side by bush, maybe 18?” Future you will be grateful. Future you may even forgive present you for buying the cheap tape measure.
If you are buying materials yourself, add a modest waste allowance. Small errors happen. Cuts go wrong. Corners require fittings. Sectional gutters need overlap at joints. Even careful homeowners sometimes discover that the fascia is not perfectly straight or that an old gutter was hiding rotten wood. Having a little extra material is better than stopping the project because you are short by 11 inches.
The final real-world lesson is not to separate gutter measurement from drainage planning. A perfect gutter that dumps water beside the foundation is only doing half the job. Measure extensions. Check grading. Make sure water flows away from the house. If the yard slopes toward the foundation, even excellent gutters may need help from French drains, buried downspout lines, or landscaping corrections.
In short, measuring gutters teaches patience, observation, and respect for rainwater. Water always finds the easiest path. Your job is to measure carefully enough to give it a better one.
Conclusion
Learning the three ways to measure gutters gives you a complete picture of your home’s rainwater system. First, measure linear feet so you know how much gutter material is needed. Second, measure the existing gutter width, depth, profile, and downspout size so you can match or upgrade the system correctly. Third, measure roof area, pitch, rainfall demand, slope, and downspout placement so the gutters can handle real storms, not just imaginary drizzle.
Good gutter measurements help prevent overflow, leaks, fascia damage, foundation problems, and unnecessary material costs. They also make conversations with contractors much easier because you can compare estimates with confidence. And honestly, there is something deeply satisfying about looking at a roofline and knowing exactly what it needs. It is not glamorous, but neither is bailing water out of a basement.