
Note: This guide is for legally downloaded movies, public-domain films, creator-provided video files, and personal home videos only. It does not cover pirated downloads, ripping protected streaming content, or bypassing copy protection.
Maybe you found a classic public-domain film you want to keep on a shelf. Maybe your parents still own a DVD player that has survived three TVs, two couches, and one suspiciously sticky remote. Or maybe you just want to turn a digital movie file into something you can hand to Grandma without also handing her a lecture about apps, logins, and “the cloud.” Fair enough.
The good news is that burning a movie to a DVD is still very doable. The less-fun news is that it is only easy once you know the difference between a data DVD and a playable video DVD. Mix those up, and your “movie night masterpiece” may turn into a disc that works only on a computer and stares blankly at your living-room DVD player like it has never met cinema before.
In this guide, you’ll learn how to legally download a movie, pick the right blank disc, prepare the video file, and burn it properly on Windows or Mac. You’ll also see the common mistakes people make, how to avoid coaster-level failure, and what to do if your DVD player rejects your disc like an overly dramatic film critic.
What You Need Before You Start
Before you burn anything, gather the basics:
- A legally obtained movie file in a common format such as MP4, MOV, or WMV
- A computer with a DVD burner, either built-in or external USB
- Blank DVDs, usually DVD-R, DVD+R, DVD-RW, or dual-layer DVD+R DL
- Enough free storage space on your computer
- DVD-burning or DVD-authoring software
If you are making a simple backup disc for computer use, you may only need a basic burn feature. If you want a disc that plays in a standard DVD player, you need DVD authoring software that converts the video into DVD-Video format and creates the proper folder structure, usually VIDEO_TS. That little detail is the difference between “works beautifully” and “why is my player acting haunted?”
Step 1: Download a Movie the Right Way
The safest way to start is with a movie you have the legal right to save and burn. That usually means one of four things:
1. Public-domain movies
Public-domain films are often the easiest option. Many classic movies are available from legitimate archives and collections. These are great for practice because you can download them without tiptoeing around copyright issues.
2. Creator-authorized downloads
Some filmmakers, educators, and media companies offer direct downloads of their films for personal use. If the site says you may download it, read the terms before assuming you may also burn copies for friends. “Downloadable” does not always mean “redistributable.”
3. Your own home videos or edited projects
This is the cleanest option of all. If you exported a wedding video, family slideshow, documentary project, or short film, you can absolutely turn that file into a DVD for playback or gifting.
4. Purchased downloads without restrictions
Some downloads are sold as video files you can keep. Others come wrapped in DRM or app-based playback restrictions. If your movie only plays inside a specific app and cannot be exported as a normal video file, it is probably not a good candidate for DVD burning. In plain English: if the file is locked down, don’t try to outsmart it.
Step 2: Know the Difference Between a Data DVD and a Video DVD
This is the most important part of the whole guide.
Data DVD
A data DVD works like storage. You drag a movie file onto the disc, burn it, and the computer can read that file later. This is useful for archiving or moving files around. But many standalone DVD players will not play it unless they specifically support your file format.
Video DVD
A video DVD is built for traditional DVD players. The authoring software converts your video into the DVD-Video standard, creates the correct folders, and often lets you add menus, chapters, and a title screen. If your goal is “put disc in player, press play, enjoy snacks,” this is the format you want.
Think of it like this: a data DVD is a file cabinet, while a video DVD is a finished movie theater package. Same plastic circle. Very different personality.
Step 3: Pick the Right Blank Disc
Most people will use a standard single-layer DVD that holds about 4.7 GB. That is enough for many standard-definition movie projects. If your video is longer, or you want better quality with less compression, a dual-layer disc can hold about 8.5 GB.
- DVD-R: Great for broad compatibility and common for video discs
- DVD+R: Also widely supported and useful for one-time burning
- DVD-RW/DVD+RW: Rewritable, good for tests, but not always the best for older players
- DVD+R DL or DVD-R DL: Dual-layer discs for larger projects
If you are making a disc for someone else’s older DVD player, using a good-quality DVD-R is often the simplest bet. Rewritable discs are handy for practice runs, but for final gifts or long-term storage, write-once discs usually feel more dependable.
Step 4: Check and Prepare the Movie File
Before burning, open the movie and make sure it actually works. Yes, this sounds obvious. No, people do skip it. Then they discover the soundtrack vanishes halfway through, the subtitles are glued on upside down, or the last 20 minutes are missing like a low-budget mystery plot.
Here’s what to check:
- The file plays from beginning to end
- The audio is in sync
- The aspect ratio looks normal
- The video is not too large for the disc you chose
- The file name is clean and simple
If your file is huge, you may need to trim it, lower the bitrate, or choose a dual-layer disc. Many DVD authoring programs can handle the conversion for you, but feeding them a clean file makes everything smoother.
Step 5: Choose DVD Burning Software
Your software choice depends on what kind of disc you want to create.
For a data DVD
Windows and macOS can both burn files to disc with built-in tools. This is fine for archiving the movie file itself.
For a playable movie DVD
You need software that supports DVD authoring. This kind of program can:
- Convert video files into DVD format
- Create menus and chapter points
- Prepare the proper DVD structure
- Burn directly to disc or create an ISO image first
Common choices include consumer DVD-authoring tools such as PowerDirector, Roxio products, Nero tools, and similar disc-creation apps. Some free options exist too, but paid software often makes the process easier, especially if you want menus that do not look like they were designed during the dial-up era.
How to Burn a Movie to DVD on Windows
Option A: Burn a Data DVD
- Insert a blank DVD into your burner.
- Open the built-in burn feature or a basic disc-burning app.
- Select the option for a data DVD.
- Drag your movie file into the burn list.
- Click burn and wait for the process to finish.
This is the quickest method, but remember: the result is a file disc, not a classic living-room movie DVD.
Option B: Create a Playable Video DVD
- Open your DVD-authoring software.
- Start a new DVD-Video project.
- Import your movie file.
- Choose your TV format if prompted, such as NTSC for the U.S.
- Add a menu, chapter markers, or background image if you want.
- Preview the project to confirm the movie, sound, and menu behave correctly.
- Choose either Burn to Disc or Create ISO First.
- Insert a blank disc and begin the burn.
- After burning, test the disc on your computer and, ideally, on a standalone DVD player.
Creating an ISO first is smart because it lets you test or reburn later without repeating the whole encoding process. It is the digital equivalent of measuring twice and cutting onceexcept with fewer splinters and more progress bars.
How to Burn a Movie to DVD on Mac
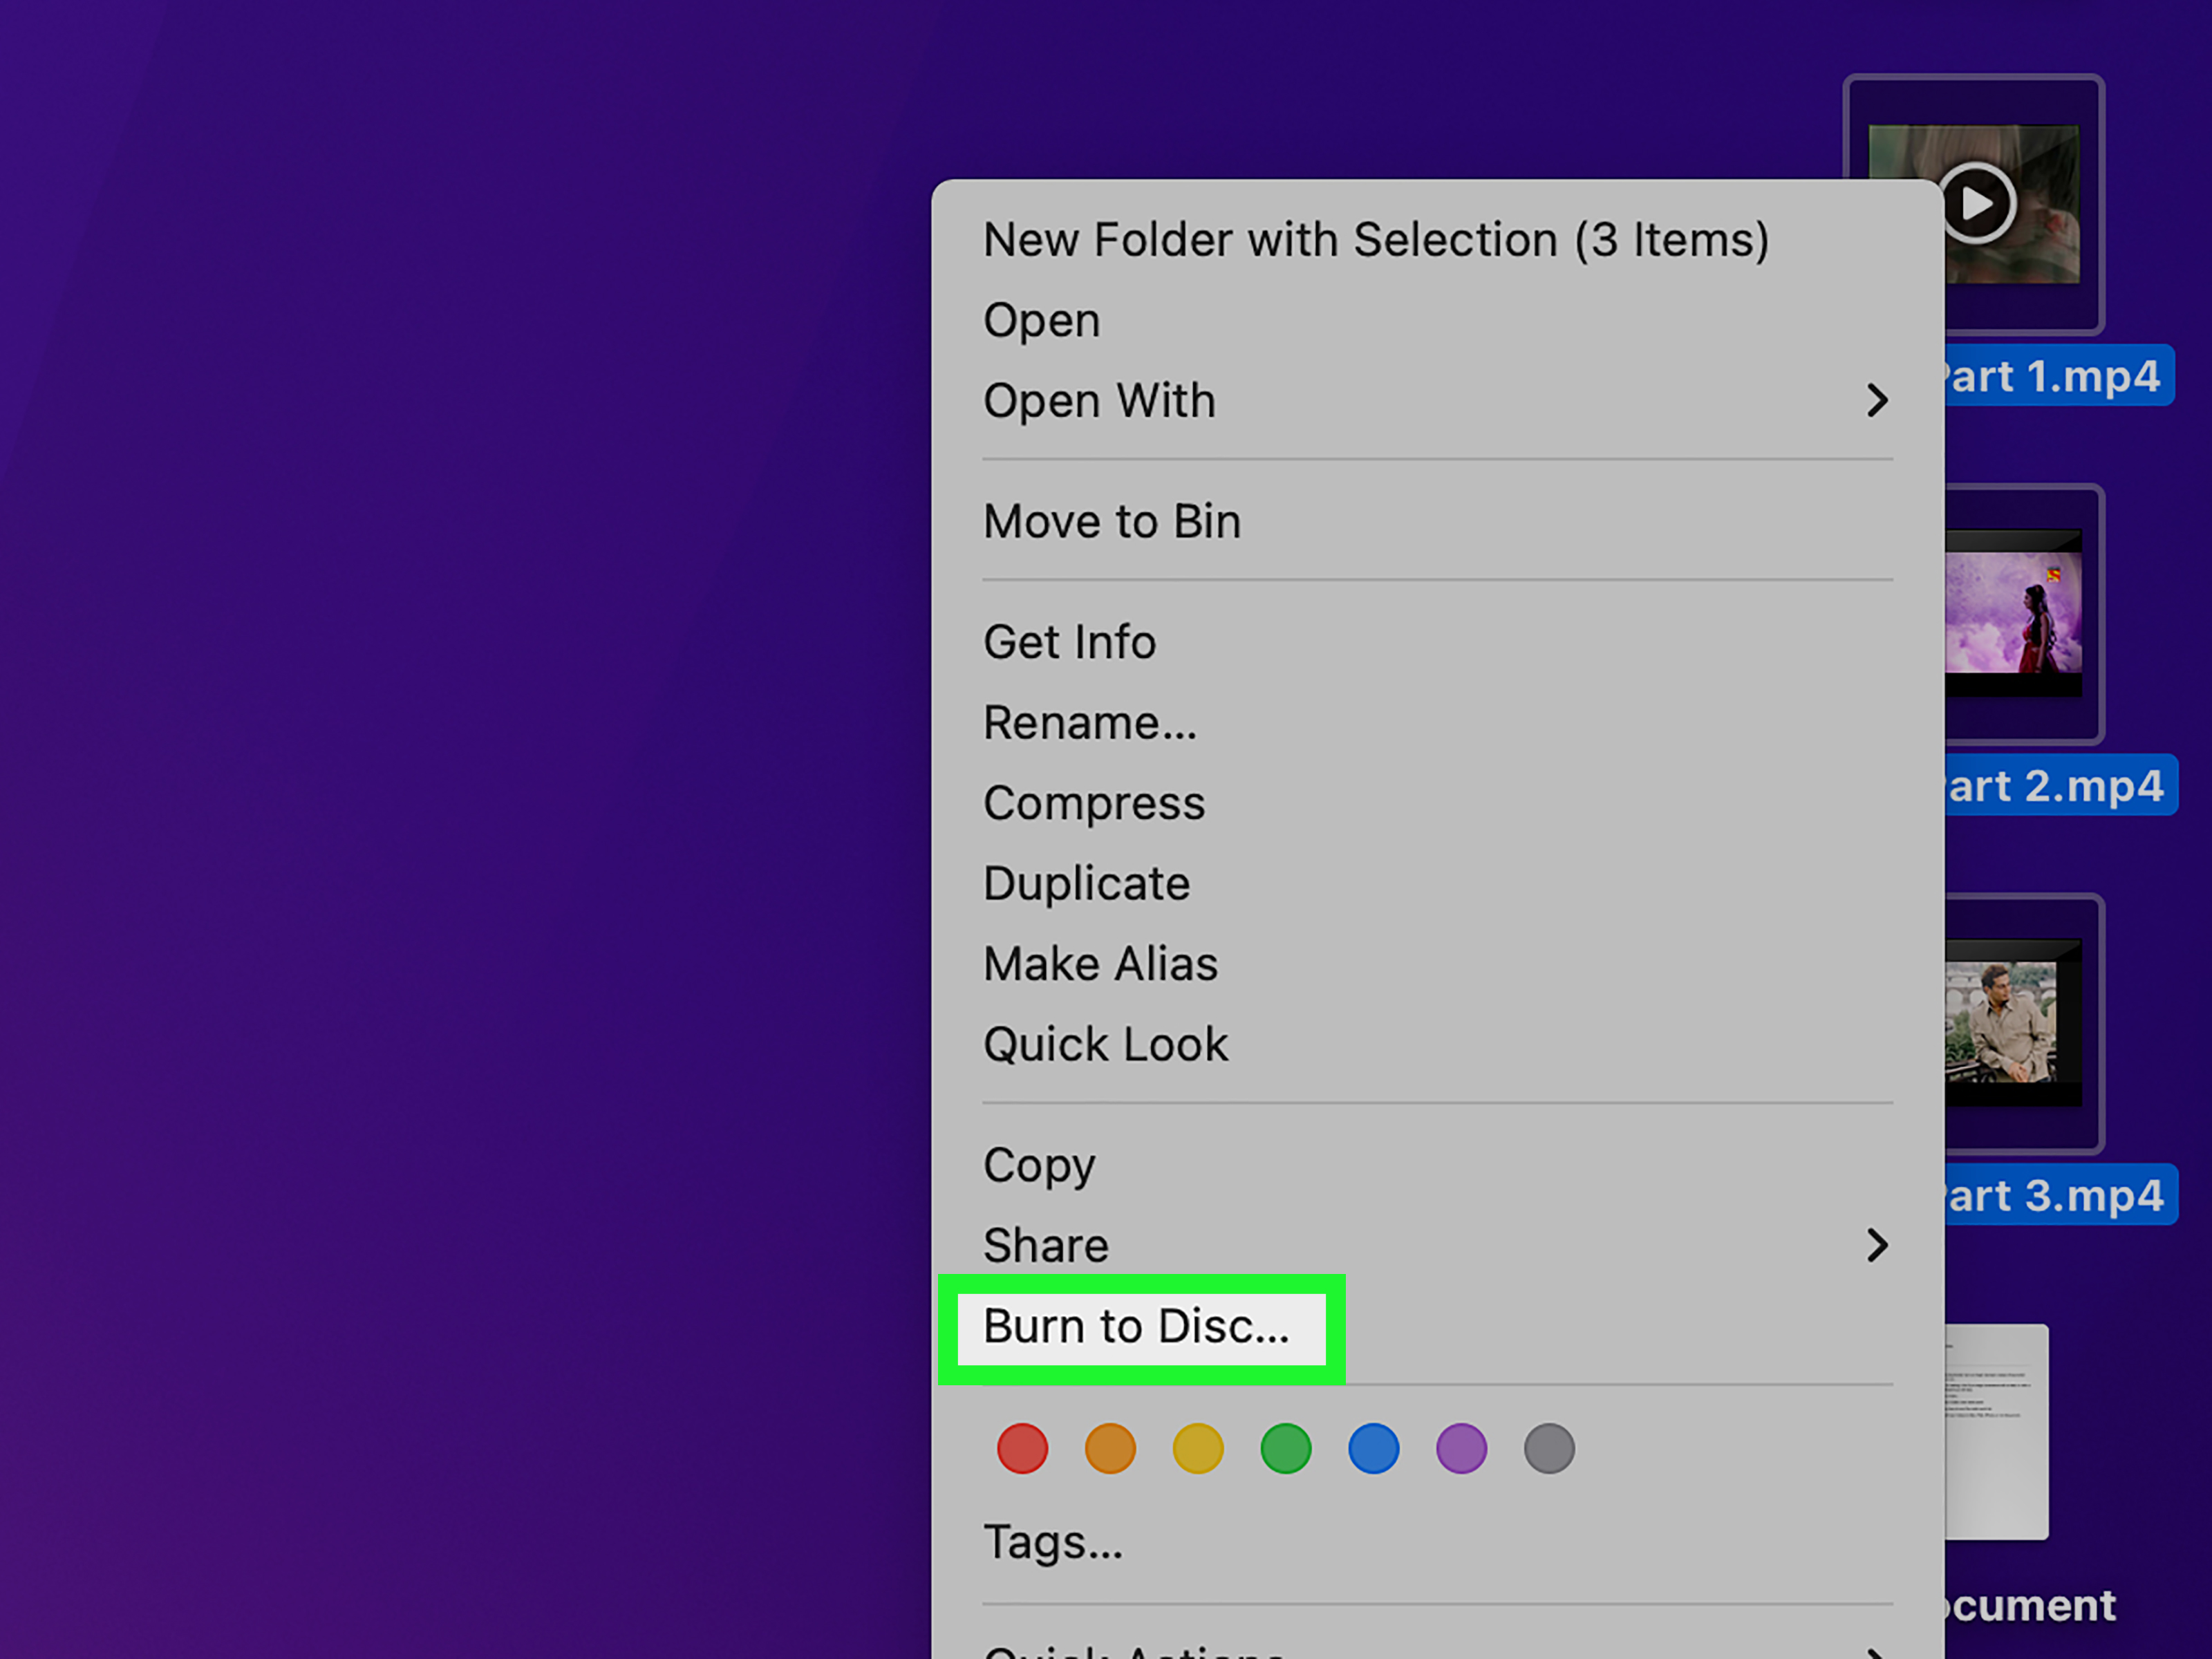
Option A: Burn a Data DVD in Finder
- Connect an external DVD burner if your Mac does not have one built in.
- Create a burn folder or choose files to burn.
- Add your movie file.
- Insert a blank DVD.
- Click Burn and follow the prompts.
This works well for storage, but Finder alone does not magically convert a regular video file into a traditional DVD movie structure.
Option B: Create a Playable DVD
- Export your final movie file from iMovie, Final Cut Pro, or another editor.
- Open a DVD-authoring app that supports DVD-Video creation.
- Import the file and set the project to standard DVD.
- Add chapters or a menu if desired.
- Burn directly to disc or make a DVD image first.
- Test the finished disc using DVD playback software.
If you are on a newer Mac, remember to leave enough free storage space before burning. Optical drives may be old-school, but they still demand some workspace behind the curtain.
Best Settings for Better Results
If you want your DVD to look good and play smoothly, keep these practical tips in mind:
- Use standard definition settings for DVD output, because DVD is not a 4K party trick
- Do not overload a 4.7 GB disc with a super-long movie unless you accept heavier compression
- Use a moderate burn speed instead of the absolute maximum
- Finalize the disc when your software offers the option
- Use decent blank media rather than mystery discs from the bargain bin of chaos
A slower, steadier burn often gives better compatibility than trying to blaze through the job at top speed. Sure, speed is fun, but so is a disc that actually plays.
Troubleshooting Common Problems
The DVD burns, but my player will not read it
This usually points to disc format, poor media quality, lack of finalization, or a player that is simply too picky for modern burned discs. Try a DVD-R, reduce the burn speed, and verify the disc was finalized.
The disc works on my computer but not on a DVD player
You likely made a data DVD instead of a video DVD. Recreate it using DVD-authoring software.
The movie is too big for the disc
Use a dual-layer disc, shorten the project, or allow the software to compress it for DVD size.
The menu looks strange or the chapters do not work
Preview the project before burning. Many authoring tools let you fix navigation, button layout, and chapter timing before you waste a disc.
The burn fails halfway through
Check your drive, free up storage, close background apps, and try different media. External burners also behave better when plugged directly into the computer instead of through a flaky hub that acts like it has personal grudges.
Is It Better to Burn Straight to Disc or Create an ISO First?
If you are only making one quick disc, burning straight to DVD is fine. But if you want a safer workflow, creating an ISO first is often the better choice. An ISO lets you:
- Test the DVD structure before burning
- Reburn later without re-encoding the movie
- Archive the project in a cleaner way
- Make multiple copies more easily
In short, an ISO is the “future me will thank present me” option.
Legal and Practical Tips You Should Not Ignore
Here is the simple version: if you did not make the movie, did not receive permission, and cannot clearly download it as a lawful file, do not burn it to DVD. Plenty of legitimate movie files do exist, especially public-domain classics and creator-provided downloads. But trying to turn protected streams or locked downloads into discs is where people stumble into legal and technical trouble.
Also remember that “personal use” is not a magical phrase that overrides copyright. A site’s license terms still matter. If a creator allows download but not redistribution, respect that boundary. The internet already has enough chaos without adding “rogue family DVD distributor” to your résumé.
Real-World Experiences: What It’s Actually Like to Burn a Movie to DVD
If you have never burned a DVD before, the process can feel weirdly nostalgic and slightly intimidating. It is one of those tasks that seems like it should be simple because people were doing it everywhere 15 or 20 years ago, yet somehow it now feels more specialized than flying a small moon mission. The first surprise for many people is that the computer does not automatically know what you mean by “make me a movie DVD.” You have to be specific.
A common first-time experience goes like this: someone downloads a perfectly good MP4 file, drags it onto a blank disc, burns it, and then proudly walks over to the living-room DVD player. The tray closes. The machine hums. Hope rises. Then the player either says No Disc or displays the file name like a confused robot librarian. That is the moment when people realize they made a data disc instead of a video DVD.
Once you understand that difference, the whole process gets easier. People who switch to proper DVD-authoring software usually report a much smoother second attempt. Suddenly there is a menu, a title screen, maybe chapters, and the disc behaves like an actual movie DVD instead of a storage experiment. It feels more polished and, honestly, more satisfying.
Another real-world lesson is that not all blank DVDs behave the same. Cheap discs can burn successfully and still refuse to play in older machines. Good-quality media often saves a lot of frustration. So does lowering the burn speed a little. It sounds backward in an age of instant everything, but taking the slower lane can lead to fewer errors and better compatibility.
External USB DVD burners also have their own personality. Most work fine, but they are happiest when connected directly to the computer. If the drive keeps disconnecting or the burn fails for no obvious reason, the issue may be the connection rather than the movie file. Many people spend an hour blaming software when the real villain is a sleepy USB hub.
On the emotional side, burning a movie to DVD still has a charm that digital sharing does not. A disc can feel like a finished object. It can be labeled, gifted, filed, or tucked into a case on a shelf. That matters for weddings, memorial videos, school projects, vacation compilations, and family archives. Not everyone wants a link. Some people want something they can hold, hand off, and play without passwords, updates, or app drama.
There is also a practical joy in making discs for relatives who do not love technology. A labeled DVD with “Summer Trip 2025” written on it in black marker can sometimes be more useful than the sleekest cloud folder ever invented. No account setup. No forgotten login. No accidental deletion. Just a disc and a remote.
In the end, the experience of downloading a lawful movie file and burning it to DVD is less about pressing one magical button and more about choosing the right path. If you want storage, make a data DVD. If you want playback in a standard player, author a video DVD. Use good media, test the file first, preview the project, and do not rush the final burn. Follow those steps, and the process stops feeling like retro tech wizardry and starts feeling pleasantly doable.
Final Thoughts
Downloading a movie and burning it to a DVD is still a useful skill, especially when you are working with public-domain films, creator-approved downloads, or your own personal videos. The trick is understanding the format you need and using the right tool for the job.
If you only want file storage, a data DVD is enough. If you want a disc that behaves like a traditional movie DVD in a standalone player, you need DVD-authoring software and the proper DVD-Video structure. Choose solid media, preview your project, and test the final disc before declaring victory.
Do it right, and you end up with something refreshingly tangible: a movie you can hold in your hand, archive on a shelf, or gift to someone who still believes streaming menus are a form of emotional warfare.
SEO Tags