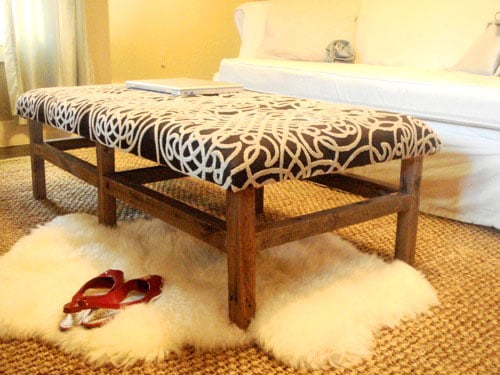

There are two types of living rooms: the ones with a great ottoman, and the ones where everyone awkwardly balances coffee mugs on the sofa arm while pretending this is fine. A DIY ottoman fixes that problem beautifully. It can become a footrest, extra seating, a soft coffee table, a secret storage box, a pet-approved throne, or the one piece of furniture that makes guests say, “Wait, you made that?”
The best part is that building an amazing DIY ottoman does not require a full-blown workshop, a design degree, or the emotional stamina of a home renovation show contestant. With basic lumber, foam, batting, fabric, a staple gun, and a little patience, you can create a custom ottoman that fits your room better than most store-bought pieces. You control the size, color, height, texture, firmness, storage capacity, and budget. In other words, you get designer flexibility without designer sticker shock.
This guide walks you through the process of building a sturdy, stylish, upholstered DIY ottoman from scratch. We will cover planning, measurements, tools, materials, frame construction, padding, upholstery, finishing details, storage options, safety tips, design ideas, and mistakes to avoid. By the end, you will be ready to make an ottoman that looks polished, feels comfortable, and does not wobble like a nervous giraffe.
Why Build a DIY Ottoman Instead of Buying One?
A store-bought ottoman can be convenient, but it often comes with compromises. Maybe it is too tall for your sofa, too narrow for your sectional, too beige for your personality, or too expensive for something your dog will immediately claim. A DIY ottoman gives you control over every important detail.
You can build a square ottoman for a modern living room, a long bench-style ottoman for the foot of a bed, a round ottoman for a cozy reading corner, or a storage ottoman that hides blankets, toys, games, remotes, and the mysterious charger nobody recognizes but everyone is afraid to throw away.
DIY also lets you choose durable materials. If your home has kids, pets, movie nights, snack nights, or people who believe coasters are a myth, you can use performance upholstery fabric, outdoor fabric, faux leather, denim, canvas, or tightly woven polyester blends. If your ottoman will mostly sit in a decorative corner looking glamorous, you can choose velvet, boucle, linen blend, or patterned fabric with a little more drama.
Planning Your Ottoman: Size, Shape, and Function
Before you buy supplies, decide what your ottoman needs to do. A footrest does not require the same structure as a storage ottoman. A coffee-table ottoman needs a broad, stable top. A bench ottoman needs more length and stronger internal support. A cube ottoman can be simple and beginner-friendly.
Choose the Right Height
For comfort, the ottoman should usually be close to the height of your sofa seat or slightly lower. Most sofa seats are around 16 to 20 inches high. If your ottoman is too tall, your knees will feel like they are applying for a new career. If it is too low, it may look undersized and feel less useful.
Pick a Practical Width and Depth
For a small apartment, a 24-by-24-inch square ottoman can work well. For a standard sofa, a 30-by-30-inch or 36-by-24-inch ottoman gives more surface area. For a sectional, you may want something larger, such as 40-by-30 inches, especially if the ottoman will double as a soft coffee table.
Decide Whether You Want Storage
A storage ottoman is one of the most useful DIY furniture projects because it earns its floor space. The top can lift off or hinge open, and the inside can hold blankets, pillows, children’s toys, board games, seasonal décor, or magazines. If you add storage, plan for a hollow box frame, a reinforced lid, and either hinges or a lift-off cushion top.
Tools and Materials You Will Need
You can build a DIY upholstered ottoman with basic tools. A circular saw or miter saw helps, but many home improvement stores can cut boards or plywood to size. The exact list depends on your design, but this is a reliable starting point.
Basic Tools
- Measuring tape
- Pencil
- Speed square or carpenter’s square
- Drill and drill bits
- Screwdriver or driver bit
- Staple gun with heavy-duty staples
- Scissors or rotary cutter for fabric
- Saw, if cutting your own lumber
- Clamps, helpful but not mandatory
- Sandpaper or sanding block
Core Materials
- 3/4-inch plywood for the base, sides, or lid
- 1×2 or 2×2 boards for internal supports
- Wood screws
- Wood glue
- High-density upholstery foam, usually 2 to 4 inches thick
- Polyester batting to soften edges
- Upholstery fabric
- Spray adhesive suitable for foam, optional
- Furniture legs, bun feet, casters, or glides
- Hinges, if making a storage lid
- Dust cover fabric for the underside, optional
Choosing the Best Fabric for a DIY Ottoman
Fabric choice can make or break your ottoman. It affects durability, comfort, appearance, and how many times you mutter “why did I choose white?” after a salsa-related incident.
For everyday family use, choose upholstery fabric with a tight weave. Canvas, denim, microfiber, polyester blends, faux leather, and outdoor fabrics are popular because they handle wear better than delicate decorative fabrics. If you love linen, consider a linen blend rather than pure linen, which can wrinkle and stretch more easily. Velvet and boucle look gorgeous, but they may require more care depending on the household.
Patterns can be very forgiving. A small geometric print, tweed texture, stripe, or botanical pattern hides lint, minor marks, and beginner upholstery imperfections. Solid colors look elegant, but they show wrinkles and uneven tension more clearly. If this is your first upholstery project, a textured neutral or subtle pattern is your friend. It is the furniture equivalent of forgiving lighting.
Step-by-Step: Building a Simple Upholstered Storage Ottoman
The following method creates a rectangular storage ottoman with a padded lid. You can adapt the measurements to fit your space. For this example, imagine a finished ottoman about 36 inches long, 24 inches deep, and 18 inches high.
Step 1: Sketch the Design and Confirm Measurements
Start with a simple drawing. Mark the finished length, width, and height. Remember to include the thickness of the foam and the height of the legs. If you want the finished ottoman to be 18 inches high and you plan to use 3-inch foam plus 3-inch legs, your wooden box should be about 12 inches tall.
This is the point where measuring twice saves you from building once and then staring into space like a person betrayed by math.
Step 2: Cut the Plywood Panels
For a basic storage box, cut one bottom panel, two long side panels, and two short side panels. Use 3/4-inch plywood for strength. If the ottoman will be used as seating, do not rely on thin, flimsy panels. A solid frame prevents sagging and keeps the piece feeling like furniture instead of a decorated cardboard box.
Step 3: Assemble the Box Frame
Apply wood glue along the edges, clamp the panels if possible, and drive screws through the sides into the adjoining panels. Pre-drilling helps prevent splitting and makes assembly cleaner. Check corners with a square as you go. A square frame makes upholstery easier and keeps the finished ottoman from looking slightly haunted.
Add 1×2 or 2×2 cleats inside the corners for reinforcement. You can also add a center support if the ottoman is long. This is especially important if people may sit on it.
Step 4: Build the Lid
Cut a plywood lid slightly larger than the box opening, or flush with the outside edges if you prefer a clean modern look. For a soft top, attach high-density foam to the lid using spray adhesive or careful placement before wrapping it with batting and fabric. If you want a plush coffee-table style ottoman, 3-inch or 4-inch foam gives a generous cushion. For a firmer bench-style ottoman, 2-inch foam may be enough.
Step 5: Add Foam and Batting
Cut the foam to match the lid size. A sharp utility knife, electric carving knife, or foam saw can create cleaner edges. Then wrap the foam and lid with batting. Batting softens the corners, smooths the shape, and makes the upholstery look more professional. Pull the batting around the underside of the lid and staple it in place.
Do not skip batting unless you want your ottoman to look like a plywood sandwich wearing a tight shirt.
Step 6: Upholster the Lid
Lay the fabric face down on a clean surface. Place the padded lid upside down on top. Make sure the pattern is straight before stapling. Start by placing one staple in the center of each side, pulling the fabric snug but not distorted. Then work outward from the center, alternating sides so the tension stays even.
At the corners, fold the fabric neatly like wrapping a present. Trim excess bulk before stapling, but do not cut too close. Clean corners are one of the details that make a DIY ottoman look store-bought.
Step 7: Upholster the Base
If you want a fully upholstered base, wrap the box with batting first, then fabric. Staple the fabric inside the top edge and underneath the bottom edge where staples will be hidden. Pull evenly, smooth wrinkles as you go, and keep seams or pattern repeats aligned.
Another option is to paint or stain the wooden base and upholster only the lid. This creates a modern mixed-material ottoman and reduces fabric work. It also works beautifully with tapered legs, mid-century styling, or rustic wood finishes.
Step 8: Attach Legs, Feet, or Casters
Turn the ottoman upside down and attach legs using mounting plates or screws appropriate for your chosen hardware. Short bun feet create a traditional look. Tapered legs feel mid-century modern. Casters make the ottoman easy to move, which is useful in family rooms and playrooms. If using casters, choose locking casters for safety and stability.
Step 9: Install Hinges or Keep the Lid Removable
For storage, you can attach the lid with hinges or leave it as a lift-off top. Hinges are convenient, but they require careful alignment. A lift-off lid is simpler and avoids pinched fingers, although you need a place to set the lid when accessing storage. For a hinged lid, consider soft-close lid supports if children will use the ottoman.
Step 10: Add Finishing Touches
Finish the underside with dust cover fabric for a polished look. Add felt pads under feet to protect floors. If using the ottoman as a coffee table, place a tray on top for drinks, candles, remotes, or snacks. A tray keeps the surface functional without sacrificing the softness that makes an ottoman so comfortable.
Design Ideas for an Amazing DIY Ottoman
The Classic Storage Ottoman
This is the hardworking hero of the living room. It has a padded lid, upholstered sides, and a hidden compartment. Use neutral fabric for a timeless look or bold patterned fabric to make it the room’s focal point.
The Coffee Table Ottoman
Make it larger, lower, and firmer. Choose dense foam and a durable fabric. Add a large tray for practical use. This style works especially well with sectionals and cozy family rooms.
The Bedroom Bench Ottoman
Build a long rectangular ottoman for the foot of the bed. It can hold extra blankets or pillows while giving the room a finished, hotel-inspired feel. Use velvet, linen blend, or faux leather for a more elegant finish.
The Round Ottoman
A round ottoman softens rooms with lots of square furniture. It is slightly trickier to upholster because curves demand patience, but the result is stylish and friendly. Round ottomans are great for small spaces because they improve traffic flow and reduce shin collisions.
The Upcycled Ottoman
You can turn an old coffee table, toy box, storage cube, or footstool into an ottoman. This is often cheaper and faster than building from scratch. Just make sure the base is sturdy enough for the way you plan to use it.
Common DIY Ottoman Mistakes to Avoid
The first mistake is choosing foam that is too soft. A super-squishy ottoman may feel nice for five minutes, but it can sag quickly and make trays unstable. High-density foam is usually the better choice for furniture that will be used often.
The second mistake is ignoring fabric direction. Many upholstery fabrics have a nap, grain, or pattern direction. If one side reflects light differently or the pattern runs sideways, the finished piece may look unintentionally odd. Lay everything out before cutting.
The third mistake is underbuilding the frame. If someone might sit on the ottoman, build it like seating, not like décor. Reinforce corners, use strong screws, and add supports where needed.
The fourth mistake is pulling fabric too tightly. Tight fabric can distort patterns, flatten foam edges, or create puckers. Aim for smooth and snug, not stretched like a drum at a marching band audition.
The fifth mistake is forgetting about real life. If the ottoman will live in a busy home, choose stain-resistant fabric, darker colors, removable slipcovers, or materials that can handle cleaning. Your future self will thank you during the first nacho emergency.
How Much Does a DIY Ottoman Cost?
The cost depends on size, fabric, foam thickness, legs, and whether you already own tools. A small cube ottoman can be very inexpensive if you use scrap wood and budget fabric. A large storage ottoman with premium upholstery fabric, thick foam, hinges, and decorative legs will cost more but still may be less expensive than buying a comparable custom-looking piece.
To save money, look for fabric remnants, curtains, durable tablecloths, canvas drop cloths, or thrifted textiles. Just make sure the material is strong enough for upholstery. Thin quilting cotton may look cute, but it will not hold up well on a hardworking ottoman.
Maintenance Tips: Keeping Your Ottoman Beautiful
Vacuum the ottoman regularly using an upholstery attachment. Rotate trays and accessories so one spot does not get constant pressure. Treat stains quickly according to the fabric type. If you have pets, choose fabric that does not trap fur too aggressively. If you have kids, accept that the ottoman may someday become a pirate ship, trampoline, snack station, or emergency art desk. Build accordingly.
For long-term durability, periodically check leg screws, hinges, and staples. Tighten hardware if needed. If the fabric loosens over time, you can remove the dust cover underneath and add a few staples to restore tension.
Real-World Experience: What Building a DIY Ottoman Actually Teaches You
Building a DIY ottoman teaches you very quickly that furniture is not magic. It is a series of small decisions stacked on top of each other: measure this, cut that, pull here, staple there, step back, squint, adjust, repeat. The process feels less intimidating once you realize that most mistakes can be corrected. A crooked staple can be removed. A wrinkle can be smoothed. A leg can be repositioned. Even a fabric choice that feels too bold can become the best thing in the room once the ottoman is finished.
One of the most useful lessons is that comfort comes from layers. The frame gives structure, the foam gives support, the batting gives softness, and the fabric gives personality. Skip one of those layers, and the project usually tells on you. Without batting, corners look sharp. Without a strong frame, the piece feels weak. Without good fabric tension, the top looks tired before it is even used. A beautiful DIY ottoman is not about one expensive material; it is about combining ordinary materials thoughtfully.
Another experience many DIYers discover is that upholstery rewards patience more than brute force. Pulling fabric evenly matters. Working from the center outward matters. Checking the pattern before stapling absolutely matters. Nothing humbles a person faster than finishing an ottoman and realizing the stripes are leaning diagonally across the room like they have somewhere urgent to be. The good news is that every project builds your eye. By the second corner, you are better than you were at the first. By the last side, you start feeling suspiciously professional.
A DIY ottoman also changes how you look at old furniture. That scratched coffee table at a yard sale? Potential ottoman. That plain storage cube? Future footrest. That outdated bench with sturdy bones? Weekend makeover. Once you understand the basic structure, you see possibilities everywhere. This is both inspiring and slightly dangerous, because suddenly every thrift store looks like a furniture rescue center and your garage starts collecting “future projects” with alarming confidence.
The most satisfying moment is not always the final staple. It is usually the first time the ottoman is used in real life. Someone puts their feet on it. A tray lands on top with coffee and cookies. A child hides toys inside. A guest asks where you bought it. That is when the project stops being a project and becomes part of the home. It is functional, personal, and proudly imperfect in the best possible way.
There is also a confidence boost that comes with making something useful. A DIY ottoman is manageable enough for beginners but impressive enough to feel like a real accomplishment. It teaches basic woodworking, simple upholstery, material selection, proportion, and finishing. Those skills transfer to benches, headboards, dining chair seats, window cushions, and future furniture makeovers. In other words, you are not just building an ottoman. You are building the dangerous belief that you can probably make half the things in your house better with plywood, fabric, and a staple gun.
Conclusion
Building an amazing DIY ottoman is one of the most rewarding home projects because it blends style, comfort, storage, and creativity in one practical piece. You can keep it simple with a small upholstered cube or go bigger with a custom storage ottoman that anchors your living room. The key is to plan the size carefully, build a strong frame, choose durable foam and fabric, upholster patiently, and finish the details cleanly.
Your ottoman does not need to be perfect to be wonderful. It needs to fit your home, support your feet, hide your clutter, and make you smile when you remember that you built it yourself. And if anyone asks where you bought it, you are legally allowed to pause dramatically before saying, “Oh, this? I made it.”
Note: This original article was written for web publication and synthesized from reputable DIY, woodworking, upholstery, and home décor best practices. External source links are not inserted, as requested.