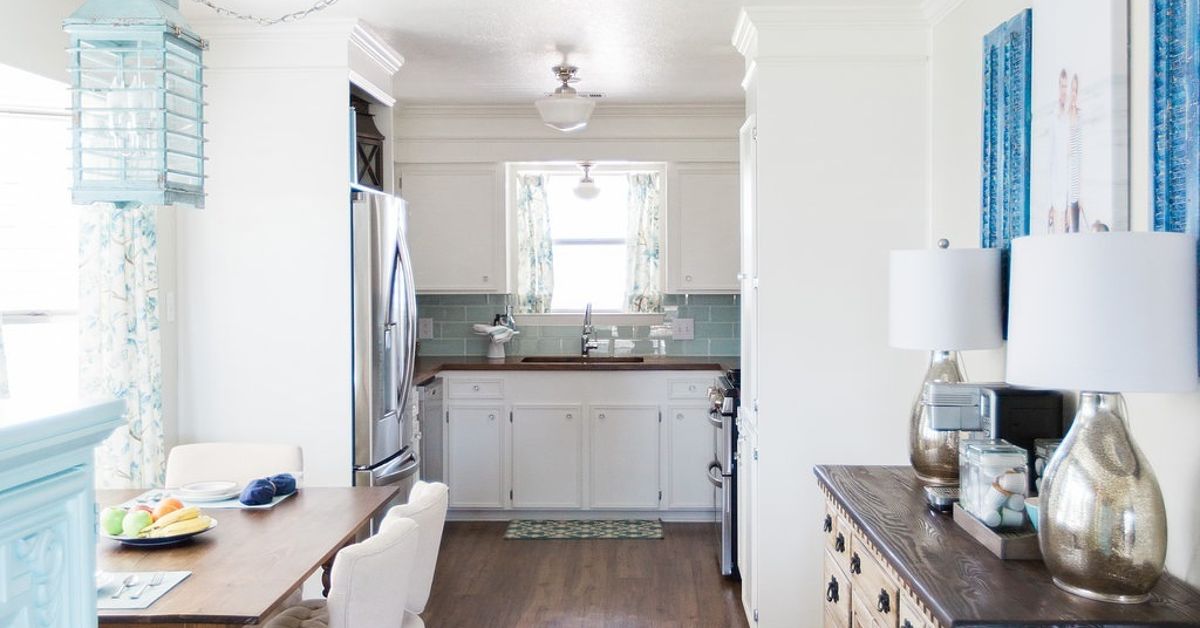

A DIY coastal kitchen makeover can make an ordinary kitchen feel brighter, calmer, and approximately 73% more likely to inspire you to slice lemons for no practical reason. The best part? You do not need an oceanfront address, a six-figure renovation budget, or a contractor named Chad who arrives carrying twelve different tile samples.
Modern coastal kitchen design is less about anchors, seashell borders, and signs that say “Beach Please,” and more about creating the feeling of a relaxed seaside home. Think warm whites, watery blues, light wood, natural fibers, simple cabinetry, reflective surfaces, and plenty of functional lighting. The result should feel breezy rather than themed.
This guide explains how to plan a coastal kitchen renovation you can realistically tackle yourself, including cabinet painting, backsplash updates, lighting, hardware, storage, decor, and budget-friendly finishing touches.
What Makes a Kitchen Look Coastal?
Successful coastal kitchens borrow colors, textures, and materials from the shoreline without attempting to recreate an entire souvenir shop.
Across contemporary American coastal interiors, several elements appear repeatedly:
- Warm white, ivory, sand, pale gray, and soft blue color palettes
- White or muted blue Shaker-style cabinets
- Light oak, maple, bamboo, or weathered wood accents
- White quartz, marble-look, or pale stone countertops
- Subway, zellige-style, glass, or blue-green backsplash tile
- Woven rattan, cane, jute, and wicker textures
- Simple brass, nickel, or matte black hardware
- Abundant natural and task lighting
- Minimal nautical decorations
The secret is restraint. One woven pendant can suggest a coastal home beautifully. Five fishing nets, three wooden seagulls, and a decorative life preserver may suggest that your kitchen has been taken hostage by a seafood restaurant.
Step 1: Create a Coastal Color Palette
Before buying paint, tile, or cabinet hardware, choose a small color palette. Keeping the colors consistent prevents individual DIY projects from looking unrelated.
Start With a Warm Neutral Base
Warm whites and creamy off-whites are particularly effective because they reflect light without creating the sterile feeling sometimes associated with icy white kitchens.
Good coastal-inspired families include:
- Soft white
- Ivory
- Oyster
- Warm greige
- Sand
- Pale driftwood gray
Paint manufacturers such as Benjamin Moore and Sherwin-Williams frequently feature soft blues, blue-grays, creamy whites, and muted greens in coastal-inspired palettes. Rather than copying a color you saw online, test several samples in your actual kitchen. Morning light, afternoon sunlight, LED bulbs, floors, and countertops can dramatically change how a paint color appears.
Add One Ocean-Inspired Accent
Blue is the obvious choice, but it does not need to be bright Caribbean turquoise. Dusty blue, slate blue, muted teal, sea-glass green, and blue-gray usually create a more sophisticated coastal kitchen.
For example, you might pair warm white upper cabinets with soft blue lower cabinets. Another approach is keeping all perimeter cabinetry white and painting only the island blue.
Step 2: Paint Instead of Replacing the Cabinets
Replacing cabinets can consume a large percentage of a kitchen remodeling budget. If the cabinet boxes and doors are structurally sound, painting them can deliver one of the biggest visual transformations for the money.
Unfortunately, cabinet painting is not quite as simple as opening a paint can and shouting, “Makeover!”
Prepare the Cabinets Properly
Remove doors, drawer fronts, knobs, and pulls. Label every door and drawer before removal. Numbered painter’s tape is surprisingly useful when you later discover that eighteen apparently identical cabinet doors are, in fact, not identical.
Clean every surface thoroughly with an appropriate degreasing cleaner. Kitchen cabinets accumulate cooking oils, fingerprints, dust, and invisible layers of culinary history that can prevent primer and paint from adhering properly.
Depending on the existing finish and paint system, lightly sand or degloss the surface. Repair dents and unused hardware holes, then apply a suitable bonding primer.
Use Cabinet-Appropriate Paint
Choose a durable cabinet, trim, or furniture enamel rather than ordinary wall paint. Satin and semi-gloss finishes are commonly used because they tolerate wiping while still looking refined.
A small foam or microfiber roller can produce a smooth finish on large flat areas, while a quality brush works well around rails, corners, and recessed panels.
Allow each coat to dry according to the manufacturer’s directions. Rushing this step is how freshly painted cabinet doors develop mysterious fingerprints that seem to belong to everyone in the household.
Step 3: Update the Backsplash
A backsplash occupies relatively little square footage, which makes it an excellent place to introduce coastal personality.
Classic White Tile
White subway tile remains useful because it works with almost every cabinet color and reflects light. To make it feel less generic, consider handmade-look tile, irregular edges, slightly varied glazing, or an elongated shape.
Soft Blue or Sea-Glass Tile
Pale blue ceramic or glass tile can introduce color without overwhelming the space. Blue-green tones pair particularly well with white cabinets, stainless steel appliances, pale counters, and natural wood.
Budget-Friendly Backsplash Options
If removing existing tile is unrealistic, several lower-cost alternatives may work depending on the surface:
- Paint existing backsplash tile with a compatible coating system
- Use high-quality peel-and-stick tile for an easier DIY update
- Install beadboard or another appropriate washable panel outside heavy splash zones
- Tile only the primary cooking wall rather than every available surface
Whatever material you use, remember that kitchens produce moisture, heat, grease, and splashes. Choose surfaces that can actually be cleaned. A beautiful kitchen that fears tomato sauce is not particularly useful.
Step 4: Replace Cabinet Hardware
Changing knobs and pulls is one of the quickest components of a budget coastal kitchen makeover.
Brushed brass can warm up white or blue cabinets. Polished nickel feels crisp and classic. Matte black adds stronger contrast and can make an otherwise soft palette feel more contemporary.
If possible, choose new pulls that match the existing screw spacing. This allows you to reuse the original holes instead of filling, sanding, measuring, drilling, realizing the measurement was wrong, and briefly reconsidering all your life choices.
For a coordinated design, repeat the hardware finish in one or two nearby elements such as the faucet, pendant lights, or shelf brackets. Everything does not need to match perfectly, but the finishes should feel intentional.
Step 5: Bring in Natural Wood
Natural materials prevent a coastal kitchen from becoming too cold.
Light or medium wood tones can be introduced through:
- Floating shelves
- Counter stools
- Cutting boards
- Serving trays
- A butcher-block section
- Wooden pendant details
- A small kitchen island or cart
A warm white kitchen with pale oak shelves and soft blue accents often feels more relaxed than an all-white room containing nothing but glossy surfaces.
You also do not need artificially distressed furniture to create coastal character. Natural grain and subtle imperfections usually age more gracefully than aggressively “weathered” furniture that looks like someone attacked it with a chain.
Step 6: Improve the Lighting
Lighting can determine whether your coastal kitchen looks fresh and airy or vaguely like a basement sandwich shop.
Use Layers of Light
A practical kitchen typically benefits from several types of lighting:
- General ceiling lighting
- Task lighting over work areas
- Pendants above islands or peninsulas
- Under-cabinet lighting
- Decorative lighting for atmosphere
Woven pendants made from rattan or similar natural materials can introduce coastal texture without taking up counter space. Clear glass fixtures provide another light, water-inspired option.
Under-cabinet LED lighting is particularly useful because it brightens countertops while visually opening the workspace.
Electrical modifications beyond simple fixture replacement may require a qualified electrician depending on the project and local requirements.
Step 7: Upgrade the Sink and Faucet Strategically
A complete sink replacement is not mandatory, but changing an outdated faucet can noticeably modernize the kitchen.
Popular coastal combinations include stainless steel or white sinks paired with polished nickel, brushed brass, or matte black faucets.
A deep single-bowl sink can provide practical washing space, while farmhouse-style sinks complement traditional or coastal farmhouse interiors when the cabinetry and countertop configuration support them.
Do not choose plumbing fixtures solely because they photograph well. Consider clearance, reach, spray functions, sink dimensions, existing holes, water connections, and ease of cleaning.
Step 8: Use Open Shelving Carefully
Open shelving appears frequently in coastal kitchens because it can create a lighter visual effect than a solid wall of upper cabinetry.
However, open shelving is best treated as an accent rather than a mandatory design commandment.
One or two shelves can display everyday white dishes, blue glassware, wooden bowls, or pottery while keeping frequently used objects accessible.
If your current cabinet doors are removable, experimenting with one open cabinet can help you decide whether you enjoy the look before permanently removing cabinetry.
Remember that open shelves require some maintenance. If your collection includes fourteen novelty coffee mugs, three mismatched plastic bowls, and an appliance manual from 2007, closed storage remains a wonderful invention.
Step 9: Add Coastal Texture Without Clutter
Texture is one of the easiest ways to create a sophisticated seaside atmosphere.
Consider introducing:
- Woven counter stools
- Rattan trays
- Jute or washable flat-weave runners
- Linen Roman shades
- Cane-front furniture
- Ceramic serving pieces
- Wood cutting boards
Natural textures work especially well when cabinets and countertops are visually simple.
Use Nautical Decor Sparingly
A coastal kitchen does not require literal ocean objects. In many cases, abstract references work better.
A blue ceramic bowl may suggest the ocean. A rope-wrapped pendant introduces maritime texture. Pale wood resembles driftwood. Wavy handmade tile can echo water.
These subtle cues usually age better than covering every horizontal surface with shells.
Step 10: Add Greenery
Plants introduce an organic element and add contrast against white, blue, and sandy neutral colors.
If natural light permits, herbs such as basil, rosemary, mint, or thyme can provide both decoration and cooking ingredients.
For darker kitchens, consider low-maintenance plants suited to available light conditions or simply use a vase of fresh branches or flowers.
A Sample Budget for a DIY Coastal Kitchen Makeover
Your cost depends heavily on kitchen size, material choices, and how much work you perform yourself. A cosmetic renovation might prioritize improvements approximately like this:
| Project | Typical Budget Priority |
|---|---|
| Cabinet paint and supplies | Low to moderate |
| New knobs and pulls | Low to moderate |
| Backsplash update | Low to moderate |
| Under-cabinet lighting | Low |
| Pendant or ceiling fixture | Low to moderate |
| Open wood shelves | Low to moderate |
| Faucet replacement | Moderate |
| Decor and textiles | Low |
If the existing floor, appliances, countertops, and cabinet boxes are usable, keeping them can dramatically reduce the total renovation cost.
Where Should You Spend and Where Should You Save?
Spend on Surfaces You Touch Every Day
Durable cabinet paint, reliable hardware, a functional faucet, and quality lighting generally deserve more attention than temporary decorative objects.
A bargain faucet that begins leaking after six months is not a bargain. It is simply an expensive way to meet the plumber.
Save on Decorative Accessories
Cutting boards, baskets, artwork, pottery, rugs, and towels can often be found inexpensively. They are also easy to change later, which allows your kitchen to evolve without another renovation.
Keep Good Existing Materials
Do not automatically replace something simply because it is old. Solid cabinets can often be painted. Existing tile may be cleanable or paintable. Good wood floors might need refinishing rather than removal.
A thoughtful DIY makeover is often more sustainable and affordable when it improves existing materials instead of sending everything to a dumpster.
Common DIY Coastal Kitchen Makeover Mistakes
Making Everything Blue
Blue is useful, but a coastal kitchen does not need blue cabinets, blue tile, blue chairs, blue curtains, blue dishes, and a blue refrigerator all simultaneously competing for attention.
Choose one or two major blue elements and let neutral colors provide visual breathing room.
Choosing Stark White Without Testing It
Pure white can become harsh next to warm floors and countertops. Test warmer whites and off-whites before committing.
Skipping Cabinet Preparation
Poor preparation can cause peeling, chipping, and uneven paint. Cleaning and surface preparation may be boring, but repainting every cabinet six months later is considerably more boring.
Buying Decor Before Fixing Function
New baskets cannot solve a kitchen with inadequate lighting or unusable storage. Address practical problems first, then decorate.
Turning Coastal Into a Theme
The strongest modern coastal interiors communicate their style through light, color, texture, and natural materials rather than excessive themed accessories.
A Practical DIY Makeover Order
Completing projects in the right sequence reduces accidental damage and repeated work.
- Remove clutter and create your design plan.
- Select paint, backsplash, hardware, and lighting finishes.
- Repair walls and cabinet surfaces.
- Paint walls and cabinetry.
- Install or update the backsplash.
- Replace lighting and plumbing fixtures when appropriate.
- Install cabinet hardware.
- Add shelves and storage improvements.
- Bring in rugs, stools, baskets, plants, and artwork.
- Step back and remove one decorative object if the room starts looking like a beach gift shop.
Realistic Experience: What a DIY Coastal Kitchen Makeover Actually Feels Like
The photographs make a kitchen makeover look wonderfully simple. Friday evening: old kitchen. Saturday morning: smiling person holding a paintbrush. Sunday afternoon: sparkling coastal paradise featuring an inexplicable bowl containing seventeen perfect lemons.
Real DIY projects are usually more interesting.
The first lesson most homeowners discover is that preparation takes longer than expected. Removing twenty cabinet doors sounds easy until every hinge, handle, screw, and door needs to remain organized. Labeling everything feels unnecessary for approximately thirty minutes, after which it suddenly feels like the smartest thing you have ever done.
The second lesson is that paint colors deserve testing. That perfect pale coastal blue viewed on a phone screen can become nursery blue under warm kitchen lighting or nearly gray in a north-facing room. Large sample boards are extremely helpful because they can be moved beside countertops, flooring, appliances, and windows throughout the day.
Another useful experience is learning when to stop changing things. A coastal makeover often becomes more successful when the homeowner realizes the existing countertop or floor is perfectly acceptable once surrounding finishes improve. Painting cabinets, replacing dark hardware, changing the backsplash, and improving lighting can make previously disliked surfaces suddenly seem intentional.
Hardware creates another surprisingly satisfying moment. After several days of cleaning, sanding, priming, and painting, installing new pulls produces an almost instant transformation. Suddenly the project stops looking like a construction zone and begins looking like a kitchen again.
Backsplash work tends to provide the opposite lesson: measure twice, then measure once more because the electrical outlet has apparently moved since the last measurement. DIY tile projects reward careful layout. Starting blindly at one corner can leave an awkward sliver of tile at the opposite end. Dry-fitting or planning the pattern beforehand usually creates a more professional appearance.
Then comes lighting. Many homeowners underestimate how much old bulbs and fixtures influence the room. Once the kitchen has fresh warm-white cabinets, pale wood, and reflective tile, improved lighting can reveal details that previously disappeared into shadows. Under-cabinet lights are especially noticeable during evening cooking.
Finally, decorating is where restraint becomes important. It is tempting to purchase every woven basket, striped towel, blue vase, shell-shaped bowl, and wooden sign within driving distance. Usually, the room looks better with fewer pieces.
A practical finishing combination might be a washable runner, one ceramic bowl, two wood cutting boards leaned against the backsplash, a small herb plant, and a woven pendant. That may provide enough coastal character without sacrificing workspace.
The biggest takeaway from a DIY kitchen renovation is that perfection is rarely necessary. One slightly uneven paint line will not destroy the room. A tiny tile variation is unlikely to trigger an architectural emergency. Handmade improvements naturally contain small imperfections, and those details can contribute to the relaxed character coastal design is supposed to create in the first place.
Most importantly, spread the work across manageable stages. A kitchen does not have to transform in one heroic weekend. Cabinets can be completed first, hardware the next weekend, backsplash later, and decorative details afterward. Phased improvements make budgeting easier and give you time to evaluate each decision before adding the next layer.
Conclusion: Create a Coastal Kitchen That Feels Like Home
A successful DIY coastal kitchen makeover is not about covering a kitchen with nautical symbols. It is about capturing the qualities people associate with relaxed seaside living: natural light, soft colors, practical simplicity, tactile materials, and an atmosphere that feels casual but intentional.
Start with what you already own. Paint structurally sound cabinets instead of immediately replacing them. Introduce warm whites and muted ocean-inspired colors. Upgrade dated hardware and lighting. Add a manageable backsplash project, natural wood, woven texture, and a few carefully selected accessories.
The most attractive coastal kitchen is ultimately one that still works as a kitchen. There should be room to chop vegetables, unload groceries, make coffee, and occasionally leave a cereal box on the counter without destroying the entire design concept.
Build the room around everyday life first. Let the beach-inspired atmosphere follow naturally. No ocean view required.
Note: Product suitability, installation methods, electrical requirements, plumbing requirements, costs, and drying times vary by home and manufacturer. Follow product instructions and applicable local building requirements, and use qualified professionals for work beyond your DIY skill level.