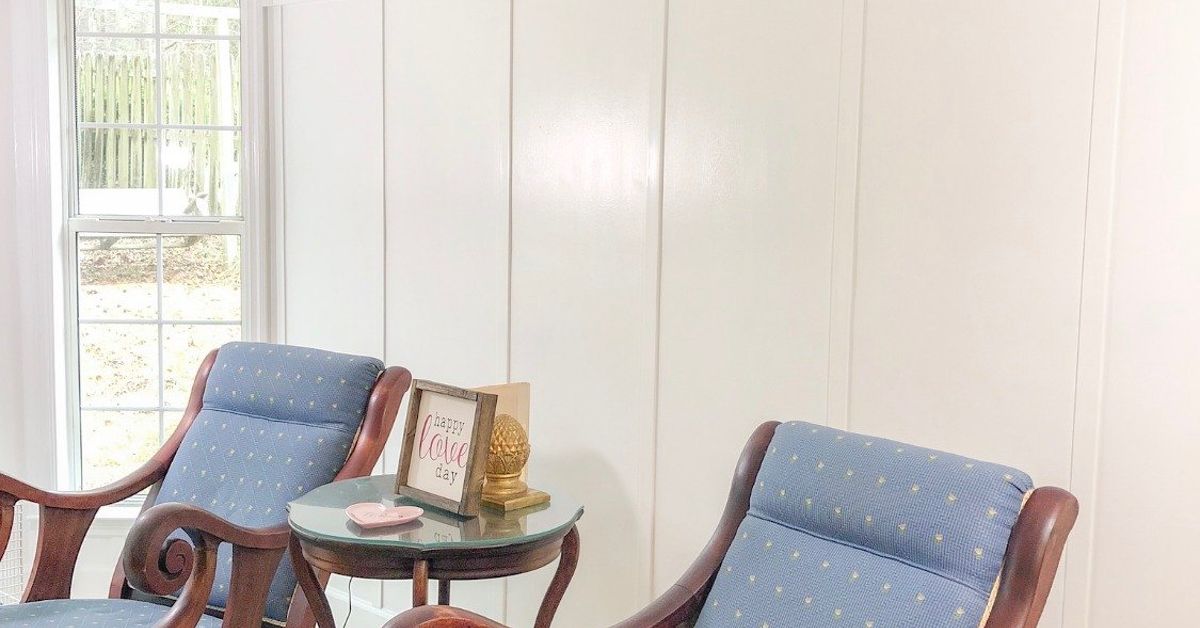

Blank drywall has never committed a crime, but it is not exactly known for its personality. An easy DIY farmhouse-style wainscot can change that by adding texture, architectural character, and practical protection to the lower part of a wallwithout requiring a cabinetmaker, a renovation crew, or a mysterious truck full of specialized tools.
This project uses simple boards, the existing wall surface, and a smooth painted finish to create the appearance of traditional farmhouse wall paneling. It works beautifully in dining rooms, entryways, bedrooms, mudrooms, hallways, powder rooms, and home offices. Best of all, the layout can be adapted to nearly any wall, including the ones that are not perfectly square because, apparently, houses enjoy keeping secrets.
What Is Farmhouse-Style Wainscoting?
Wainscoting is decorative paneling installed on the lower portion of an interior wall. Traditional versions may use solid raised panels, tongue-and-groove beadboard, or carefully assembled rails and stiles. A beginner-friendly farmhouse version usually creates the effect with flat horizontal and vertical trim boards attached directly over painted drywall.
This simplified approach is sometimes called faux board-and-batten wainscoting. The wall itself becomes the recessed “panel,” while the applied boards form the frame. Once the boards, drywall, nail holes, and seams are painted in one color, the separate parts read as one architectural feature. It is less complicated than building individual wood panels, yet it delivers much of the same visual depth.
Board-and-batten designs use broad vertical sections divided by narrower battens, while beadboard has repeated vertical grooves. Both styles suit farmhouse interiors because they add honest-looking texture, clean lines, and the kind of practical charm associated with hardworking country homes.
Why This DIY Wainscot Works So Well
It Adds Character Without Overdecorating
Farmhouse design looks most convincing when the room feels collected rather than costumed. Simple wall trim provides structure without requiring a barn door on every available opening or a decorative rooster supervising breakfast. Painted wainscoting gives the room a finished foundation, allowing vintage furniture, woven baskets, natural wood, black hardware, and linen textiles to stand out.
It Protects Busy Walls
The lower third of a wall tends to collect chair marks, shoe scuffs, pet-related evidence, fingerprints, and mysterious dents nobody remembers creating. Wainscoting provides an additional layer of protection, especially when finished with durable, washable paint.
It Is Flexible
You can install farmhouse wainscoting around an entire room or limit it to one accent wall. It can be crisp white, muted sage, charcoal, dusty blue, warm beige, or nearly any color that coordinates with the room. Although the traditional guideline places wainscoting around one-third of the wall height, taller treatments can make a stronger statement in rooms with high ceilings.
Choose the Right Wainscot Height
For an eight-foot ceiling, a finished height of roughly 32 to 36 inches often looks balanced. In a room with a nine-foot ceiling, approximately 36 inches is a useful starting point. These measurements should include the top cap or chair rail, not just the vertical battens.
However, the mathematical answer is not always the attractive answer. Before choosing a height, consider:
- The position of windowsills and door hardware
- The height of light switches and electrical outlets
- The backs of dining chairs or benches
- Existing baseboards and trim profiles
- Furniture that will sit against the wall
Use painter’s tape to mark the proposed top line around the room. Step back, sit down, walk through the doorway, and view it from several angles. Painter’s tape is cheaper than discovering that your chair rail appears to be arguing with every windowsill.
Materials and Tools
Suggested Materials
- Primed MDF boards, finger-jointed pine, or smooth wood lattice
- Top rail or chair rail molding
- Base cap or narrow ledge molding, if desired
- Construction adhesive rated for interior trim
- Finish nails or brad nails
- Paintable acrylic-latex caulk
- Wood filler or lightweight patching compound
- Primer for bare wood, MDF edges, and patched areas
- Durable interior trim paint
- Painter’s tape and drop cloths
Suggested Tools
- Tape measure
- Four-foot level or laser level
- Stud finder
- Pencil
- Miter saw, circular saw, or miter box with hand saw
- Brad nailer or hammer and nail set
- Caulk gun
- Putty knife
- Fine-grit sanding sponge
- Angled paintbrush and small roller
- Jigsaw or oscillating tool for outlet openings, when necessary
- Safety glasses and hearing protection
Primed MDF is smooth, affordable, and easy to paint, making it popular for dry interior rooms. Solid or finger-jointed wood is more resistant to minor moisture exposure but may require additional sanding and priming. In bathrooms, laundry rooms, and other damp areas, use a moisture-appropriate material and coating rather than standard MDF, which can swell if water reaches an unsealed edge.
Plan the Layout Before Buying Boards
A successful DIY wainscoting project is mostly a layout project wearing a tool belt. Begin by measuring the total length of every wall that will receive trim. Record doorways, corners, windows, outlets, vents, and other interruptions.
Choose Your Board Widths
A common farmhouse combination is a wider top rail with narrower vertical battens. For example, you might use nominal 1-by-4 boards for the top rail and nominal 1-by-3 boards for the vertical pieces. The exact dimensions matter less than maintaining a consistent visual hierarchy.
Calculate Even Spacing
Do not automatically place one batten every 16 inches. Wall studs matter for fastening, but attractive panel spacing matters for design. Lay out the entire wall so the first and last openings appear reasonably balanced.
Use this basic calculation:
Open wall width − total width of all battens = total open space
Then divide the total open space by the number of panel openings. For example, imagine a 120-inch wall with six vertical battens that are each 2.5 inches wide. The battens occupy 15 inches, leaving 105 inches. If the layout creates five openings, each opening would be 21 inches wide.
Real walls include outlets and corners, so adjust the plan until the spacing looks intentional. A slightly altered opening near a doorway is usually less noticeable than a tiny, awkward panel trapped in a corner.
Create a Spacer Block
Once you determine the distance between battens, cut a scrap board to that exact width. Use it as a spacer during installation. This reduces repeated measuring and helps prevent small errors from multiplying across the wall. Professional-looking trim is often the result of humble little jigs doing repetitive work while the human takes credit.
How to Install Easy DIY Farmhouse Wainscoting
Step 1: Inspect and Prepare the Wall
Remove artwork, wall plates, and furniture. Clean the wall, patch major dents, scrape away loose material, and sand obvious bumps. Applied trim will not magically flatten a badly damaged surface.
If your home was built before 1978, disturbing old painted surfaces may create hazardous lead dust. The U.S. Environmental Protection Agency recommends determining whether lead-based paint is present and using lead-safe renovation practices or a certified contractor.
Step 2: Mark the Finished Height
Locate the highest point of the floor along the project wall. Floors are often slightly uneven, particularly in older homes. Measure the selected wainscot height from that point and draw a level reference line around the room.
Use a long level, chalk line, or laser rather than measuring repeatedly from the floor. A rail can be perfectly level even when the distance beneath it varies slightly. Trust the levelnot the floorboards, which may have spent decades developing their own opinions.
Step 3: Decide What to Do With the Baseboard
Examine the existing baseboard profile. Thin battens placed on top of a narrow, rounded baseboard may project beyond its top edge, producing a clumsy intersection.
You have three practical options:
- Replace the baseboard with a flat, thicker board.
- Add a narrow cap molding above the existing baseboard to create a landing point.
- Use battens thin enough to terminate neatly against the existing trim.
Removing and replacing the baseboard generally creates the cleanest result, but adapting existing trim can save time and reduce wall damage.
Step 4: Install the Top Rail
Cut the top rail to length. Use butt joints at simple inside corners or cope the profile when working with decorative molding. Miter outside corners for a wrapped appearance.
Apply a moderate bead of construction adhesive to the back, align the rail with the level reference line, and secure it with finish nails. Nail into studs when practical, particularly for a deep cap that may be used as a display ledge. Do not apply so much adhesive that it squeezes onto the finished wall like frosting escaping a poorly supervised cake.
Step 5: Install the End Battens
Position a vertical board at each end of the wall or wherever the design terminates. Check every piece with a level before fastening it. Walls and door casings are not always plumb, so decide whether the batten should follow the architecture or remain visually vertical. In most situations, a plumb batten looks better.
Step 6: Add the Remaining Vertical Boards
Place the spacer block against the previous batten, position the next piece, and check it for plumb. Apply adhesive, then fasten it with brads or finish nails. Continue across the wall.
Some installation methods rely on both panel adhesive and finish nails because the adhesive holds the trim flat while the nails secure it as the bond cures. On smooth drywall, this approach can create a durable treatment without installing a full plywood backing.
Step 7: Work Around Outlets Safely
Turn off power at the breaker before removing electrical cover plates or working close to receptacles. Verify that the circuit is off with an appropriate tester.
Try to arrange battens so they do not cross an outlet. When wall paneling increases the wall thickness around an electrical box, an approved box extender may be necessary so the device remains properly supported and enclosed. Do not bury electrical boxes, make unsafe improvised spacers, or assume a longer screw solves every electrical problem. Consult a qualified electrician when the correct treatment is uncertain.
Wainscoting panels should be measured and cut for outlets before they are permanently adhered to the wall.
Step 8: Add a Cap or Display Ledge
For a more traditional farmhouse profile, install a narrow shelf or decorative cap over the top rail. Keep the ledge shallow in narrow hallways, where an enthusiastic shoulder could otherwise turn your architectural detail into a recurring personal grievance.
If the cap will hold frames or pottery, fasten it securely into studs or properly installed anchors. Decorative trim alone should not be treated like structural shelving.
Caulking, Filling, and Painting
Installation creates the structure, but finishing creates the illusion that the wainscoting has always belonged in the house.
Fill Nail Holes
Apply wood filler to nail holes and obvious surface defects. Allow it to dry, then sand it flush. Avoid leaving raised patches; paint highlights lumps with remarkable enthusiasm.
Caulk the Seams
Use paintable caulk along the edges where trim meets drywall, at small corner gaps, and at suitable board joints. Apply a narrow bead and smooth it promptly with a caulk tool or damp finger. Caulk is excellent for fine gaps, but it should not be used to sculpt a missing corner or conceal a wildly inaccurate cut.
Prime Correctly
Prime bare wood, cut MDF edges, filler, and patched areas. MDF edges are especially absorbent and may require extra primer followed by light sanding. Proper preparation helps the finish coat appear smoother and more uniform.
Apply a Durable Finish
A satin or semi-gloss finish is commonly selected for wainscoting because it is easier to wipe clean than flat wall paint. Brush paint into inside corners and along trim edges, then use a small roller on larger flat areas. Two thin coats generally look better than one heroic coat applied during a sudden burst of optimism.
Professional paint preparation guidance consistently emphasizes filling defects, sanding smooth, removing dust, priming bare or patched material, and using a washable topcoat on trim.
Farmhouse Paint and Styling Ideas
Classic Warm White
Warm white wainscoting paired with a soft greige or pale taupe upper wall creates a bright farmhouse backdrop without feeling sterile. Add medium-toned wood, black metal lighting, and vintage art for contrast.
Muted Sage Green
Sage works especially well in dining rooms, mudrooms, and bedrooms. Paint both the battens and lower wall in the same green, then use warm white above. The result feels natural, calm, and slightly historic.
Moody Charcoal
Dark wainscoting can ground a large room and make light furniture stand out. Charcoal, deep olive, and near-black colors work well with aged brass, oak, and natural linen.
Tone-on-Tone Color
For a quieter modern-farmhouse look, paint the upper and lower wall in related shades. Use a slightly deeper color or glossier sheen on the wainscot so the texture remains visible without creating a sharp horizontal divide.
Beadboard Variation
Replace the open drywall panels with beadboard sheets or individual tongue-and-groove boards for stronger cottage character. Beadboard works particularly well in breakfast nooks, bathrooms, kitchens, and mudrooms. In damp locations, choose moisture-resistant panels and coatings designed for those conditions.
Common DIY Wainscoting Mistakes
Starting Installation Without a Full Layout
Installing battens one at a time without calculating the final panel widths often produces a tiny leftover space at the opposite corner. Draw the complete wall first.
Measuring Every Piece From the Floor
An uneven floor can make the top rail wander. Establish one level line and work from that reference.
Ignoring Baseboard Thickness
The vertical boards should meet the baseboard cleanly. Resolve that connection before buying or cutting the battens.
Skipping Caulk
Small shadows around the trim will reveal every seam. Careful caulking is what visually merges the boards and wall.
Using Caulk for Large Errors
Caulk should refine the carpentry, not replace it. Recut badly fitting pieces rather than creating thick, flexible wedges that may crack later.
Painting Before the Adhesive and Filler Cure
Follow the product instructions for drying and curing. Rushing the finish can cause soft filler, visible shrinkage, or disturbed joints.
Forgetting a Test Section
Build a small sample with your chosen boards, caulk, primer, and paint. A test reveals the final thickness, sheen, and joint appearance before the entire room becomes involved.
Experience Notes: What This Project Teaches You
The first lesson from installing farmhouse-style wainscoting is that the saw is rarely the hardest part. Layout is the real project. Cutting a straight board is straightforward; deciding exactly where that board belongs can consume an impressive amount of coffee. Spending an extra hour with painter’s tape, a calculator, and a level usually saves several hours of recutting and creative muttering.
A useful real-world strategy is to mock up one complete panel before installing the entire wall. Tape the top rail position, hold two short battens in place, and place a piece of baseboard beneath them. This shows whether the proportions feel too narrow, too chunky, or just right. Measurements that look balanced on paper can feel different when viewed next to actual furniture.
Another practical discovery is that walls are almost never as straight as they appear. A board placed against drywall may reveal a shallow bow, a proud joint, or an inside corner that leans slightly. Do not force every board to follow every bump. Keep the important lines level and plumb, use adhesive to support modest gaps, and reserve caulk for fine finishing. In a genuinely crooked corner, scribing the final board to fit often looks better than trying to force a standard-width piece into submission.
Prepainting can be helpful, but it does not eliminate finish work. Painting boards before installation reduces brushing along tight edges, yet cutting, nailing, filling, sanding, and caulking still damage the finish. A sensible compromise is to prime the boards and apply one finish coat before installation, then complete the final coat after all repairs are finished. This approach protects difficult-to-reach edges while preserving a unified final appearance.
The choice between MDF and wood becomes clearer after handling both. MDF is exceptionally smooth and accepts paint well, but its corners can dent and its cut edges absorb primer. Wood is tougher and often better for spaces exposed to occasional moisture, although knots and grain may require more preparation. The best material is not automatically the most expensive one; it is the material suited to the room, finish, tools, and patience available.
It is also worth resisting the temptation to overcomplicate the design. Farmhouse interiors usually benefit from repetition and restraint. Narrow battens, a clean top rail, and an understated cap often look more authentic than several stacked moldings competing for attention. The finished wall should support the room rather than announce that someone recently discovered the trim aisle.
During installation, keep one sample batten labeled as the master length. Use it to check later pieces rather than measuring from scratch every time. Do the same with the spacer block. Small templates reduce variation, particularly when installing a long hallway or wrapping multiple walls.
Lighting affects the finished result more than many first-time installers expect. Side light from a window emphasizes nail holes, uneven sanding, and caulk ridges. Inspect the surface during daylight and again with the room’s lights turned on before applying the final coat. Run your hand over patched areas; fingertips often find imperfections that eyes miss.
Finally, expect the room to look temporarily worse before it looks better. There will be tools on the floor, pencil marks on the wall, unpainted boards, and at least one moment when the project resembles a poorly planned lumber exhibit. That stage is normal. Once the holes are filled, the joints are caulked, and the final color is applied, the separate pieces visually lock together.
The completed wainscot does more than decorate the wall. It changes how the room feels. Furniture appears more anchored, long walls gain rhythm, and basic builder-grade spaces acquire a sense of craftsmanship. The project is approachable because each individual step is simple. The polished result comes from performing those simple steps carefullyand from accepting that “measure twice” is less of a suggestion than a peace treaty with your future self.
Conclusion
An easy DIY farmhouse-style wainscot is one of the most effective ways to add architectural detail without undertaking a full renovation. The project can be completed with accessible trim boards, basic cutting tools, careful measurements, and a patient finishing process.
Begin with a balanced layout, establish a truly level top line, solve the baseboard connection, and check every batten for plumb. Then give filling, sanding, caulking, priming, and painting the attention they deserve. Those finishing steps turn a collection of affordable boards into a wall treatment that looks custom-built.
Whether you choose classic white, muted green, deep charcoal, simple board and batten, or traditional beadboard, the best farmhouse wainscoting feels practical, warm, and comfortably imperfectrather like a home where people are actually allowed to sit on the furniture.