
Learning how to adjust a truss rod on a bass sounds like the sort of job that requires a secret handshake, a dusty workbench, and a luthier named Gus. Good news: for small neck-relief tweaks, you can often do it safely at home with patience, the right tool, and the self-control not to treat the truss rod like a jar of pickles that refuses to open.
The truss rod is not there to “lower the action” by brute force. Its job is to control bass neck relief, which is the slight forward bow that lets thick bass strings vibrate without smacking into frets like angry suspension cables. Once relief is correct, then you can fine-tune bridge saddle height, intonation, and pickup height. In other words, the truss rod is step one, not the entire setup.
What a Bass Truss Rod Actually Does
A bass neck lives under constant string tension. Four strings already pull hard; five- and six-string basses bring even more muscle to the party. The truss rod is a metal rod inside the neck that counteracts that pull. When adjusted correctly, it helps the neck maintain a slight, controlled curve.
That curve is called neck relief. A little relief is useful because bass strings move in a wide vibration pattern, especially when played hard, slapped, or attacked with a pick. Too little relief can cause buzzing in the lower and middle frets. Too much relief can make the bass feel stiff, high, and tiring to play. Your fretting hand should not feel like it is filing a tax return every time you play a line.
Relief vs. Action: Do Not Confuse the Two
Relief is the curve of the neck. Action is the height of the strings above the frets. They interact, but they are not the same adjustment. If the bass buzzes mostly around the first to seventh frets, relief may be involved. If it buzzes mostly above the 12th fret, bridge saddle height may be the bigger issue. If open strings buzz, the nut may be too low or the neck may have backbow. A smart setup begins with diagnosis, not random wrench spinning.
Tools You Need Before Adjusting a Bass Truss Rod
You do not need a full repair shop. For a simple bass truss rod adjustment, gather these basics:
- The correct Allen wrench, socket wrench, screwdriver, or truss rod tool for your bass
- A tuner
- A capo, or a careful fretting hand
- A feeler gauge, ideally around .008 inch to .015 inch for checking bass relief
- A clean, stable work surface or a safe playing position
- Good lighting and a calm mood
The correct tool matters. If the wrench is loose, angled, or not fully seated, it can strip the truss rod nut. A stripped truss rod nut is not a fun little weekend project. It is the sort of problem that makes a repair tech quietly sigh before giving you an estimate.
Step-by-Step: How to Adjust a Truss Rod on a Bass
Step 1: Tune the Bass to Pitch
Start with the bass tuned to the pitch and string gauge you actually use. Relief changes when string tension changes. If you normally tune down a whole step, measure the bass tuned down. If you just installed heavier strings, expect the neck to behave differently than it did with lighter strings.
Step 2: Check the Neck Relief
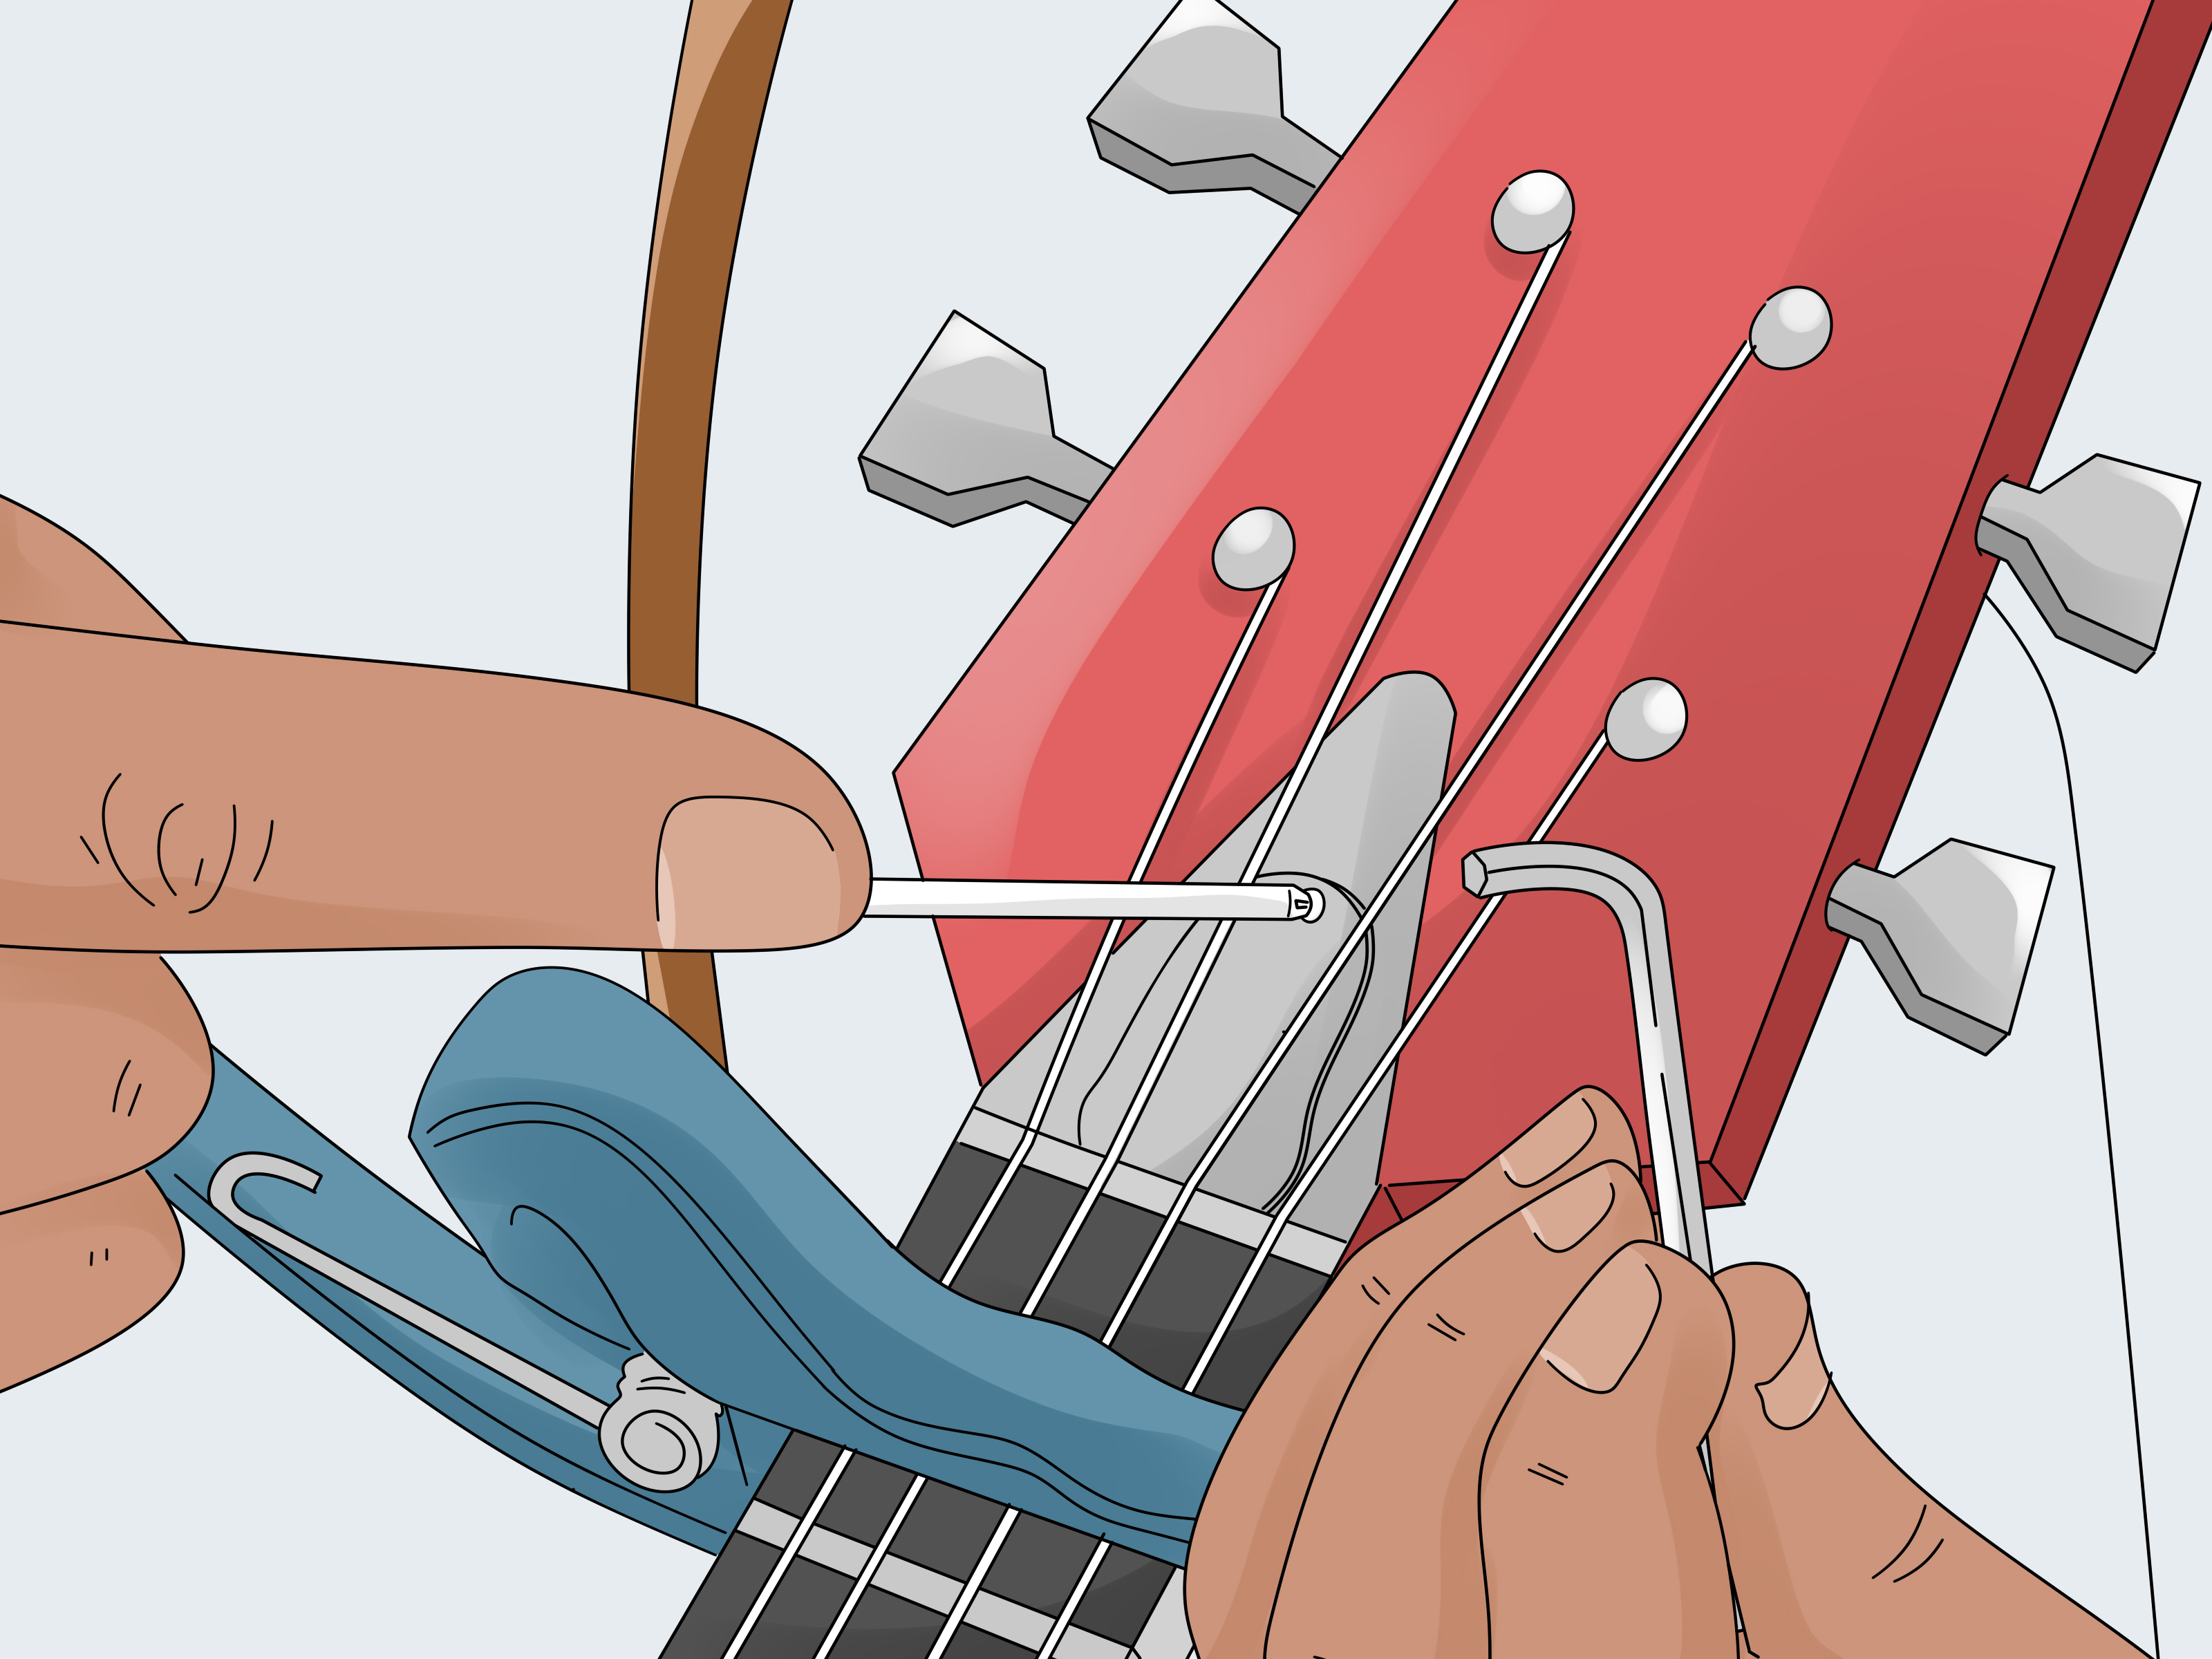
Place a capo on the first fret. Then fret the lowest string where the neck meets the body, often around the 14th to 17th fret, depending on the bass. This turns the string into a straightedge. Now look at the gap between the bottom of the string and the top of the fret around the seventh or eighth fret.
A feeler gauge gives the cleanest reading. Many basses play well with relief somewhere around .008 inch to .014 inch, while some manufacturer specs may land slightly higher or lower depending on neck radius, playing style, and instrument design. A light-touch player may prefer a straighter neck. A slap player or heavy picker may need a little more room for string movement.
Step 3: Decide Which Direction to Turn
Here is the simple rule for most standard bass truss rods:
- Too much relief: the neck bows forward too much, action feels high in the middle frets, and you usually turn the truss rod clockwise to tighten it.
- Too little relief or backbow: the strings are too close to the frets, buzzing appears in the lower and middle positions, and you usually turn the truss rod counterclockwise to loosen it.
Think of clockwise as “straighten the neck” and counterclockwise as “allow more forward bow.” Most basses follow this pattern, but not all designs are identical. Some instruments have dual-action rods, wheel adjusters, or model-specific procedures. When in doubt, check the owner’s manual for your bass.
Step 4: Make a Tiny Adjustment
Loosen the strings slightly if your bass manual recommends it or if the truss rod feels under heavy tension. Insert the tool fully and turn only a small amount. A safe adjustment is usually 1/8 to 1/4 turn at a time. That is not much. That is the point.
Do not crank the rod half a turn, squint at the neck, and declare yourself the sheriff of setup town. Small movements are easier to control, easier to reverse, and kinder to the instrument.
Step 5: Retune and Recheck
After each adjustment, tune the bass back to pitch and measure the relief again. The bass must be under normal playing tension for the measurement to mean anything. If you check while the strings are loose, you are measuring a different instrument than the one you actually play.
Some necks respond quickly. Others need a few minutes, a few hours, or overnight to settle completely. For a minor tweak, you can usually get close immediately, but it is smart to recheck later before making another adjustment.
Step 6: Stop When the Bass Plays Cleanly
The goal is not a mathematically perfect number. The goal is a bass that feels comfortable, plays in tune, and buzzes only within your personal tolerance. A little acoustic fret noise is not always a disaster, especially if it does not come through the amp. But if the note chokes, rattles loudly, or loses sustain, the setup still needs attention.
Common Signs Your Bass Needs a Truss Rod Adjustment
The Action Feels High in the Middle of the Neck
If the bass feels reasonably playable near the nut and upper frets but stiff around frets five through nine, there may be too much relief. Tightening the truss rod slightly can reduce that excessive forward bow.
You Hear Buzzing on Lower Frets
If notes buzz near the first few frets and the neck looks too straight or slightly backward-bowed, the rod may need to be loosened. Loosening allows string tension to pull more relief into the neck.
The Bass Changed After Weather or String Changes
Wood reacts to humidity and temperature. A bass that played perfectly in July may grumble in January. New strings, different gauges, alternate tunings, and travel can also change neck relief. Seasonal adjustments are normal. The neck is wood, not a granite countertop.
The Bass Still Buzzes After Relief Looks Correct
If the relief is correct but buzzing remains, the problem may be action height, uneven frets, nut slot depth, loose hardware, pickup height, or playing technique. The truss rod is powerful, but it is not a magic wand. It will not fix every rattle in the kingdom.
Safety Rules: How Not to Break Your Bass
Truss rod adjustments are usually safe when done correctly, but the danger comes from force, impatience, and the wrong tool. Follow these rules:
- Never force a truss rod that feels stuck.
- Never use a tool that does not fit snugly.
- Never make large adjustments in one move.
- Stop if you hear cracking, popping, or grinding.
- Stop if the truss rod reaches the end of its travel.
- Take the bass to a qualified repair technician if the adjustment has no effect.
If the rod resists normal hand pressure, do not “show it who’s boss.” The bass already knows who is boss, and it is physics. Forcing a stuck rod can damage the nut, compress wood, crack the neck, or break the truss rod. A professional setup costs less than a neck repair and comes with fewer emotional support snacks.
What Relief Measurement Should You Use?
There is no single perfect number for every bass. A common starting range is roughly .008 inch to .014 inch at the seventh or eighth fret, measured while fretting the first fret and a fret near the body joint. Some manufacturer specifications may recommend .010 inch, .012 inch, .014 inch, or even around 1/64 inch, depending on the instrument.
Use the number as a starting point, then listen and feel. A jazz player with a feather-light touch may enjoy a straighter neck and lower action. A rock player who digs in with a pick may need extra relief and higher saddles. A slap player may need more clearance because those strings travel like they have weekend plans.
Example Setup Scenario
Suppose your four-string bass has high action around the seventh fret. You measure relief and find a large gap, around .020 inch. That suggests too much forward bow. You tighten the truss rod clockwise by 1/8 turn, retune, and measure again. The gap drops to .014 inch. The bass already feels easier. You play across the neck, hear no major buzz, and stop. Congratulations: you adjusted the truss rod like an adult with a calendar and responsibilities.
Now imagine another bass that buzzes on frets one through five. You measure and the string nearly touches the seventh fret. That suggests too little relief or backbow. You loosen the rod counterclockwise by 1/8 turn, retune, recheck, and give the neck time to settle. If the buzzing improves, you are moving in the right direction.
After the Truss Rod: Finish the Bass Setup in Order
Once neck relief is correct, move on to string action at the bridge. Measure string height near the 12th or 17th fret, depending on your preferred setup method or manufacturer specs. Raise or lower the saddles until the bass feels comfortable and rings clearly.
Next, check intonation. Compare the 12th-fret harmonic to the fretted 12th-fret note. If the fretted note is sharp, lengthen the string by moving the saddle back. If it is flat, shorten the string by moving the saddle forward. Retune after every saddle move.
Finally, check pickup height. Pickups that sit too close to the strings can reduce sustain or create uneven response. Pickups that sit too low may sound weak. Adjust them after relief and action are already set, because string height changes the pickup distance.
Beginner Mistakes to Avoid
Mistake 1: Adjusting Without Measuring
Sighting down the neck can help, but your eyes can lie. A feeler gauge tells the truth without drama. Measure before and after each adjustment so you know what changed.
Mistake 2: Using the Truss Rod to Fix Everything
If the bass is too high everywhere, bridge saddles may be the issue. If only open notes buzz, the nut may be involved. If one fret buzzes badly while others are fine, an uneven fret may be the culprit. The truss rod controls neck curvature, not the entire universe.
Mistake 3: Forgetting to Retune
Every truss rod adjustment changes string tension slightly. Retune before measuring again. Skipping this step is like weighing yourself while holding a bowling ball and blaming lunch.
Mistake 4: Ignoring Playing Style
A setup that feels perfect for one player may rattle like a toolbox for another. Your attack, string gauge, tuning, and tone goals all matter. The best bass setup is personal.
When to Take Your Bass to a Professional
Take the bass to a repair technician if the truss rod is frozen, stripped, maxed out, or unusually tight. Also seek help if the neck has a twist, if the bass needs constant adjustment, or if relief changes do not affect playability. A good tech can also identify fret issues, nut problems, neck pocket angle, and other setup details that are easy to misdiagnose at home.
There is no shame in getting help. Knowing when to stop is part of good maintenance. The bravest phrase in guitar repair is not “I can fix it.” It is “I should not keep turning this.”
Experience Notes: What Adjusting Bass Truss Rods Teaches You Over Time
The first time you adjust a bass truss rod, it can feel more intense than it really is. You remove the truss rod cover, insert the wrench, and suddenly the room becomes very quiet. Every tiny creak sounds like a shipwreck. The trick is to slow down. Most successful adjustments are boring, and boring is exactly what you want.
One practical lesson is that the bass usually tells you what it needs before the ruler does. If the middle of the neck feels like a speed bump, there is probably too much relief. If the first few frets buzz even with a normal touch, the neck may be too straight or bowed backward. Measurements confirm the story, but your hands often notice the plot twist first.
Another lesson is that fresh strings change everything. A bass with dead strings may feel dull and stiff, and the player may blame the neck. After new strings go on, tension, brightness, and feel can shift enough to make a small truss rod adjustment necessary. This is especially true when changing gauge or switching from roundwounds to flats. Flatwound strings can feel smoother and sometimes pull differently, so it is smart to recheck relief after the bass settles.
Humidity is another sneaky character. In dry winter air, some necks straighten or backbow. In humid weather, some develop more forward bow. Not every bass reacts dramatically, but many do. Players who gig, travel, or store instruments near windows learn this quickly. A bass case humidifier, stable room conditions, and occasional measurement can prevent panic adjustments.
With experience, you also learn not to chase silence. Bass strings are large, physical objects. Played unplugged, a properly set up bass may still have a little mechanical noise. What matters is whether the note is clear through the amplifier. A perfectly silent unplugged bass with high action may be less useful than a lively bass with low action and a tiny bit of harmless fret noise.
The best habit is to write down your setup. Note the string brand, gauge, tuning, relief measurement, action height, and date. After a few seasonal adjustments, you will start to see patterns. Maybe your bass likes .012 inch of relief with nickel rounds in standard tuning. Maybe it prefers a straighter neck with flats. These notes save time and reduce guesswork.
Finally, you learn respect. A truss rod is strong, but the neck is still wood. The right approach is gentle, measured, and patient. Make a small adjustment, retune, recheck, play, and stop when the bass feels right. That simple method turns a scary maintenance task into a normal part of owning your instrument.
Conclusion
Adjusting a truss rod on a bass is not mysterious, but it does require care. Tune the bass, measure the neck relief, turn the rod only in small increments, retune, recheck, and let the neck settle. Tighten clockwise to reduce excessive relief on most basses; loosen counterclockwise to add relief when the neck is too straight or backbowed. Most importantly, never force a resistant truss rod.
Once the neck relief is right, the rest of the setup becomes easier: bridge action, intonation, and pickup height all depend on that first step. Treat the process like cooking with hot sauce. Add a little, test it, and do not dump in the whole bottle unless you enjoy regret.
SEO Tags