
Connecting a USB controller to a Nintendo Switch sounds like it should be as simple as “plug it in and go.” Most of the time, it is. Other times, the Switch gives you the digital equivalent of a blank stare, and suddenly your game night turns into a tiny tech-support conference. Good news: the fix is usually easy, painless, and does not require sacrificing a Joy-Con to the gaming gods.
This guide explains how to connect a USB controller to a Switch in four clear steps, covering the original Nintendo Switch, Nintendo Switch OLED Model, Nintendo Switch Lite, and Nintendo Switch 2 where relevant. You will learn what equipment you need, where to plug in the controller, which setting to enable, and how to troubleshoot common problems like a controller that charges but will not respond.
Note: This article focuses on USB wired controllers and USB controller adapters. If you are using a Bluetooth controller, the setup may involve an adapter, pairing button, or manufacturer-specific firmware update.
Can You Use a USB Controller on Nintendo Switch?
Yes, you can use many USB controllers on a Nintendo Switch, but compatibility depends on the controller type. The safest options are the official Nintendo Switch Pro Controller, officially licensed wired Nintendo Switch controllers, GameCube controllers with a compatible adapter, and supported third-party controllers used through a reputable USB adapter.
The Switch is friendly, but not magical. A random USB PC controller from the bottom drawer may not work just because it has a USB plug. The console expects the controller or adapter to communicate in a format it recognizes. That is why licensed Switch controllers and well-known adapters usually produce fewer headaches than mystery controllers with names like “Super Turbo Mega Game Pad 9000.”
For the original Nintendo Switch and Switch OLED Model, USB controllers are usually connected through the USB ports on the dock. For Nintendo Switch Lite, which does not include a dock, you need a compatible USB-C accessory, such as a licensed playstand or USB hub designed for Switch use. For Nintendo Switch 2, the process is similar, but the settings menu uses updated wording in some places.
Before You Start: What You Need
Before connecting a USB controller to a Switch, gather the basics. This prevents the classic “why is nothing happening?” moment that usually ends with someone realizing the console is not docked.
Compatible controller options
- Nintendo Switch Pro Controller: Works wired through the dock with the proper setting enabled.
- Officially licensed wired Switch controller: Brands such as PowerA, HORI, and PDP offer plug-and-play wired controllers built for Switch.
- GameCube controller: Requires a compatible GameCube controller adapter.
- PS5, PS4, Xbox, or other controllers: Usually require a USB adapter such as 8BitDo or Mayflash, and some features may not carry over.
- Nintendo Switch Lite setup: Requires a compatible USB-C accessory or licensed playstand with USB-A ports.
Use the right cable
If your controller connects with a detachable cable, use a data-capable USB cable, not a charge-only cable. A charge-only cable may power the controller but fail to send button inputs. That is like giving the controller a snack but refusing to let it speak.
For the official Nintendo Switch Pro Controller, use the included USB charging cable when possible. For a wired third-party controller, use the cable provided by the manufacturer. If your controller has a removable cable and refuses to respond, testing another cable is one of the fastest troubleshooting steps.
How to Connect a USB Controller to a Switch: 4 Steps
Step 1: Put the Switch in the correct mode
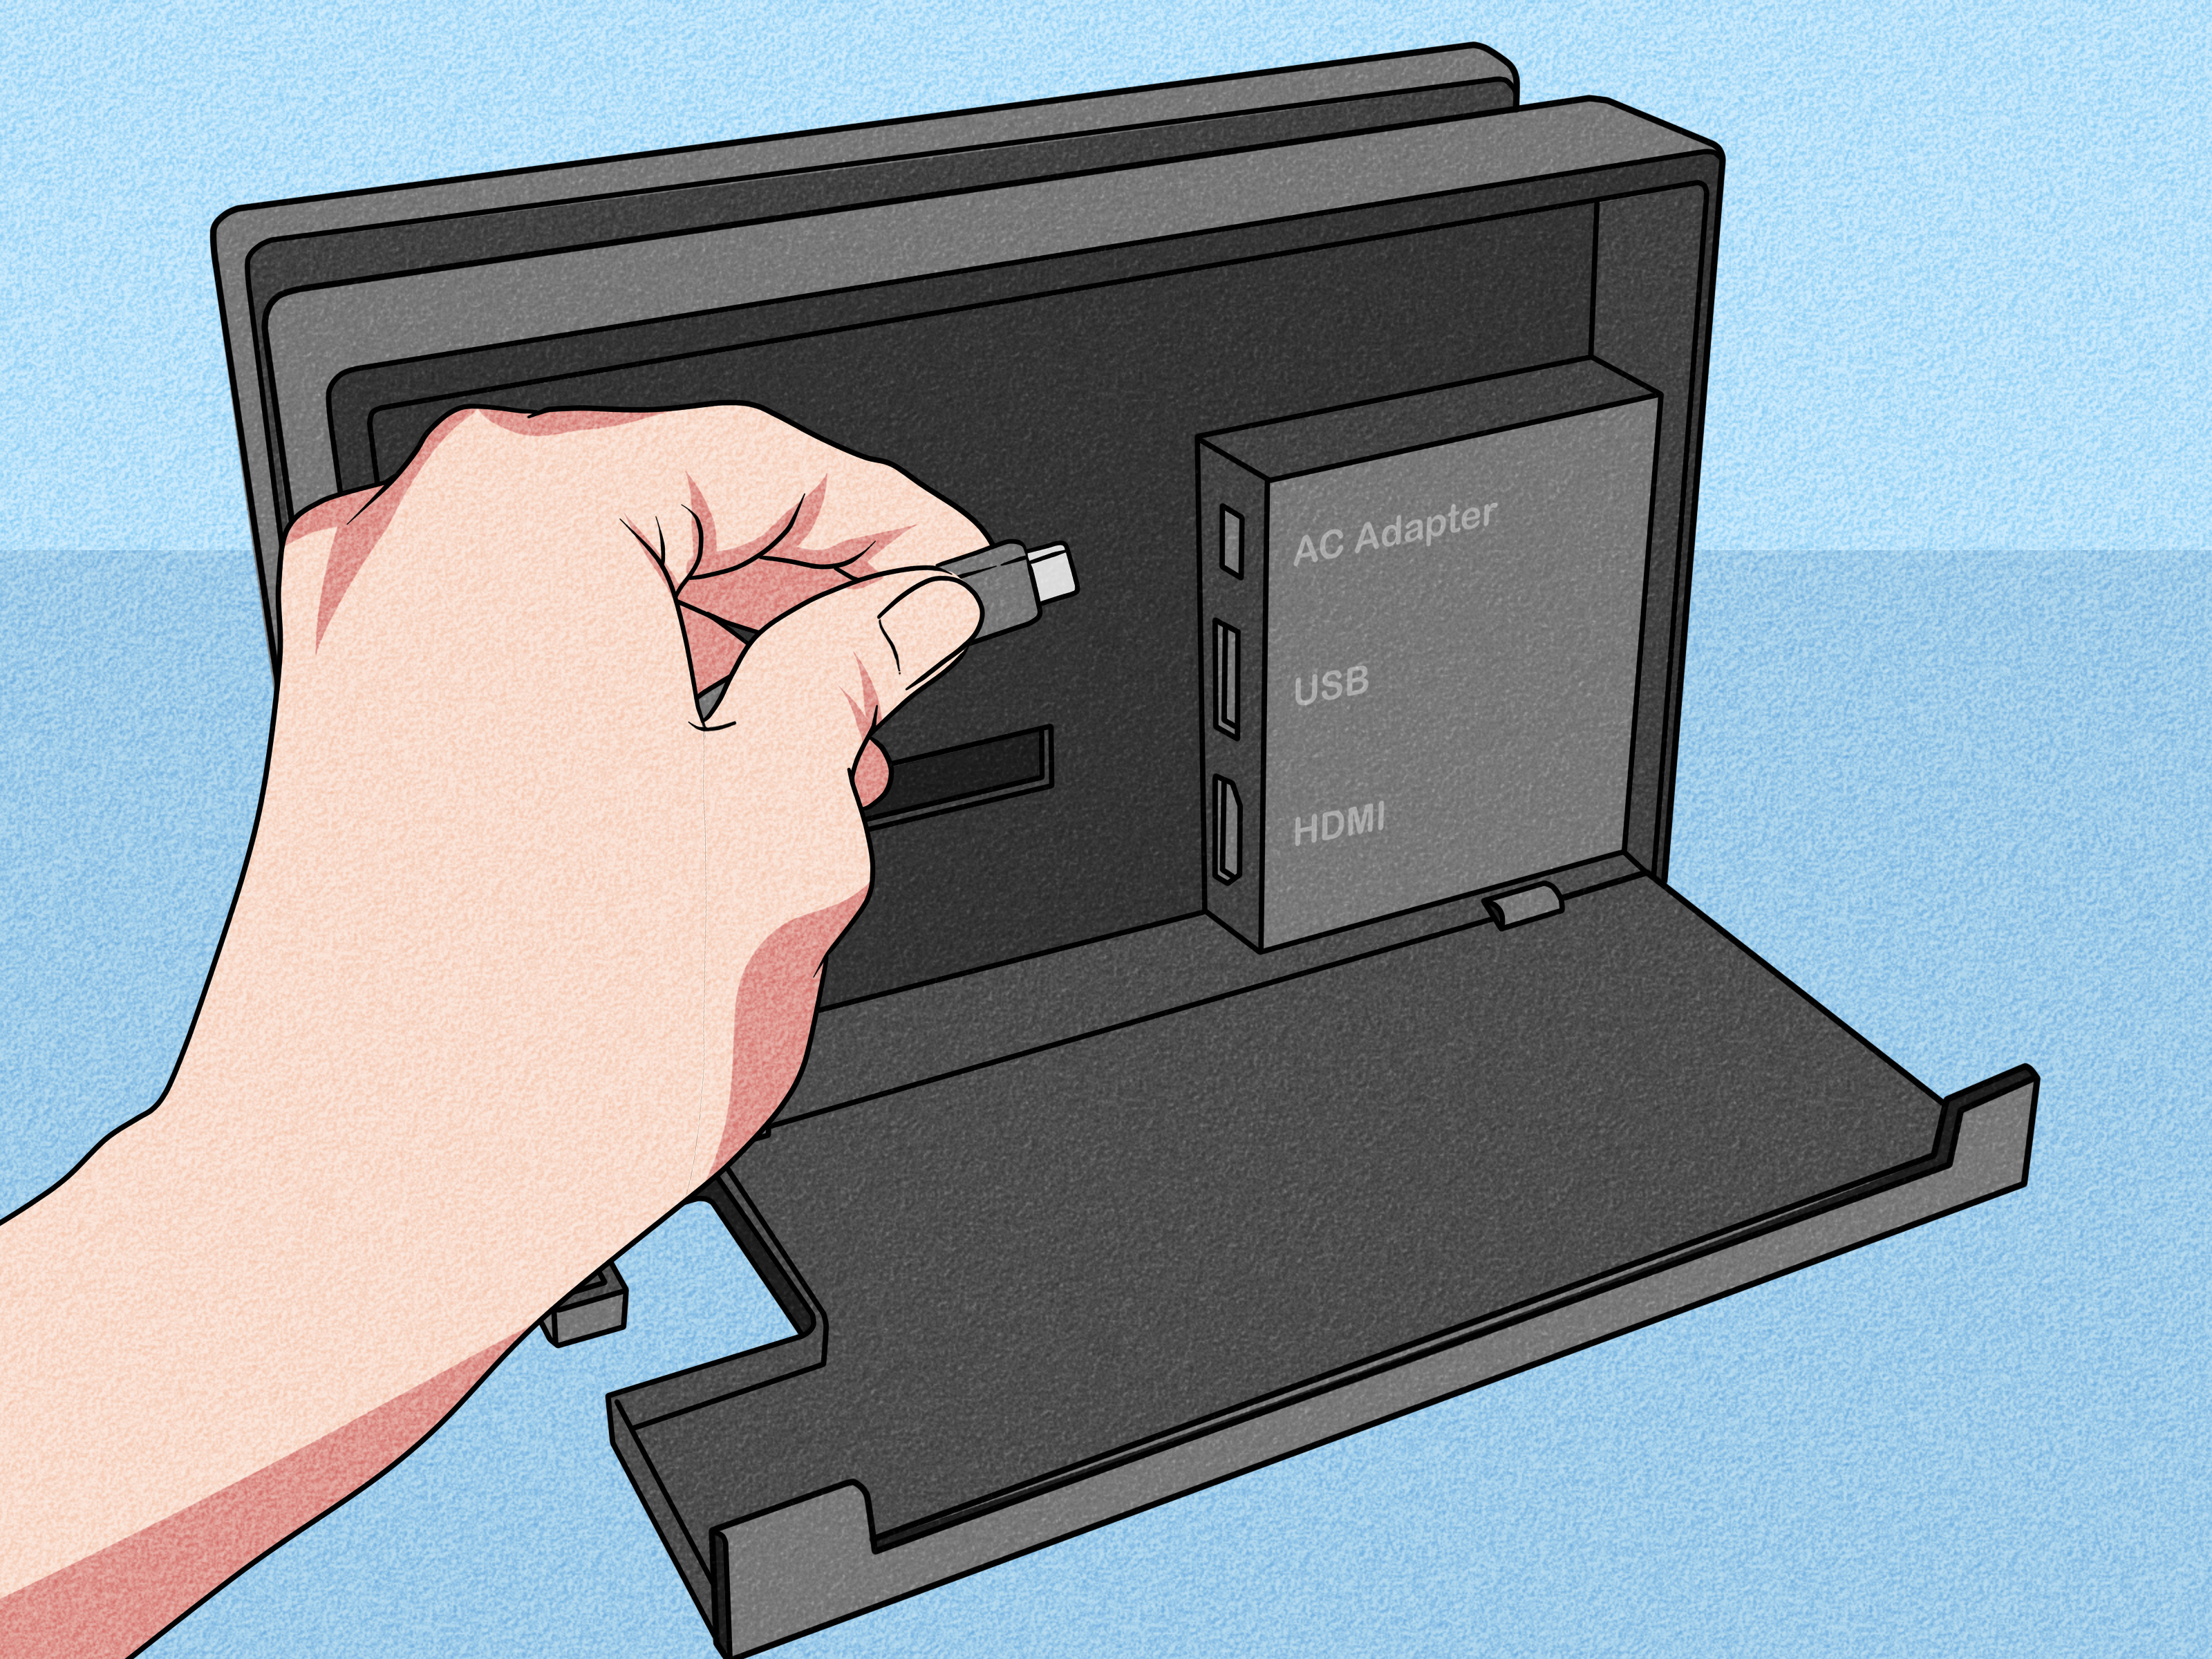
For the original Nintendo Switch or Switch OLED Model, place the console into the dock and connect the dock to your TV. Make sure the Nintendo Switch AC adapter is plugged into the dock and the system is powered on.
Most wired USB controller setups are designed for TV mode because the standard Switch dock provides the USB-A ports. Look at the side or back of the dock and you will find the USB ports where wired controllers or USB adapters connect.
If you are using Nintendo Switch Lite, you cannot use the standard dock because the Lite does not support TV mode. Instead, use a compatible USB-C playstand or accessory with USB-A ports. HORI, for example, makes playstands designed to let Switch Lite owners connect wired controllers in tabletop mode.
If you are using Nintendo Switch 2, place the console in its dock for TV mode. Some accessories also support tabletop play, but compatibility depends on the controller and accessory.
Step 2: Enable Pro Controller Wired Communication
This is the step many people miss. On the original Nintendo Switch and Switch OLED Model, go to:
System Settings > Controllers and Sensors > Pro Controller Wired Communication > On
On Nintendo Switch 2, the menu wording may appear as:
System Settings > Controllers and Accessories > Nintendo Switch Pro Controller Wired Communication > On
This setting allows the console to communicate with certain wired controllers and adapters through USB. If it is turned off, your controller may charge, light up, or look perfectly happy while still doing absolutely nothing in the game. That is not a broken controller; that is just a setting waiting to be invited to the party.
One important detail: when the Nintendo Switch Pro Controller is used in wired communication mode, some wireless-only features may be unavailable. For example, NFC functionality is disabled while using the controller as a wired controller. If you need amiibo scanning, switch back to wireless mode afterward.
Step 3: Plug the USB controller into the dock or adapter
Now connect the controller. For a licensed wired Nintendo Switch controller, plug the USB cable into a USB port on the Switch dock, then connect the other end to the controller if the cable is detachable. Many wired controllers are ready immediately after being plugged in.
For the Nintendo Switch Pro Controller, connect the USB-C end to the controller and the USB-A end to the dock. Press a button on the controller to wake it. If you are switching from wireless to wired use, you may need to press the sync button once or press another button after connecting the cable so the console recognizes the wired connection.
For a USB adapter, plug the adapter into the Switch dock first. Then connect or pair your controller according to the adapter instructions. For example, an adapter may require you to press its pairing button until the LED flashes, then press the pairing buttons on a PS, Xbox, or other wireless controller. Some adapters also support wired controller input through a USB port on the adapter itself.
For GameCube controllers, plug the GameCube controller into the GameCube adapter, then connect the adapter to the Switch dock. Many GameCube-style setups are popular for games like Super Smash Bros. Ultimate, where muscle memory is practically a family heirloom.
Step 4: Test the controller and adjust settings
Once the controller is connected, test it on the HOME Menu. Move the stick, press A, and see whether the Switch responds. If it works, open your game and confirm the button layout feels right.
You can also check controller behavior in the Switch settings. Go to the controller menu and look for options such as button testing, change grip/order, or button mapping. Button mapping can be useful if your controller layout feels backward, especially when using non-Nintendo controllers through an adapter.
If you are using a PS or Xbox controller through an adapter, remember that button labels may not match the Switch layout. For example, the confirm and cancel buttons may feel swapped if your hands are trained on another console. This is normal. Your thumbs are not broken; they are just bilingual.
Quick Compatibility Guide
| Controller Type | How It Connects | Best Use Case |
|---|---|---|
| Nintendo Switch Pro Controller | USB-C cable to Switch dock | Docked play, low-latency gaming, charging while playing |
| Licensed wired Switch controller | USB-A cable to Switch dock | Affordable multiplayer and simple plug-and-play setup |
| GameCube controller | GameCube adapter to USB dock port | Fighting games and retro-style control |
| PS5, PS4, or Xbox controller | USB adapter or Bluetooth adapter | Using a controller you already own |
| Generic USB PC controller | May require adapter; not guaranteed | Only worth trying if compatibility is confirmed |
Troubleshooting: USB Controller Not Working on Switch
Check the wired communication setting
If your USB controller is not responding, return to System Settings and confirm that Pro Controller Wired Communication is turned on. This is especially important when using adapters from brands such as 8BitDo or Mayflash, because many of them depend on the Switch recognizing the adapter as a wired Pro Controller-style device.
Plug directly into the dock
If you are using a USB hub, remove it temporarily and plug the controller or adapter directly into the dock. Hubs can work, but they also add one more link in the chain. When troubleshooting, simple is better. The fewer accessories between the controller and the console, the easier it is to find the problem.
Try another USB port
The dock has multiple USB ports. Try a different one. If your controller works in one port but not another, the controller may be fine and the port may be dirty, blocked, or having connection issues.
Use a different cable
A weak or charge-only USB cable is a common reason a controller powers on but does not send input. Test another cable that supports data transfer. This is especially important for Pro Controllers and third-party controllers with detachable USB-C cables.
Update the controller or adapter firmware
Third-party adapters often receive firmware updates to improve compatibility with Switch, Switch OLED, Switch Lite accessories, and Switch 2. If an adapter worked before but suddenly acts weird after a system update, check the manufacturer’s firmware tool or support page.
Restart the console
When in doubt, restart the Switch. Hold the POWER button, choose Power Options, and restart the system. This is the gaming equivalent of “have you tried turning it off and on again?” It is boring advice because it works annoyingly often.
Common Mistakes to Avoid
Assuming every USB controller works
The Nintendo Switch does not automatically support every USB controller. A controller built for PC may not identify itself correctly to the Switch. Before buying, look for wording such as “compatible with Nintendo Switch,” “officially licensed by Nintendo,” or support from a known adapter.
Forgetting that Switch Lite needs an accessory
The Switch Lite does not include a dock, so a standard wired controller cannot simply plug into a dock port. You need a USB-C accessory that supports controllers in tabletop mode. A licensed playstand with USB-A ports is usually the cleanest solution.
Expecting every feature to work through adapters
Adapters are useful, but they are not miracle machines. Depending on the controller, features such as NFC, HD rumble, audio jacks, motion controls, player LEDs, analog triggers, or wake-from-sleep may not work. For basic gameplay, that may not matter. For advanced features, the official Pro Controller or a licensed controller may be a better choice.
Buying the cheapest controller without checking reviews
A cheap wired controller can be a great backup for guests, younger siblings, or the friend who always says “one more match.” But a very low-cost controller may have stiff buttons, loose sticks, or limited support. Check compatibility notes before buying.
Best Situations for Using a USB Controller
A USB controller is especially useful for docked play. It avoids battery worries, reduces pairing issues, and keeps everyone connected during multiplayer sessions. If you are playing Mario Kart 8 Deluxe, Super Smash Bros. Ultimate, Splatoon, Fortnite, or a long RPG session, wired control can feel stable and simple.
Wired controllers are also budget-friendly. Instead of buying four wireless controllers for local multiplayer, you can often buy several wired controllers for less. They are not as flexible as wireless controllers, but they are dependable. Nobody has to ask, “Is this controller charged?” five minutes before the final race.
For competitive players, wired controllers can feel more consistent. The difference in input delay is usually small, but some players prefer the reliability of a physical connection. More importantly, wired setups reduce the chance of a controller disconnecting at the worst possible moment, such as right before you land the perfect combo or drive off Rainbow Road again. We will not judge. Rainbow Road judges enough.
Real-World Experience: What It Is Actually Like to Use a USB Controller on Switch
In everyday use, connecting a USB controller to a Switch is one of those small upgrades that makes the console feel more like a traditional living-room gaming system. The Joy-Con controllers are clever, portable, and great for quick sessions, but a full-size wired controller can feel better during longer games. The grips are larger, the buttons are easier to press, and your hands do not feel like they are trying to solve a tiny plastic puzzle.
The best experience usually comes from using a controller made specifically for Nintendo Switch. A licensed wired controller often works immediately: plug it into the dock, press a button, and play. This is ideal for families, dorm rooms, parties, and anyone who does not want to explain Bluetooth pairing while four people are waiting to start a race. Wired controllers are also great for younger players because there is no charging schedule to manage. If the cable is plugged in, the controller is ready.
Using the official Pro Controller with a USB cable feels premium and reliable. It is comfortable for long sessions, and the wired option is helpful when the battery is low. However, many people connect it with a USB cable and assume it is automatically operating as a wired controller. On Switch, the Pro Controller Wired Communication setting matters. Once enabled, the setup feels smoother and more predictable.
Adapters are where things get more interesting. A good adapter can let you use a controller you already own, such as a PlayStation or Xbox controller. This can save money and reduce clutter. The trade-off is that you may lose certain features, and the button labels may not match the Switch layout. For casual games, that is usually fine. For fast games where button memory matters, it may take a few rounds before your thumbs stop filing complaints.
For Switch Lite owners, the experience depends heavily on the accessory. A sturdy USB playstand can turn the Lite into a surprisingly comfortable tabletop setup, especially for multiplayer. A flimsy adapter, on the other hand, can make the whole arrangement feel like a science project balanced on a snack tray. If you plan to use wired controllers often with a Switch Lite, invest in a stable stand with proper USB support.
The biggest practical tip is to keep your setup simple. Plug directly into the dock when possible, use the cable that came with the controller, and enable the correct setting before troubleshooting anything complicated. Most problems come from one of three things: the setting is off, the cable only charges, or the controller is not actually Switch-compatible. Once those are handled, a USB controller is one of the easiest ways to make Switch gaming more comfortable, dependable, and party-ready.
Final Thoughts
Learning how to connect a USB controller to a Switch is simple once you know the four key steps: prepare the console, enable wired communication, plug the controller into the dock or adapter, and test the controller before playing. The process is quick for licensed wired controllers and only slightly more involved for adapters or specialty controllers.
For the smoothest experience, use official or officially licensed hardware, keep your Switch updated, and avoid assuming that every USB controller will work automatically. A little preparation saves a lot of button-mashing confusion. And when the controller finally responds, you can get back to the important part: blaming lag, not your setup.